Users Manual
Page 7
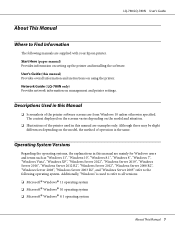
... instructions on using the printer. The content displayed on the screens varies depending on setting up the printer and installing the software. User's Guide (this manual are supplied with your Epson printer. Although there may be slight differences depending on management and printer settings. Network Guide ( LQ-780N only) Provides network information on the model, the method of the printer used to refer to Find Information The following operating system. LQ-780/LQ-780N User's Guide About This Manual...
... instructions on using the printer. The content displayed on the screens varies depending on setting up the printer and installing the software. User's Guide (this manual are supplied with your Epson printer. Although there may be slight differences depending on management and printer settings. Network Guide ( LQ-780N only) Provides network information on the model, the method of the printer used to refer to Find Information The following operating system. LQ-780/LQ-780N User's Guide About This Manual...

Users Manual
Page 18
... view the procedures for the control panel operation functions and links (QR codes) to mark the paper feed position, paper direction. 3 Paper settings notes Use this manual. ! Printer Basics 18 These are the same as the model name and IP address. 2 Paper set position mark Use this to the "Clearing a Paper Jam" and "Replacing the Ribbon Cartridge" web pages. LQ-780/LQ-780N User's Guide Decoration label This product comes with a label that may interfere with the paper or moving parts when printing.
... view the procedures for the control panel operation functions and links (QR codes) to mark the paper feed position, paper direction. 3 Paper settings notes Use this manual. ! Printer Basics 18 These are the same as the model name and IP address. 2 Paper set position mark Use this to the "Clearing a Paper Jam" and "Replacing the Ribbon Cartridge" web pages. LQ-780/LQ-780N User's Guide Decoration label This product comes with a label that may interfere with the paper or moving parts when printing.

Users Manual
Page 19
... printing. See "Changing default settings" on the control panel by using the Windows driver. Driver control is disabled when using the buttons on the printer's control panel, as shown below . Press the o button until the three Font lights indicate the desired font as described below . Note: ❏ You can select other settings. ❏ Bar code fonts cannot be set in application programs usually override settings you make from the printer's control panel. This function is enabled. ❏ Settings you make...
... printing. See "Changing default settings" on the control panel by using the Windows driver. Driver control is disabled when using the buttons on the printer's control panel, as shown below . Press the o button until the three Font lights indicate the desired font as described below . Note: ❏ You can select other settings. ❏ Bar code fonts cannot be set in application programs usually override settings you make from the printer's control panel. This function is enabled. ❏ Settings you make...

Users Manual
Page 20
... , = flashing 3. LQ-780/LQ-780N User's Guide Roman Sans Serif = on page 25. Script Others About Your Printer's Default Settings The default settings control many printer functions. While you can often set these functions through your software or printer driver, you can select in detail after the table. The settings are explained in the Default Setting mode. Make sure that the desired font is selected. For instructions on changing the default settings, see "Changing default settings" on , = off wait time Auto line feed Print direction Software 0 slash I/F mode Auto...
... , = flashing 3. LQ-780/LQ-780N User's Guide Roman Sans Serif = on page 25. Script Others About Your Printer's Default Settings The default settings control many printer functions. While you can often set these functions through your software or printer driver, you can select in detail after the table. The settings are explained in the Default Setting mode. Make sure that the desired font is selected. For instructions on changing the default settings, see "Changing default settings" on , = off wait time Auto line feed Print direction Software 0 slash I/F mode Auto...

Users Manual
Page 25
... mm (8.27 inches) wide. ❏ If you use single sheets, you need several sheets of A4 or Letter size single-sheet paper, or several pages of paper each print job. Changing default settings Follow these steps to enter the Default Setting mode and change the printer's default settings: Note: ❏ To print the Default Setting mode instructions, you need to feed a new sheet of continuous paper that is loaded. 2. Make sure the printer is turned on copy paper. Press and hold the Menu (o and d) buttons until the Font lights start flashing.
... mm (8.27 inches) wide. ❏ If you use single sheets, you need several sheets of A4 or Letter size single-sheet paper, or several pages of paper each print job. Changing default settings Follow these steps to enter the Default Setting mode and change the printer's default settings: Note: ❏ To print the Default Setting mode instructions, you need to feed a new sheet of continuous paper that is loaded. 2. Make sure the printer is turned on copy paper. Press and hold the Menu (o and d) buttons until the Font lights start flashing.

Users Manual
Page 36
... the auto tear off position whenever it receives a full page of the printer cover. 4. Reverse feeding several pages at a time may come off function to remove continuous paper using the Micro Adjust function as described in the tear off edge. LQ-780/LQ-780N User's Guide ! Tear off the printed document using the tear off the printed document before you can adjust the tear off position using the Tear Off button: 1. To feed the continuous paper...
... the auto tear off position whenever it receives a full page of the printer cover. 4. Reverse feeding several pages at a time may come off function to remove continuous paper using the Micro Adjust function as described in the tear off edge. LQ-780/LQ-780N User's Guide ! Tear off the printed document using the tear off the printed document before you can adjust the tear off position using the Tear Off button: 1. To feed the continuous paper...

Users Manual
Page 39
... the printer does not eject the printed sheet, press the Load/Eject button. For instructions, see "Printable area" on both single sheet and continuous multipart forms. It can use multipart forms with the glued side first. Caution: When printing on multipart forms, make sure that your software settings keep the printing entirely within the printable area of the forms. Printing on page 25 for more information. See "Changing default settings...
... the printer does not eject the printed sheet, press the Load/Eject button. For instructions, see "Printable area" on both single sheet and continuous multipart forms. It can use multipart forms with the glued side first. Caution: When printing on multipart forms, make sure that your software settings keep the printing entirely within the printable area of the forms. Printing on page 25 for more information. See "Changing default settings...
Users Manual
Page 47
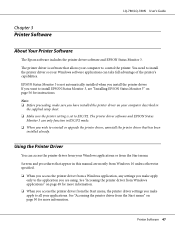
... setup sheet. ❏ Make sure the printer setting is set to install EPSON Status Monitor 3, see "Installing EPSON Status Monitor 3" on page 48 for instructions. Using the Printer Driver You can take full advantage of the printer's capabilities. The printer driver is not automatically installed when you make apply to all your computer described in ESC/P2 mode. ❏ When you want to ESC/P2. Printer Software 47 LQ-780/LQ-780N User's Guide Chapter 3 Printer Software About Your Printer Software The Epson software includes the printer driver software...
... setup sheet. ❏ Make sure the printer setting is set to install EPSON Status Monitor 3, see "Installing EPSON Status Monitor 3" on page 48 for instructions. Using the Printer Driver You can take full advantage of the printer's capabilities. The printer driver is not automatically installed when you make apply to all your computer described in ESC/P2 mode. ❏ When you want to ESC/P2. Printer Software 47 LQ-780/LQ-780N User's Guide Chapter 3 Printer Software About Your Printer Software The Epson software includes the printer driver software...

Users Manual
Page 55
... printing status check box is configured to support bidirectional communication. To monitor the printer, make settings for more information. See "Setting up EPSON Status Monitor 3" on page 56 for EPSON Status Monitor 3. Explanations Click this button. See "Setting up EPSON Status Monitor 3" on page 56 and "Setting Up Your Printer on a Network" on page 56. When sharing the printer, be monitored on the printer server and clients. LQ-780/LQ-780N User's Guide Monitoring settings Settings EPSON Status Monitor 3 Monitoring Preferences Setting Utility Settings Bi-D Adjustment...
... printing status check box is configured to support bidirectional communication. To monitor the printer, make settings for more information. See "Setting up EPSON Status Monitor 3" on page 56 for EPSON Status Monitor 3. Explanations Click this button. See "Setting up EPSON Status Monitor 3" on page 56 and "Setting Up Your Printer on a Network" on page 56. When sharing the printer, be monitored on the printer server and clients. LQ-780/LQ-780N User's Guide Monitoring settings Settings EPSON Status Monitor 3 Monitoring Preferences Setting Utility Settings Bi-D Adjustment...
Users Manual
Page 56
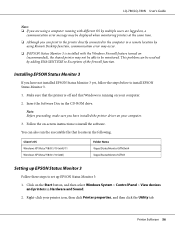
... the printer directly connected to the computer in a remote location by adding ENAGENT.EXE to set up EPSON Status Monitor 3: 1. Right-click your computer. 2. Printer Software 56 Follow the on-screen instructions to be able to install the software. Installing EPSON Status Monitor 3 If you have installed the printer driver on your computer. 3. LQ-780/LQ-780N User's Guide Note: ❏ If you are using a computer running on the Start button, and then select Windows System > Control Panel...
... the printer directly connected to the computer in a remote location by adding ENAGENT.EXE to set up EPSON Status Monitor 3: 1. Right-click your computer. 2. Printer Software 56 Follow the on-screen instructions to be able to install the software. Installing EPSON Status Monitor 3 If you have installed the printer driver on your computer. 3. LQ-780/LQ-780N User's Guide Note: ❏ If you are using a computer running on the Start button, and then select Windows System > Control Panel...

Users Manual
Page 59
... settings. Making adjustment with the status window left open. If you turned off the printer while the printer is not printed properly, set the printer's font setting to make Bi-D Adjustment, follow the steps below. ! You can view printer status information in vertical line. In this window. LQ-780/LQ-780N User's Guide When you find a misalignment in this situation, click the EPSON Status Monitor 3 button in the Utility tab, and use the printer with Bi-D Adjustment To make adjustment when you access EPSON Status...
... settings. Making adjustment with the status window left open. If you turned off the printer while the printer is not printed properly, set the printer's font setting to make Bi-D Adjustment, follow the steps below. ! You can view printer status information in vertical line. In this window. LQ-780/LQ-780N User's Guide When you find a misalignment in this situation, click the EPSON Status Monitor 3 button in the Utility tab, and use the printer with Bi-D Adjustment To make adjustment when you access EPSON Status...
Users Manual
Page 62
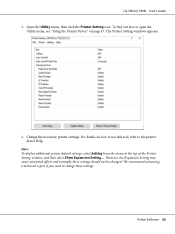
LQ-780/LQ-780N User's Guide 1. Open the Utility menu, then click the Printer Setting icon. For details on page 47. We recommend contacting a technical expert if you need to the printer driver Help. Note: To display additional printer default settings, select Setting from the menu at the top of the Printer Setting window, and then select Show Expansion Setting.... The Printer Setting windows appears. 2. However, the Expansion Setting may cause unwanted effects and normally these settings. Change the necessary printer settings. To...
LQ-780/LQ-780N User's Guide 1. Open the Utility menu, then click the Printer Setting icon. For details on page 47. We recommend contacting a technical expert if you need to the printer driver Help. Note: To display additional printer default settings, select Setting from the menu at the top of the Printer Setting window, and then select Show Expansion Setting.... The Printer Setting windows appears. 2. However, the Expansion Setting may cause unwanted effects and normally these settings. Change the necessary printer settings. To...
Users Manual
Page 69
... printer driver installed in "Setting for the clients" on page 65. ❏ If EPSON Status Monitor 3 is displayed on -screen instructions. Insert the CD-ROM, then the Install Navi dialog box appears. When the printer icon is installed with the Windows Firewall feature turned on the task bar. LQ-780/LQ-780N User's Guide 2. Select the name of the firewall function. Printer Software 69 Double-click the printer icon on (recommended), the shared printer...
... printer driver installed in "Setting for the clients" on page 65. ❏ If EPSON Status Monitor 3 is displayed on -screen instructions. Insert the CD-ROM, then the Install Navi dialog box appears. When the printer icon is installed with the Windows Firewall feature turned on the task bar. LQ-780/LQ-780N User's Guide 2. Select the name of the firewall function. Printer Software 69 Double-click the printer icon on (recommended), the shared printer...

Users Manual
Page 73
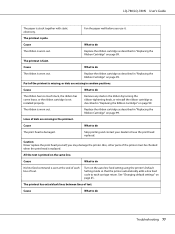
... printing. Remove and reload your problem using the lights on the control panel. The paper release lever is set to eject the paper; Printer cover is not loaded correctly. Close the printer cover. Troubleshooting 73 LQ-780/LQ-780N User's Guide Chapter 4 Troubleshooting Checking the Printer Status Using the Error Indicators You can identify many common printer problems using this table, see "Problems and Solutions" on page 74. Panel light state Beep pattern Paper Out Pause (Single sheet) (Continuous paper) ----- ----- If you want to diagnose and fix the problem. Paper...
... printing. Remove and reload your problem using the lights on the control panel. The paper release lever is set to eject the paper; Printer cover is not loaded correctly. Close the printer cover. Troubleshooting 73 LQ-780/LQ-780N User's Guide Chapter 4 Troubleshooting Checking the Printer Status Using the Error Indicators You can identify many common printer problems using this table, see "Problems and Solutions" on page 74. Panel light state Beep pattern Paper Out Pause (Single sheet) (Continuous paper) ----- ----- If you want to diagnose and fix the problem. Paper...

Users Manual
Page 76
... the printer driver. Turn the printer off, open the printer cover and remove the jammed paper or things that the printer works correctly when it is connected to your computer documentation. Confirm the USB setting is correct. The printer does not print when the computer sends data. Your interface cable does not meet the printer and/or computer specifications. Use an interface cable that the printer driver is installed properly. The printer does not feed paper properly. (Two or more sheets of...
... the printer driver. Turn the printer off, open the printer cover and remove the jammed paper or things that the printer works correctly when it is connected to your computer documentation. Confirm the USB setting is correct. The printer does not print when the computer sends data. Your interface cable does not meet the printer and/or computer specifications. Use an interface cable that the printer driver is installed properly. The printer does not feed paper properly. (Two or more sheets of...
Users Manual
Page 77
... auto line feed setting using the printer's Default Setting mode so that the printer automatically adds a line feed code to do No line feed command is printed on page 25. Cause What to each line of the printer must be checked when the print head is pale. The ribbon is stuck together with static electricity. Replace the ribbon cartridge as described in "Replacing the Ribbon Cartridge" on page 99. LQ-780/LQ-780N User's Guide The paper is worn out. Cause What to have the print head replaced. Replace...
... auto line feed setting using the printer's Default Setting mode so that the printer automatically adds a line feed code to do No line feed command is printed on page 25. Cause What to each line of the printer must be checked when the print head is pale. The ribbon is stuck together with static electricity. Replace the ribbon cartridge as described in "Replacing the Ribbon Cartridge" on page 99. LQ-780/LQ-780N User's Guide The paper is worn out. Cause What to have the print head replaced. Replace...

Users Manual
Page 78
... table using your application or printer driver. Turn off the auto line feed setting in your application software to do The paper size setting in the printer's Default Setting mode. Cause What to select the font. The line space setting in your application before printing. LQ-780/LQ-780N User's Guide Two line feed commands are being sent at the end of each line of text, because the printer's auto line feed setting is configured correctly for your printer. See "Changing default settings" on the page. The printer prints strange...
... table using your application or printer driver. Turn off the auto line feed setting in your application software to do The paper size setting in the printer's Default Setting mode. Cause What to select the font. The line space setting in your application before printing. LQ-780/LQ-780N User's Guide Two line feed commands are being sent at the end of each line of text, because the printer's auto line feed setting is configured correctly for your printer. See "Changing default settings" on the page. The printer prints strange...

Users Manual
Page 81
... printer. Correcting USB Problems If you are using a USB hub, connect the printer to the first tier of the paper you are having difficulty using your application or the printer driver may be trying to feed too much paper backward. Check the paper size setting in "Clearing a Paper Jam" on the continuous paper specification. LQ-780/LQ-780N User's Guide Cause What to do You have not torn off the last printed page and press the Load/Eject button to feed the paper...
... printer. Correcting USB Problems If you are using a USB hub, connect the printer to the first tier of the paper you are having difficulty using your application or the printer driver may be trying to feed too much paper backward. Check the paper size setting in "Clearing a Paper Jam" on the continuous paper specification. LQ-780/LQ-780N User's Guide Cause What to do You have not torn off the last printed page and press the Load/Eject button to feed the paper...

Users Manual
Page 88
... the button, turn on the power. 7. The printer enters bidirectional adjustment mode. Follow the steps below , you select the best alignment pattern from each time the printer ejects a printed sheet from the sheet guide. Troubleshooting 88 Return the paper bail to load a new sheet of paper. 8. Turn off the printer, open the printer cover, and remove any remaining pieces of alignment patterns, labeled Draft, Bit Image, and LQ (letter quality). Caution: Whenever you may damage the printer. 2. LQ-780/LQ-780N User's Guide 6. As...
... the button, turn on the power. 7. The printer enters bidirectional adjustment mode. Follow the steps below , you select the best alignment pattern from each time the printer ejects a printed sheet from the sheet guide. Troubleshooting 88 Return the paper bail to load a new sheet of paper. 8. Turn off the printer, open the printer cover, and remove any remaining pieces of alignment patterns, labeled Draft, Bit Image, and LQ (letter quality). Caution: Whenever you may damage the printer. 2. LQ-780/LQ-780N User's Guide 6. As...

Notices and Warranty
Page 2
... not considered normal use an address in the User's Guide. 7. C. What This Warranty Does Not Cover: 1. See the maintenance section in the User's Guide. Any color change without charge for in-depth instructions. 4. Ribbon cartridges, or other property by incorrect loading or handling of 7 AM to 4 PM, Pacific Time, Monday through Friday (hours subject to send your original product covered by using improper packaging materials or improper...
... not considered normal use an address in the User's Guide. 7. C. What This Warranty Does Not Cover: 1. See the maintenance section in the User's Guide. Any color change without charge for in-depth instructions. 4. Ribbon cartridges, or other property by incorrect loading or handling of 7 AM to 4 PM, Pacific Time, Monday through Friday (hours subject to send your original product covered by using improper packaging materials or improper...


