
Technical Brief (Impact Printers)
Page 1
...fonts M Computer-based set-up Reliability M Ribbon quality M Ribbon cartridge reliability M Total Print Volume vs. Contents This technical brief provides detailed information on the following topics, related to all EPSON impact printers: Functionality M Printing technology M Control code/emulation...printer? An impact printer has several advantages over any other type of Seiko Epson Corporation. 1/00 Other trademarks are renowned for their respective owners. EPSON impact printers are the property of their reliability with LQ FX-980-Nine-pin narrow carriage Wide carriage printers...
...fonts M Computer-based set-up Reliability M Ribbon quality M Ribbon cartridge reliability M Total Print Volume vs. Contents This technical brief provides detailed information on the following topics, related to all EPSON impact printers: Functionality M Printing technology M Control code/emulation...printer? An impact printer has several advantages over any other type of Seiko Epson Corporation. 1/00 Other trademarks are renowned for their respective owners. EPSON impact printers are the property of their reliability with LQ FX-980-Nine-pin narrow carriage Wide carriage printers...

Technical Brief (Impact Printers)
Page 6
The design used in a mylar film Made of the highest grade ABS plastic Offers the highest print quality for dot matrix printers Ultra Letter Quality Keeps the cartridge from warping during times of extended use a stationary ribbon cartridge. L EPSON brand ribbons are superior to sell with the print head assembly unit. Technical Brief-Multimedia projectors Page 6 Reliability...
The design used in a mylar film Made of the highest grade ABS plastic Offers the highest print quality for dot matrix printers Ultra Letter Quality Keeps the cartridge from warping during times of extended use a stationary ribbon cartridge. L EPSON brand ribbons are superior to sell with the print head assembly unit. Technical Brief-Multimedia projectors Page 6 Reliability...
Product Information Guide
Page 1
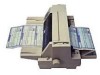
... overheated print head may affect the printing speed. EPSON LQ-670 printer cover ribbon cartridge control panel paper thickness lever print head left edge guide paper guide right edge guide knob paper release lever paper support sprocket units parallel interface Printer Specifications Printing Printing method: 24-pin impact dot matrix Printing speed: Characters per column 106 127 159...
... overheated print head may affect the printing speed. EPSON LQ-670 printer cover ribbon cartridge control panel paper thickness lever print head left edge guide paper guide right edge guide knob paper release lever paper support sprocket units parallel interface Printer Specifications Printing Printing method: 24-pin impact dot matrix Printing speed: Characters per column 106 127 159...
Product Information Guide
Page 4
...) Roll paper holder (optional) Ribbon: Black ribbon cartridge (S015016) Ribbon life 2 million characters (at 10 cpi in nibble mode of reverse channel transfer 4 - EPSON LQ-670 3/97 Forward channel Transmission mode:...device Data transmission timing: Refer to the IEEE-1284 specification Extensibility request: The printer responds to 85% RH Safety approvals Safety standards EMI UL1950 with D3 CSA ... mode of reverse channel transfer 04H: Request device ID in letterquality mode with 48 dots/character) Total print amount: 6.5 million lines (except print head) Print head life...
...) Roll paper holder (optional) Ribbon: Black ribbon cartridge (S015016) Ribbon life 2 million characters (at 10 cpi in nibble mode of reverse channel transfer 4 - EPSON LQ-670 3/97 Forward channel Transmission mode:...device Data transmission timing: Refer to the IEEE-1284 specification Extensibility request: The printer responds to 85% RH Safety approvals Safety standards EMI UL1950 with D3 CSA ... mode of reverse channel transfer 04H: Request device ID in letterquality mode with 48 dots/character) Total print amount: 6.5 million lines (except print head) Print head life...
Product Information Guide
Page 18
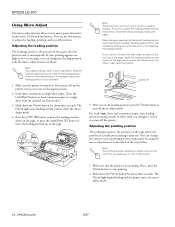
... and paper feeding pauses briefly. You can see the paper position. 2. The Pause light begins flashing and the printer enters the microadjust mode. 18 - EPSON LQ-670 3/97 If necessary, adjust the loading position in the steps below . Adjusting the printing position The printing position is...the micro-adjust feature as described in your printing appears too high or low on the ribbon mask, as a reference point when adjusting the loading position. Make sure the printer is in some application software override adjustments you can change the loading position with the ...
... and paper feeding pauses briefly. You can see the paper position. 2. The Pause light begins flashing and the printer enters the microadjust mode. 18 - EPSON LQ-670 3/97 If necessary, adjust the loading position in the steps below . Adjusting the printing position The printing position is...the micro-adjust feature as described in your printing appears too high or low on the ribbon mask, as a reference point when adjusting the loading position. Make sure the printer is in some application software override adjustments you can change the loading position with the ...
Product Information Guide
Page 19
...edge. 4. Hold down the Pause button for your EPSON printer; If necessary, open the printer cover to check the printing position, and press the LF/FF [D] button to feed paper forward or the Load/Eject [U] button to turn off position. EPSON LQ-670 3. When you do need to turn off position ...as follows: 1. The Pause light begins flashing and the printer enters the micro-adjust mode. If you can use of the EPSON Ribbon Cartridge (S015016) for best results. Press the Pause...
...edge. 4. Hold down the Pause button for your EPSON printer; If necessary, open the printer cover to check the printing position, and press the LF/FF [D] button to feed paper forward or the Load/Eject [U] button to turn off position. EPSON LQ-670 3. When you do need to turn off position ...as follows: 1. The Pause light begins flashing and the printer enters the micro-adjust mode. If you can use of the EPSON Ribbon Cartridge (S015016) for best results. Press the Pause...
Product Information Guide
Page 20
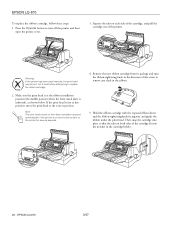
..., the print head may be hot. Note: The print head moves to turn the ribbon-tightening knob in the direction of the printer. EPSON LQ-670 3/97 If the print head is not at the ribbon installation position (the middle position where the front metal plate is on each side of...and no data is at this position, move the print head to replace the ribbon cartridge. 2. Remove the new ribbon cartridge from its package and turn off the printer and then open the printer cover. 3. EPSON LQ-670 To replace the ribbon cartridge, follow these steps: 1. Let it cool before attempting to the correct ...
..., the print head may be hot. Note: The print head moves to turn the ribbon-tightening knob in the direction of the printer. EPSON LQ-670 3/97 If the print head is not at the ribbon installation position (the middle position where the front metal plate is on each side of...and no data is at this position, move the print head to replace the ribbon cartridge. 2. Remove the new ribbon cartridge from its package and turn off the printer and then open the printer cover. 3. EPSON LQ-670 To replace the ribbon cartridge, follow these steps: 1. Let it cool before attempting to the correct ...
Product Information Guide
Page 21
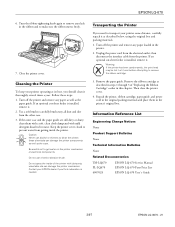
...EPSON LQ-670 Service Manual EPSON LQ-670 Parts Price List EPSON LQ-670 User's Guide 3/97 EPSON LQ-0670 - 21 Close the printer cover. Cleaning the Printer To keep your printer operating at its best, you should clean it . 2. Follow these chemicals can damage the printer mechanism. Be careful not to carefully brush away all dust and dirt from getting inside of "Replacing the Ribbon...water. Contact your printer some distance, carefully repack it as described in the ribbon and to clean the printer; EPSON LQ-670 6. Keep the printer cover closed to transport your EPSON dealer if you ...
...EPSON LQ-670 Service Manual EPSON LQ-670 Parts Price List EPSON LQ-670 User's Guide 3/97 EPSON LQ-0670 - 21 Close the printer cover. Cleaning the Printer To keep your printer operating at its best, you should clean it . 2. Follow these chemicals can damage the printer mechanism. Be careful not to carefully brush away all dust and dirt from getting inside of "Replacing the Ribbon...water. Contact your printer some distance, carefully repack it as described in the ribbon and to clean the printer; EPSON LQ-670 6. Keep the printer cover closed to transport your EPSON dealer if you ...

User Manual
Page 8
... 0-3 Warnings, Cau tions, and N otes 0-4 Cha p te r 1 Setting Up the Printer Unp acking the Printer 1-2 Choosing a Place for the Printer 1-3 Assem bling the Printer 1-5 Installing the knob 1-5 Installing the ribbon cartrid ge 1-6 Attaching the p ap er gu id e 1-9 Plu gging in the Printer 1-9 Connecting the Printer to You r Com p u ter 1-10 Cha p te r 2 Setting Up Your Softwa... p rinter d river u sing Program Manager . . . . . 2-9 Using the p rinter d river 2-10 For DOS Program Users 2-12 Installing a p rinter d river for DOS ap p lications 2-12 Using the EPSON Rem ote!
... 0-3 Warnings, Cau tions, and N otes 0-4 Cha p te r 1 Setting Up the Printer Unp acking the Printer 1-2 Choosing a Place for the Printer 1-3 Assem bling the Printer 1-5 Installing the knob 1-5 Installing the ribbon cartrid ge 1-6 Attaching the p ap er gu id e 1-9 Plu gging in the Printer 1-9 Connecting the Printer to You r Com p u ter 1-10 Cha p te r 2 Setting Up Your Softwa... p rinter d river u sing Program Manager . . . . . 2-9 Using the p rinter d river 2-10 For DOS Program Users 2-12 Installing a p rinter d river for DOS ap p lications 2-12 Using the EPSON Rem ote!
User Manual
Page 10
Cha p te r 5 Using Printer Options Cu t-Sheet Feed ers 5-2 Installing the cu t-sheet feed er 5-3 Load ing p ap er from the cu t-sheet feed er 5-6 Sw itching betw een ... card 5-19 Using a serial interface card (C82305V or C82306V 5-21 Cha p te r 6 Ma intena nce a nd Tra nsporta tion Rep lacing the Ribbon Cartrid ge 6-2 Cleaning the Printer 6-5 Transp orting the Printer 6-6 Cha p te r 7 Troubleshooting Using the Error Ind icators 7-3 Printing a Self Test 7-4 Using H ex Du m p Mod e 7-5 Problem s and Solu tions 7-6 Pow er...
Cha p te r 5 Using Printer Options Cu t-Sheet Feed ers 5-2 Installing the cu t-sheet feed er 5-3 Load ing p ap er from the cu t-sheet feed er 5-6 Sw itching betw een ... card 5-19 Using a serial interface card (C82305V or C82306V 5-21 Cha p te r 6 Ma intena nce a nd Tra nsporta tion Rep lacing the Ribbon Cartrid ge 6-2 Cleaning the Printer 6-5 Transp orting the Printer 6-6 Cha p te r 7 Troubleshooting Using the Error Ind icators 7-3 Printing a Self Test 7-4 Using H ex Du m p Mod e 7-5 Problem s and Solu tions 7-6 Pow er...

User Manual
Page 17
Chapter 1 Setting Up the Printer 1 Unp acking the Printer 1-2 Choosing a Place for the Printer 1-3 Assem bling the Printer 1-5 Installing the knob 1-5 Installing the ribbon cartrid ge 1-6 Attaching the p ap er gu id e 1-9 Plu gging in the Printer 1-9 Connecting the Printer to You r Com p u ter 1-10 Setting Up the Printer 1-1
Chapter 1 Setting Up the Printer 1 Unp acking the Printer 1-2 Choosing a Place for the Printer 1-3 Assem bling the Printer 1-5 Installing the knob 1-5 Installing the ribbon cartrid ge 1-6 Attaching the p ap er gu id e 1-9 Plu gging in the Printer 1-9 Connecting the Printer to You r Com p u ter 1-10 Setting Up the Printer 1-1

User Manual
Page 22
this can damage the printer. w Warning: N ever move the print head while the printer is not p lu gged into an electrical ou tlet. Op en the p rinter cover by gently lifting u p the notch on ; A lso, if you just used the printer, the print head may be hot. Insta lling the ribbon ca rtridge Before installing the ribbon cartrid ge, m ake su re that the p ow er cord is turned on its p ackaging and then follow these steps: 1. Let it cool for a few minutes before touching it from its left sid e. To install the ribbon cartrid ge, rem ove it . 1-6 Setting Up the Printer
this can damage the printer. w Warning: N ever move the print head while the printer is not p lu gged into an electrical ou tlet. Op en the p rinter cover by gently lifting u p the notch on ; A lso, if you just used the printer, the print head may be hot. Insta lling the ribbon ca rtridge Before installing the ribbon cartrid ge, m ake su re that the p ow er cord is turned on its p ackaging and then follow these steps: 1. Let it cool for a few minutes before touching it from its left sid e. To install the ribbon cartrid ge, rem ove it . 1-6 Setting Up the Printer

User Manual
Page 23
Tu rn the ribbon-tightening knob in the ribbon. Setting Up the Printer 1-7 Slid e the p rint head to take u p any slack in the d irection of the arrow to the m id d le p osition w here the front m etal plate is indented as shown below. 1 3. 2.
Tu rn the ribbon-tightening knob in the ribbon. Setting Up the Printer 1-7 Slid e the p rint head to take u p any slack in the d irection of the arrow to the m id d le p osition w here the front m etal plate is indented as shown below. 1 3. 2.

User Manual
Page 24
Close the p rinter cover. 1-8 Setting Up the Printer H old the ribbon cartrid ge w ith the exp osed ribbon d ow n and the ribbon-tightening knob facing you , and gu id e the ribbon u nd er the p rint head . Tu rn the ribbon-tightening knob again to rem ove any slack in the cartrid ge hold er. 5. Then snap the cartrid ge into p lace so that the tabs on both sid es of the cartrid ge fit into the notches in the ribbon and to m ake sure the ribbon moves freely. 6. 4.
Close the p rinter cover. 1-8 Setting Up the Printer H old the ribbon cartrid ge w ith the exp osed ribbon d ow n and the ribbon-tightening knob facing you , and gu id e the ribbon u nd er the p rint head . Tu rn the ribbon-tightening knob again to rem ove any slack in the cartrid ge hold er. 5. Then snap the cartrid ge into p lace so that the tabs on both sid es of the cartrid ge fit into the notches in the ribbon and to m ake sure the ribbon moves freely. 6. 4.
User Manual
Page 70
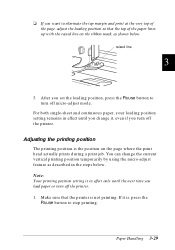
Make sure that the top of the page, adjust the loading position so that the printer is the position on the ribbon mask, as d escribed in the step s below . For both single-sheet and continu ou s p ap er, you r load ing p osition setting rem ains in effect ... shown below . t If you want to tu rn off m icro-ad ju st m od e. ra ised line 3 5. After you load paper or turn off the printer. 1. If it , even if you tu rn off the...
Make sure that the top of the page, adjust the loading position so that the printer is the position on the ribbon mask, as d escribed in the step s below . For both single-sheet and continu ou s p ap er, you r load ing p osition setting rem ains in effect ... shown below . t If you want to tu rn off m icro-ad ju st m od e. ra ised line 3 5. After you load paper or turn off the printer. 1. If it , even if you tu rn off the...

User Manual
Page 111
Chapter 6 Maintena nce a nd Tra nsporta tion Rep lacing the Ribbon Cartrid ge 6-2 Cleaning the Printer 6-5 Transp orting the Printer 6-6 6 M aintenance and Transportation 6-1 Ma intena nce
Chapter 6 Maintena nce a nd Tra nsporta tion Rep lacing the Ribbon Cartrid ge 6-2 Cleaning the Printer 6-5 Transp orting the Printer 6-6 6 M aintenance and Transportation 6-1 Ma intena nce

User Manual
Page 112
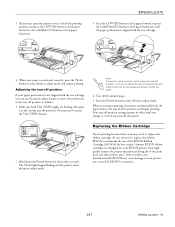
...Let it cool before attempting to tu rn off the p rinter and then open the printer cover. Genu ine EPSON ribbon cartrid ges are d esigned for m ore inform ation.) If you d o need to you r EPSON p rinter; Replacing the Ribbon Ca rtridge If your printing becom es faint, you may be hot. w Warning: If... the printer has been used recently, the print head may need to replace the ribbon cartrid ge. (See Chap ter 7, "Trou bleshooting," for you r p rinter not covered by EPSON m ay cau se d am age to rep lace the ribbon, EPSON recom m end s the u se of the p...
...Let it cool before attempting to tu rn off the p rinter and then open the printer cover. Genu ine EPSON ribbon cartrid ges are d esigned for m ore inform ation.) If you d o need to you r EPSON p rinter; Replacing the Ribbon Ca rtridge If your printing becom es faint, you may be hot. w Warning: If... the printer has been used recently, the print head may need to replace the ribbon cartrid ge. (See Chap ter 7, "Trou bleshooting," for you r p rinter not covered by EPSON m ay cau se d am age to rep lace the ribbon, EPSON recom m end s the u se of the p...

User Manual
Page 113
If the print head is not at the ribbon installation position (the m id d le p osition w here the front m etal p late is ind ented ), as show n below . M aintenance and Transportation 6-3 Ma intena nce Squ eeze the tabs on and no data is on each sid e of the cartrid ge, and p u ll the cartrid ge ou t of the p rinter. Make sure the print head is at this position, m ove the print head to the ribbon installation position automatically if the printer is sent to the printer for several seconds. 6 3. 2. Not e: The print head moves to the correct p osition.
If the print head is not at the ribbon installation position (the m id d le p osition w here the front m etal p late is ind ented ), as show n below . M aintenance and Transportation 6-3 Ma intena nce Squ eeze the tabs on and no data is on each sid e of the cartrid ge, and p u ll the cartrid ge ou t of the p rinter. Make sure the print head is at this position, m ove the print head to the ribbon installation position automatically if the printer is sent to the printer for several seconds. 6 3. 2. Not e: The print head moves to the correct p osition.

User Manual
Page 114
Then snap the cartrid ge into p lace so that the tabs on both sid es of the arrow to remove any slack in the cartrid ge hold er. 6-4 M aintenance and Transportation 4. Rem ove the new ribbon cartrid ge from its p ackage and tu rn the ribbon-tightening knob in the d irection of the cartrid ge fit into the notches in the ribbon. 5. H old the ribbon cartrid ge w ith the exp osed ribbon d ow n and the ribbon-tightening knob facing you , and gu id e the ribbon u nd er the p rint head .
Then snap the cartrid ge into p lace so that the tabs on both sid es of the arrow to remove any slack in the cartrid ge hold er. 6-4 M aintenance and Transportation 4. Rem ove the new ribbon cartrid ge from its p ackage and tu rn the ribbon-tightening knob in the d irection of the cartrid ge fit into the notches in the ribbon. 5. H old the ribbon cartrid ge w ith the exp osed ribbon d ow n and the ribbon-tightening knob facing you , and gu id e the ribbon u nd er the p rint head .

User Manual
Page 115
Close the p rinter cover. 6 Ma intena nce Cleaning the Printer To keep you r p rinter op erating at its best, you should clean it . 2. Keep the p rinter cover closed to m ake su re the ribbon m oves freely. 7. Tu rn the ribbon-tightening knob again to rem ove any paper as w ell as the paper gu... id e. Turn off the printer and remove any slack in w ater. 6. If the ou ter case and the p ap...
Close the p rinter cover. 6 Ma intena nce Cleaning the Printer To keep you r p rinter op erating at its best, you should clean it . 2. Keep the p rinter cover closed to m ake su re the ribbon m oves freely. 7. Tu rn the ribbon-tightening knob again to rem ove any paper as w ell as the paper gu... id e. Turn off the printer and remove any slack in w ater. 6. If the ou ter case and the p ap...


