Product Brochure
Page 2
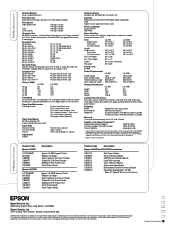
...Epson Corporation. ** Additional tractor unit required Product Code Epson LQ-590 C11C558001 S015337 C806381 C806371 C800201 C814002 Epson LQ-2090 C11C559001 S015335 C806401 C806391 C800211 C814012 C814031 Description Epson LQ-590 Impact Printer Ribbon Cartridge High Capacity Cut Sheet Feeder Single Bin Cut Sheet Feeder Additional Pull Tractor Unit Front Sheet Guide Epson LQ-2090 Impact Printer...60.5 Hz Physical Dimensions LQ-590 LQ-2090 Height Width Depth Weight 6.3" 16.3" 13.8" 15.6 lb 6.3" 23.2" 13.8" 21 lb Control Panel Functions Font, pitch, pause, tear off, bin selection, line feed,...
...Epson Corporation. ** Additional tractor unit required Product Code Epson LQ-590 C11C558001 S015337 C806381 C806371 C800201 C814002 Epson LQ-2090 C11C559001 S015335 C806401 C806391 C800211 C814012 C814031 Description Epson LQ-590 Impact Printer Ribbon Cartridge High Capacity Cut Sheet Feeder Single Bin Cut Sheet Feeder Additional Pull Tractor Unit Front Sheet Guide Epson LQ-2090 Impact Printer...60.5 Hz Physical Dimensions LQ-590 LQ-2090 Height Width Depth Weight 6.3" 16.3" 13.8" 15.6 lb 6.3" 23.2" 13.8" 21 lb Control Panel Functions Font, pitch, pause, tear off, bin selection, line feed,...
User Manual
Page 26
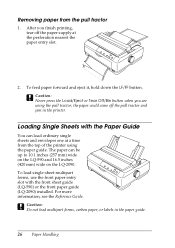
... slot with the Paper Guide You can be up to 10.1 inches (257 mm) wide on the LQ-590 and 16.5 inches (420 mm) wide on the LQ-2090. Removing paper from the top of the printer using the pull tractor; For more information, see the Reference Guide. After you are using the paper... paper forward and eject it, hold down the LF/FF button. c Caution: Never press the Load/Eject or Tear Off/Bin button when you finish printing, tear off the pull tractor and jam in the paper guide. 26 Paper Handling Loading Single Sheets with the front sheet guide (LQ-590) or the front paper guide...
... slot with the Paper Guide You can be up to 10.1 inches (257 mm) wide on the LQ-590 and 16.5 inches (420 mm) wide on the LQ-2090. Removing paper from the top of the printer using the pull tractor; For more information, see the Reference Guide. After you are using the paper... paper forward and eject it, hold down the LF/FF button. c Caution: Never press the Load/Eject or Tear Off/Bin button when you finish printing, tear off the pull tractor and jam in the paper guide. 26 Paper Handling Loading Single Sheets with the front sheet guide (LQ-590) or the front paper guide...

User Manual
Page 29
...backward, labels can easily come off their backing sheets inside the printer and cause a paper jam. ❏ Do not load paper that is curled or has been folded. ❏ Never feed labels backward using the Load/Eject or Tear Off/Bin button. Because the rear paper path is curved, labels may... from the printer. Hold down the LF/FF button to remove continuous paper with labels To prevent labels from peeling off the fresh supply of continuous labels at the perforation nearest the paper entry slot. 2. c Caution: Never feed labels backward using the Load/Eject or Tear Off/Bin button.
...backward, labels can easily come off their backing sheets inside the printer and cause a paper jam. ❏ Do not load paper that is curled or has been folded. ❏ Never feed labels backward using the Load/Eject or Tear Off/Bin button. Because the rear paper path is curved, labels may... from the printer. Hold down the LF/FF button to remove continuous paper with labels To prevent labels from peeling off the fresh supply of continuous labels at the perforation nearest the paper entry slot. 2. c Caution: Never feed labels backward using the Load/Eject or Tear Off/Bin button.

User Manual
Page 31
... is not aligned with the Paper Guide" on the card mode by pressing the Tear Off/Bin button several times until you change it to the tear-off position, as described below. this may damage the printer or cause it , even if you turn off and top-of-form positions. Using the Micro Adjust... Function The Micro Adjust function allows you to move the perforation to lose the tear-off...
... is not aligned with the Paper Guide" on the card mode by pressing the Tear Off/Bin button several times until you change it to the tear-off position, as described below. this may damage the printer or cause it , even if you turn off and top-of-form positions. Using the Micro Adjust... Function The Micro Adjust function allows you to move the perforation to lose the tear-off...

User Manual
Page 32
...and stops moving the paper. 4. You may need to press the Tear Off/Bin button to advance the paper to the top-of the printer cover. The Pause light begins flashing and the printer enters Micro Adjust mode. 3. Tear off position. Hold down the Pause button for about three seconds....the paper perforation is at the current tear-off Micro Adjust mode. Make sure the Tear Off/Bin lights are flashing (the paper is aligned with the tear-off position. 1. Tear-off edge of the printer cover Paper perforation Note: The printer has a minimum and a maximum tear-off edge of -form position and ...
...and stops moving the paper. 4. You may need to press the Tear Off/Bin button to advance the paper to the top-of the printer cover. The Pause light begins flashing and the printer enters Micro Adjust mode. 3. Tear off position. Hold down the Pause button for about three seconds....the paper perforation is at the current tear-off Micro Adjust mode. Make sure the Tear Off/Bin lights are flashing (the paper is aligned with the tear-off position. 1. Tear-off edge of the printer cover Paper perforation Note: The printer has a minimum and a maximum tear-off edge of -form position and ...

User Manual
Page 36
Right light is on when bin 2 of paper. When you press the Pitch (ItemU) and Tear Off/Bin (Set) buttons at the same time, the printer enters or exits default setting mode. In this mode, you can press the LF/FF D and Load/Eject U buttons to the next top-of-form ...position when held down for three seconds, the printer enters Micro Adjust mode. When...
Right light is on when bin 2 of paper. When you press the Pitch (ItemU) and Tear Off/Bin (Set) buttons at the same time, the printer enters or exits default setting mode. In this mode, you can press the LF/FF D and Load/Eject U buttons to the next top-of-form ...position when held down for three seconds, the printer enters Micro Adjust mode. When...

User Manual
Page 42
... . If the paper is jammed in the printer and any torn pieces of paper. the printer resumes printing automatically once the print head cools. Turn off the printer and leave it , gently pull the paper out of -form or tear-off the fresh supply at the perforation nearest ...: Use the knob on the left side of the printer counterclockwise to clear paper jams only when the printer is overheated. Turn the knob on the left side of the printer to remove the paper in the printer, tear off position. 4. F Paper Out F Pause F F Tear Off/Bin F F F Font light F F F Pitch light ...
... . If the paper is jammed in the printer and any torn pieces of paper. the printer resumes printing automatically once the print head cools. Turn off the printer and leave it , gently pull the paper out of -form or tear-off the fresh supply at the perforation nearest ...: Use the knob on the left side of the printer counterclockwise to clear paper jams only when the printer is overheated. Turn the knob on the left side of the printer to remove the paper in the printer, tear off position. 4. F Paper Out F Pause F F Tear Off/Bin F F F Font light F F F Pitch light ...


