Technical Brief (Impact Printers)
Page 2
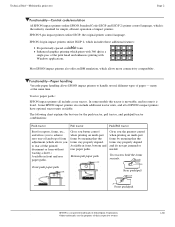
...EPSON impact printers also include additional tractor units, and all include a rear tractor. Tractor paper paths: EPSON impact printers all of impact printers. Gives you the greatest control when printing on multi-part forms by ensuring that the forms stay properly aligned. Most EPSON impact printers also offer an IBM emulation, which prints... path Rear push/pull Front push/pull EPSON Sales Training EPSON is a registered trademark of Seiko Epson Corporation. 1/00 Other trademarks are the property of the print head and enhances printing with 360 dpi in front and rear paper...
...EPSON impact printers also include additional tractor units, and all include a rear tractor. Tractor paper paths: EPSON impact printers all of impact printers. Gives you the greatest control when printing on multi-part forms by ensuring that the forms stay properly aligned. Most EPSON impact printers also offer an IBM emulation, which prints... path Rear push/pull Front push/pull EPSON Sales Training EPSON is a registered trademark of Seiko Epson Corporation. 1/00 Other trademarks are the property of the print head and enhances printing with 360 dpi in front and rear paper...

Technical Brief (Impact Printers)
Page 6
... and tear on the print head EPSON Sales Training EPSON is a registered trademark of Seiko Epson Corporation. 1/00 Other trademarks are the property of their respective owners. L EPSON's stationary ribbon cartridge Competitive design with every printer Adds profit to the less expensive compatible ribbons. Technical Brief-Multimedia projectors Page 6 Reliability-Ribbon quality EPSON brand impact printer ribbons are ... The design...
... and tear on the print head EPSON Sales Training EPSON is a registered trademark of Seiko Epson Corporation. 1/00 Other trademarks are the property of their respective owners. L EPSON's stationary ribbon cartridge Competitive design with every printer Adds profit to the less expensive compatible ribbons. Technical Brief-Multimedia projectors Page 6 Reliability-Ribbon quality EPSON brand impact printer ribbons are ... The design...
Technical Brief (Impact Printers)
Page 7
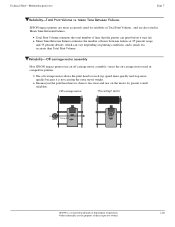
... Other trademarks are also rated in competitive printers. Because just the print head moves, there is less wear and tear on printing conditions, and is much less accurate than Total Print Volume. LL Reliability-Off-carriage motor assembly Most EPSON impact printers use an off -carriage motor allows the print head to r EPSON Sales Training EPSON is not carrying the extra motor...
... Other trademarks are also rated in competitive printers. Because just the print head moves, there is less wear and tear on printing conditions, and is much less accurate than Total Print Volume. LL Reliability-Off-carriage motor assembly Most EPSON impact printers use an off -carriage motor allows the print head to r EPSON Sales Training EPSON is not carrying the extra motor...

Product Information Guide
Page 2
... to two copies. L-1000/LQ-500 DOT-MATRIX PRINTER 1 Environment Temperature: Humidity: Shock: Vibration: Printable area: Smgle sheet Co"tlnuous paper Paper feed speed: Paper thickness: Number of copies: Approx. 100 msiline at 48 dots/character): 2 million MCBF: For all components excluding print head: 3 million lines MTBF: 4000 power on hours Print head life: 200 mdlion strokes...
... to two copies. L-1000/LQ-500 DOT-MATRIX PRINTER 1 Environment Temperature: Humidity: Shock: Vibration: Printable area: Smgle sheet Co"tlnuous paper Paper feed speed: Paper thickness: Number of copies: Approx. 100 msiline at 48 dots/character): 2 million MCBF: For all components excluding print head: 3 million lines MTBF: 4000 power on hours Print head life: 200 mdlion strokes...

Product Information Guide
Page 3
...1000/LQ-500 DOT-MATRIX PRINTER Pitch selection Font selection w ~Descrlptlon 1'. If this button to automat&Iv load the paper. 24 - press tht3 button to teed paper contmuousiv. After tnsertmg a smgle sheet while the PAPER OUT Ilght IS on line press this light flickers, the print head is...13 on press this case. the printer waits until the print head cools and then resumes printing. On when the printer can recewe and print data tram the computer. When the printer IS on and the printer can receive and print data from the computer. Pin Printers 12/12/88 International character set...
...1000/LQ-500 DOT-MATRIX PRINTER Pitch selection Font selection w ~Descrlptlon 1'. If this button to automat&Iv load the paper. 24 - press tht3 button to teed paper contmuousiv. After tnsertmg a smgle sheet while the PAPER OUT Ilght IS on line press this light flickers, the print head is...13 on press this case. the printer waits until the print head cools and then resumes printing. On when the printer can recewe and print data tram the computer. When the printer IS on and the printer can receive and print data from the computer. Pin Printers 12/12/88 International character set...
User Manual
Page 15
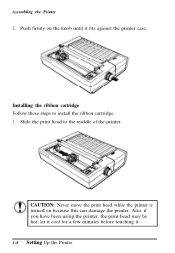
Slide the print head to install the ribbon cartridge. 1. Installing the ribbon cartridge Follow these steps to the middle of the printer. let it cool for a few minutes before touching it fits against the printer case. Assembling the Printer 2. CAUTION: Never move the print head while the printer is turned on the knob until it . 1-8 Setting Up the Printer Also, if you have been using the printer, the print head may be hot; Push firmly on because this can damage the printer.
Slide the print head to install the ribbon cartridge. 1. Installing the ribbon cartridge Follow these steps to the middle of the printer. let it cool for a few minutes before touching it fits against the printer case. Assembling the Printer 2. CAUTION: Never move the print head while the printer is turned on the knob until it . 1-8 Setting Up the Printer Also, if you have been using the printer, the print head may be hot; Push firmly on because this can damage the printer.

User Manual
Page 17
Use a pointed object, such as the tip of a pencil, to guide the ribbon between the print head and ribbon guide while you turn the ribbon-tightening knob to be sure it moves smoothly. Also check that the ribbon is not twisted or creased. 1-10 Setting Up the Printer Slide the print head from side to side to help feed the-ribbon into place. 6. Assembling the Printer 5.
Use a pointed object, such as the tip of a pencil, to guide the ribbon between the print head and ribbon guide while you turn the ribbon-tightening knob to be sure it moves smoothly. Also check that the ribbon is not twisted or creased. 1-10 Setting Up the Printer Slide the print head from side to side to help feed the-ribbon into place. 6. Assembling the Printer 5.

User Manual
Page 23
then press the AUTO LOAD button again. Press the AUTO LOAD button once to automatically load the paper. Turn off the printer. 1-16 Setting Up the Printer Note: If the platen turns without loading the paper, remove the paper and re-insert it more firmly; Be sure you have loaded a ...as described above. 2. Testing the Printer WARNING: Never run in draft mode or Letter Quality mode. Running the self test The self test can be run the self test using paper that is narrower than 8¼ inches (210 mm or A4 size) because then the print head prints directly onto the platen. 5. Follow ...
then press the AUTO LOAD button again. Press the AUTO LOAD button once to automatically load the paper. Turn off the printer. 1-16 Setting Up the Printer Note: If the platen turns without loading the paper, remove the paper and re-insert it more firmly; Be sure you have loaded a ...as described above. 2. Testing the Printer WARNING: Never run in draft mode or Letter Quality mode. Running the self test The self test can be run the self test using paper that is narrower than 8¼ inches (210 mm or A4 size) because then the print head prints directly onto the platen. 5. Follow ...

User Manual
Page 40
WARNING: If the printer has been used recently, the print head may be hot. Let it cool before attempting to the middle of continuous paper: It is also important to load continuous paper. 1. Slide the print head to move it. Paper Handling 2-11 Loading continuous paper Follow these steps to align your printer and supply of the printer. Using Continuous Paper Positioning your continuous paper supply Here are three ways to position your paper supply with the paper loaded in the tractor so that the paper feeds smoothly and straight into the printer. Turn off the printer. 2.
WARNING: If the printer has been used recently, the print head may be hot. Let it cool before attempting to the middle of continuous paper: It is also important to load continuous paper. 1. Slide the print head to move it. Paper Handling 2-11 Loading continuous paper Follow these steps to align your printer and supply of the printer. Using Continuous Paper Positioning your continuous paper supply Here are three ways to position your paper supply with the paper loaded in the tractor so that the paper feeds smoothly and straight into the printer. Turn off the printer. 2.

User Manual
Page 45
Using Continuous Paper 11. Place the paper guide over the printer and paper. 2-16 Paper Handling Attaching the paper guide With continuous paper, the paper guide functions as a paper separator. 1. If there is slack in the paper between the print head and the tractor unit, use the paper feed knob to take up the slack.
Using Continuous Paper 11. Place the paper guide over the printer and paper. 2-16 Paper Handling Attaching the paper guide With continuous paper, the paper guide functions as a paper separator. 1. If there is slack in the paper between the print head and the tractor unit, use the paper feed knob to take up the slack.
User Manual
Page 49
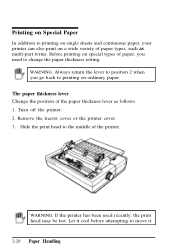
Turn off the printer. 2. WARNING: If the printer has been used recently, the print head may be hot. Printing on Special Paper In addition to printing on single sheets and continuous paper, your printer can also print on a wide variety of paper types, such as follows: 1. The paper thickness lever Change.... Let it cool before attempting to printing on special types of the printer. WARNING: Always return the lever to position 2 when you need to change the paper thickness setting. Remove the tractor cover or the printer cover. 3. Slide the print head to the middle of paper, you ...
Turn off the printer. 2. WARNING: If the printer has been used recently, the print head may be hot. Printing on Special Paper In addition to printing on single sheets and continuous paper, your printer can also print on a wide variety of paper types, such as follows: 1. The paper thickness lever Change.... Let it cool before attempting to printing on special types of the printer. WARNING: Always return the lever to position 2 when you need to change the paper thickness setting. Remove the tractor cover or the printer cover. 3. Slide the print head to the middle of paper, you ...

User Manual
Page 54
...paper or advance continuous paper to automatically load the paper. When the printer is off line, press this button to the top of the next page. When the printer is on line, press this light flickers, the print head is on line/off line status. When you are using an ... are on selecting a font with SelecType. If this button to feed paper continuously. When the printer is off line, press this case, the printer waits until the print head cools and then resumes printing. Using the Printer 3-3 In this button to feed the paper one line, or hold it down to select the...
...paper or advance continuous paper to automatically load the paper. When the printer is off line, press this button to the top of the next page. When the printer is on line, press this light flickers, the print head is on line/off line status. When you are using an ... are on selecting a font with SelecType. If this button to feed paper continuously. When the printer is off line, press this case, the printer waits until the print head cools and then resumes printing. Using the Printer 3-3 In this button to feed the paper one line, or hold it down to select the...
User Manual
Page 70
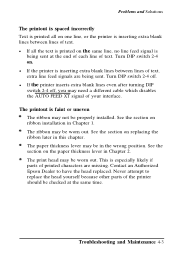
...on . Troubleshooting and Maintenance 4-3 Turn DIP switch 2-4 on the paper thickness lever in Chapter 2. l If the printer inserts extra blank lines even after turning DIP switch 2-4 off . The print head may be worn out. Turn DIP switch 2-4 off , you may need a different cable which disables the AUTO... printer is inserting extra blank lines between lines of text. The paper thickness lever may not be checked at the end of each line of text, extra line feed signals are missing. Contact an Authorized Epson Dealer to replace the head yourself because other parts of printed ...
...on . Troubleshooting and Maintenance 4-3 Turn DIP switch 2-4 on the paper thickness lever in Chapter 2. l If the printer inserts extra blank lines even after turning DIP switch 2-4 off . The print head may be worn out. Turn DIP switch 2-4 off , you may need a different cable which disables the AUTO... printer is inserting extra blank lines between lines of text. The paper thickness lever may not be checked at the end of each line of text, extra line feed signals are missing. Contact an Authorized Epson Dealer to replace the head yourself because other parts of printed ...
User Manual
Page 71
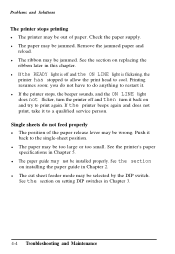
Remove the jammed paper and reload. l If the READY light is off and then turn the printer off and the ON LINE light is flickering, the printer has stopped to allow the print head to a qualified service person. Printing resumes soon; l The paper guide may not be jammed. l The ribbon may be installed properly. See the...
Remove the jammed paper and reload. l If the READY light is off and then turn the printer off and the ON LINE light is flickering, the printer has stopped to allow the print head to a qualified service person. Printing resumes soon; l The paper guide may not be jammed. l The ribbon may be installed properly. See the...
User Manual
Page 75
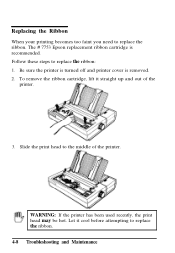
Replacing the Ribbon When your printing becomes too faint you need to replace the ribbon: 1. The # 7753 Epson replacement ribbon cartridge is removed. 2. Follow these steps to replace the ribbon. To remove the ribbon cartridge, lift it cool before attempting to the middle of the printer. 3. Be sure the printer is turned off and printer cover is recommended. WARNING: If the printer has been used recently, the print head may be hot. Let it straight up and out of the printer. Slide the print head to replace the ribbon. 4-8 Troubleshooting and Maintenance
Replacing the Ribbon When your printing becomes too faint you need to replace the ribbon: 1. The # 7753 Epson replacement ribbon cartridge is removed. 2. Follow these steps to replace the ribbon. To remove the ribbon cartridge, lift it cool before attempting to the middle of the printer. 3. Be sure the printer is turned off and printer cover is recommended. WARNING: If the printer has been used recently, the print head may be hot. Let it straight up and out of the printer. Slide the print head to replace the ribbon. 4-8 Troubleshooting and Maintenance
User Manual
Page 77
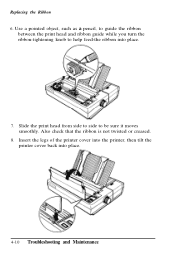
Also check that the ribbon is not twisted or creased. 8. Replacing the Ribbon 6. Slide the print head from side to side to help feed-the ribbon into place. 4-10 Troubleshooting and Maintenance Insert the legs of the printer cover into the printer, then tilt the printer cover back into place. 7. Use a pointed object, such as a pencil, to guide the ribbon between the print head and ribbon guide while you turn the ribbon-tightening knob to be sure it moves smoothly.
Also check that the ribbon is not twisted or creased. 8. Replacing the Ribbon 6. Slide the print head from side to side to help feed-the ribbon into place. 4-10 Troubleshooting and Maintenance Insert the legs of the printer cover into the printer, then tilt the printer cover back into place. 7. Use a pointed object, such as a pencil, to guide the ribbon between the print head and ribbon guide while you turn the ribbon-tightening knob to be sure it moves smoothly.
User Manual
Page 84
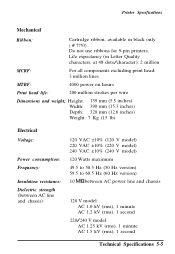
Do not use ribbons for 9-pin printers. Printer Specifications Mechanical Ribbon: Cartridge ribbon, available in Letter Quality characters, at 48 dots/character): 2 million MCBF: For all components excluding print head: 3 million lines MTBF: 4000 power on hours Print head life: 200 million strokes per wire Dimensions and weight; Height: 139 mm (5.5 inches) Width: 390 mm (15.3 inches...
Do not use ribbons for 9-pin printers. Printer Specifications Mechanical Ribbon: Cartridge ribbon, available in Letter Quality characters, at 48 dots/character): 2 million MCBF: For all components excluding print head: 3 million lines MTBF: 4000 power on hours Print head life: 200 million strokes per wire Dimensions and weight; Height: 139 mm (5.5 inches) Width: 390 mm (15.3 inches...

User Manual
Page 118
.... baud rate A measure of the speed of information used by a printer or computer. application program A program that these definitions apply specifically to letters and symbols. bit A binary digit (0 or 1), which the print head goes from right to left to bits per second. condensed Printing in which is approximately 60% of the width of standard...
.... baud rate A measure of the speed of information used by a printer or computer. application program A program that these definitions apply specifically to letters and symbols. bit A binary digit (0 or 1), which the print head goes from right to left to bits per second. condensed Printing in which is approximately 60% of the width of standard...

User Manual
Page 125
... thickness lever, 2-20-21 Parallel interface connecting, 1-19-20 specifications, 5-7-9 Pitches, 3-7-8, 5-2, 5-12 Power light, 2-4, 3-2 Prestige font, 5-3, A-14 Printable area, 5-4 Print direction, 3-7, 3-9, 5-2 Printer assembling, 1-7-12 cleaning, 4-6-7 cover, 1-2, 1-12, 2-3, 2-8 default settings, 5-12 specifications, 5-1-12 testing, 1-13-18 transporting, 4-11 unpacking, 1-2-4 voltage, 1-3 Print head, 1-8, 2-11, 4-3, 4-8 Print speed, 5-2 Problems, see Troubleshooting Proportional pitch, 3-8, 5-2 Pull tractor removing, 1-3 installing, 2-8-10 2 Index
... thickness lever, 2-20-21 Parallel interface connecting, 1-19-20 specifications, 5-7-9 Pitches, 3-7-8, 5-2, 5-12 Power light, 2-4, 3-2 Prestige font, 5-3, A-14 Printable area, 5-4 Print direction, 3-7, 3-9, 5-2 Printer assembling, 1-7-12 cleaning, 4-6-7 cover, 1-2, 1-12, 2-3, 2-8 default settings, 5-12 specifications, 5-1-12 testing, 1-13-18 transporting, 4-11 unpacking, 1-2-4 voltage, 1-3 Print head, 1-8, 2-11, 4-3, 4-8 Print speed, 5-2 Problems, see Troubleshooting Proportional pitch, 3-8, 5-2 Pull tractor removing, 1-3 installing, 2-8-10 2 Index


