
Technical Brief (Impact Printers)
Page 1
...and multiple paper paths that the printer are the property of their reliability with tireless printheads and superior quality ribbons. Reliability - Impact printers are renowned for their respective owners. both in their names EPSON Sales Training EPSON is a 9- These printers have the sturdiest printhead pins which... The name of an EPSON's impact printer tells you if it has a narrow or wide carriage: LLL L Nine-pin printers all begin with LQ FX-980-Nine-pin narrow carriage Wide carriage printers have 4 number in their names Narrow carriage printers have 3 numbers in ...
...and multiple paper paths that the printer are the property of their reliability with tireless printheads and superior quality ribbons. Reliability - Impact printers are renowned for their respective owners. both in their names EPSON Sales Training EPSON is a 9- These printers have the sturdiest printhead pins which... The name of an EPSON's impact printer tells you if it has a narrow or wide carriage: LLL L Nine-pin printers all begin with LQ FX-980-Nine-pin narrow carriage Wide carriage printers have 4 number in their names Narrow carriage printers have 3 numbers in ...

Technical Brief (Impact Printers)
Page 6
... quality throughout the life of the print head = First Character = 2,000,000 th Character vs. Technical Brief-Multimedia projectors Page 6 Reliability-Ribbon quality EPSON brand impact printer ribbons are ... Customer advantages Manufactured with ink precisely applied to both sides of the ribbon nylon by computercontrolled machinery Made with the highest quality nylon manufactured Made with smaller...
... quality throughout the life of the print head = First Character = 2,000,000 th Character vs. Technical Brief-Multimedia projectors Page 6 Reliability-Ribbon quality EPSON brand impact printer ribbons are ... Customer advantages Manufactured with ink precisely applied to both sides of the ribbon nylon by computercontrolled machinery Made with the highest quality nylon manufactured Made with smaller...
Product Support Bulletin(s)
Page 4
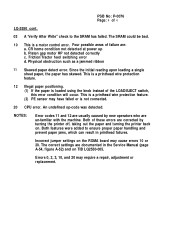
Physical obstruction such as a jammed ribbon 11 Skewed paper detect error. The correct settings are documented in printhead failures.... LOAD/EJECT switch, this error condition will occur. CR home condition not detected at power up b. Both of 4 LQ-2550 cont. 03 A 'Verify After Write" check to ensure proper paper handling and prevent paper jams, which can ... TIB LQ2550-005. NOTES: Error codes 11 and 12 are usually caused by turning the printer off, taking out the paper and turning the printer back on. PSB No: P-0076 Page: 4 of these errors are corrected by new operators...
Physical obstruction such as a jammed ribbon 11 Skewed paper detect error. The correct settings are documented in printhead failures.... LOAD/EJECT switch, this error condition will occur. CR home condition not detected at power up b. Both of 4 LQ-2550 cont. 03 A 'Verify After Write" check to ensure proper paper handling and prevent paper jams, which can ... TIB LQ2550-005. NOTES: Error codes 11 and 12 are usually caused by turning the printer off, taking out the paper and turning the printer back on. PSB No: P-0076 Page: 4 of these errors are corrected by new operators...
User Manual
Page 7
... and Graphics 4-1 Enhancing Your Printing 4-2 Graphics 4-9 User-defined Characters 4-20 Chapter 5 Using the Printer Options 5-1 The Cut Sheet Feeder 5-2 The Pull Tractor 5-21 The Multi-Font Module 5-34 The Interface Boards 5-40 Chapter 6 Maintenance 6-1 Replacing the Ribbon 6-5 Transporting the Printer 6-11 Chapter 7 Troubleshooting 7-1 Problems and Solutions 7-2 Power Supply 7-4 Printing 7-5 Paper Handling 7-14 Options...
... and Graphics 4-1 Enhancing Your Printing 4-2 Graphics 4-9 User-defined Characters 4-20 Chapter 5 Using the Printer Options 5-1 The Cut Sheet Feeder 5-2 The Pull Tractor 5-21 The Multi-Font Module 5-34 The Interface Boards 5-40 Chapter 6 Maintenance 6-1 Replacing the Ribbon 6-5 Transporting the Printer 6-11 Chapter 7 Troubleshooting 7-1 Problems and Solutions 7-2 Power Supply 7-4 Printing 7-5 Paper Handling 7-14 Options...
User Manual
Page 11
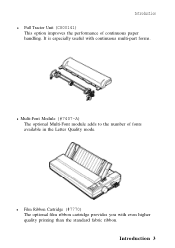
l Film Ribbon Cartridge (#7770) The optional film ribbon cartridge provides you with continuous multi-part forms. l Multi-Font Module (#7407-A) The optional Multi-Font module adds to the number of continuous paper handling. Introduction 3 Introduction l Pull Tractor Unit (C800141) This option improves the performance of fonts available in the Letter Quality mode. It is especially useful with even higher quality printing than the standard fabric ribbon.
l Film Ribbon Cartridge (#7770) The optional film ribbon cartridge provides you with continuous multi-part forms. l Multi-Font Module (#7407-A) The optional Multi-Font module adds to the number of continuous paper handling. Introduction 3 Introduction l Pull Tractor Unit (C800141) This option improves the performance of fonts available in the Letter Quality mode. It is especially useful with even higher quality printing than the standard fabric ribbon.
User Manual
Page 15
Chapter 1 Setting Up the Printer Unpacking the Printer 1-2 Checking the Parts 1-2 Removing the Protective Materials 1-3 Choosing a Place for the Printer 1-5 Assembling the Printer 1-7 Installing the Platen Knob 1-7 Installing the Ribbon Cartridge 1-8 Attaching the Paper Guide 1-12 Testing the Printer 1-14 Plugging in the Printer 1-14 Running the Self Test 1-15 If the Self Test Does Not Work 1-22 Connecting the Printer to Your Computer 1-23 The Parallel Interface 1-23 Setting Up Your Application Software 1-26 Choosing From a Menu 1-26 Setting Up the Printer 1-1
Chapter 1 Setting Up the Printer Unpacking the Printer 1-2 Checking the Parts 1-2 Removing the Protective Materials 1-3 Choosing a Place for the Printer 1-5 Assembling the Printer 1-7 Installing the Platen Knob 1-7 Installing the Ribbon Cartridge 1-8 Attaching the Paper Guide 1-12 Testing the Printer 1-14 Plugging in the Printer 1-14 Running the Self Test 1-15 If the Self Test Does Not Work 1-22 Connecting the Printer to Your Computer 1-23 The Parallel Interface 1-23 Setting Up Your Application Software 1-26 Choosing From a Menu 1-26 Setting Up the Printer 1-1
User Manual
Page 22
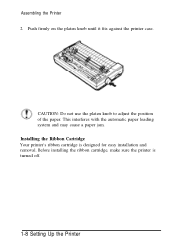
CAUTION: Do not use the platen knob to adjust the position of the paper. Installing the Ribbon Cartridge Your printer's ribbon cartridge is turned off. 1-8 Setting Up the Printer Before installing the ribbon cartridge, make sure the printer is designed for easy installation and removal. Assembling the Printer 2. Push firmly on the platen knob until it fits against the printer case. This interferes with the automatic paper loading system and may cause a paper jam.
CAUTION: Do not use the platen knob to adjust the position of the paper. Installing the Ribbon Cartridge Your printer's ribbon cartridge is turned off. 1-8 Setting Up the Printer Before installing the ribbon cartridge, make sure the printer is designed for easy installation and removal. Assembling the Printer 2. Push firmly on the platen knob until it fits against the printer case. This interferes with the automatic paper loading system and may cause a paper jam.
User Manual
Page 23
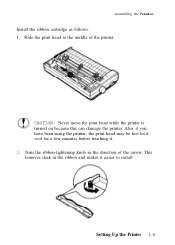
let it cool for a few minutes before touching it easier to the middle of the arrow. Turn the ribbon-tightening knob in the ribbon and makes it . 2. Also, if you have been using the printer, the print head may be hot; This removes slack in the direction of the printer. Slide the print head to install. Setting Up the Printer 1-9 Assembling the Printer Install the ribbon cartridge as follows. 1. CAUTION: Never move the print head while the printer is turned on because this can damage the printer.
let it cool for a few minutes before touching it easier to the middle of the arrow. Turn the ribbon-tightening knob in the ribbon and makes it . 2. Also, if you have been using the printer, the print head may be hot; This removes slack in the direction of the printer. Slide the print head to install. Setting Up the Printer 1-9 Assembling the Printer Install the ribbon cartridge as follows. 1. CAUTION: Never move the print head while the printer is turned on because this can damage the printer.
User Manual
Page 24
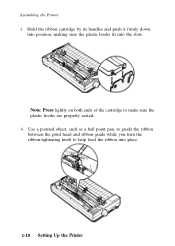
Use a pointed object, such as a ball point pen, to guide the ribbon between the print head and ribbon guide while you turn the ribbon-tightening knob to make sure the plastic hooks are properly seated. 4. Note: Press lightly on both ends of the cartridge to help feed the ribbon into the slots. Hold the ribbon cartridge by its handles and push it firmly down into position, making sure the plastic hooks fit into place. 1-10 Setting Up the Printer Assembling the Printer 3.
Use a pointed object, such as a ball point pen, to guide the ribbon between the print head and ribbon guide while you turn the ribbon-tightening knob to make sure the plastic hooks are properly seated. 4. Note: Press lightly on both ends of the cartridge to help feed the ribbon into the slots. Hold the ribbon cartridge by its handles and push it firmly down into position, making sure the plastic hooks fit into place. 1-10 Setting Up the Printer Assembling the Printer 3.
User Manual
Page 25
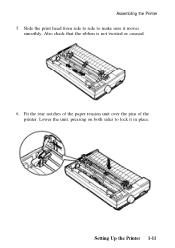
Assembling the Printer 5. Fit the rear notches of the paper tension unit over the pins of the printer. Lower the unit, pressing on both sides to make sure it in place. Setting Up the Printer 1-11 Slide the print head from side to side to lock it moves smoothly. Also check that the ribbon is not twisted or creased. 6.
Assembling the Printer 5. Fit the rear notches of the paper tension unit over the pins of the printer. Lower the unit, pressing on both sides to make sure it in place. Setting Up the Printer 1-11 Slide the print head from side to side to lock it moves smoothly. Also check that the ribbon is not twisted or creased. 6.
User Manual
Page 28
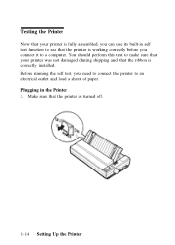
You should perform this test to an electrical outlet and load a sheet of paper. Plugging in self test function to see that the printer is working correctly before you connect it to a computer. Make sure that the printer is turned off. 1-14 Setting Up the Printer Before running the self test, you need to connect the printer to make sure that your printer is fully assembled, you can use its built-in the Printer 1. Testing the Printer Now that your printer was not damaged during shipping and that the ribbon is correctly installed.
You should perform this test to an electrical outlet and load a sheet of paper. Plugging in self test function to see that the printer is working correctly before you connect it to a computer. Make sure that the printer is turned off. 1-14 Setting Up the Printer Before running the self test, you need to connect the printer to make sure that your printer is fully assembled, you can use its built-in the Printer 1. Testing the Printer Now that your printer was not damaged during shipping and that the ribbon is correctly installed.
User Manual
Page 36
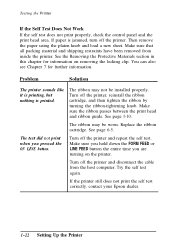
.... Then remove the paper using the platen knob and load a new sheet. The ribbon may be installed properly. See page 1-10. If the printer still does not print the self test correctly, contact your Epson dealer. 1-22 Setting Up the Printer See the Removing the Protective Materials section in this chapter for further information...
.... Then remove the paper using the platen knob and load a new sheet. The ribbon may be installed properly. See page 1-10. If the printer still does not print the self test correctly, contact your Epson dealer. 1-22 Setting Up the Printer See the Removing the Protective Materials section in this chapter for further information...
User Manual
Page 109
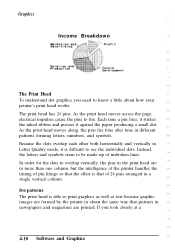
...page, electrical impulses cause the pins to be made up of 24 pins arranged in newspapers and magazines are formed by the printer in about how your printer's print head works. Instead, the letters and symbols seem to fire. Graphics Income Breakdown The Print Head To understand dot ...graphics you look closely at a 4-10 Software and Graphics The print head has 24 pins. Each time a pin fires, it strikes the inked ribbon and presses...
...page, electrical impulses cause the pins to be made up of 24 pins arranged in newspapers and magazines are formed by the printer in about how your printer's print head works. Instead, the letters and symbols seem to fire. Graphics Income Breakdown The Print Head To understand dot ...graphics you look closely at a 4-10 Software and Graphics The print head has 24 pins. Each time a pin fires, it strikes the inked ribbon and presses...
User Manual
Page 181
Chapter 6 Maintenance Cleaning the Printer 6-2 Replacing the Ribbon 6-5 Transporting the Printer 6-11 Maintenance 6-1
Chapter 6 Maintenance Cleaning the Printer 6-2 Replacing the Ribbon 6-5 Transporting the Printer 6-11 Maintenance 6-1
User Manual
Page 185
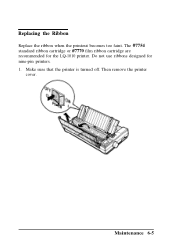
Do not use ribbons designed for the LQ-1010 printer. Make sure that the printer is turned off. Maintenance 6-5 Replacing the Ribbon Replace the ribbon when the printout becomes too faint. The #7754 standard ribbon cartridge or #7770 film ribbon cartridge are recommended for nine-pin printers. 1. Then remove the printer cover.
Do not use ribbons designed for the LQ-1010 printer. Make sure that the printer is turned off. Maintenance 6-5 Replacing the Ribbon Replace the ribbon when the printout becomes too faint. The #7754 standard ribbon cartridge or #7770 film ribbon cartridge are recommended for nine-pin printers. 1. Then remove the printer cover.
User Manual
Page 186
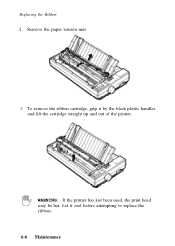
Remove the paper tension unit. 3. Let it by the black plastic handles and lift the cartridge straight up and out of the printer. To remove the ribbon cartridge, grip it cool before attempting to replace the ribbon. 6-6 Maintenance WARNING: If the printer has just been used, the print head may be hot. Replacing the Ribbon 2.
Remove the paper tension unit. 3. Let it by the black plastic handles and lift the cartridge straight up and out of the printer. To remove the ribbon cartridge, grip it cool before attempting to replace the ribbon. 6-6 Maintenance WARNING: If the printer has just been used, the print head may be hot. Replacing the Ribbon 2.
User Manual
Page 187
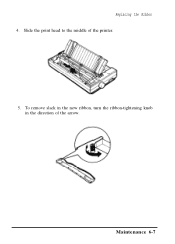
Maintenance 6-7 To remove slack in the new ribbon, turn the ribbon-tightening knob in the direction of the printer. 5. Replacing the Ribbon 4. Slide the print head to the middle of the arrow.
Maintenance 6-7 To remove slack in the new ribbon, turn the ribbon-tightening knob in the direction of the printer. 5. Replacing the Ribbon 4. Slide the print head to the middle of the arrow.
User Manual
Page 188
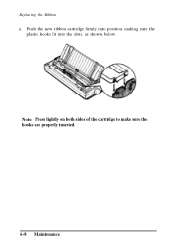
Replacing the Ribbon 6. Note: Press lightly on both sides of the cartridge to make sure the hooks are properly inserted. 6-8 Maintenance Push the new ribbon cartridge firmly into position, making sure the plastic hooks fit into the slots, as shown below.
Replacing the Ribbon 6. Note: Press lightly on both sides of the cartridge to make sure the hooks are properly inserted. 6-8 Maintenance Push the new ribbon cartridge firmly into position, making sure the plastic hooks fit into the slots, as shown below.
User Manual
Page 189
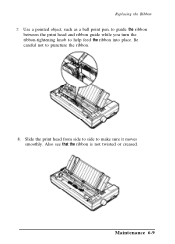
Use a pointed object, such as a ball point pen, to guide the ribbon between the print head and ribbon guide while you turn the ribbon-tightening knob to make sure it moves smoothly. Also see that the ribbon is not twisted or creased. Replacing the Ribbon 7. Slide the print head from side to side to help feed the ribbon into place. Be careful not to puncture the ribbon. 8. Maintenance 6-9
Use a pointed object, such as a ball point pen, to guide the ribbon between the print head and ribbon guide while you turn the ribbon-tightening knob to make sure it moves smoothly. Also see that the ribbon is not twisted or creased. Replacing the Ribbon 7. Slide the print head from side to side to help feed the ribbon into place. Be careful not to puncture the ribbon. 8. Maintenance 6-9
User Manual
Page 190
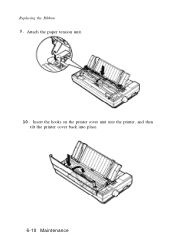
Attach the paper tension unit. 10. Replacing the Ribbon 9 . Insert the hooks on the printer cover unit into the printer, and then tilt the printer cover back into place. 6-10 Maintenance
Attach the paper tension unit. 10. Replacing the Ribbon 9 . Insert the hooks on the printer cover unit into the printer, and then tilt the printer cover back into place. 6-10 Maintenance


