Product Information Guide
Page 1
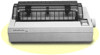
...of the tent modules that can mstall an optmnal font module. Pin Printers 12/12/88 Character fonts: ' Font E p s o n Dratt : Epson Roman Epson Sans Surf Cower ioptlonal) Prestrge (OptIonal) ScrlotODtlO".d) i OCR-8 (...7.2 t o 14.3 inches 1182 to 10.1 m&s I . II Printing Printing method: 24-pin impact dot matrix Printing speed: Y Pitch Quality : Character/second/line 10 draft i 150 10 Letter Quality...Letter Quality I To expand the range ot your pnnter's capabiiitles. L-1000/LQ-500 DOT-MATRIX PRINTER Paper guide Paper rest %3 Paper feed knob Ribbon cartridge Single - Line...
...of the tent modules that can mstall an optmnal font module. Pin Printers 12/12/88 Character fonts: ' Font E p s o n Dratt : Epson Roman Epson Sans Surf Cower ioptlonal) Prestrge (OptIonal) ScrlotODtlO".d) i OCR-8 (...7.2 t o 14.3 inches 1182 to 10.1 m&s I . II Printing Printing method: 24-pin impact dot matrix Printing speed: Y Pitch Quality : Character/second/line 10 draft i 150 10 Letter Quality...Letter Quality I To expand the range ot your pnnter's capabiiitles. L-1000/LQ-500 DOT-MATRIX PRINTER Paper guide Paper rest %3 Paper feed knob Ribbon cartridge Single - Line...

Product Information Guide
Page 2
...3.75 kV rms applied tar one onginal plus up to two copies. and the receipt ot the data on line/off lme status. Pin Printers Weight: 15 lbs. (7 kg, Electrical Voltage: 120 VAC 2 10% Power consumption: 120 Watts maximum Frequency: 49.5 to 50.5 Hz...intermIttent feeding; 2.2 inches/s wth continuous feeding. whxh would allow It t o r e s u m e prmtmg L-1000-2 12/12/88 24 - Life expectancy (in black only (#7753). L-1000/LQ-500 DOT-MATRIX PRINTER 1 Environment Temperature: Humidity: Shock: Vibration: Printable area: Smgle sheet Co"tlnuous paper Paper feed speed: Paper thickness: ...
...3.75 kV rms applied tar one onginal plus up to two copies. and the receipt ot the data on line/off lme status. Pin Printers Weight: 15 lbs. (7 kg, Electrical Voltage: 120 VAC 2 10% Power consumption: 120 Watts maximum Frequency: 49.5 to 50.5 Hz...intermIttent feeding; 2.2 inches/s wth continuous feeding. whxh would allow It t o r e s u m e prmtmg L-1000-2 12/12/88 24 - Life expectancy (in black only (#7753). L-1000/LQ-500 DOT-MATRIX PRINTER 1 Environment Temperature: Humidity: Shock: Vibration: Printable area: Smgle sheet Co"tlnuous paper Paper feed speed: Paper thickness: ...

Product Information Guide
Page 3
... ".K 4 Denmark 1 5 Sweden 6 hly 7 SpaIn I .--. 23 24 40 58 5C 50 5E M) 78 7C 70 7E l-1 1-2 l-3 0 PAPER OUT OON L I N E FORM FEED L- 1000-3 the printer waits until the print head cools and then resumes printing. this button to each font name. See the sectlon m this case. press tht3 button to... the paper. 24 - This button controls the pnnters on selecting a tent with SelecType LVhen the prmter IS off Ime. L-1000/LQ-500 DOT-MATRIX PRINTER Pitch selection Font selection w ~Descrlptlon 1'. In this chapter on lxx ott lme status. ION iOFF Page / ON LINE: ...
... ".K 4 Denmark 1 5 Sweden 6 hly 7 SpaIn I .--. 23 24 40 58 5C 50 5E M) 78 7C 70 7E l-1 1-2 l-3 0 PAPER OUT OON L I N E FORM FEED L- 1000-3 the printer waits until the print head cools and then resumes printing. this button to each font name. See the sectlon m this case. press tht3 button to... the paper. 24 - This button controls the pnnters on selecting a tent with SelecType LVhen the prmter IS off Ime. L-1000/LQ-500 DOT-MATRIX PRINTER Pitch selection Font selection w ~Descrlptlon 1'. In this chapter on lxx ott lme status. ION iOFF Page / ON LINE: ...

Product Information Guide
Page 4
... Character Style 9-30 116 74 Select Character Table 9-32 119 77 Turn D o u b l e - i .r Epson Extended Graphics Character Tables iCODE / 0 1 2 34 5 678 9 ABCDEF 0 2 3 4 5 6 7 8 9 A I3 C 0 E F L-1000-4 12/12/88 24 - h i g h M o d e O n ,Off 9 - 2 7 120 ...n c e l S u p e r s c r i p t / S u b s c r i p t 9-29 85 55 Turn Unidirectional Mode O n / O f f 9 - 1 1 87 57 Turn D o u b l e - L-1000/LQ-500 DOT-MATRIX PRINTER Commands in Inches. ...... ESC $$ ESC A ESC B ESC C ESC C 0 ESC D ESC E ESC F ESC G ESC H ESC I ESC K ESC L ESC XI ESC N ESC 0 ESC : ESC Q ESC...
... Character Style 9-30 116 74 Select Character Table 9-32 119 77 Turn D o u b l e - i .r Epson Extended Graphics Character Tables iCODE / 0 1 2 34 5 678 9 ABCDEF 0 2 3 4 5 6 7 8 9 A I3 C 0 E F L-1000-4 12/12/88 24 - h i g h M o d e O n ,Off 9 - 2 7 120 ...n c e l S u p e r s c r i p t / S u b s c r i p t 9-29 85 55 Turn Unidirectional Mode O n / O f f 9 - 1 1 87 57 Turn D o u b l e - L-1000/LQ-500 DOT-MATRIX PRINTER Commands in Inches. ...... ESC $$ ESC A ESC B ESC C ESC C 0 ESC D ESC E ESC F ESC G ESC H ESC I ESC K ESC L ESC XI ESC N ESC 0 ESC : ESC Q ESC...

Product Information Guide
Page 5
... -sheet paper. Sheet Feeder/ Single - Cut - This is not listed in your program, look in the printer User's Manual for each software package. L-1000/LQ-500 DOT-MATRIX PRINTER I Installation/Support Tips I Software The type of printer installed on your system must be lines from the first page printed at the top of the... second page if the page length IS not set correctly. 24 - Sheet Operation The page length will avoid unexpected results. Pin Printers 12/12/68 L-1000-5 There will be identified for the next-best model selection.
... -sheet paper. Sheet Feeder/ Single - Cut - This is not listed in your program, look in the printer User's Manual for each software package. L-1000/LQ-500 DOT-MATRIX PRINTER I Installation/Support Tips I Software The type of printer installed on your system must be lines from the first page printed at the top of the... second page if the page length IS not set correctly. 24 - Sheet Operation The page length will avoid unexpected results. Pin Printers 12/12/68 L-1000-5 There will be identified for the next-best model selection.
User Manual
Page 4
... 1 About This Guide 2 Chapter 1 Setting Up the Printer 1-1 Unpacking the Printer 1-2 Choosing a Place for the Printer 1-5 Assembling the Printer 1-7 Testing the Printer 1-13 Connecting the Printer to Your Computer 1-19 Printer Selection Menus 1-21 Chapter 2 Paper Handling 2-1 Using Single Sheets 2-2 Using Continuous Paper 2-8 Printing on Special Paper 2-20 Chapter 3 Using the Printer 3-1 Operating the Control Panel 3-2 DIP Switches...
... 1 About This Guide 2 Chapter 1 Setting Up the Printer 1-1 Unpacking the Printer 1-2 Choosing a Place for the Printer 1-5 Assembling the Printer 1-7 Testing the Printer 1-13 Connecting the Printer to Your Computer 1-19 Printer Selection Menus 1-21 Chapter 2 Paper Handling 2-1 Using Single Sheets 2-2 Using Continuous Paper 2-8 Printing on Special Paper 2-20 Chapter 3 Using the Printer 3-1 Operating the Control Panel 3-2 DIP Switches...
User Manual
Page 5
Chapter 5 Technical Specifications 5-1 Printer Specifications 5-2 Interface Specifications 5-7 Initialization 5-11 Default Settings 5-12 Chapter 6 Command Summary 6-1 Appendix A-1 The Interface Boards A-2 The Multi-Font Module A-14 Glossary Index iv Contents
Chapter 5 Technical Specifications 5-1 Printer Specifications 5-2 Interface Specifications 5-7 Initialization 5-11 Default Settings 5-12 Chapter 6 Command Summary 6-1 Appendix A-1 The Interface Boards A-2 The Multi-Font Module A-14 Glossary Index iv Contents
User Manual
Page 6
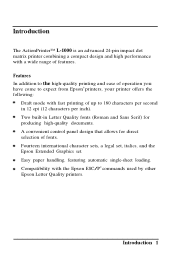
... set. Compatibility with a wide range of features. Introduction The ActionPrinter™ L-1000 is an advanced 24-pin impact dot matrix printer combining a compact design and high performance with the Epson ESC/P® commands used by other Epson Letter Quality printers. Two built-in 12 cpi (12 characters per inch). A... second in Letter Quality fonts (Roman and Sans Serif) for direct selection of up to expect from Epson® printers, your printer offers the following: Draft mode with fast printing of fonts. Easy paper handling, featuring automatic single-sheet loading.
... set. Compatibility with a wide range of features. Introduction The ActionPrinter™ L-1000 is an advanced 24-pin impact dot matrix printer combining a compact design and high performance with the Epson ESC/P® commands used by other Epson Letter Quality printers. Two built-in 12 cpi (12 characters per inch). A... second in Letter Quality fonts (Roman and Sans Serif) for direct selection of up to expect from Epson® printers, your printer offers the following: Draft mode with fast printing of fonts. Easy paper handling, featuring automatic single-sheet loading.

User Manual
Page 7
...read and follow the instructions in this manual is also a glossary of your printer. 2 About This Guide Chapters 2 and 3 include important information on general maintenance, specifications, and printer commands. About This Guide This user's guide provides fully illustrated, step-by-step... the day-to-day operation of your printer. This information is necessary for setting up , testing, and connecting the printer. Conventions used in this chapter first. Other chapters contain information on paper handling and general printer operation. Notes: contain important information and...
...read and follow the instructions in this manual is also a glossary of your printer. 2 About This Guide Chapters 2 and 3 include important information on general maintenance, specifications, and printer commands. About This Guide This user's guide provides fully illustrated, step-by-step... the day-to-day operation of your printer. This information is necessary for setting up , testing, and connecting the printer. Conventions used in this chapter first. Other chapters contain information on paper handling and general printer operation. Notes: contain important information and...
User Manual
Page 8
Chapter 1 Setting Up the Printer Unpacking the Printer 1-2 Removing the pull tractor 1-3 Choosing a Place for the Printer 1-5 Assembling the Printer 1-7 Installing the paper feed knob 1-7 Installing the ribbon cartridge 1-8 Attaching the paper guide 1-11 Testing the Printer 1-13 Plugging in the printer 1-13 Loading a sheet of paper 1-14 Running the self test 1-16 Connecting the Printer to Your Computer 1-19 The parallel interface 1-19 Printer Selection Menus 1-21 Choosing from a menu 1-21 Setting Up the Printer 1-1
Chapter 1 Setting Up the Printer Unpacking the Printer 1-2 Removing the pull tractor 1-3 Choosing a Place for the Printer 1-5 Assembling the Printer 1-7 Installing the paper feed knob 1-7 Installing the ribbon cartridge 1-8 Attaching the paper guide 1-11 Testing the Printer 1-13 Plugging in the printer 1-13 Loading a sheet of paper 1-14 Running the self test 1-16 Connecting the Printer to Your Computer 1-19 The parallel interface 1-19 Printer Selection Menus 1-21 Choosing from a menu 1-21 Setting Up the Printer 1-1
User Manual
Page 9
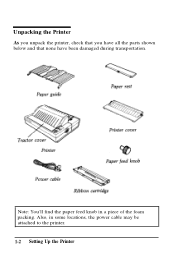
Note: You'll find the paper feed knob in some locations, the power cable may be attached to the printer. 1-2 Setting Up the Printer Unpacking the Printer As you unpack the printer, check that you have all the parts shown below and that none have been damaged during transportation. Also, in a piece of the foam packing.
Note: You'll find the paper feed knob in some locations, the power cable may be attached to the printer. 1-2 Setting Up the Printer Unpacking the Printer As you unpack the printer, check that you have all the parts shown below and that none have been damaged during transportation. Also, in a piece of the foam packing.

User Manual
Page 10
...need to transport your dealer. The power supply type is not possible to perform the printer's self test later. Raise the tractor cover to remove the pull tractor: 1. Setting Up the Printer 1-3 Removing the pull tractor By removing the pull tractor now, you ever need ...voltage for different electrical standards. CAUTION: There are several different versions of the printer designed for your country, contact your printer. It is shown on the label on another voltage. Unpacking the Printer After removing the parts, store the packaging materials in case you will be ...
...need to transport your dealer. The power supply type is not possible to perform the printer's self test later. Raise the tractor cover to remove the pull tractor: 1. Setting Up the Printer 1-3 Removing the pull tractor By removing the pull tractor now, you ever need ...voltage for different electrical standards. CAUTION: There are several different versions of the printer designed for your country, contact your printer. It is shown on the label on another voltage. Unpacking the Printer After removing the parts, store the packaging materials in case you will be ...
User Manual
Page 11
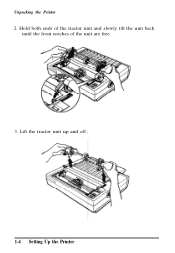
Lift the tractor unit up and off.; 1-4 Setting Up the Printer Unpacking the Printer 2. Hold both ends of the tractor unit and slowly tilt the unit back until the front notches of the unit are free. 3.
Lift the tractor unit up and off.; 1-4 Setting Up the Printer Unpacking the Printer 2. Hold both ends of the tractor unit and slowly tilt the unit back until the front notches of the unit are free. 3.
User Manual
Page 12
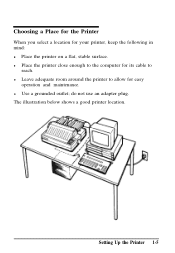
do not use an adapter plug. The illustration below shows a good printer location. l Use a grounded outlet; Setting Up the Printer 1-5 l Leave adequate room around the printer to allow for its cable to the computer for easy operation and maintenance. l Place the printer close enough to reach. Choosing a Place for the Printer When you select a location for your printer, keep the following in mind: l Place the printer on a flat, stable surface.
do not use an adapter plug. The illustration below shows a good printer location. l Use a grounded outlet; Setting Up the Printer 1-5 l Leave adequate room around the printer to allow for its cable to the computer for easy operation and maintenance. l Place the printer close enough to reach. Choosing a Place for the Printer When you select a location for your printer, keep the following in mind: l Place the printer on a flat, stable surface.
User Manual
Page 13
... subject to direct sunlight, excessive heat, moisture, or dust. l Avoid using outlets on the stand supports. l If the paper supply is below the printer stand, make sure it meets the following requirements: l The stand must support at least 30 lb or 14 kg (twice the weight of the... are controlled by wall switches or automatic timers. l Keep the entire computer system away from horizontal. Choosing a Place for the Printer Note: If you plan to use a printer stand, make sure that the paper cannot catch on the underside of the stand or on the same circuit with paper feeding.
... subject to direct sunlight, excessive heat, moisture, or dust. l Avoid using outlets on the stand supports. l If the paper supply is below the printer stand, make sure it meets the following requirements: l The stand must support at least 30 lb or 14 kg (twice the weight of the... are controlled by wall switches or automatic timers. l Keep the entire computer system away from horizontal. Choosing a Place for the Printer Note: If you plan to use a printer stand, make sure that the paper cannot catch on the underside of the stand or on the same circuit with paper feeding.
User Manual
Page 14
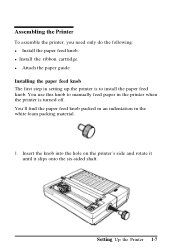
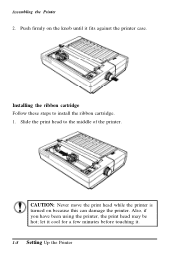
... need only do the following: l Install the paper feed knob. Insert the knob into the hole on the printer's side and rotate it until it slips onto the six-sided shaft. You use this knob to install the paper feed knob. You'll find ...the paper feed knob packed in an indentation in the printer when the printer is turned off. Installing the paper feed knob The first step in setting up the...
... need only do the following: l Install the paper feed knob. Insert the knob into the hole on the printer's side and rotate it until it slips onto the six-sided shaft. You use this knob to install the paper feed knob. You'll find ...the paper feed knob packed in an indentation in the printer when the printer is turned off. Installing the paper feed knob The first step in setting up the...
User Manual
Page 15
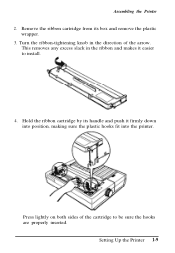
Push firmly on because this can damage the printer. Installing the ribbon cartridge Follow these steps to the middle of the printer. let it cool for a few minutes before touching it fits against the printer case. Assembling the Printer 2. CAUTION: Never move the print head while the printer is turned on the knob until it . 1-8 Setting Up the Printer Also, if you have been using the printer, the print head may be hot; Slide the print head to install the ribbon cartridge. 1.
Push firmly on because this can damage the printer. Installing the ribbon cartridge Follow these steps to the middle of the printer. let it cool for a few minutes before touching it fits against the printer case. Assembling the Printer 2. CAUTION: Never move the print head while the printer is turned on the knob until it . 1-8 Setting Up the Printer Also, if you have been using the printer, the print head may be hot; Slide the print head to install the ribbon cartridge. 1.
User Manual
Page 16
Hold the ribbon cartridge by its box and remove the plastic wrapper. 3. Press lightly on both sides of the arrow. Remove the ribbon cartridge from its handle and push it easier to be sure the hooks are properly inserted. Assembling the Printer 2. Turn the ribbon-tightening knob in the ribbon and makes it firmly down into position, making sure the plastic hooks fit into the printer. This removes any excess slack in the direction of the cartridge to install. 4. Setting Up the Printer 1-9
Hold the ribbon cartridge by its box and remove the plastic wrapper. 3. Press lightly on both sides of the arrow. Remove the ribbon cartridge from its handle and push it easier to be sure the hooks are properly inserted. Assembling the Printer 2. Turn the ribbon-tightening knob in the ribbon and makes it firmly down into position, making sure the plastic hooks fit into the printer. This removes any excess slack in the direction of the cartridge to install. 4. Setting Up the Printer 1-9
User Manual
Page 17
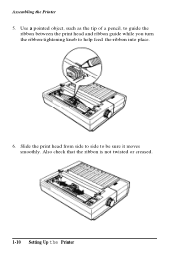
Assembling the Printer 5. Slide the print head from side to side to help feed the-ribbon into place. 6. Use a pointed object, such as the tip of a pencil, to guide the ribbon between the print head and ribbon guide while you turn the ribbon-tightening knob to be sure it moves smoothly. Also check that the ribbon is not twisted or creased. 1-10 Setting Up the Printer
Assembling the Printer 5. Slide the print head from side to side to help feed the-ribbon into place. 6. Use a pointed object, such as the tip of a pencil, to guide the ribbon between the print head and ribbon guide while you turn the ribbon-tightening knob to be sure it moves smoothly. Also check that the ribbon is not twisted or creased. 1-10 Setting Up the Printer

User Manual
Page 18
Setting Up the Printer 1-11 Follow these steps to feed the paper smoothly and efficiently. Place the paper guide on the printer. 2. Assembling the Printer Attaching the paper guide The paper guide functions to install the paper guide: 1. Raise the paper guide until it locks into place.
Setting Up the Printer 1-11 Follow these steps to feed the paper smoothly and efficiently. Place the paper guide on the printer. 2. Assembling the Printer Attaching the paper guide The paper guide functions to install the paper guide: 1. Raise the paper guide until it locks into place.


