
Product Information Guide
Page 1
... a new dot matrix printer product section to be added to the EPSON Product Information Guide. The table of contents of this section is listed below. EPSON FX-890/FX-2190 TABLE OF CONTENTS User Replaceable Parts EPSON FX-890/FX-2190 - 1 Options ...EPSON FX-890/FX-2190 - 1 Printer Specifications EPSON FX-890/FX-2190 - 2 Control Panel Buttons and Lights EPSON FX-890/FX-2190 - 7 Error Indicators EPSON FX-890/FX-2190 - 8 Selecting a Font and Pitch EPSON FX-890/FX-2190 - 8 Selecting a Paper Source EPSON FX-890/FX-2190...
... a new dot matrix printer product section to be added to the EPSON Product Information Guide. The table of contents of this section is listed below. EPSON FX-890/FX-2190 TABLE OF CONTENTS User Replaceable Parts EPSON FX-890/FX-2190 - 1 Options ...EPSON FX-890/FX-2190 - 1 Printer Specifications EPSON FX-890/FX-2190 - 2 Control Panel Buttons and Lights EPSON FX-890/FX-2190 - 7 Error Indicators EPSON FX-890/FX-2190 - 8 Selecting a Font and Pitch EPSON FX-890/FX-2190 - 8 Selecting a Paper Source EPSON FX-890/FX-2190...
Product Information Guide
Page 2
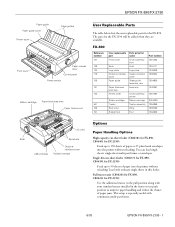
... the pull position along with continuous multi-part forms. 6/03 EPSON FX-890/FX-2190 - 1 FX-890 Reference number 107 108 120 115 106 121 104 541 105 101 User replaceable part Front cover Knob Logo plate Optional interface cover Paper guide Paper thickness lever cap Printer cover Ribbon cartridge Tractor Rear wing Rubber foot Parts price list...
... the pull position along with continuous multi-part forms. 6/03 EPSON FX-890/FX-2190 - 1 FX-890 Reference number 107 108 120 115 106 121 104 541 105 101 User replaceable part Front cover Knob Logo plate Optional interface cover Paper guide Paper thickness lever cap Printer cover Ribbon cartridge Tractor Rear wing Rubber foot Parts price list...
User Manual
Page 10
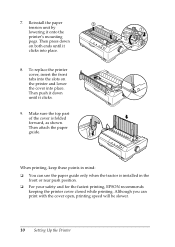
... keep these points in the front or rear push position. ❏ For your safety and for the fastest printing, EPSON recommends keeping the printer cover closed while printing. To replace the printer cover, insert the front tabs into place. Then attach the paper guide. Make sure the top part of the cover... is installed in mind: ❏ You can print with the cover open, printing speed will be slower. 10 Setting Up the Printer Then push it...
... keep these points in the front or rear push position. ❏ For your safety and for the fastest printing, EPSON recommends keeping the printer cover closed while printing. To replace the printer cover, insert the front tabs into place. Then attach the paper guide. Make sure the top part of the cover... is installed in mind: ❏ You can print with the cover open, printing speed will be slower. 10 Setting Up the Printer Then push it...
User Manual
Page 47
...the FCC for this equipment. The exchanged product or part may expire before the expiration of the limited warranty for the EPSON product. Exchange or replacement products or parts assume the remaining warranty period of the product covered by the manufacturer could void the user's authority ..., do not leave cables connected to unused interfaces. For warranty service, you must provide proof of the date of a part, the item replaced becomes EPSON property. Product Information 47 WARNING The connection of a non-shielded equipment interface cable to this equipment will , at (562) 276-4322 or...
...the FCC for this equipment. The exchanged product or part may expire before the expiration of the limited warranty for the EPSON product. Exchange or replacement products or parts assume the remaining warranty period of the product covered by the manufacturer could void the user's authority ..., do not leave cables connected to unused interfaces. For warranty service, you must provide proof of the date of a part, the item replaced becomes EPSON property. Product Information 47 WARNING The connection of a non-shielded equipment interface cable to this equipment will , at (562) 276-4322 or...

Product Brochure
Page 1
...Epson FX-880/880+/980 or Okidata® Microline® 320/320 Turbo. And, it includes Epson Remote Configuration Manager™ software for easy printer setup and simple setting selections via most Windows® operating systems. Ideal for rugged environments, this versatile product is the perfect drop-in replacement... interface cards Easy-to Epson's superior technical support IMPACT PRINTER FX-890 Epson FX-890 And, as part of 20,000 POH and a 400 million character print head life User-friendly setup and operation s Facilitates easy printer configuration using a newly designed...
...Epson FX-880/880+/980 or Okidata® Microline® 320/320 Turbo. And, it includes Epson Remote Configuration Manager™ software for easy printer setup and simple setting selections via most Windows® operating systems. Ideal for rugged environments, this versatile product is the perfect drop-in replacement... interface cards Easy-to Epson's superior technical support IMPACT PRINTER FX-890 Epson FX-890 And, as part of 20,000 POH and a 400 million character print head life User-friendly setup and operation s Facilitates easy printer configuration using a newly designed...

Service Manual
Page 3
..., WHEN ACCESSING INTERNAL COMPONENTS. 5. INTRODUCTION OF SECOND-SOURCE ICs OR OTHER NONAPPROVED COMPONENTS MAY DAMAGE THE PRODUCT AND VOID ANY APPLICABLE EPSON WARRANTY. Great caution should always be exercised in damage to equipment. NO WORK SHOULD BE PERFORMED ON THE UNIT BY PERSONS UNFAMILIAR ... FROM AVAILABLE POWER SOURCE, DO NOT CONNECT IT TO THE POWER SOURCE. 3. ALWAYS VERIFY THAT THE EPSON PRODUCT HAS BEEN DISCONNECTED FROM THE POWER SOURCE BEFORE REMOVING OR REPLACING PRINTED CIRCUIT BOARDS AND/OR INDIVIDUAL CHIPS. 4. WHEN THE POWER SUPPLY CABLE MUST BE CONNECTED, USE ...
..., WHEN ACCESSING INTERNAL COMPONENTS. 5. INTRODUCTION OF SECOND-SOURCE ICs OR OTHER NONAPPROVED COMPONENTS MAY DAMAGE THE PRODUCT AND VOID ANY APPLICABLE EPSON WARRANTY. Great caution should always be exercised in damage to equipment. NO WORK SHOULD BE PERFORMED ON THE UNIT BY PERSONS UNFAMILIAR ... FROM AVAILABLE POWER SOURCE, DO NOT CONNECT IT TO THE POWER SOURCE. 3. ALWAYS VERIFY THAT THE EPSON PRODUCT HAS BEEN DISCONNECTED FROM THE POWER SOURCE BEFORE REMOVING OR REPLACING PRINTED CIRCUIT BOARDS AND/OR INDIVIDUAL CHIPS. 4. WHEN THE POWER SUPPLY CABLE MUST BE CONNECTED, USE ...

Service Manual
Page 35
... the resistances NO normal? START FX-1180/FX-880 Service Manual Chapter 3 Troubleshooting Is AC input NO voltage normal? 120V version: 85 - 138V 230V version: 187 - 276V Universal Version: 85 - 276V YES Use the correct AC input voltage. YES Replace the C229MAIN. Replace the applied unit. Figure 3-4. YES.... NO Measure the +35V line at pin 3 or 4 of CN2 on again? Printer fails to Table 3-1 and Table 3-2. NO Is the new fuse also blown when power is permitted. YES Replace the C229 PSB/PSE/PSH. Flowchart (1) Rev. No fluctuation from AC voltage range is...
... the resistances NO normal? START FX-1180/FX-880 Service Manual Chapter 3 Troubleshooting Is AC input NO voltage normal? 120V version: 85 - 138V 230V version: 187 - 276V Universal Version: 85 - 276V YES Use the correct AC input voltage. YES Replace the C229MAIN. Replace the applied unit. Figure 3-4. YES.... NO Measure the +35V line at pin 3 or 4 of CN2 on again? Printer fails to Table 3-1 and Table 3-2. NO Is the new fuse also blown when power is permitted. YES Replace the C229 PSB/PSE/PSH. Flowchart (1) Rev. No fluctuation from AC voltage range is...
Service Manual
Page 36
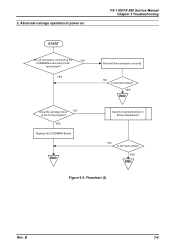
YES Replace the C229MAIN Board. YES END Figure 3-5. B 3-6 END Reinsert the connectors correctly. YES END See the troubleshooting for Printer Mechanism. NO Is the fault solved? YES Dose the carriage move NO to the home position? Flowchart (2) Rev. Abnormal carriage operation at power on. FX-1180/FX-880 Service Manual Chapter 3 Troubleshooting START Are all connectors connecting the NO C229MAIN board and printer mechanism? 2. NO Is the fault solved?
YES Replace the C229MAIN Board. YES END Figure 3-5. B 3-6 END Reinsert the connectors correctly. YES END See the troubleshooting for Printer Mechanism. NO Is the fault solved? YES Dose the carriage move NO to the home position? Flowchart (2) Rev. Abnormal carriage operation at power on. FX-1180/FX-880 Service Manual Chapter 3 Troubleshooting START Are all connectors connecting the NO C229MAIN board and printer mechanism? 2. NO Is the fault solved?

Service Manual
Page 37
... 120V version: 85 - 138V 230V version: 187 - 276V Universal Version: 85 - 276V YES Use the correct AC input voltage. Replace the fuse. NO Is output voltage normal? Is output voltage NO normal? Printing is faulty during self-test, but carriage operation is ... new fuse also blown when power is turned on YES C229PSB/PSE/PSH blown? Figure 3-6. B 3-7 YES Replace the C229MAIN. FX-1180/FX-880 Service Manual Chapter 3 Troubleshooting 3. YES Replace the C229 PSB/PSE/PSH. YES Verify each motor and printhead solenoid resistance,referring to Table 3-1 and Table...
... 120V version: 85 - 138V 230V version: 187 - 276V Universal Version: 85 - 276V YES Use the correct AC input voltage. Replace the fuse. NO Is output voltage normal? Is output voltage NO normal? Printing is faulty during self-test, but carriage operation is ... new fuse also blown when power is turned on YES C229PSB/PSE/PSH blown? Figure 3-6. B 3-7 YES Replace the C229MAIN. FX-1180/FX-880 Service Manual Chapter 3 Troubleshooting 3. YES Replace the C229 PSB/PSE/PSH. YES Verify each motor and printhead solenoid resistance,referring to Table 3-1 and Table...

Service Manual
Page 38
... to the troubleshooting of Printer Mechanism. YES Load the paper correctly. Flowchart (4) Rev. Abnormal paper feeding FX-1180/FX-880 Service Manual Chapter 3 Troubleshooting START Is the paper loaded NO correctly? YES END Dose the platen knob rotate NO smoothly when it is turned manually at power off? YES Replace the C229MAIN board. YES...
... to the troubleshooting of Printer Mechanism. YES Load the paper correctly. Flowchart (4) Rev. Abnormal paper feeding FX-1180/FX-880 Service Manual Chapter 3 Troubleshooting START Is the paper loaded NO correctly? YES END Dose the platen knob rotate NO smoothly when it is turned manually at power off? YES Replace the C229MAIN board. YES...

Service Manual
Page 39
YES NO Verify that the harness for the operation panel is connected, replace the harness. YES Replace the C229MAIN board. B 3-9 Abnormal control panel operation START FX-1180/FX-880 Service Manual Chapter 3 Troubleshooting Do the switches have continuity. Flowchart (5) Rev. END Is the fault solved? END END Figure 3-8. 5. Is the fault NO solved? If it is properly inserted and have clicks? YES NO Replace the Operation Panel.
YES NO Verify that the harness for the operation panel is connected, replace the harness. YES Replace the C229MAIN board. B 3-9 Abnormal control panel operation START FX-1180/FX-880 Service Manual Chapter 3 Troubleshooting Do the switches have continuity. Flowchart (5) Rev. END Is the fault solved? END END Figure 3-8. 5. Is the fault NO solved? If it is properly inserted and have clicks? YES NO Replace the Operation Panel.

Service Manual
Page 40
Flowchart (6) Rev. NO Replace the interface cable. NO Is the fault solved? NO Is the fault solved? NO Dose the self test print normally? YES Verify the default setting. ... gap. (Refer to a position with a higher number. YES END NO Is the fault solved? FX-1180/FX-880 Service Manual Chapter 3 Troubleshooting 6. Data sent by the host computer is printed incorrectly. START Execute the printer self test. Refer to the other troubleshooting items. Is the interface cable connected correctly? YES Replace the C229MAIN board.
Flowchart (6) Rev. NO Replace the interface cable. NO Is the fault solved? NO Is the fault solved? NO Dose the self test print normally? YES Verify the default setting. ... gap. (Refer to a position with a higher number. YES END NO Is the fault solved? FX-1180/FX-880 Service Manual Chapter 3 Troubleshooting 6. Data sent by the host computer is printed incorrectly. START Execute the printer self test. Refer to the other troubleshooting items. Is the interface cable connected correctly? YES Replace the C229MAIN board.

Service Manual
Page 41
Repair of the C229PSB/PSE/PSH Symptom The printer dose not operate at the collector of transformer using (T1) is defective. Cause Fuse F1 is defective. a multimeter. Figure 3-10. Replace the C229PSB/ PSE/PSH board. The table provides various symptoms, likely cases, and checkpoints.... Checkpoint Check that the fuse is defective. Collector of Q1. Table 3-7. Drain of each component. Replace the C229PSB/ PSE/PSH board. B Figure 3-11. FX-1180/FX-880 Service Manual Chapter 3 Troubleshooting 3.3 UNIT REPAIRING OF THE POWER SUPPLY BOARD This section is necessary ...
Repair of the C229PSB/PSE/PSH Symptom The printer dose not operate at the collector of transformer using (T1) is defective. Cause Fuse F1 is defective. a multimeter. Figure 3-10. Replace the C229PSB/ PSE/PSH board. The table provides various symptoms, likely cases, and checkpoints.... Checkpoint Check that the fuse is defective. Collector of Q1. Table 3-7. Drain of each component. Replace the C229PSB/ PSE/PSH board. B Figure 3-11. FX-1180/FX-880 Service Manual Chapter 3 Troubleshooting 3.3 UNIT REPAIRING OF THE POWER SUPPLY BOARD This section is necessary ...

Service Manual
Page 42
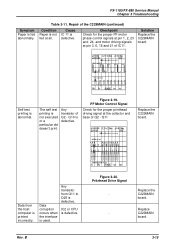
Checkpoint Check for the proper waveform at pin 9 or 10 of IC51. Replace the C229PSB/ PSE/PSH board. OSC of IC51 Check for the proper waveform at all. Output of IC51 3-12 Figure 3-12. Waveform of PC1 Regulator ... C229PSB/ PSE/PSH board. +5V line is defective. Repair of the C229PSB/PSE/PSH (continued) Condition +35V line is defective. B Figure 3-13. Replace the C229PSB/ PSE/PSH board. FX-1180/FX-880 Service Manual Chapter 3 Troubleshooting Symptom The printer dose not operate at (IC51) is pin 5 of IC51. Cause PC1 is defective. Figure 3-14.
Checkpoint Check for the proper waveform at pin 9 or 10 of IC51. Replace the C229PSB/ PSE/PSH board. OSC of IC51 Check for the proper waveform at all. Output of IC51 3-12 Figure 3-12. Waveform of PC1 Regulator ... C229PSB/ PSE/PSH board. +5V line is defective. Repair of the C229PSB/PSE/PSH (continued) Condition +35V line is defective. B Figure 3-13. Replace the C229PSB/ PSE/PSH board. FX-1180/FX-880 Service Manual Chapter 3 Troubleshooting Symptom The printer dose not operate at (IC51) is pin 5 of IC51. Cause PC1 is defective. Figure 3-14.

Service Manual
Page 43
... Figure 3-15. Chip Select Signal for servicers who perform only board replacement can ignore this section. Repair of the C229MAIN Symptom The printer dose not operate at pin 22 Replace the control ROM of IC7 or pin 30 of each component. FX-1180/FX-880 Service Manual Chapter 3 Troubleshooting 3.4 UNIT REPAIRING OF THE MAIN BOARD...
... Figure 3-15. Chip Select Signal for servicers who perform only board replacement can ignore this section. Repair of the C229MAIN Symptom The printer dose not operate at pin 22 Replace the control ROM of IC7 or pin 30 of each component. FX-1180/FX-880 Service Manual Chapter 3 Troubleshooting 3.4 UNIT REPAIRING OF THE MAIN BOARD...

Service Manual
Page 44
The carriage operates abnormally. Solution Replace the C229MAIN board. Replace the C229MAIN board. B 3-14 Clock Signal of CPU Check for the proper oscillator signal at pin 26 or 27 of IC8. CR Motor Control Signal ... of IC8 Figure 3-18. IC8 is defective. Pin 5 of IC8 Pin 1, of the C229MAIN (continued) Condition The CPU dose not operate. FX-1180/FX-880 Service Manual Chapter 3 Troubleshooting Symptom The printer dose not operate at all . Cause The CPU is defective. Checkpoint Check for the proper CR motor phase control signals at...
The carriage operates abnormally. Solution Replace the C229MAIN board. Replace the C229MAIN board. B 3-14 Clock Signal of CPU Check for the proper oscillator signal at pin 26 or 27 of IC8. CR Motor Control Signal ... of IC8 Figure 3-18. IC8 is defective. Pin 5 of IC8 Pin 1, of the C229MAIN (continued) Condition The CPU dose not operate. FX-1180/FX-880 Service Manual Chapter 3 Troubleshooting Symptom The printer dose not operate at all . Cause The CPU is defective. Checkpoint Check for the proper CR motor phase control signals at...
Service Manual
Page 45
FX-1180/FX-880 Service Manual Chapter 3 Troubleshooting Symptom Paper is defective. defective. Solution Replace the C229MAIN board. BASE of Q2 - Any transistor from the host computer is printed incorrectly. Any transistor of Q5 ...defective. Data corruption occurs when the interface is not executed or a particular dot doesn't print. CORRECTOR of Q2 - Table 3-11. Repair of IC11. Q10 is abnormal. Replace the C229MAIN board. Rev. Q11 Replace the C229MAIN board. Replace C229MAIN board. Figure 3-19. Checkpoint Check for the proper printhead driving signal...
FX-1180/FX-880 Service Manual Chapter 3 Troubleshooting Symptom Paper is defective. defective. Solution Replace the C229MAIN board. BASE of Q2 - Any transistor from the host computer is printed incorrectly. Any transistor of Q5 ...defective. Data corruption occurs when the interface is not executed or a particular dot doesn't print. CORRECTOR of Q2 - Table 3-11. Repair of IC11. Q10 is abnormal. Replace the C229MAIN board. Rev. Q11 Replace the C229MAIN board. Replace C229MAIN board. Figure 3-19. Checkpoint Check for the proper printhead driving signal...

Service Manual
Page 46
... driver IC8 on the main board. not move it manually. w Problem: Self test printing is shorted, necessary). detector. FX-1180/FX-880 Service Manual Chapter 3 Troubleshooting 3.5 REPAIRING THE PRINTER MECHANISM For detailed procedures for replacing or adjusting matter, refer to the the carriage. resistance. defective. carriage. using a multi meter. common wires are broken or...
... driver IC8 on the main board. not move it manually. w Problem: Self test printing is shorted, necessary). detector. FX-1180/FX-880 Service Manual Chapter 3 Troubleshooting 3.5 REPAIRING THE PRINTER MECHANISM For detailed procedures for replacing or adjusting matter, refer to the the carriage. resistance. defective. carriage. using a multi meter. common wires are broken or...
Service Manual
Page 47
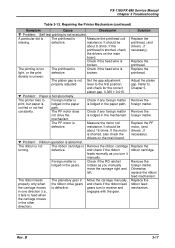
...the is lodged in the mechanism. Replace the printhead. Replace the ribbon cartridge. Otherwise, replace the ribbon feed mechanism. B 3-17 FX-1180/FX-880 Service Manual Chapter 3 Troubleshooting... operation is Measure the printhead coil missing. Remove the foreign matter. A particular dot is The printhead is abnormal. w Problem: Paper is Remove the ribbon cartridge turning... the Printer Mechanism (continued) Symptom Cause Checkpoint w Problem: Self test printing is uneven. density is not executed. Replace the printhead. Adjust the platen gap. Solution Replace the ...
...the is lodged in the mechanism. Replace the printhead. Replace the ribbon cartridge. Otherwise, replace the ribbon feed mechanism. B 3-17 FX-1180/FX-880 Service Manual Chapter 3 Troubleshooting... operation is Measure the printhead coil missing. Remove the foreign matter. A particular dot is The printhead is abnormal. w Problem: Paper is Remove the ribbon cartridge turning... the Printer Mechanism (continued) Symptom Cause Checkpoint w Problem: Self test printing is uneven. density is not executed. Replace the printhead. Adjust the platen gap. Solution Replace the ...

Service Manual
Page 48
... is Check if the ribbon Reinstall the ribbon printed areas. is loaded. end of the page. correct position. w Problem: The printer continues to print after paper ends or when no paper is bad. Rev. Refer to the first position, gap. detector. positioned ... 5 gap. FX-1180/FX-880 Service Manual Chapter 3 Troubleshooting Table 3-14. Repairing the Printer Mechanism (continued) Symptom Cause Checkpoint Solution w Problem: Paper is installed in the mask. gap is Check if the PE detector Replace the PE printing beyond the defective. The printer keeps The PE...
... is Check if the ribbon Reinstall the ribbon printed areas. is loaded. end of the page. correct position. w Problem: The printer continues to print after paper ends or when no paper is bad. Rev. Refer to the first position, gap. detector. positioned ... 5 gap. FX-1180/FX-880 Service Manual Chapter 3 Troubleshooting Table 3-14. Repairing the Printer Mechanism (continued) Symptom Cause Checkpoint Solution w Problem: Paper is installed in the mask. gap is Check if the PE detector Replace the PE printing beyond the defective. The printer keeps The PE...


