
Product Information Guide
Page 1
... in Your Printout EPSON FX-890/FX-2190 - 16 Printing a Self Test EPSON FX-890/FX-2190 - 17 Printing a Hex Dump EPSON FX-890/FX-2190 - 17 Resetting the Printer EPSON FX-890/FX-2190 - 17 Cleaning the Printer EPSON FX-890/FX-2190 - 18 Transporting the Printer EPSON FX-890/FX-2190 - 18 Related Documentation EPSON FX-890/FX-2190 - 18 6/03 The table of contents of this section is listed below. P R O D U C T I N F O R M A T I O N G U I D E EPSON UPDATE 6/11/03 This package provides a new dot matrix printer product section...
... in Your Printout EPSON FX-890/FX-2190 - 16 Printing a Self Test EPSON FX-890/FX-2190 - 17 Printing a Hex Dump EPSON FX-890/FX-2190 - 17 Resetting the Printer EPSON FX-890/FX-2190 - 17 Cleaning the Printer EPSON FX-890/FX-2190 - 18 Transporting the Printer EPSON FX-890/FX-2190 - 18 Related Documentation EPSON FX-890/FX-2190 - 18 6/03 The table of contents of this section is listed below. P R O D U C T I N F O R M A T I O N G U I D E EPSON UPDATE 6/11/03 This package provides a new dot matrix printer product section...
Product Information Guide
Page 2
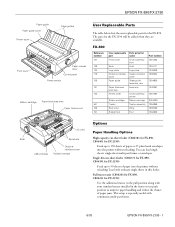
... (C806381 for FX-890, C806401 for FX-2190) Feeds up to 150 sheets of paper into the printer without reloading. EPSON FX-890/FX-2190 Paper guide Paper guide cover Printer cover Edge guides Front cover Paper release lever Control panel Power switch Ribbon cartridge Paper thickness lever Paper tension unit User Replaceable Parts The table below lists the user...
... (C806381 for FX-890, C806401 for FX-2190) Feeds up to 150 sheets of paper into the printer without reloading. EPSON FX-890/FX-2190 Paper guide Paper guide cover Printer cover Edge guides Front cover Paper release lever Control panel Power switch Ribbon cartridge Paper thickness lever Paper tension unit User Replaceable Parts The table below lists the user...
Product Information Guide
Page 16
...press PRINT. Press the Font button until you selected. The printed instructions list the settings you make sure the printer is turned off wait time Bottom margin Line spacing (lines per inch) Paper out override Printer settings in Okidata mode. Feature Software emulation Auto tear off . You can... enter Okidata mode on and paper is now operating in Okidata mode. See page 14. 6/03 EPSON FX-890/FX-2190 - 15 In Okidata mode, the printer emulates Okidata functions, and the following additional settings can continue to load a new sheet of continuous paper that came ...
...press PRINT. Press the Font button until you selected. The printed instructions list the settings you make sure the printer is turned off wait time Bottom margin Line spacing (lines per inch) Paper out override Printer settings in Okidata mode. Feature Software emulation Auto tear off . You can... enter Okidata mode on and paper is now operating in Okidata mode. See page 14. 6/03 EPSON FX-890/FX-2190 - 15 In Okidata mode, the printer emulates Okidata functions, and the following additional settings can continue to load a new sheet of continuous paper that came ...
Product Information Guide
Page 19
... 4041363-00/ CPD-15991R1 EPSON FX-890/2190 User's Guide 3020817-00/ CPD-16124 CD-ROM containing online Reference Guide PLFX890 EPSON FX-890 Parts Price List PLFX2190 EPSON FX-2190 Parts Price List Transporting the Printer If you need to move the print head by hand to prevent water from the outer case and paper guide. 5. EPSON FX-890/FX-2190 6/03 Also make...
... 4041363-00/ CPD-15991R1 EPSON FX-890/2190 User's Guide 3020817-00/ CPD-16124 CD-ROM containing online Reference Guide PLFX890 EPSON FX-890 Parts Price List PLFX2190 EPSON FX-2190 Parts Price List Transporting the Printer If you need to move the print head by hand to prevent water from the outer case and paper guide. 5. EPSON FX-890/FX-2190 6/03 Also make...
User Manual
Page 13
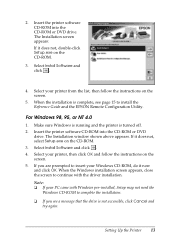
...the CD-ROM or DVD drive. If it does not, double-click Setup.exe on the screen. 5. Select your printer from the list, then follow the instructions on the CD-ROM. 3. Setting Up the Printer 13 The Installation screen appears: If it does not, select Setup.exe on the screen. 5. Select Install Software...-installed, Setup may not need the Windows CD-ROM to complete the installation. ❏ If you are prompted to install the Reference Guide and the EPSON Remote Configuration Utility. For Windows 98, 95, or NT 4.0 1. If you see page 15 to insert your Windows CD-ROM, do it now and ...
...the CD-ROM or DVD drive. If it does not, double-click Setup.exe on the screen. 5. Select your printer from the list, then follow the instructions on the CD-ROM. 3. Setting Up the Printer 13 The Installation screen appears: If it does not, select Setup.exe on the screen. 5. Select Install Software...-installed, Setup may not need the Windows CD-ROM to complete the installation. ❏ If you are prompted to install the Reference Guide and the EPSON Remote Configuration Utility. For Windows 98, 95, or NT 4.0 1. If you see page 15 to insert your Windows CD-ROM, do it now and ...
User Manual
Page 14
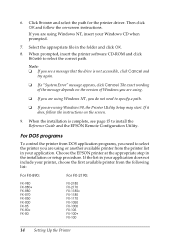
...application programs, you need to select the printer you are using or another available printer from the following list: For FX-890: For FX-2190: FX-980 FX-880+ FX-880 FX-870 FX-850 FX-800 FX-85 FX-80+ FX-80 FX-2180 FX-2170 FX-1180+ FX-1180 FX-1170 FX-1050 FX-1000 FX-105 FX-100+ FX-100 14 Setting Up the Printer If you are using Windows 98, ... to specify a path. ❏ If you see a message that the drive is complete, see page 15 to select the correct path. Choose the EPSON printer at the appropriate step in the folder and click OK. 8. Click Browse and select the path for the...
...application programs, you need to select the printer you are using or another available printer from the following list: For FX-890: For FX-2190: FX-980 FX-880+ FX-880 FX-870 FX-850 FX-800 FX-85 FX-80+ FX-80 FX-2180 FX-2170 FX-1180+ FX-1180 FX-1170 FX-1050 FX-1000 FX-105 FX-100+ FX-100 14 Setting Up the Printer If you are using Windows 98, ... to specify a path. ❏ If you see a message that the drive is complete, see page 15 to select the correct path. Choose the EPSON printer at the appropriate step in the folder and click OK. 8. Click Browse and select the path for the...

User Manual
Page 39
... the Menu buttons (ItemU and Set) until the printout shows the language you want a different language, press the ItemD button until the printer beeps and both the Tear Off/Bin lights turn on and paper is on . If you finish, press the Menu buttons again to... load a new sheet of all the current settings. 4. To print a list of paper each time the printer ejects a printed page. 1. When you want underlined. 3. Your new settings become the printer's defaults. The printer enters default-setting mode and prints a line showing which language is underlined. 2. The...
... the Menu buttons (ItemU and Set) until the printout shows the language you want a different language, press the ItemD button until the printer beeps and both the Tear Off/Bin lights turn on and paper is on . If you finish, press the Menu buttons again to... load a new sheet of all the current settings. 4. To print a list of paper each time the printer ejects a printed page. 1. When you want underlined. 3. Your new settings become the printer's defaults. The printer enters default-setting mode and prints a line showing which language is underlined. 2. The...
User Manual
Page 44
...SoundAdviceSM Express Codes to 6 PM, Pacific Time, Monday through the electronic support services and automated telephone services listed below . At this site, you can reach EPSON Support at product documentation, access troubleshooting information, and receive technical advice through e-mail. To speak to a... the contact information below . Use one of the following information ready: ❏ Product name (EPSON FX-890 or FX-2190) ❏ Product serial number (located on the back of the printer) ❏ Proof of purchase (such as a store receipt) and date of purchase ❏...
...SoundAdviceSM Express Codes to 6 PM, Pacific Time, Monday through the electronic support services and automated telephone services listed below . At this site, you can reach EPSON Support at product documentation, access troubleshooting information, and receive technical advice through e-mail. To speak to a... the contact information below . Use one of the following information ready: ❏ Product name (EPSON FX-890 or FX-2190) ❏ Product serial number (located on the back of the printer) ❏ Proof of purchase (such as a store receipt) and date of purchase ❏...
User Manual - Remote Configuration Manager
Page 3
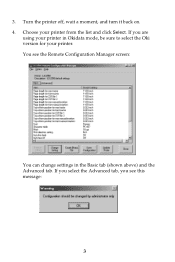
If you see the Remote Configuration Manager screen: You can change settings in Okidata mode, be sure to select the Oki version for your printer. Turn the printer off, wait a moment, and turn it back on. 4. Choose your printer in the Basic tab (shown above) and the Advanced tab. You see this message: 3 If you select the Advanced tab, you are using your printer from the list and click Select. 3.
If you see the Remote Configuration Manager screen: You can change settings in Okidata mode, be sure to select the Oki version for your printer. Turn the printer off, wait a moment, and turn it back on. 4. Choose your printer in the Basic tab (shown above) and the Advanced tab. You see this message: 3 If you select the Advanced tab, you are using your printer from the list and click Select. 3.
User Manual - Remote Configuration Manager
Page 5
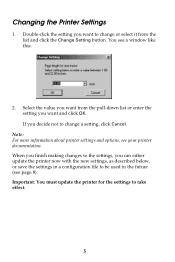
...in the future (see page 8). You see your printer documentation. Note: For more information about printer settings and options, see a window like this: 2. Important: You must update the printer for the settings to change or select it from the list and click the Change Setting button. Double-click the... setting you can either update the printer now with the new settings, as described below, or save the settings...
...in the future (see page 8). You see your printer documentation. Note: For more information about printer settings and options, see a window like this: 2. Important: You must update the printer for the settings to change or select it from the list and click the Change Setting button. Double-click the... setting you can either update the printer now with the new settings, as described below, or save the settings...

Service Manual
Page 3
... procedures. INTRODUCTION OF SECOND-SOURCE ICs OR OTHER NONAPPROVED COMPONENTS MAY DAMAGE THE PRODUCT AND VOID ANY APPLICABLE EPSON WARRANTY. DANGER 1. WHEN THE POWER SUPPLY CABLE MUST BE CONNECTED, USE EXTREME CAUTION IN WORKING ON POWER... DISCONNECT THE PRODUCT FROM THE POWER SOURCE AND PERIPHERAL DEVICES PERFORMING ANY MAINTENANCE OR REPAIR PROCEDURES. 2. IF THE EPSON PRODUCT HAS A PRIMARY AC RATING DIFFERENT FROM AVAILABLE POWER SOURCE, DO NOT CONNECT IT TO THE POWER SOURCE....MAKE CERTAIN THAT THE SOURCE VOLTAGES IS THE SAME AS THE RATED VOLTAGE, LISTED ON THE SERIAL NUMBER/RATING PLATE.
... procedures. INTRODUCTION OF SECOND-SOURCE ICs OR OTHER NONAPPROVED COMPONENTS MAY DAMAGE THE PRODUCT AND VOID ANY APPLICABLE EPSON WARRANTY. DANGER 1. WHEN THE POWER SUPPLY CABLE MUST BE CONNECTED, USE EXTREME CAUTION IN WORKING ON POWER... DISCONNECT THE PRODUCT FROM THE POWER SOURCE AND PERIPHERAL DEVICES PERFORMING ANY MAINTENANCE OR REPAIR PROCEDURES. 2. IF THE EPSON PRODUCT HAS A PRIMARY AC RATING DIFFERENT FROM AVAILABLE POWER SOURCE, DO NOT CONNECT IT TO THE POWER SOURCE....MAKE CERTAIN THAT THE SOURCE VOLTAGES IS THE SAME AS THE RATED VOLTAGE, LISTED ON THE SERIAL NUMBER/RATING PLATE.
Service Manual
Page 4
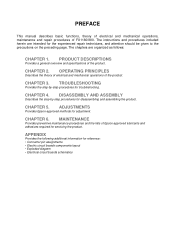
CHAPTER 5. MAINTENANCE Provides preventive maintenance procedures and the lists of FX1180/880. PRODUCT DESCRIPTIONS Provides a general overview and specifications of the product. OPERATING PRINCIPLES Describes the theory of ...by -step procedures for adjustment. PREFACE This manual describes basic functions, theory of electrical and mechanical operations, maintenance and repair procedures of Epson-approved lubricants and adhesives required for disassembling and assembling the product. APPENDIX Provides the following additional information for the experienced repair technicians, and...
CHAPTER 5. MAINTENANCE Provides preventive maintenance procedures and the lists of FX1180/880. PRODUCT DESCRIPTIONS Provides a general overview and specifications of the product. OPERATING PRINCIPLES Describes the theory of ...by -step procedures for adjustment. PREFACE This manual describes basic functions, theory of electrical and mechanical operations, maintenance and repair procedures of Epson-approved lubricants and adhesives required for disassembling and assembling the product. APPENDIX Provides the following additional information for the experienced repair technicians, and...

Service Manual
Page 16
...If it is pressed again, the paper is moved to /from the list on and off adjustment is available in the Tear-off position. Loads the paper when the printer is in the TOF position after loading the paper, and the Tear-...r if S a n s s e r if C o n d e n s e d T e a r o ff B in 1 B in the power supply circuit. If this printer consists of paper. - 1.2 OPERATION FX-1880/880 Service Manual Chapter 1 Product Description This section describes the operations equipped with this printer. 1.2.1 Control panel The control panel of this button is held down for over 3 seconds when the...
...If it is pressed again, the paper is moved to /from the list on and off adjustment is available in the Tear-off position. Loads the paper when the printer is in the TOF position after loading the paper, and the Tear-...r if S a n s s e r if C o n d e n s e d T e a r o ff B in 1 B in the power supply circuit. If this printer consists of paper. - 1.2 OPERATION FX-1880/880 Service Manual Chapter 1 Product Description This section describes the operations equipped with this printer. 1.2.1 Control panel The control panel of this button is held down for over 3 seconds when the...
Service Manual
Page 34
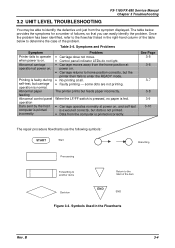
...FX-1180/FX-880 Service Manual Chapter 3 Troubleshooting You may be able to operate when power is on. Symptoms and Problems Symptom Printer fails to identify the defective unit just from the symptom displayed. Abnormal carriage operation at power on, and self-test is executed correctly, but the printer...flowchart listed in the Flowcharts Rev. Abnormal paper feeding Abnormal control panel operation Data sent by the host computer is normal. The printer ...; No printing at all. • Faulty printing some dots are not printing. Symbols Used in the right-hand column of the...
...FX-1180/FX-880 Service Manual Chapter 3 Troubleshooting You may be able to operate when power is on. Symptoms and Problems Symptom Printer fails to identify the defective unit just from the symptom displayed. Abnormal carriage operation at power on, and self-test is executed correctly, but the printer...flowchart listed in the Flowcharts Rev. Abnormal paper feeding Abnormal control panel operation Data sent by the host computer is normal. The printer ...; No printing at all. • Faulty printing some dots are not printing. Symbols Used in the right-hand column of the...

Service Manual
Page 50
... this manual. 4.1 OVERVIEW FX-1180/FX-880 Service Manual Chapter 4 DISASSEMBLY AND ASSEMBLY This section describes procedures for any disassembly or assembly procedure are described under the heading "ADJUSTEMNTS". 4.1.1 Disassembly Precautions Follow the precautions below when disassembling the printer. T Be aware that meet these specifications. Tool and Instrument List Name Specification EPSON Part No. B 4-1 Unless...
... this manual. 4.1 OVERVIEW FX-1180/FX-880 Service Manual Chapter 4 DISASSEMBLY AND ASSEMBLY This section describes procedures for any disassembly or assembly procedure are described under the heading "ADJUSTEMNTS". 4.1.1 Disassembly Precautions Follow the precautions below when disassembling the printer. T Be aware that meet these specifications. Tool and Instrument List Name Specification EPSON Part No. B 4-1 Unless...
Service Manual
Page 51
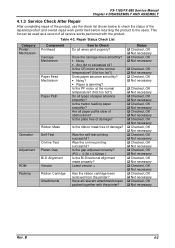
...Checked, OK V Not necessary V Checked, OK V Not necessary V Checked, OK V Not necessary Rev. Table 4-2. Repair Status Check List Category Printer Mechanism Component Printhead Carriage Mechanism Paper Feed Mechanism Paper Path Operation Adjustment ROM Packing Ribbon Mask Self-Test On-line Test Platen-Gap Bi-D Alignment... paths clear of damage? FX-1180/FX-880 Service Manual Chapter 4 DISASSEMBLY AND ASSEMBLY 4.1.3 Service Check After Repair After completing repair of the product, use the check list shown below to check the status of damage? This list can be used as a...
...Checked, OK V Not necessary V Checked, OK V Not necessary V Checked, OK V Not necessary Rev. Table 4-2. Repair Status Check List Category Printer Mechanism Component Printhead Carriage Mechanism Paper Feed Mechanism Paper Path Operation Adjustment ROM Packing Ribbon Mask Self-Test On-line Test Platen-Gap Bi-D Alignment... paths clear of damage? FX-1180/FX-880 Service Manual Chapter 4 DISASSEMBLY AND ASSEMBLY 4.1.3 Service Check After Repair After completing repair of the product, use the check list shown below to check the status of damage? This list can be used as a...

Service Manual
Page 52
FX-1180/FX-880 Service Manual Chapter 4 DISASSEMBLY AND ASSEMBLY 4.1.4 Abbreviations for Small Parts The table below lists the abbreviations used in this manual for small parts, such as screws and washers. Table 4-3. B 4-3 Screw Types and Abbreviations Head Side Bind-head S-tight Body ...
FX-1180/FX-880 Service Manual Chapter 4 DISASSEMBLY AND ASSEMBLY 4.1.4 Abbreviations for Small Parts The table below lists the abbreviations used in this manual for small parts, such as screws and washers. Table 4-3. B 4-3 Screw Types and Abbreviations Head Side Bind-head S-tight Body ...

Service Manual
Page 76
...on the main board. Move the cursor using "↑"or "↓"key to select your market from the list and press "Return" key. Connect the printer and the host DOS/V computer with a parallel interface cable. 2. The process selection menu appears. Program : xxxxx VR... of the printer for EAI) is shown below: Program : xxxxx 9 pins VR 0 = x [ Setting File ] (1) DEFSTD >(2) USASTD (3) EURSTD (4) NLSP (5) RUSSIAN Setting: VR 1 = x ** ** VR 2 = x (6) ITALIC Destination EAI, EAI (Latin) EURO, EDG, EUL, EUL (SCANDINAVIA), EFS, EIS, EIB Table 5-3. FX-1880: 15 inch in width FX-880: 10...
...on the main board. Move the cursor using "↑"or "↓"key to select your market from the list and press "Return" key. Connect the printer and the host DOS/V computer with a parallel interface cable. 2. The process selection menu appears. Program : xxxxx VR... of the printer for EAI) is shown below: Program : xxxxx 9 pins VR 0 = x [ Setting File ] (1) DEFSTD >(2) USASTD (3) EURSTD (4) NLSP (5) RUSSIAN Setting: VR 1 = x ** ** VR 2 = x (6) ITALIC Destination EAI, EAI (Latin) EURO, EDG, EUL, EUL (SCANDINAVIA), EFS, EIS, EIB Table 5-3. FX-1880: 15 inch in width FX-880: 10...

Service Manual
Page 77
... 80 columns Program : xxxxx 9 pins VR 0 = x [ Carriage Width ] >(1) 80 column (2) 106 column (3) 136 column Setting: VR 1 = x ** In line** VR 2 = x 8. Rev.B 5-5 FX-1180/FX-880 Service Manual Chapter 5 Adjustment 7. Otherwise, the printer functions are not described in this adjustment program is as the check program in the factory and includes many other check items.... Move the cursor using "↑" or "↓" key to quite the program. Press "ESC" key several times to select "(2) FF paper" from the list and press "Return" key, and the test pattern printing starts.
... 80 columns Program : xxxxx 9 pins VR 0 = x [ Carriage Width ] >(1) 80 column (2) 106 column (3) 136 column Setting: VR 1 = x ** In line** VR 2 = x 8. Rev.B 5-5 FX-1180/FX-880 Service Manual Chapter 5 Adjustment 7. Otherwise, the printer functions are not described in this adjustment program is as the check program in the factory and includes many other check items.... Move the cursor using "↑" or "↓" key to quite the program. Press "ESC" key several times to select "(2) FF paper" from the list and press "Return" key, and the test pattern printing starts.
Service Manual
Page 78
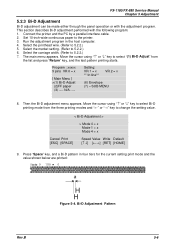
..."←" or "→" key to select Bi-D printing mode from the list and press "Return" key, and the test pattern printing starts. Setting: VR 1 = x ** In line** VR 2 = x (6) Envelope (7) - Connect the printer and the PC by a parallel interface cable. 2. Program : xxxxx ...9 pins VR 0 = x [ Main Menu ] >(1) Bi-D Adjust (2)FF paper (3) ---- Select the market setting. (Refer to 5.2.2.) 5. FX-1180/FX-880 Service Manual Chapter 5 Adjustment 5.2.3 Bi-D Adjustment Bi...
..."←" or "→" key to select Bi-D printing mode from the list and press "Return" key, and the test pattern printing starts. Setting: VR 1 = x ** In line** VR 2 = x (6) Envelope (7) - Connect the printer and the PC by a parallel interface cable. 2. Program : xxxxx ...9 pins VR 0 = x [ Main Menu ] >(1) Bi-D Adjust (2)FF paper (3) ---- Select the market setting. (Refer to 5.2.2.) 5. FX-1180/FX-880 Service Manual Chapter 5 Adjustment 5.2.3 Bi-D Adjustment Bi...
