
User Manual
Page 2
... can be reproduced, stored in a retrieval system, or transmitted, in a residential installation. Government Printing Office, Washington, DC 20402. If this book, Seiko Epson Corporation assumes no guarantee that the printer and receiver are designed to comply with the specifications in a particular installation. No patent liability is encouraged to try to correct the...
... can be reproduced, stored in a retrieval system, or transmitted, in a residential installation. Government Printing Office, Washington, DC 20402. If this book, Seiko Epson Corporation assumes no guarantee that the printer and receiver are designed to comply with the specifications in a particular installation. No patent liability is encouraged to try to correct the...

User Manual
Page 3
Contents Introduction 2 About This Manual Chapter 1 Setting Up Your FX Printer 1-1 Unpacking Your Printer 1-2 Selecting the Right Location 1-3 Installing the Ribbon 1-6 Loading Continuous-feed Paper 1-12 Turning On the Printer 1-12 Operating the Control Panel 1-14 SelecType 1-16 Running the Self Test 1-17 Connecting the Printer to Your Computer 1-18 Choosing the Operating Mode with DIP...
Contents Introduction 2 About This Manual Chapter 1 Setting Up Your FX Printer 1-1 Unpacking Your Printer 1-2 Selecting the Right Location 1-3 Installing the Ribbon 1-6 Loading Continuous-feed Paper 1-12 Turning On the Printer 1-12 Operating the Control Panel 1-14 SelecType 1-16 Running the Self Test 1-17 Connecting the Printer to Your Computer 1-18 Choosing the Operating Mode with DIP...

User Manual
Page 4
Chapter 4 FX Printer Features 4-1 Quality and Fonts 4-2 Print Size and Character Width 4-2 Pitches and Proportional Spacing 4-3 Special Effects and Emphasis 4-4 Using Different Character... Your Own Graphics 5-13 User-defined Characters Appendix A Command Summary A-4 Commands in Numerical Order A-7 Epson (ESC/P) Commands A-36 IBM Printer Emulation Mode Commands Appendix B Character Tables El Epson Mode B-9 Epson International Character Sets B-11 IBM Printer Emulation Mode Appendix C Problem Solving and Maintenance C-1 General Troubleshooting C-3 Troubleshooting Graphics Problems C-3 Data Dump...
Chapter 4 FX Printer Features 4-1 Quality and Fonts 4-2 Print Size and Character Width 4-2 Pitches and Proportional Spacing 4-3 Special Effects and Emphasis 4-4 Using Different Character... Your Own Graphics 5-13 User-defined Characters Appendix A Command Summary A-4 Commands in Numerical Order A-7 Epson (ESC/P) Commands A-36 IBM Printer Emulation Mode Commands Appendix B Character Tables El Epson Mode B-9 Epson International Character Sets B-11 IBM Printer Emulation Mode Appendix C Problem Solving and Maintenance C-1 General Troubleshooting C-3 Troubleshooting Graphics Problems C-3 Data Dump...
User Manual
Page 6
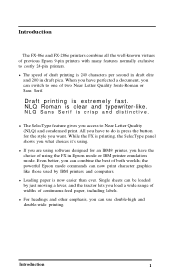
Introduction The FX-86e and FX-286e printers combine all the well-known virtues of both worlds; NLQ Roman is extremely fast. l The SelecType feature gives you have the choice of draft printing is 240 characters per second in draft elite and 200 in Epson mode or IBM printer emulation mode. Even better, you can combine the...
Introduction The FX-86e and FX-286e printers combine all the well-known virtues of both worlds; NLQ Roman is extremely fast. l The SelecType feature gives you have the choice of draft printing is 240 characters per second in draft elite and 200 in Epson mode or IBM printer emulation mode. Even better, you can combine the...

User Manual
Page 7
... up instructions. About this Manual To make it easier to use any of the printer's commands, and some advice on the inside the back of the back flap, summarizes the first chapter's setting up your new FX-86e or FX-286e, this manual includes a lo-step guide. This guide, which is printed on solving...
... up instructions. About this Manual To make it easier to use any of the printer's commands, and some advice on the inside the back of the back flap, summarizes the first chapter's setting up your new FX-86e or FX-286e, this manual includes a lo-step guide. This guide, which is printed on solving...
User Manual
Page 8
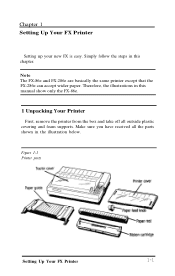
Simply follow the steps in this chapter. Therefore, the illustrations in this manual show only the FX-86e. 1 Unpacking Your Printer First, remove the printer from the box and take off all the parts shown in the illustration below. Figure 1-1 Printer parts Setting Up Your FX Printer 1-1 Chapter 1 Setting Up Your FX Printer Setting up your new FX is easy. Note The FX-86e and FX-286e are basically the same printer except that the FX-286e can accept wider paper. Make sure you have received all outside plastic covering and foam supports.
Simply follow the steps in this chapter. Therefore, the illustrations in this manual show only the FX-86e. 1 Unpacking Your Printer First, remove the printer from the box and take off all the parts shown in the illustration below. Figure 1-1 Printer parts Setting Up Your FX Printer 1-1 Chapter 1 Setting Up Your FX Printer Setting up your new FX is easy. Note The FX-86e and FX-286e are basically the same printer except that the FX-286e can accept wider paper. Make sure you have received all outside plastic covering and foam supports.

User Manual
Page 9
...a print head protector, a platen protector and two locking tabs during shipping; But also keep the following tips in mind: 1-2 Setting Up Your FX Printer Follow the steps below Figure 1-2. To install the knob, simply push it . (These pads protect the tractor unit during shipping. Also, you... turn on the right side of the printer as shown in Figure 1-2. 1. Remove the right locking tab and the platen protector. 2 Selecting the Right Location The most important consideration in choosing...
...a print head protector, a platen protector and two locking tabs during shipping; But also keep the following tips in mind: 1-2 Setting Up Your FX Printer Follow the steps below Figure 1-2. To install the knob, simply push it . (These pads protect the tractor unit during shipping. Also, you... turn on the right side of the printer as shown in Figure 1-2. 1. Remove the right locking tab and the platen protector. 2 Selecting the Right Location The most important consideration in choosing...

User Manual
Page 10
... you are three common methods of arranging a printer and continuous paper: l Using a printer stand with the paper stacked underneath it , simply pull the back of power to use an adapter plug. There are going to your printer. Setting Up Your FX Printer 1-3 l Avoid using an outlet on the ...same circuit breaker with the printer near the rear edge and the paper on the floor or on unstable surfaces such as ...
... you are three common methods of arranging a printer and continuous paper: l Using a printer stand with the paper stacked underneath it , simply pull the back of power to use an adapter plug. There are going to your printer. Setting Up Your FX Printer 1-3 l Avoid using an outlet on the ...same circuit breaker with the printer near the rear edge and the paper on the floor or on unstable surfaces such as ...

User Manual
Page 11
..., be OFF when you 've been using your printer. for the FX-286e hold the ribbon cartridge by the two plastic tabs. Press firmly on each end of the arrow to tighten the ribbon. If you move the print head. Lower the cartridge into the printer, guiding the two pins on each end of... cartridge, turn the ribbon knob in the direction of the cartridge into the slots in the printer frame, as shown in Figure 1-5. (There is also a diagram on the top of the cartridge; Now use . 3. For the FX-86e, hold the cartridge by the raised plastic fin on top of the ribbon cartridge...
..., be OFF when you 've been using your printer. for the FX-286e hold the ribbon cartridge by the two plastic tabs. Press firmly on each end of the arrow to tighten the ribbon. If you move the print head. Lower the cartridge into the printer, guiding the two pins on each end of... cartridge, turn the ribbon knob in the direction of the cartridge into the slots in the printer frame, as shown in Figure 1-5. (There is also a diagram on the top of the cartridge; Now use . 3. For the FX-86e, hold the cartridge by the raised plastic fin on top of the ribbon cartridge...

User Manual
Page 12
Positioning the ribbon Setting Up Your FX Printer 1-5 Figure 1-4. Installing the ribbon cartridge Figure 1-5.
Positioning the ribbon Setting Up Your FX Printer 1-5 Figure 1-4. Installing the ribbon cartridge Figure 1-5.

User Manual
Page 13
4 Loading Continuous-feed Paper When you receive your FX, it is set up the printer for instructions on setting up to print on the FX-286e. The FX tractor units are adjustable to accommodate different widths of the cover toward you plan to use single-sheet paper, turn to ...to 16 inches on continuous-feed paper. Remove the tractor cover that comes installed on the printer cable. 1-6 Setting Up Your FX Printer To remove it is turned off the printer. 3. Make sure the printer is vertical. If you have bought the optional automatic sheet feeder, complete the remainder of the...
4 Loading Continuous-feed Paper When you receive your FX, it is set up the printer for instructions on setting up to print on the FX-286e. The FX tractor units are adjustable to accommodate different widths of the cover toward you plan to use single-sheet paper, turn to ...to 16 inches on continuous-feed paper. Remove the tractor cover that comes installed on the printer cable. 1-6 Setting Up Your FX Printer To remove it is turned off the printer. 3. Make sure the printer is vertical. If you have bought the optional automatic sheet feeder, complete the remainder of the...

User Manual
Page 14
Installing the paper rest 4. Figure 1-6. Pull both the paper release lever and the paper bail lever toward the front of the printer. (Figure 1-6 shows where these levers are.) Setting Up Your FX Printer 1-7
Installing the paper rest 4. Figure 1-6. Pull both the paper release lever and the paper bail lever toward the front of the printer. (Figure 1-6 shows where these levers are.) Setting Up Your FX Printer 1-7

User Manual
Page 15
... lever is about 1/4 inch from the left and right. Just follow the steps below: 1. Now you can move the pin-feed holders. 1-8 Setting Up Your FX Printer Using Figure 1-7 as shown in place.
... lever is about 1/4 inch from the left and right. Just follow the steps below: 1. Now you can move the pin-feed holders. 1-8 Setting Up Your FX Printer Using Figure 1-7 as shown in place.

User Manual
Page 16
Figure 1-8. Pull the paper up between the ribbon guide and the platen. (Moving the paper with a side-to push the paper through.) 5. Open pin-feed cover 4. Fit the holes on the left holder (as shown in Figure 1-9) and close the cover. Figure 1-9. Guide the paper into the paper slot, and push it through until it easier to -side motion makes it comes up until the top is above the pin-feed holders. Fitting the paper over the pins in the left side of the paper over the pin feeds Setting Up Your FX Printer 1-9
Figure 1-8. Pull the paper up between the ribbon guide and the platen. (Moving the paper with a side-to push the paper through.) 5. Open pin-feed cover 4. Fit the holes on the left holder (as shown in Figure 1-9) and close the cover. Figure 1-9. Guide the paper into the paper slot, and push it through until it easier to -side motion makes it comes up until the top is above the pin-feed holders. Fitting the paper over the pins in the left side of the paper over the pin feeds Setting Up Your FX Printer 1-9

User Manual
Page 17
... tab into the left . Figure 1-10 This guide keeps paper that is coming out of the printer from interfering with the edge tab on single sheets of the paper. 7. Push the paper bail ...tab into the right holder, moving the holder as shown in place. Hold the paper guide above the printer with the paper going in the upright position for printing on the left slot and push the guide ...back so that you have loaded the continuous-feed paper, prepare the printer for printing. 1. Fit the right side of the paper into the right tab slot, as needed to ...
... tab into the left . Figure 1-10 This guide keeps paper that is coming out of the printer from interfering with the edge tab on single sheets of the paper. 7. Push the paper bail ...tab into the right holder, moving the holder as shown in place. Hold the paper guide above the printer with the paper going in the upright position for printing on the left slot and push the guide ...back so that you have loaded the continuous-feed paper, prepare the printer for printing. 1. Fit the right side of the paper into the right tab slot, as needed to ...

User Manual
Page 18
...want them to and prevents the printer from printing on the right side of the printer until the first row of form This is turned on or when software initializes the printer or sets the page length. 4. Replace the tractor cover. Setting Up Your FX Printer 1-11 Setting top of perforations ...is about even with the paper feed knob on the perforations. With the printer turned OFF, advance the paper with the top...
...want them to and prevents the printer from printing on the right side of the printer until the first row of form This is turned on or when software initializes the printer or sets the page length. 4. Replace the tractor cover. Setting Up Your FX Printer 1-11 Setting top of perforations ...is about even with the paper feed knob on the perforations. With the printer turned OFF, advance the paper with the top...

User Manual
Page 19
... removed all packing materials. l The green power light on the control panel comes on the printer when the print head cannot move may seriously damage the mechanism. is turned off; 5 Turning On the Printer Before plugging in the power cord, see that the power switch near the back of the...things happen: l The print head moves back and forth and stops at the left side of the printer. Now, turn on the left side of the printer; The FX control panel. 1.12 Setting Up Your FX Printer this is initialized and set to certain default settings (which are fully described in Figure 1-12. ...
... removed all packing materials. l The green power light on the control panel comes on the printer when the print head cannot move may seriously damage the mechanism. is turned off; 5 Turning On the Printer Before plugging in the power cord, see that the power switch near the back of the...things happen: l The print head moves back and forth and stops at the left side of the printer. Now, turn on the left side of the printer; The FX control panel. 1.12 Setting Up Your FX Printer this is initialized and set to certain default settings (which are fully described in Figure 1-12. ...

User Manual
Page 20
... to receive and print data from the computer. When the printer is on the right side of the printer control advancing the paper and communication with the computer. The indicator lights In addition to advance paper. Setting Up Your FX Printer 1-13 Note Use the paper feed knob on line and ...in NLQ mode, pressing the button selects the Sans Serif font. When the printer is turned on. POWER This comes on to the power and is on...
... to receive and print data from the computer. When the printer is on the right side of the printer control advancing the paper and communication with the computer. The indicator lights In addition to advance paper. Setting Up Your FX Printer 1-13 Note Use the paper feed knob on line and ...in NLQ mode, pressing the button selects the Sans Serif font. When the printer is turned on. POWER This comes on to the power and is on...

User Manual
Page 21
... SelecType button, it . You select them by using the FORM FEED and LINE FEED buttons while the printer is on a line. NLQ Sans Serif is clear and typewriter-like. If you can produce any of... If you choose the print style and size. Also on the control panel are described in the Epson mode. In the condensed mode all characters are available: Roman and Sans Serif. Two NLQ fonts are...Sans Serif, A software command to show that let you 1.14 Setting Up Your FX Printer These buttons select the most used printing features-Near Letter Quality (NLQ) and condensed. PAPER OUT This ...
... SelecType button, it . You select them by using the FORM FEED and LINE FEED buttons while the printer is on a line. NLQ Sans Serif is clear and typewriter-like. If you can produce any of... If you choose the print style and size. Also on the control panel are described in the Epson mode. In the condensed mode all characters are available: Roman and Sans Serif. Two NLQ fonts are...Sans Serif, A software command to show that let you 1.14 Setting Up Your FX Printer These buttons select the most used printing features-Near Letter Quality (NLQ) and condensed. PAPER OUT This ...

User Manual
Page 22
... print control codes for your application program instead of the SelecType buttons. 3. One reset signal, however, does not affect your SelecType settings. Setting Up Your FX Printer 1-15 It beeps once and the indicator light turns off either mode, press its button again. This is a simple three-step process: 1. Create a short sample...
... print control codes for your application program instead of the SelecType buttons. 3. One reset signal, however, does not affect your SelecType settings. Setting Up Your FX Printer 1-15 It beeps once and the indicator light turns off either mode, press its button again. This is a simple three-step process: 1. Create a short sample...


