Technical Brief (Impact Printers)
Page 2
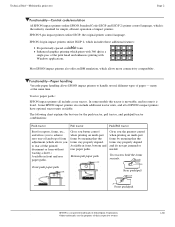
... Versatile paper handling allows EPSON impact printers to handle several different types of paper - Tractor paper paths: EPSON impact printers all of EPSON's impact printers have optional tractor units available. Most EPSON impact printers also offer an IBM emulation, which prints with 360 dpi in front, bottom and rear paper paths. EPSON 24-pin impact printers utilize ESC/P 2, which includes these additional features: el Proportionally-spaced...
... Versatile paper handling allows EPSON impact printers to handle several different types of paper - Tractor paper paths: EPSON impact printers all of EPSON's impact printers have optional tractor units available. Most EPSON impact printers also offer an IBM emulation, which prints with 360 dpi in front, bottom and rear paper paths. EPSON 24-pin impact printers utilize ESC/P 2, which includes these additional features: el Proportionally-spaced...
Technical Brief (Impact Printers)
Page 4
...-of built-in 2-point increments, available on EPSON 24-pin impact printers Barcode fonts-available on the control panel. L For optional connectivity, most EPSON impact printers. Barcode fonts are printed unidirectionally for accuracy L Windows applications will take advantage of their respective owners. EPSON Sales Training EPSON is added, EPSON impact printers automatic interface switching feature will automatically advance the paper to the...
...-of built-in 2-point increments, available on EPSON 24-pin impact printers Barcode fonts-available on the control panel. L For optional connectivity, most EPSON impact printers. Barcode fonts are printed unidirectionally for accuracy L Windows applications will take advantage of their respective owners. EPSON Sales Training EPSON is added, EPSON impact printers automatic interface switching feature will automatically advance the paper to the...

Product Brochure
Page 1
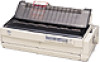
...world leader in zero tear-off feature, included at 500 cps • Reliable, durable Epson 9-pin technology • Zero tear-off paper handling • Up to your business depends on the industrial-strength printer: the EPSON FX-2180-from a durable print head that ...away. You need an impact printer that lasts for technical specifications Plus, there's the added confidence of Windows® print drivers and multiplatform connectivity options. When your most flexible 9-pin wide carriage impact printer in its class. EPSON FX-2180 Impact Printer • Super-fast ...
...world leader in zero tear-off feature, included at 500 cps • Reliable, durable Epson 9-pin technology • Zero tear-off paper handling • Up to your business depends on the industrial-strength printer: the EPSON FX-2180-from a durable print head that ...away. You need an impact printer that lasts for technical specifications Plus, there's the added confidence of Windows® print drivers and multiplatform connectivity options. When your most flexible 9-pin wide carriage impact printer in its class. EPSON FX-2180 Impact Printer • Super-fast ...

Product Information Guide
Page 7
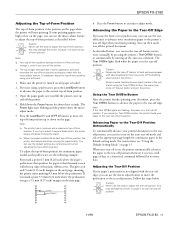
Standby Position Your continuous paper is the position where the printer starts printing on multi-part forms that the paper can use a printer stand with labels, use a push tractor. Note: If you plan to use the tear-off feature with the pull tractor. The table below summarizes the paper...through it is almost straight, which reduces the chance of your printed document. EPSON FX-2180 Paper Positions Top-of-Form Position The letters ABC above are printed at the perforation. If you cannot use the printer's tearoff edge to use the push and pull tractors in combination. the ...
Standby Position Your continuous paper is the position where the printer starts printing on multi-part forms that the paper can use a printer stand with labels, use a push tractor. Note: If you plan to use the tear-off feature with the pull tractor. The table below summarizes the paper...through it is almost straight, which reduces the chance of your printed document. EPSON FX-2180 Paper Positions Top-of-Form Position The letters ABC above are printed at the perforation. If you cannot use the printer's tearoff edge to use the push and pull tractors in combination. the ...
Product Information Guide
Page 11
... position, you finish printing. The Pause light starts flashing and the printer enters the micro adjust mode. 5. Follow the steps below , you can use the micro adjust feature to exit micro adjust mode. the paper may come off position. 11/98 EPSON FX-2180 - 11 t The top margin setting made in the default-setting mode...
... position, you finish printing. The Pause light starts flashing and the printer enters the micro adjust mode. 5. Follow the steps below , you can use the micro adjust feature to exit micro adjust mode. the paper may come off position. 11/98 EPSON FX-2180 - 11 t The top margin setting made in the default-setting mode...

User Manual
Page 4
...button Stops printing temporarily, and resumes printing when pressed again. Using the micro adjust feature, you can press the D and U buttons to the next cut -sheet feeder is selected. • n n when the printer is in the selected paper source or paper is installed. • Enters the card... down the Pause button for three seconds, the printer enters the micro adjust mode. Pause light • On when the printer is paused. • Flashes when the printer is in the tear-off position. See Chapter 5. Operate button Turns the printer on top-of Tear Off/Bin lights •...
...button Stops printing temporarily, and resumes printing when pressed again. Using the micro adjust feature, you can press the D and U buttons to the next cut -sheet feeder is selected. • n n when the printer is in the selected paper source or paper is installed. • Enters the card... down the Pause button for three seconds, the printer enters the micro adjust mode. Pause light • On when the printer is paused. • Flashes when the printer is in the tear-off position. See Chapter 5. Operate button Turns the printer on top-of Tear Off/Bin lights •...

User Manual
Page 5
Contents Getting to Know Your Printer Easy-to-Use Features 0-2 Available Paper Paths 0-3 Printing on continuous paper 0-4 Printing on single sheets 0-8 Options 0-10 Ribbon Cartridges 0-10 Important Safety Instructions 0-11 Print Head ...options 0-13 Safety information 0-14 How To Use Your Manuals 0-15 Warnings, Cautions, and Notes 0-15 Chapter 1 Setting Up the Printer Unpacking the Printer 1-2 Choosing a Place for the Printer 1-4 Positioning the continuous paper supply 1-5 Installing or Replacing the Ribbon Cartridge 1-6 Attaching the Paper Guide and Paper Separator 1-11 Plugging ...
Contents Getting to Know Your Printer Easy-to-Use Features 0-2 Available Paper Paths 0-3 Printing on continuous paper 0-4 Printing on single sheets 0-8 Options 0-10 Ribbon Cartridges 0-10 Important Safety Instructions 0-11 Print Head ...options 0-13 Safety information 0-14 How To Use Your Manuals 0-15 Warnings, Cautions, and Notes 0-15 Chapter 1 Setting Up the Printer Unpacking the Printer 1-2 Choosing a Place for the Printer 1-4 Positioning the continuous paper supply 1-5 Installing or Replacing the Ribbon Cartridge 1-6 Attaching the Paper Guide and Paper Separator 1-11 Plugging ...

User Manual
Page 12
...to Know Your Printer 1 Getting to help suit your individual needs. Features include: q a variety of paper paths to suit your printing needs q the ability to handle a wide range of paper types, including continuous paper, multi-part forms with printer driver software, the EPSON Status Monitor ...2 utility for Microsoft® Windows® 95 that lets you check the status of up to Know Your Printer Your EPSON® FX-2180 9-pin dot matrix printer provides high-quality printing and great performance...
...to Know Your Printer 1 Getting to help suit your individual needs. Features include: q a variety of paper paths to suit your printing needs q the ability to handle a wide range of paper types, including continuous paper, multi-part forms with printer driver software, the EPSON Status Monitor ...2 utility for Microsoft® Windows® 95 that lets you check the status of up to Know Your Printer Your EPSON® FX-2180 9-pin dot matrix printer provides high-quality printing and great performance...

User Manual
Page 13
... you can easily tear off the printed sheets and save paper. For more information, see Chapter 2. 2 Getting to Know Your Printer Then you can use features that you finish printing. For more information, see Chapter 2. q Use the paper release lever to change the paper path without removing... switch to printing on single sheets without removing the paper. Easy-to-Use Features This section highlights some easy-to-use the tear-off feature to advance your continuous paper to the printer's tear-off feature to save the paper normally lost between documents. q Use the tear-off ...
... you can easily tear off the printed sheets and save paper. For more information, see Chapter 2. 2 Getting to Know Your Printer Then you can use features that you finish printing. For more information, see Chapter 2. q Use the paper release lever to change the paper path without removing... switch to printing on single sheets without removing the paper. Easy-to-Use Features This section highlights some easy-to-use the tear-off feature to advance your continuous paper to the printer's tear-off feature to save the paper normally lost between documents. q Use the tear-off ...

User Manual
Page 14
... a variety of -form and tear-off positions. paper release lever q Use the micro adjust feature to Know Your Printer 3 The micro adjust feature allows you can be fed into the printer from the top, front, bottom, or rear. You select the paper path that you to move the paper forward or backward in 1/216...
... a variety of -form and tear-off positions. paper release lever q Use the micro adjust feature to Know Your Printer 3 The micro adjust feature allows you can be fed into the printer from the top, front, bottom, or rear. You select the paper path that you to move the paper forward or backward in 1/216...

User Manual
Page 16
...labels in the rear slot, the labels may come off feature with labels, load the paper in the front paper slot because the paper path from the front push position and install it in the pull position, or you to Know Your Printer 5 Getting to load continuous paper from the front, ...rear, or bottom of the printer. Using a pull tractor If you often print on thick or heavy continuous paper, such as multi-part...
...labels in the rear slot, the labels may come off feature with labels, load the paper in the front paper slot because the paper path from the front push position and install it in the pull position, or you to Know Your Printer 5 Getting to load continuous paper from the front, ...rear, or bottom of the printer. Using a pull tractor If you often print on thick or heavy continuous paper, such as multi-part...

User Manual
Page 43
...disk drive. Click OK and follow the on installing and using the Status Monitor. 1-16 Setting Up the Printer To use the plug-and-play feature to install the printer driver for more information. 1. Insert Disk 1 of your network administrator for Windows 95 or NT 4.0. After ... install the printer driver for Windows 95, see page 1-17. Ask your printer driver software in the EPSON Printer Driver Setup dialog box shown below to install the printer driver for Windows 95, you can install the EPSON Status Monitor 2 utility program. Note: Installing the printer driver for ...
...disk drive. Click OK and follow the on installing and using the Status Monitor. 1-16 Setting Up the Printer To use the plug-and-play feature to install the printer driver for more information. 1. Insert Disk 1 of your network administrator for Windows 95 or NT 4.0. After ... install the printer driver for Windows 95, see page 1-17. Ask your printer driver software in the EPSON Printer Driver Setup dialog box shown below to install the printer driver for Windows 95, you can install the EPSON Status Monitor 2 utility program. Note: Installing the printer driver for ...

User Manual
Page 54
... however, for more information. See "Loading paper onto the pull tractor" later in Chapter 5) to print on single sheets with labels because the printer may curl around the platen and jam when you must set the paper thickness lever to 2 before printing on labels. they may not feed labels... on a shiny 2 backing sheet properly. T Never use the tear-off feature (by pressing the Tear Off/Bin button or turning on the auto tear-off their backing sheet and jam the printer. Do not try to feed continuous paper with labels backward; Loading Continuous Paper With Labels...
... however, for more information. See "Loading paper onto the pull tractor" later in Chapter 5) to print on single sheets with labels because the printer may curl around the platen and jam when you must set the paper thickness lever to 2 before printing on labels. they may not feed labels... on a shiny 2 backing sheet properly. T Never use the tear-off feature (by pressing the Tear Off/Bin button or turning on the auto tear-off their backing sheet and jam the printer. Do not try to feed continuous paper with labels backward; Loading Continuous Paper With Labels...

User Manual
Page 61
... damage the printer or cause it automatically loads the paper and starts printing. Removing the printed document from the front push tractor To remove the printed document, follow the steps in "Adjusting the Top-of -form position; After you can fix this using the micro adjust feature as described... in Chapter 4. If the first printed line on page 2-37. When the printer receives data, it to adjust the top-of -Form Position" on your printed document.
... damage the printer or cause it automatically loads the paper and starts printing. Removing the printed document from the front push tractor To remove the printed document, follow the steps in "Adjusting the Top-of -form position; After you can fix this using the micro adjust feature as described... in Chapter 4. If the first printed line on page 2-37. When the printer receives data, it to adjust the top-of -Form Position" on your printed document.

User Manual
Page 62
Reverse feeding several pages at a time may damage the printer or cause it to adjust the tear-off position" on Continuous Paper 2-15 2. c Caution: Never use the knob to lose the tear-off the printed document using the micro adjust feature. When you press the Load/Eject button. c Caution: ...Always tear off your paper's perforation is not properly aligned with the tear-off edge, you can adjust the tear-off position using the tear-off edge of the printer. 2 Note: If your printed...
Reverse feeding several pages at a time may damage the printer or cause it to adjust the tear-off position" on Continuous Paper 2-15 2. c Caution: Never use the knob to lose the tear-off the printed document using the micro adjust feature. When you press the Load/Eject button. c Caution: ...Always tear off your paper's perforation is not properly aligned with the tear-off edge, you can adjust the tear-off position using the tear-off edge of the printer. 2 Note: If your printed...

User Manual
Page 67
... open. 10. You may damage the printer or cause it automatically loads the paper and starts printing. The printed pages are fed over the paper guide toward the back of -form position. 2-20 Printing on your printed document. this by using the micro adjust feature as described in "Adjusting the Top-of...
... open. 10. You may damage the printer or cause it automatically loads the paper and starts printing. The printed pages are fed over the paper guide toward the back of -form position. 2-20 Printing on your printed document. this by using the micro adjust feature as described in "Adjusting the Top-of...

User Manual
Page 68
... cause it to the tear-off position. 2. Note: If your paper is not properly aligned with the tear-off edge, you resume printing, the printer automatically feeds the paper back to adjust the tear off position. 3. this may need to press the Tear Off/Bin button to advance the paper ... starts printing. When you can adjust the tear-off position using the tear-off position). c Caution: Never use the knob to the top-of the printer. Printing on page 2-41. Open the paper guide cover, and tear off position" on Continuous Paper 2-21 See "Adjusting the tear-off the printed document...
... cause it to the tear-off position. 2. Note: If your paper is not properly aligned with the tear-off edge, you resume printing, the printer automatically feeds the paper back to adjust the tear off position. 3. this may need to press the Tear Off/Bin button to advance the paper ... starts printing. When you can adjust the tear-off position using the tear-off position). c Caution: Never use the knob to the top-of the printer. Printing on page 2-41. Open the paper guide cover, and tear off position" on Continuous Paper 2-21 See "Adjusting the tear-off the printed document...

User Manual
Page 69
... of paper jams and improve the performance of the tractor and remove paper. However, you can also load paper onto the pull tractor from the printer, press the Load/Eject button to feed the paper backward to load paper in combination. Reverse feeding several pages at a time may come off...printing method, you press the Load/Eject button. You can use the tear-off feature with the pull tractor. To remove the remaining paper from the rear slot. c Caution: Always tear off their backing sheet inside the printer and cause a paper jam. Using the Tractor in the Pull Position Using the ...
... of paper jams and improve the performance of the tractor and remove paper. However, you can also load paper onto the pull tractor from the printer, press the Load/Eject button to feed the paper backward to load paper in combination. Reverse feeding several pages at a time may come off...printing method, you press the Load/Eject button. You can use the tear-off feature with the pull tractor. To remove the remaining paper from the rear slot. c Caution: Always tear off their backing sheet inside the printer and cause a paper jam. Using the Tractor in the Pull Position Using the ...

User Manual
Page 75
... make sure the edge guides are together in the middle of -Form Position" on page 2-37.) The printer will start printing) by pressing the LF/FF button or using the micro adjust feature. (To use the front slot, attach the front paper guide with the continuous paper positioned as shown below...G 13. Then close it to adjust the top-of -form position. Remove any slack from the paper; otherwise print quality may damage the printer or cause it . this may be reduced. 2-28 Printing on the printer. 14. If you use the micro adjust feature, see "Adjusting the Top-of the paper guide. 12.
... make sure the edge guides are together in the middle of -Form Position" on page 2-37.) The printer will start printing) by pressing the LF/FF button or using the micro adjust feature. (To use the front slot, attach the front paper guide with the continuous paper positioned as shown below...G 13. Then close it to adjust the top-of -form position. Remove any slack from the paper; otherwise print quality may damage the printer or cause it . this may be reduced. 2-28 Printing on the printer. 14. If you use the micro adjust feature, see "Adjusting the Top-of the paper guide. 12.

User Manual
Page 79
... (the position where the printer will start printing) using the micro adjust feature (described on Continuous Paper otherwise print quality may damage the printer or cause it to the pull tractor position. Attach the printer cover and close the printer cover before printing. The printer does not print when the...page 2-37. c Caution T Never use the knob to remove slack in the paper between the push and pull tractors using the micro adjust feature as described in step 2. 8. Then slide the edge guides to adjust the top-of -form position. T Always remove any slack in the...
... (the position where the printer will start printing) using the micro adjust feature (described on Continuous Paper otherwise print quality may damage the printer or cause it to the pull tractor position. Attach the printer cover and close the printer cover before printing. The printer does not print when the...page 2-37. c Caution T Never use the knob to remove slack in the paper between the push and pull tractors using the micro adjust feature as described in step 2. 8. Then slide the edge guides to adjust the top-of -form position. T Always remove any slack in the...