Product Information Guide
Page 3
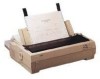
... #8750 Wide: #8755 Life expectancy at 14 dots/character: 3 million characters MTBF: Standard: 4000 power-on hours Wide: 6000 power-on hours Print head life: 100 million characters/wire Dimensions and...printer. 9-Pin Printers 10/13/92 FX-870/1170-3 FX-870/1170 Mechanical Paper-feed methods: Friction (with D3 CSA22.2 No. 220 R.F.I. Safety Approvals Safety standards: UL1950 with or without condensation): Operation: 10% to 80% RH Storage: 5% to 85% RH Interface Cards You can use optional interface cards to 132 V Rated current: 1.8 A Power consumption: (during self-test printing...
... #8750 Wide: #8755 Life expectancy at 14 dots/character: 3 million characters MTBF: Standard: 4000 power-on hours Wide: 6000 power-on hours Print head life: 100 million characters/wire Dimensions and...printer. 9-Pin Printers 10/13/92 FX-870/1170-3 FX-870/1170 Mechanical Paper-feed methods: Friction (with D3 CSA22.2 No. 220 R.F.I. Safety Approvals Safety standards: UL1950 with or without condensation): Operation: 10% to 80% RH Storage: 5% to 85% RH Interface Cards You can use optional interface cards to 132 V Rated current: 1.8 A Power consumption: (during self-test printing...

Product Information Guide
Page 6
... is off for these fonts. CI Entering the Micro-feed mode (Hold down to advance continuous paper to select a font (draft, Epson Roman, or Epson Sans Serif). PAPER FEED Press this button once to advance paper to the tear-off position. This light is already loaded in the...-of paper.) When you can be printed using the ESC \ (characters) or ESC * (one character) software command. Other control-panel features Default setting mode: Self test: Hold down the PAUSE button while you turn on the printer to perform the self test. FX-870/1170 Symbol set can select the bin before...
... is off for these fonts. CI Entering the Micro-feed mode (Hold down to advance continuous paper to select a font (draft, Epson Roman, or Epson Sans Serif). PAPER FEED Press this button once to advance paper to the tear-off position. This light is already loaded in the...-of paper.) When you can be printed using the ESC \ (characters) or ESC * (one character) software command. Other control-panel features Default setting mode: Self test: Hold down the PAUSE button while you turn on the printer to perform the self test. FX-870/1170 Symbol set can select the bin before...
User Manual
Page 10
...lines-per -page setting for paper that it prints the last few things you choose single sheets. When you want. 4. This is not 8.5 x 11 inches, create a test document using single sheets or continuous paper. See Chapter 1 for the right printer to adjust; Some programs also let you indicate ...whether you may notice that your printer prints the first page of your file correctly but then prints too low on the next page, or...
...lines-per -page setting for paper that it prints the last few things you choose single sheets. When you want. 4. This is not 8.5 x 11 inches, create a test document using single sheets or continuous paper. See Chapter 1 for the right printer to adjust; Some programs also let you indicate ...whether you may notice that your printer prints the first page of your file correctly but then prints too low on the next page, or...

User Manual
Page 11
... 5 Chapter 1 Setting Up the Printer 1-1 Unpacking the Printer Choosing a Place for the Printer 1-2 Assembling the Printer 1-6 Testing the Printer 1-10 Connecting the Printer to Your Computer 1-14 Configuring Your Software for the Printer 1-15 Chapter 2 Paper Handling 2-1 Selecting a Paper Feeding Method 2-2 Using Single Sheets 2-4 Using Continuous Paper 2-6 Switching Between Continuous and Single Sheets 2-20 Printing on Special Paper 2-23...
... 5 Chapter 1 Setting Up the Printer 1-1 Unpacking the Printer Choosing a Place for the Printer 1-2 Assembling the Printer 1-6 Testing the Printer 1-10 Connecting the Printer to Your Computer 1-14 Configuring Your Software for the Printer 1-15 Chapter 2 Paper Handling 2-1 Selecting a Paper Feeding Method 2-2 Using Single Sheets 2-4 Using Continuous Paper 2-6 Switching Between Continuous and Single Sheets 2-20 Printing on Special Paper 2-23...

User Manual
Page 16
... be observed to avoid damage to read this chapter first. Be sure to your printer. If the printer does not operate properly or the printed results are not what you expect, see Chapter 6 for setting up , testing, and connecting the printer. Warnings, Cautions, and Notes I!!!!!!' Other chapters contain information on unpacking, setting up and operating...
... be observed to avoid damage to read this chapter first. Be sure to your printer. If the printer does not operate properly or the printed results are not what you expect, see Chapter 6 for setting up , testing, and connecting the printer. Warnings, Cautions, and Notes I!!!!!!' Other chapters contain information on unpacking, setting up and operating...

User Manual
Page 28
...Testing the Printer Running the self test You can load paper for full details on the printer. Also, you turn on paper handling. Make sure that the printer is turned off. Hold down the PAPER FEED button while you can run the test using the currently selected font. 1. The printer prints the self test... using a single sheet of paper, loaded from the rear, front, top, or bottom. Move the paper-release lever to run the self test with continuous paper or single sheets. ...
...Testing the Printer Running the self test You can load paper for full details on the printer. Also, you turn on paper handling. Make sure that the printer is turned off. Hold down the PAPER FEED button while you can run the test using the currently selected font. 1. The printer prints the self test... using a single sheet of paper, loaded from the rear, front, top, or bottom. Move the paper-release lever to run the self test with continuous paper or single sheets. ...
User Manual
Page 30
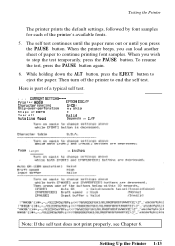
... the ALT button, press the EJECT button to stop the test temporarily, press the PAUSE button. CIJRRECIT SETTIl'ICi --I - I"ri.11 t e r mode EF'SOCI l3c/I -.- Character spacinq I. 0 c u i SGrip-over--perforation H o skip S h a p e o f zercl 0 Tear off the printer to continue printing font samples. Testing the Printer The printer prints the default settings, followed by font samples for each of...
... the ALT button, press the EJECT button to stop the test temporarily, press the PAUSE button. CIJRRECIT SETTIl'ICi --I - I"ri.11 t e r mode EF'SOCI l3c/I -.- Character spacinq I. 0 c u i SGrip-over--perforation H o skip S h a p e o f zercl 0 Tear off the printer to continue printing font samples. Testing the Printer The printer prints the default settings, followed by font samples for each of...
User Manual
Page 31
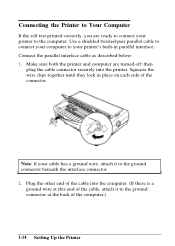
... connector. Squeeze the wire clips together until they lock in parallel interface. Connecting the Printer to Your Computer If the self test printed correctly, you are turned off; Make sure both the printer and computer are ready to connect your printer to the ground connector at this end of the cable, attach it to your...
... connector. Squeeze the wire clips together until they lock in parallel interface. Connecting the Printer to Your Computer If the self test printed correctly, you are turned off; Make sure both the printer and computer are ready to connect your printer to the ground connector at this end of the cable, attach it to your...

User Manual
Page 120
... eliminate the top margin and to choose the correct printer from your application software. Troubleshooting 6-7 If possible, specify single-sheet paper with your application program's menu. If the printer still does not print correctly, try the self test described in the computer, the software, or the cable.... Be sure to reduce the page length. If the self test works properly, the printer is all right and the problem probably lies in Chapter 1. Printing l Regular gays occur in the printout. 1 inch skip-over -perforation off in the default-setting...
... eliminate the top margin and to choose the correct printer from your application software. Troubleshooting 6-7 If possible, specify single-sheet paper with your application program's menu. If the printer still does not print correctly, try the self test described in the computer, the software, or the cable.... Be sure to reduce the page length. If the self test works properly, the printer is all right and the problem probably lies in Chapter 1. Printing l Regular gays occur in the printout. 1 inch skip-over -perforation off in the default-setting...
User Manual
Page 134
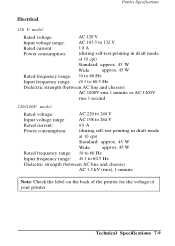
Technical Specifications 7-9 Printer Specifications Electrical 120 V model: Rated voltage: AC 120 V Input voltage range: AC 103.5 to 132 V Rated current: 1.8 A Power consumption: (during self-test printing in draft mode at 10 cpi) Standard: approx. 45 W Wide: approx. 45 W Rated frequency range: 50 to ... model: Rated voltage: AC 220 to 240 V Input voltage range: AC 198 to 264 V Rated current: 0.9 A Power consumption: (during self-test printing in draft mode at 10 cpi) Standard: approx. 45 W Wide: approx. 45 W Rated frequency range: 50 to 60 Hz Input frequency range...
Technical Specifications 7-9 Printer Specifications Electrical 120 V model: Rated voltage: AC 120 V Input voltage range: AC 103.5 to 132 V Rated current: 1.8 A Power consumption: (during self-test printing in draft mode at 10 cpi) Standard: approx. 45 W Wide: approx. 45 W Rated frequency range: 50 to ... model: Rated voltage: AC 220 to 240 V Input voltage range: AC 198 to 264 V Rated current: 0.9 A Power consumption: (during self-test printing in draft mode at 10 cpi) Standard: approx. 45 W Wide: approx. 45 W Rated frequency range: 50 to 60 Hz Input frequency range...

User Manual
Page 179
...task, such as a buffer and for storing user-defined characters. tear off A paper feed operation that helps you run the self test, the printer prints the characters stored in the upper part of continuous paper to the tear-off position and then feeds the paper back to its ROM....by sending a command, an INIT signal, or by turning the printer off . Glossary GL-5 self test A method for checking the operation of the printer's memory used as word processing or financial planning. The portion of the printer. subscript Printing in which each character is turned off and then back on....
...task, such as a buffer and for storing user-defined characters. tear off A paper feed operation that helps you run the self test, the printer prints the characters stored in the upper part of continuous paper to the tear-off position and then feeds the paper back to its ROM....by sending a command, an INIT signal, or by turning the printer off . Glossary GL-5 self test A method for checking the operation of the printer's memory used as word processing or financial planning. The portion of the printer. subscript Printing in which each character is turned off and then back on....
User Manual
Page 183
... 5, 2-2-3, 4-13 Paper-thickness lever, Intro 5, 2-23-24 Parallel interface, 1-14 PAUSE button, control panel, 3-3 Power cord, 1-10 Printable area, 7-6-7 Print direction, 7-2 Print test, running, 1-10-13 Problems, see Troubleshooting Protective materials removing, 1-3 Pull tractor, loading paper, 2-16-18 optional, 4-13-15 position, 2-8-9 Push tractor, ...3-20 Technical specifications, 7-1-18 Tractor unit, loading paper, 2-10-24 optional, 4-13--15 position, 2-7-10 Transporting the printer, 5-4 Troubleshooting, 6-1-12 directory of problems, 6-2 options, 6-11-12 paper handling, 6-8-10 power supply...
... 5, 2-2-3, 4-13 Paper-thickness lever, Intro 5, 2-23-24 Parallel interface, 1-14 PAUSE button, control panel, 3-3 Power cord, 1-10 Printable area, 7-6-7 Print direction, 7-2 Print test, running, 1-10-13 Problems, see Troubleshooting Protective materials removing, 1-3 Pull tractor, loading paper, 2-16-18 optional, 4-13-15 position, 2-8-9 Push tractor, ...3-20 Technical specifications, 7-1-18 Tractor unit, loading paper, 2-10-24 optional, 4-13--15 position, 2-7-10 Transporting the printer, 5-4 Troubleshooting, 6-1-12 directory of problems, 6-2 options, 6-11-12 paper handling, 6-8-10 power supply...
Service Manual
Page 3
...WORK. 3< WHEN PERFORMING TESTING AS DICTATED WITHIN THIS MANUAL, DO NOT CONNECT THE UNIT TO A POWER SOURCE UNTIL INSTRUCTED TO DO SO. ALWAYS VERIFY THAT THE EPSON PRODUCT HAS BEEN DISCONNECTED FROM THE POWER SOURCE BEFORE REMOVING OR REPLACING PRINTED CIRCUIT BOARDS AND/OR ...INDIVIDUAL CHIPS. 4. REPLACE MALFUNCTIONING COMPONENTS ONLY WITH THOSE COMPONENTS RECOMMENDED BY THE MANUFACTURER; ii - REPAIRS ON EPSON PRODUCT SHOULD BE PERFORMED ONLY BY AN EPSON CERTIFIED REPAIR TECHNICIAN. 2. MAKE CERTAIN THAT...
...WORK. 3< WHEN PERFORMING TESTING AS DICTATED WITHIN THIS MANUAL, DO NOT CONNECT THE UNIT TO A POWER SOURCE UNTIL INSTRUCTED TO DO SO. ALWAYS VERIFY THAT THE EPSON PRODUCT HAS BEEN DISCONNECTED FROM THE POWER SOURCE BEFORE REMOVING OR REPLACING PRINTED CIRCUIT BOARDS AND/OR ...INDIVIDUAL CHIPS. 4. REPLACE MALFUNCTIONING COMPONENTS ONLY WITH THOSE COMPONENTS RECOMMENDED BY THE MANUFACTURER; ii - REPAIRS ON EPSON PRODUCT SHOULD BE PERFORMED ONLY BY AN EPSON CERTIFIED REPAIR TECHNICIAN. 2. MAKE CERTAIN THAT...
Service Manual
Page 7
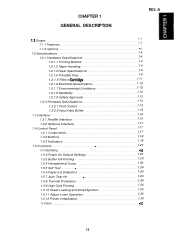
... Specifications 1. . -12 1.2.1.7 Environmental Conditions 1. -12 1.2.1.8 Reliability 1. . -.13 1.2.1.9 Safety Approvals 1. .-13 1.2.2 Firmware Specifications 1. .-13 1.2.2.1 Print Control 1. .-13 1.2.2.2 Input Data Buffer 1. .-14 1.3 Interface ...1. .-.1. 5 1.3.1 Parallel Interface 1. .-.15 1.3.2 Optional Interface 1. .-.17 1.4 Control... 1. .-23 1.5.3 Buffer-full Printing 1. . -. 23 1.5.4 Hexadecimal Dump 1. . -.23 1.5.5 Self Test 1. .-24 1.5.6 Paper-out Detection 1. -. 24 1.5.7 Auto Tear-off 1. .-24 1.5.8 Thermal Protection 1. . -. 24 1.5.9 High Duty Printing 1. . -. 24 1.5.10 ...
... Specifications 1. . -12 1.2.1.7 Environmental Conditions 1. -12 1.2.1.8 Reliability 1. . -.13 1.2.1.9 Safety Approvals 1. .-13 1.2.2 Firmware Specifications 1. .-13 1.2.2.1 Print Control 1. .-13 1.2.2.2 Input Data Buffer 1. .-14 1.3 Interface ...1. .-.1. 5 1.3.1 Parallel Interface 1. .-.15 1.3.2 Optional Interface 1. .-.17 1.4 Control... 1. .-23 1.5.3 Buffer-full Printing 1. . -. 23 1.5.4 Hexadecimal Dump 1. . -.23 1.5.5 Self Test 1. .-24 1.5.6 Paper-out Detection 1. -. 24 1.5.7 Auto Tear-off 1. .-24 1.5.8 Thermal Protection 1. . -. 24 1.5.9 High Duty Printing 1. . -. 24 1.5.10 ...
Service Manual
Page 33
... paper handling and font selection. ) When pages are printed from overheating. 1.5.9 High Duty Printing The printer stops printing when the printing duty is set the printer ready to print by pressing the PAUSE button. 1.5.7 Auto Tear-off the printer. (The control panel is used for scaling the sheet length. The self test prints out the following: (a) Maximum printable lines (only...
... paper handling and font selection. ) When pages are printed from overheating. 1.5.9 High Duty Printing The printer stops printing when the printing duty is set the printer ready to print by pressing the PAUSE button. 1.5.7 Auto Tear-off the printer. (The control panel is used for scaling the sheet length. The self test prints out the following: (a) Maximum printable lines (only...

Service Manual
Page 77
... gap adjusted correctly? Is th•e paper path clear of distortion? REV.-A 3.1.3 Service Checks After Repair Before you send the printer back to the customer, fill in the checklist in Table 3-3 to Check Are any wires worn out? This checklist facilitates servicing ...8226;l Not necessary u Checked, u Not necessary u Checked, lNot necessary Adjustment System upgrade Paper advance mechanism Paper path Ribbon mask Self-print test On-1ine test Printh• ead Printi•ng ROM version Is pa•per advancing smoothly? Is th•e tractor feeding the paper correctly?...
... gap adjusted correctly? Is th•e paper path clear of distortion? REV.-A 3.1.3 Service Checks After Repair Before you send the printer back to the customer, fill in the checklist in Table 3-3 to Check Are any wires worn out? This checklist facilitates servicing ...8226;l Not necessary u Checked, u Not necessary u Checked, lNot necessary Adjustment System upgrade Paper advance mechanism Paper path Ribbon mask Self-print test On-1ine test Printh• ead Printi•ng ROM version Is pa•per advancing smoothly? Is th•e tractor feeding the paper correctly?...
Service Manual
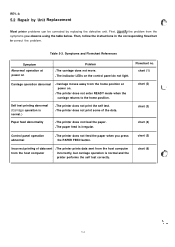
Page 108
... the home position. Flowchart no. chart (5) Incorrect printing of the dots. chart (4) Control panel operation abnormal q The printer does not feed the paper when you observe using the table below. Self test printing abnormal (Carriage operation is normal and the 6 'm., ,.. ,>; q The printer does not print some of data sent q The printer prints data sent from the host computer chart...
... the home position. Flowchart no. chart (5) Incorrect printing of the dots. chart (4) Control panel operation abnormal q The printer does not feed the paper when you observe using the table below. Self test printing abnormal (Carriage operation is normal and the 6 'm., ,.. ,>; q The printer does not print some of data sent q The printer prints data sent from the host computer chart...

Service Manual
Page 111
Replace the BOARD ASSY,, C094 MAIN. *, *-, ~ No 5-7 properly inserted? Flowhart (3) self test printing abnormal START & Set the platen gap adjust lever to O and perform the self test. (To start the self test, turn on the printer while holding down the PAPER FEED button.) I Does the printer REV.-A CN3, 4, 5, 6, 7,8,9, and 13 connecting the BOARD ASSY., C094 MAIN and the printer mechanism I Yes Perform the bidirectional , Adjust the platen gap.
Replace the BOARD ASSY,, C094 MAIN. *, *-, ~ No 5-7 properly inserted? Flowhart (3) self test printing abnormal START & Set the platen gap adjust lever to O and perform the self test. (To start the self test, turn on the printer while holding down the PAPER FEED button.) I Does the printer REV.-A CN3, 4, 5, 6, 7,8,9, and 13 connecting the BOARD ASSY., C094 MAIN and the printer mechanism I Yes Perform the bidirectional , Adjust the platen gap.

Service Manual
Page 120
.... Otherwise, replace IC4. CHl=2b CH2=50V 1 1I[ TIME=O.5ms 1 I (CH2:P IN 31) ~~ i ! REV.-A Table 5-5. A particular dot fails to print. t (CHl:Base) * I 1 b +-Ii-& +1+-1- -+-H+ U+t -W+ - I 5-16 Repairing the BOARD ASSEMBLY, C094 MAIN (Continued) Problem Self test printing abnormal Symptom Cause The printer IC4 is defective L J- (Q2, 4,5,6, 4CH2:Emitter) 8,9, 10, 11, or 12). * J b m -E m 9m - -- % - 7.i # I I I I I I I I II I 1 I I 9 ~ If the signal...
.... Otherwise, replace IC4. CHl=2b CH2=50V 1 1I[ TIME=O.5ms 1 I (CH2:P IN 31) ~~ i ! REV.-A Table 5-5. A particular dot fails to print. t (CHl:Base) * I 1 b +-Ii-& +1+-1- -+-H+ U+t -W+ - I 5-16 Repairing the BOARD ASSEMBLY, C094 MAIN (Continued) Problem Self test printing abnormal Symptom Cause The printer IC4 is defective L J- (Q2, 4,5,6, 4CH2:Emitter) 8,9, 10, 11, or 12). * J b m -E m 9m - -- % - 7.i # I I I I I I I I II I 1 I I 9 ~ If the signal...

Service Manual
Page 123
...test printing abnormal. Repairing the Printer Mechanism (Continued) symptom Cause Checkpoint Solution The carriage The common wires Check the common moves, but does not feed paper properly. The resistance should be approximately 16.5 ohms. Check if the dot wire is not uniform. The printing is too light or the print... in the paper path. defective gear. The MOTOR ASSY., PF is not adjusted properly. Replace the FFC. The printer does not print a particular dot. Replace the printhead. Set the LEVER, G. The correct gap is shorted, also check the drivers on the main...
...test printing abnormal. Repairing the Printer Mechanism (Continued) symptom Cause Checkpoint Solution The carriage The common wires Check the common moves, but does not feed paper properly. The resistance should be approximately 16.5 ohms. Check if the dot wire is not uniform. The printing is too light or the print... in the paper path. defective gear. The MOTOR ASSY., PF is not adjusted properly. Replace the FFC. The printer does not print a particular dot. Replace the printhead. Set the LEVER, G. The correct gap is shorted, also check the drivers on the main...


