
Technical Brief (Impact Printers)
Page 5
Technical Brief-Multimedia projectors Page 5 Versatility-Computer-based set-up EPSON Remote! Start UP Utility Ver. 1.22 Copyright (C) SEIKO EPSON CORP. 1992 Printer: FX-2180 Mode: ESC/P Port: LPT1 Font : Roman Pitch : 10CPI Print Quality : LQ Character Table... 2 : 11 inch CutSheetFeeder 2 : 8.5mm Manual Rear : 14 inch Manual Rear : 8.5mm Help: Select printer Font. Utility EPSON Remote! Simplifies setup when installing multiple printers-just make the necessary changes in the software utility, and download the settings to host computer connection. Manual Front :...
Technical Brief-Multimedia projectors Page 5 Versatility-Computer-based set-up EPSON Remote! Start UP Utility Ver. 1.22 Copyright (C) SEIKO EPSON CORP. 1992 Printer: FX-2180 Mode: ESC/P Port: LPT1 Font : Roman Pitch : 10CPI Print Quality : LQ Character Table... 2 : 11 inch CutSheetFeeder 2 : 8.5mm Manual Rear : 14 inch Manual Rear : 8.5mm Help: Select printer Font. Utility EPSON Remote! Simplifies setup when installing multiple printers-just make the necessary changes in the software utility, and download the settings to host computer connection. Manual Front :...
Product Information Guide
Page 10
...installation or setup section that order of preference. By reading the characters printed in the text field on the printer. 3. Nonprintable codes, such as control codes, are listed in the order of preference): FX-870 FX-1170 FX-850 FX-1050 EX-800 EX-1000 FX-86e FX-286e FX-80+ FX-l00+ FX-80 FX-100 Epson printer 9-pin printer...the front with the tractor unit installed in the front. Hold down the PAUSE button while you can handle continuous paper up to use so that lists one of the following list (the printers are represented by dots. Your printer prints all the codes it ...
...installation or setup section that order of preference. By reading the characters printed in the text field on the printer. 3. Nonprintable codes, such as control codes, are listed in the order of preference): FX-870 FX-1170 FX-850 FX-1050 EX-800 EX-1000 FX-86e FX-286e FX-80+ FX-l00+ FX-80 FX-100 Epson printer 9-pin printer...the front with the tractor unit installed in the front. Hold down the PAUSE button while you can handle continuous paper up to use so that lists one of the following list (the printers are represented by dots. Your printer prints all the codes it ...
Product Information Guide
Page 11
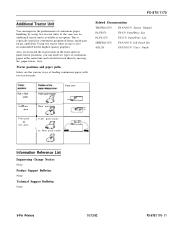
...and paper paths below are the various ways of feeding continuous paper with two tractor units. Also, if you install the tractor units in the front and rear push-tractor positions, you can improve the performance of continuous paper ...FX-1170 Parts/Price List SPKFX8/1170 FX-870/1170 Self Paced Kit 4001255 FX-870/1170 User's Guide Paper path Pull + rear push Front push rear push + Rear push-tractor I Front push-tractor I 43 I or Rear push-tractor Information Reference List Engineering Change Notices None Product Support Bulletins None Technical Support Bulletins None 9-Pin Printers...
...and paper paths below are the various ways of feeding continuous paper with two tractor units. Also, if you install the tractor units in the front and rear push-tractor positions, you can improve the performance of continuous paper ...FX-1170 Parts/Price List SPKFX8/1170 FX-870/1170 Self Paced Kit 4001255 FX-870/1170 User's Guide Paper path Pull + rear push Front push rear push + Rear push-tractor I Front push-tractor I 43 I or Rear push-tractor Information Reference List Engineering Change Notices None Product Support Bulletins None Technical Support Bulletins None 9-Pin Printers...

User Manual
Page 3
... this equipment does cause interference to radio and television reception, which can radiate radio frequency energy and, if not installed and used in a residential installation. Consult the dealer or an experienced radio/TV technician for help. However, there is connected. . Reorient or relocate the receiving antenna. . For Canadian Users This ...
... this equipment does cause interference to radio and television reception, which can radiate radio frequency energy and, if not installed and used in a residential installation. Consult the dealer or an experienced radio/TV technician for help. However, there is connected. . Reorient or relocate the receiving antenna. . For Canadian Users This ...

User Manual
Page 4
... of power source indicated on it , and use your dealer or local power company. . Unplug the printer from overheating. Placing the printer on . If you set up your printer where the cord will be equipped with a plug having a third (grounding) pin, which fits only into.... . Follow all of power available, consult your printer near or over a radiator or heat register. . Never place the printer near water or spill any slots or openings in installation unless proper ventilation is a safety feature. This is provided. . This printer may be walked on a bed, sofa, rug...
... of power source indicated on it , and use your dealer or local power company. . Unplug the printer from overheating. Placing the printer on . If you set up your printer where the cord will be equipped with a plug having a third (grounding) pin, which fits only into.... . Follow all of power available, consult your printer near or over a radiator or heat register. . Never place the printer near water or spill any slots or openings in installation unless proper ventilation is a safety feature. This is provided. . This printer may be walked on a bed, sofa, rug...

User Manual
Page 6
...-8911: Assistance in locating your nearest Authorized Epson Reseller or Service Center Technical assistance with the installation, configuration, and operation of Epson products Epson technical information library fax service Product literature with technical specifications on our current and new products Sales of authorized Epson dealers and Service Centers. Epson also provides the following support services through...
...-8911: Assistance in locating your nearest Authorized Epson Reseller or Service Center Technical assistance with the installation, configuration, and operation of Epson products Epson technical information library fax service Product literature with technical specifications on our current and new products Sales of authorized Epson dealers and Service Centers. Epson also provides the following support services through...
User Manual
Page 10
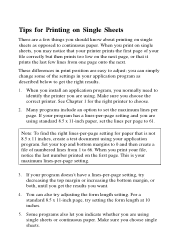
...choose. 2. This is not 8.5 x 11 inches, create a test document using your program doesn't have a lines-per -page setting for paper that your printer prints the first page of the settings in print position are easy to 66. If your application program. For a standard 8.5 x 11-inch page, try ... can also try adjusting the form length setting. Tips for Printing on Single Sheets There are a few lines from 1 to adjust; When you install an application program, you normally need to continuous paper. Note: To find the right lines-per -page setting, try setting the form length at...
...choose. 2. This is not 8.5 x 11 inches, create a test document using your program doesn't have a lines-per -page setting for paper that your printer prints the first page of the settings in print position are easy to 66. If your application program. For a standard 8.5 x 11-inch page, try ... can also try adjusting the form length setting. Tips for Printing on Single Sheets There are a few lines from 1 to adjust; When you install an application program, you normally need to continuous paper. Note: To find the right lines-per -page setting, try setting the form length at...

User Manual
Page 15
Interface Card Optional interface cards are given in your local Epson dealer for the wide carriage) This front sheet guide allows you to supplement the printer's built-in option part numbers, represented by an asterisk (*), varies by country. Front Sheet Guide (C814001 for the standard-width ... in North and South American countries only.) The last figure in parallel interface. Guidelines for choosing the right interface and instructions on installing the cards are available to load single sheets from the front paper slot. (This option may not be available in some countries.)...
Interface Card Optional interface cards are given in your local Epson dealer for the wide carriage) This front sheet guide allows you to supplement the printer's built-in option part numbers, represented by an asterisk (*), varies by country. Front Sheet Guide (C814001 for the standard-width ... in North and South American countries only.) The last figure in parallel interface. Guidelines for choosing the right interface and instructions on installing the cards are available to load single sheets from the front paper slot. (This option may not be available in some countries.)...

User Manual
Page 16
... what you expect, see Chapter 6 for setting up , testing, and connecting the printer. Warnings, Cautions, and Notes I!!!!!!' Chapter 1 contains information on installing options, general maintenance, specifications, and printer commands. Other chapters contain information on unpacking, setting up and operating your printer. Notes contain important information and useful tips on paper handling and day-to...
... what you expect, see Chapter 6 for setting up , testing, and connecting the printer. Warnings, Cautions, and Notes I!!!!!!' Chapter 1 contains information on installing options, general maintenance, specifications, and printer commands. Other chapters contain information on unpacking, setting up and operating your printer. Notes contain important information and useful tips on paper handling and day-to...
User Manual
Page 18
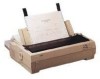
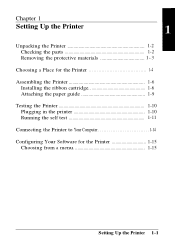
Chapter 1 Setting Up the Printer Unpacking the Printer 1-2 Checking the parts 1-2 Removing the protective materials 1 - 3 Choosing a Place for the Printer 1-4 Assembling the Printer 1-6 Installing the ribbon cartridge 1-6 Attaching the paper guide 1-9 Testing the Printer 1-10 Plugging in the printer 1-10 Running the self test 1-11 Connecting the Printer to Your Computer 1-14 Configuring Your Software for the Printer 1-15 Choosing from a menu 1-15 Setting Up the Printer l - l
Chapter 1 Setting Up the Printer Unpacking the Printer 1-2 Checking the parts 1-2 Removing the protective materials 1 - 3 Choosing a Place for the Printer 1-4 Assembling the Printer 1-6 Installing the ribbon cartridge 1-6 Attaching the paper guide 1-9 Testing the Printer 1-10 Plugging in the printer 1-10 Running the self test 1-11 Connecting the Printer to Your Computer 1-14 Configuring Your Software for the Printer 1-15 Choosing from a menu 1-15 Setting Up the Printer l - l

User Manual
Page 22
... you install a cut-sheet feeder, keep your continuous paper feeds smoothly. Setting UP the Printer 1-5 If you provide enough clearance below the stand and between its legs so that they do not interfere with paper feeding. Choosing a Place for the Printer Note: If you plan to the printer stand.... l Never use a stand that the paper has a straight path into the printer. l Position your printer's power cord and interface cable so that your printer absolutely level. If possible, secure the cables to use a printer stand, follow these guidelines: l Use a stand that supports at least twice the...
... you install a cut-sheet feeder, keep your continuous paper feeds smoothly. Setting UP the Printer 1-5 If you provide enough clearance below the stand and between its legs so that they do not interfere with paper feeding. Choosing a Place for the Printer Note: If you plan to the printer stand.... l Never use a stand that the paper has a straight path into the printer. l Position your printer's power cord and interface cable so that your printer absolutely level. If possible, secure the cables to use a printer stand, follow these guidelines: l Use a stand that supports at least twice the...

User Manual
Page 23
Lift the printer cover by its back edge and then pull it straight up and off . 3. Grasp the tabs on each side of the unit; then pull the paper-tension unit up and off the printer. 4. Press up firmly with your thumbs to the middle of the printer. 1-6 Setting Up the Printer Slide the print head to lift the front of the paper-tension unit as shown below. Make sure the printer is not plugged into an electrical outlet. 2. Assembling the Printer Installing the ribbon cartridge 1.
Lift the printer cover by its back edge and then pull it straight up and off . 3. Grasp the tabs on each side of the unit; then pull the paper-tension unit up and off the printer. 4. Press up firmly with your thumbs to the middle of the printer. 1-6 Setting Up the Printer Slide the print head to lift the front of the paper-tension unit as shown below. Make sure the printer is not plugged into an electrical outlet. 2. Assembling the Printer Installing the ribbon cartridge 1.
User Manual
Page 32
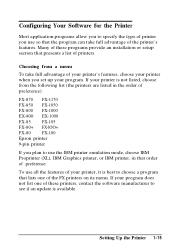
... not list one of printers. If your printer, it is best to use so that presents a list of the FX printers on its menu. Choosing from the following list (the printers are listed in that lists one of these programs provide an installation or setup section that ... specify the type of printer you use the IBM printer emulation mode, choose IBM Proprinter (XL), IBM Graphics printer, or IBM printer, in the order of preference): FX-870 FX-1170 FX-850 FX-1050 FX-800 FX-1000 EX-800 EX-1000 FX-85 FX-105 FX-80+ FX-lOO+ FX-80 FX-100 Epson printer 9-pin printer If you plan to...
... not list one of printers. If your printer, it is best to use so that presents a list of the FX printers on its menu. Choosing from the following list (the printers are listed in that lists one of these programs provide an installation or setup section that ... specify the type of printer you use the IBM printer emulation mode, choose IBM Proprinter (XL), IBM Graphics printer, or IBM printer, in the order of preference): FX-870 FX-1170 FX-850 FX-1050 FX-800 FX-1000 EX-800 EX-1000 FX-85 FX-105 FX-80+ FX-lOO+ FX-80 FX-100 Epson printer 9-pin printer If you plan to...

User Manual
Page 35
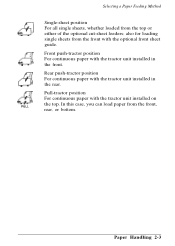
... any type of paper: l Choose the top paper guide to load continuous paper from the position you choose. 2-2 Paper Handling Selecting a Paper Feeding Method Your printer provides four paper paths so you simply set the paper-release lever to suit your particular needs: use it as a front push tractor, rear push... can mount the tractor unit in three different positions to select the active paper path in the appropriate location to print on single sheets. The printer automatically loads paper from the front, rear, or bottom. l Install the tractor unit in your...
... any type of paper: l Choose the top paper guide to load continuous paper from the position you choose. 2-2 Paper Handling Selecting a Paper Feeding Method Your printer provides four paper paths so you simply set the paper-release lever to suit your particular needs: use it as a front push tractor, rear push... can mount the tractor unit in three different positions to select the active paper path in the appropriate location to print on single sheets. The printer automatically loads paper from the front, rear, or bottom. l Install the tractor unit in your...
User Manual
Page 36
... top or either of the optional cut-sheet feeders; Paper Handling 2-3 Front push-tractor position For continuous paper with the tractor unit installed on the top. Pull-tractor position For continuous paper with the tractor unit installed in the rear. also for loading single sheets from the front with the tractor unit... installed in the front. c3 :. 43 PULL Single-sheet position For all single sheets, whether loaded from the front, rear, or bottom. Selecting a Paper Feeding Method :. ...
... top or either of the optional cut-sheet feeders; Paper Handling 2-3 Front push-tractor position For continuous paper with the tractor unit installed on the top. Pull-tractor position For continuous paper with the tractor unit installed in the rear. also for loading single sheets from the front with the tractor unit... installed in the front. c3 :. 43 PULL Single-sheet position For all single sheets, whether loaded from the front, rear, or bottom. Selecting a Paper Feeding Method :. ...

User Manual
Page 39
... for a description of each position. Tractor position and available paper paths Below are the possible ways of your paper supply. Using Continuous Paper You can install the tractor unit in one of the following positions: front, rear, or pull. To print on the wide carriage. See Setting the paperrelease lever at... paper through the front, rear, or bottom paper slots, depending upon the position of the tractor unit and the placement of feeding continuous paper. Your printer can handle continuous paper up to 254 mm (10.0 inches) wide on the standard-width carriage and up to use.
... for a description of each position. Tractor position and available paper paths Below are the possible ways of your paper supply. Using Continuous Paper You can install the tractor unit in one of the following positions: front, rear, or pull. To print on the wide carriage. See Setting the paperrelease lever at... paper through the front, rear, or bottom paper slots, depending upon the position of the tractor unit and the placement of feeding continuous paper. Your printer can handle continuous paper up to 254 mm (10.0 inches) wide on the standard-width carriage and up to use.

User Manual
Page 40
If the optional front sheet guide is turned off. 2. Make sure the printer is installed, remove it by pressing the blue lock tabs while you lift it out of the printer. 3. Changing tractor positions Before installing the tractor in the front push-tractor position 1. Open the front cover. To... that has a large enough opening for instructions on both sides and pulling it straight out of the printer. If you want to feed without obstruction. Installing in a different position, remove it from its current position by grasping the fins on loading continuous paper with the front ...
If the optional front sheet guide is turned off. 2. Make sure the printer is installed, remove it by pressing the blue lock tabs while you lift it out of the printer. 3. Changing tractor positions Before installing the tractor in the front push-tractor position 1. Open the front cover. To... that has a large enough opening for instructions on both sides and pulling it straight out of the printer. If you want to feed without obstruction. Installing in a different position, remove it from its current position by grasping the fins on loading continuous paper with the front ...

User Manual
Page 41
... page 2-13 for instructions on both ends of the unit and lift it off the printer. 3. Store the paper-tension unit in the rear push-tractor position 1. Using Continuous Paper Installing in safe place. 2-8 Paper Handling Press on loading paper with the rear push tractor. Make sure the power ...the tractor's lock tabs, tilt the unit, and lift it up and off the printer. 3. Using the tabs on the paper-tension unit, grasp both ends to install the pull tractor. 1. While pressing in its place. Installing the pull tractor You can also use the tractor unit as a pull tractor. Follow ...
... page 2-13 for instructions on both ends of the unit and lift it off the printer. 3. Store the paper-tension unit in the rear push-tractor position 1. Using Continuous Paper Installing in safe place. 2-8 Paper Handling Press on loading paper with the rear push tractor. Make sure the power ...the tractor's lock tabs, tilt the unit, and lift it up and off the printer. 3. Using the tabs on the paper-tension unit, grasp both ends to install the pull tractor. 1. While pressing in its place. Installing the pull tractor You can also use the tractor unit as a pull tractor. Follow ...

User Manual
Page 42
An arrow on loading paper with the pull tractor. Then push it straight down into the slots as shown. Paper Handling 2-9 To remove the tractor unit, press the tractor's lock tabs, tilt the unit toward you where to install the tractor. Lower it back in the direction of the mounting slots shows you , and lift it off the printer. Then replace the paper-tension unit. Using Continuous Paper 4. See page 2-16 for instructions on each side of the arrow in the illustration.
An arrow on loading paper with the pull tractor. Then push it straight down into the slots as shown. Paper Handling 2-9 To remove the tractor unit, press the tractor's lock tabs, tilt the unit toward you where to install the tractor. Lower it back in the direction of the mounting slots shows you , and lift it off the printer. Then replace the paper-tension unit. Using Continuous Paper 4. See page 2-16 for instructions on each side of the arrow in the illustration.

User Manual
Page 49
Remove the printer cover and paper guide. 2. Insert the paper into the desired paper slot until it emerges between the platen and the ribbon guide. 4. Make sure your ... pull-tractor position. 6. Then slide the edge guides to the pull-tractor position. 3. Using Continuous Paper Loading paper with the pull tractor 1. Install the pull tractor in the flat position. Make sure the printer is set to the center of the paper's width. 5. Make sure the paper-release lever is turned off.
Remove the printer cover and paper guide. 2. Insert the paper into the desired paper slot until it emerges between the platen and the ribbon guide. 4. Make sure your ... pull-tractor position. 6. Then slide the edge guides to the pull-tractor position. 3. Using Continuous Paper Loading paper with the pull tractor 1. Install the pull tractor in the flat position. Make sure the printer is set to the center of the paper's width. 5. Make sure the paper-release lever is turned off.


