Product Information Guide
Page 4
... printer's self test. See Appendix 8. See the section on microadjustment in Chapter 2 for more information. When switch 1-3 is added to accept input data. If your software has a printer selection menu, simply choose FX-850 or FX-1050. FX-850 FX-86e EX-800 FX-85 FX-80+ FX-80 FX LX MX Epson printer Draft printer FX-1050 FX-286e EX-1000 FX-286 FX-185 FX-100+ FX-100 FX LX MX Epson printer...
... printer's self test. See Appendix 8. See the section on microadjustment in Chapter 2 for more information. When switch 1-3 is added to accept input data. If your software has a printer selection menu, simply choose FX-850 or FX-1050. FX-850 FX-86e EX-800 FX-85 FX-80+ FX-80 FX LX MX Epson printer Draft printer FX-1050 FX-286e EX-1000 FX-286 FX-185 FX-100+ FX-100 FX LX MX Epson printer...
Product Support Bulletin(s)
Page 4
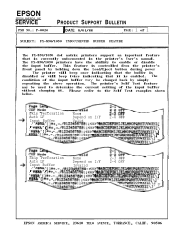
... feature is currently undocumented in the printer's User's manual. EPSON AMERICA SERVICE, 23610 TEL0 AVENUE, TORRANCE, CALIF. 90506 The condition of 1 SUBJECT: FX-850/1050 UNDOCUMENTED BUFFER FEATURE The FX-850/1050 dot matrix printers support an important feature that it . The printer's Self Test feature may be used to the Self Test examples shown below. Please refer to determine...
... feature is currently undocumented in the printer's User's manual. EPSON AMERICA SERVICE, 23610 TEL0 AVENUE, TORRANCE, CALIF. 90506 The condition of 1 SUBJECT: FX-850/1050 UNDOCUMENTED BUFFER FEATURE The FX-850/1050 dot matrix printers support an important feature that it . The printer's Self Test feature may be used to the Self Test examples shown below. Please refer to determine...
Product Support Bulletin(s)
Page 7
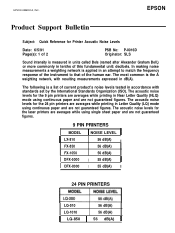
...LQ) mode using continuous paper and are not guaranteed figures. 9 PIN PRINTERS MODEL I LX-810 FX-850 FX-1050 I DFX-5000 I DFX-8000 1 NOISE LEVEL 56 dB(A) II 56 dB(A) 56 dB(A) I 55 dB(A) II I 55 dB(A) II 24 PIN PRINTERS LQ-510 56 dB(A) LQ-1010 56 dB(A) 11 LQ-850 1... averages while using continuous paper and are not guaranteed figures. EPSON AMERICA, INC. The following is measured in units called Bels (named after Alexander Graham Bell,) or more commonly in tenths of current product's noise levels tested in accordance with resulting measurements expressed in Near Letter Quality (NLQ...
...LQ) mode using continuous paper and are not guaranteed figures. 9 PIN PRINTERS MODEL I LX-810 FX-850 FX-1050 I DFX-5000 I DFX-8000 1 NOISE LEVEL 56 dB(A) II 56 dB(A) 56 dB(A) I 55 dB(A) II I 55 dB(A) II 24 PIN PRINTERS LQ-510 56 dB(A) LQ-1010 56 dB(A) 11 LQ-850 1... averages while using continuous paper and are not guaranteed figures. EPSON AMERICA, INC. The following is measured in units called Bels (named after Alexander Graham Bell,) or more commonly in tenths of current product's noise levels tested in accordance with resulting measurements expressed in Near Letter Quality (NLQ...

User Manual
Page 3
... equipment has more than one or more of any options other than those designated as Original Epson Products by any form or by Seiko Epson Corporation. Stock No. 004-000-00450-7. Plug the printer into a different outlet so that is, in strict accordance with respect to the use of... the following booklet prepared by Seiko Epson Corporation Nagano, Japan ii It has been type tested and found to comply with...
... equipment has more than one or more of any options other than those designated as Original Epson Products by any form or by Seiko Epson Corporation. Stock No. 004-000-00450-7. Plug the printer into a different outlet so that is, in strict accordance with respect to the use of... the following booklet prepared by Seiko Epson Corporation Nagano, Japan ii It has been type tested and found to comply with...
User Manual
Page 4
...Introduction 1 Features 1 Options 2 About This Guide 2 1 Setting Up the Printer 1-1 Unpacking the Printer 1-2 Choosing a Place for the Printer 1-5 Assembling the Printer 1-6 Testing the Printer 1-12 Connecting the Printer to Your Computer 1-18 2 Paper Handling 2-1 Using Single Sheets 2-2 Using ...Paper 2-17 3 Using the Printer 3-1 Operating the Control Panel 3-2 Setting the DIP Switches 3-5 Selecting Typestyles 3-10 Enhancing Your Printing 3-13 4 Using Software and Graphics 4-1 Using the FX with Application Programs 4-2 Computer-Printer Communication 4-5 Dot Graphics 4-8 ...
...Introduction 1 Features 1 Options 2 About This Guide 2 1 Setting Up the Printer 1-1 Unpacking the Printer 1-2 Choosing a Place for the Printer 1-5 Assembling the Printer 1-6 Testing the Printer 1-12 Connecting the Printer to Your Computer 1-18 2 Paper Handling 2-1 Using Single Sheets 2-2 Using ...Paper 2-17 3 Using the Printer 3-1 Operating the Control Panel 3-2 Setting the DIP Switches 3-5 Selecting Typestyles 3-10 Enhancing Your Printing 3-13 4 Using Software and Graphics 4-1 Using the FX with Application Programs 4-2 Computer-Printer Communication 4-5 Dot Graphics 4-8 ...
User Manual
Page 7
... more efficient handling of continuous paper handling. Pull tractor unit This option improves the performance of single sheet paper. The FX-850 and FX-1050 are available for setting up , testing, and connecting the printer. It is necessary for choosing the right interface and instructions on installing the boards are given in the section on...
... more efficient handling of continuous paper handling. Pull tractor unit This option improves the performance of single sheet paper. The FX-850 and FX-1050 are available for setting up , testing, and connecting the printer. It is necessary for choosing the right interface and instructions on installing the boards are given in the section on...

User Manual
Page 9
Chapter 1 Setting Up the Printer Unpacking the Printer 1-2 Removing the protective materials 1-3 Choosing a Place for the Printer 1-5 Assembling the Printer 1-6 Installing the platen knob 1-6 Installing the ribbon cartridge 1-8 Attaching the paper guide 1-11 Testing the Printer 1-12 Plugging in the printer 1-13 Loading a sheet of paper 1-13 Running the self test 1-16 Connecting the Printer to Your Computer 1-18 Connecting the parallel interface cable 1-18 Setting Up the Printer l-l
Chapter 1 Setting Up the Printer Unpacking the Printer 1-2 Removing the protective materials 1-3 Choosing a Place for the Printer 1-5 Assembling the Printer 1-6 Installing the platen knob 1-6 Installing the ribbon cartridge 1-8 Attaching the paper guide 1-11 Testing the Printer 1-12 Plugging in the printer 1-13 Loading a sheet of paper 1-13 Running the self test 1-16 Connecting the Printer to Your Computer 1-18 Connecting the parallel interface cable 1-18 Setting Up the Printer l-l
User Manual
Page 20
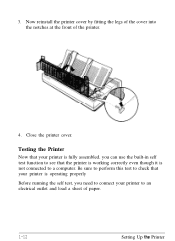
Close the printer cover. Now reinstall the printer cover by fitting the legs of the cover into the notches at the front of paper. 1-12 Setting Up the Printer Testing the Printer Now that your printer is fully assembled, you need to connect your printer is not connected to an electrical outlet and load a sheet of the printer. 4. Be sure to perform this test to check that the printer is working correctly even though it is operating properly Before running the self test, you can use the built-in self test function to see that your printer to a computer. 3.
Close the printer cover. Now reinstall the printer cover by fitting the legs of the cover into the notches at the front of paper. 1-12 Setting Up the Printer Testing the Printer Now that your printer is fully assembled, you need to connect your printer is not connected to an electrical outlet and load a sheet of the printer. 4. Be sure to perform this test to check that the printer is working correctly even though it is operating properly Before running the self test, you can use the built-in self test function to see that your printer to a computer. 3.
User Manual
Page 24
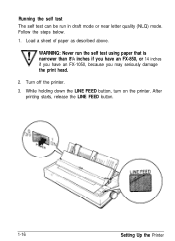
WARNING: Never run in draft mode or near letter quality (NLQ) mode. While holding down the LINE FEED button, turn on the printer. Follow the steps below. 1. Turn off the printer. 3. Running the self test The self test can be run the self test using paper that is narrower than 8¼ inches if you have an FX-850, or 14 inches if you have an FX-1050, because you may seriously damage the print head. 2. Load a sheet of paper as described above. After printing starts, release the LINE FEED button. 1-16 Setting Up the Printer
WARNING: Never run in draft mode or near letter quality (NLQ) mode. While holding down the LINE FEED button, turn on the printer. Follow the steps below. 1. Turn off the printer. 3. Running the self test The self test can be run the self test using paper that is narrower than 8¼ inches if you have an FX-850, or 14 inches if you have an FX-1050, because you may seriously damage the print head. 2. Load a sheet of paper as described above. After printing starts, release the LINE FEED button. 1-16 Setting Up the Printer

User Manual
Page 25
...paper as described above. 2. Press the LOAD/ EJECT button to take the printer off the printer, then turn off line. Note: When the cut sheet feeder is installed, the self test printout is still loaded, and then turn it on the cut sheet feeder ...Turn off line. 5. To run the self test in Chapter 7. A list of your printer's settings is part of a typical draft self test: %'( )*+,-. /t312345(5'7#9 APCDEI='GH I J KLMNC)POI ' t I j.;:345,5789: a ..,.'.-'.s...?&APCDEF~GH I J KI....MNUF'GlK t I J 2 3 4 5 6 7 $3 9 : .; The self test continues until the paper runs out or until you...
...paper as described above. 2. Press the LOAD/ EJECT button to take the printer off the printer, then turn off line. Note: When the cut sheet feeder is installed, the self test printout is still loaded, and then turn it on the cut sheet feeder ...Turn off line. 5. To run the self test in Chapter 7. A list of your printer's settings is part of a typical draft self test: %'( )*+,-. /t312345(5'7#9 APCDEI='GH I J KLMNC)POI ' t I j.;:345,5789: a ..,.'.-'.s...?&APCDEF~GH I J KI....MNUF'GlK t I J 2 3 4 5 6 7 $3 9 : .; The self test continues until the paper runs out or until you...

User Manual
Page 26
... you are unsure whether your printer to the computer. Your FX printer has a Centronics®-compatible parallel interface. If the computer cannot use of another type of a typical self test in Chapter 7. If you have a suitable shielded cable, you need to connect your computer's operating manual. Turn off the printer. If your computer. 1-18 Setting...
... you are unsure whether your printer to the computer. Your FX printer has a Centronics®-compatible parallel interface. If the computer cannot use of another type of a typical self test in Chapter 7. If you have a suitable shielded cable, you need to connect your computer's operating manual. Turn off the printer. If your computer. 1-18 Setting...

User Manual
Page 48
... as shown below. 410.33 a or more -4 I 9 0.12" or more f I 0.87" or mom t' To make sure that the printing fits within this area, always print a test on a single sheet of paper before printing on page 2-18. See the table showing envelope types and recommended lever positions on envelopes. 2-20 Paper Handling...
... as shown below. 410.33 a or more -4 I 9 0.12" or more f I 0.87" or mom t' To make sure that the printing fits within this area, always print a test on a single sheet of paper before printing on page 2-18. See the table showing envelope types and recommended lever positions on envelopes. 2-20 Paper Handling...
User Manual
Page 53
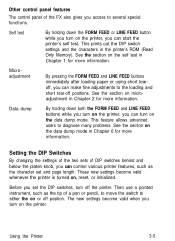
...FORM FEED and LINE FEED buttons while you turn on the printer, you turn on the self test in Chapter 6 for more information. Self test By holding down the FORM FEED or LINE FEED button while you can start the printer's self test. This prints out the DIP switch settings and the characters in... By changing the settings of the two sets of DIP switches behind and below the platen knob, you can control various printer features, such as the tip of the FX also gives you can turn on microadjustment in the printer's ROM (Read Only Memory). The new settings become valid whenever the...
...FORM FEED and LINE FEED buttons while you turn on the printer, you turn on the self test in Chapter 6 for more information. Self test By holding down the FORM FEED or LINE FEED button while you can start the printer's self test. This prints out the DIP switch settings and the characters in... By changing the settings of the two sets of DIP switches behind and below the platen knob, you can control various printer features, such as the tip of the FX also gives you can turn on microadjustment in the printer's ROM (Read Only Memory). The new settings become valid whenever the...

User Manual
Page 66
Chapter 4 Using Software and Graphics Using the FX with Application Programs 4-2 Using printer selection menus 4-2 A quick test 4- 3 Using word processors 4-3 Using spreadsheets 4-3 Using graphics software 4-5 Computer-Printer Communication 4-5 Escape sequences 4-6 Printer commands 4-6 Using the Command Summary 4-7 Sending printer commands from within your software program 4-7 Dot Graphics 4-8 The print head 4-9 Pinlabels 4-10 Graphics commands 4-11 Graphics programming 4-12 User-Defined Characters 4-19 Defining your own characters 4-20 Using Software and Graphics 4-1
Chapter 4 Using Software and Graphics Using the FX with Application Programs 4-2 Using printer selection menus 4-2 A quick test 4- 3 Using word processors 4-3 Using spreadsheets 4-3 Using graphics software 4-5 Computer-Printer Communication 4-5 Escape sequences 4-6 Printer commands 4-6 Using the Command Summary 4-7 Sending printer commands from within your software program 4-7 Dot Graphics 4-8 The print head 4-9 Pinlabels 4-10 Graphics commands 4-11 Graphics programming 4-12 User-Defined Characters 4-19 Defining your own characters 4-20 Using Software and Graphics 4-1
User Manual
Page 67
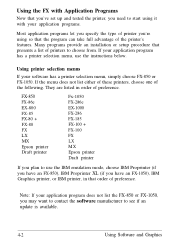
... an FX-1050), IBM Graphics printer, or IBM printer, in order of preference. FX-850 FX-86e EX-800 FX-85 FX-80 + FX-80 FX LX MX Epson printer Draft printer Fx-1050 FX-286e EX-1000 FX-286 FX-185 FX-100 + FX-100 FX LX MX Epson printer Draft printer If you plan to use the instructions below. Using the FX with Application Programs Now that you've set up and tested the printer...
... an FX-1050), IBM Graphics printer, or IBM printer, in order of preference. FX-850 FX-86e EX-800 FX-85 FX-80 + FX-80 FX LX MX Epson printer Draft printer Fx-1050 FX-286e EX-1000 FX-286 FX-185 FX-100 + FX-100 FX LX MX Epson printer Draft printer If you plan to use the instructions below. Using the FX with Application Programs Now that you've set up and tested the printer...
User Manual
Page 68
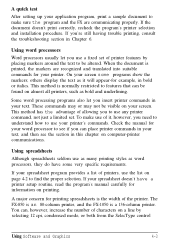
...test After setting up your application program, print a sample document to features that can be found on almost all printers, such as bold and underlining. If the document doesn't print correctly, recheck the program's printer selection and installation procedure. Some word processing programs also let you insert printer...still having trouble printing, consult the troubleshooting section in this chapter on printing. The FX-850 is an 80-column printer, and the FX-1050 is normally restricted to make use of printers, use the list on page 4-2 to be visible on a line by placing...
...test After setting up your application program, print a sample document to features that can be found on almost all printers, such as bold and underlining. If the document doesn't print correctly, recheck the program's printer selection and installation procedure. Some word processing programs also let you insert printer...still having trouble printing, consult the troubleshooting section in this chapter on printing. The FX-850 is an 80-column printer, and the FX-1050 is normally restricted to make use of printers, use the list on page 4-2 to be visible on a line by placing...
User Manual
Page 85
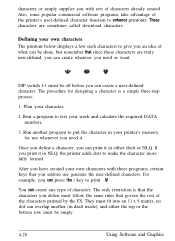
... for use generate the user-defined characters. For example, you an idea of the characters printed by the FX. They must be off before you can print it in NLQ, the printer adds dots to print !$ . You can overlap another program to give you can create a user-defined character.... Run a program to test your own characters with sets of the printer's user-defined character function to enhance printouts. These characters are truly user-defined, you can press the ( key to make ...
... for use generate the user-defined characters. For example, you an idea of the characters printed by the FX. They must be off before you can print it in NLQ, the printer adds dots to print !$ . You can overlap another program to give you can create a user-defined character.... Run a program to test your own characters with sets of the printer's user-defined character function to enhance printouts. These characters are truly user-defined, you can press the ( key to make ...
User Manual
Page 101
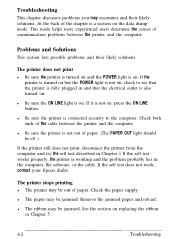
This mode helps more experienced users determine the causes of the cable between the printer and the computer. If the self test does not work, contact your Epson dealer. l The ribbon may be jammed. Check both ends of communication problems between the printer and the computer. Problems and Solutions This section lists possible problems and...
This mode helps more experienced users determine the causes of the cable between the printer and the computer. If the self test does not work, contact your Epson dealer. l The ribbon may be jammed. Check both ends of communication problems between the printer and the computer. Problems and Solutions This section lists possible problems and...

User Manual
Page 106
... sheet feeder mode 7-4 Recommended paper 7-5 Paper loading 7-5 Envelope loading 7-8 Using the cut sheet feeder 7-8 Software operation 7-9 Setting up your software 7-9 Control panel operation 7-11 Testing the printer in the cut sheet feeder mode 7-11 Switching from the cut sheet feeder to continuous paper 7-12 Single sheet insertion 7-14 The Pull Tractor 7-15... Interface Boards 7-22 Choosing an interface 7-22 Compatible interfaces 7-23 Removing the upper case 7-23 Installing the board 7-28 Attaching the upper case 7-31 Using Printer Options 7-1
... sheet feeder mode 7-4 Recommended paper 7-5 Paper loading 7-5 Envelope loading 7-8 Using the cut sheet feeder 7-8 Software operation 7-9 Setting up your software 7-9 Control panel operation 7-11 Testing the printer in the cut sheet feeder mode 7-11 Switching from the cut sheet feeder to continuous paper 7-12 Single sheet insertion 7-14 The Pull Tractor 7-15... Interface Boards 7-22 Choosing an interface 7-22 Compatible interfaces 7-23 Removing the upper case 7-23 Installing the board 7-28 Attaching the upper case 7-31 Using Printer Options 7-1

User Manual
Page 110
... the steps below. 1. Make sure that the 77 printing is no closer than l/4 of an inch to 150 sheets of envelopes or heavy 1. Using Printer Options 7-5 Recommended paper Paper: For best results, use multiple-part forms or labels. Envelopes: You can hold up to the edges. Pull the paper ... for paper loading. If you use . The cut sheet feeder can print on special paper in Chapter 2. Before printing on envelopes, you should test it before regular use paper with a glossy or textured surface, you need to set lever all the way forward until the paper supports retract and...
... the steps below. 1. Make sure that the 77 printing is no closer than l/4 of an inch to 150 sheets of envelopes or heavy 1. Using Printer Options 7-5 Recommended paper Paper: For best results, use multiple-part forms or labels. Envelopes: You can hold up to the edges. Pull the paper ... for paper loading. If you use . The cut sheet feeder can print on special paper in Chapter 2. Before printing on envelopes, you should test it before regular use paper with a glossy or textured surface, you need to set lever all the way forward until the paper supports retract and...


