
Technical Brief (Impact Printers)
Page 1
... of ownership Flexible paper handling - Impact printers are renowned for their reliability with LQ FX-980-Nine-pin narrow carriage Wide carriage printers have 4 number in their names Narrow carriage printers have 3 numbers in their names EPSON Sales Training EPSON is a 9- or 24-pin,... print speeds Print from High Speed Draft up to all EPSON impact printers: Functionality M Printing technology M Control code/emulation M Paper handling M SmartPark™ settings Versatility M Flexible interfacing M Built-in fonts M Computer-based set-up to Near Letter Quality Twenty-four-pin...
... of ownership Flexible paper handling - Impact printers are renowned for their reliability with LQ FX-980-Nine-pin narrow carriage Wide carriage printers have 4 number in their names Narrow carriage printers have 3 numbers in their names EPSON Sales Training EPSON is a 9- or 24-pin,... print speeds Print from High Speed Draft up to all EPSON impact printers: Functionality M Printing technology M Control code/emulation M Paper handling M SmartPark™ settings Versatility M Flexible interfacing M Built-in fonts M Computer-based set-up to Near Letter Quality Twenty-four-pin...

Technical Brief (Impact Printers)
Page 3
... CUT Description Single-sheet position For loading single sheets from the tractor in the read push position. Set the lever to accommodate various thicknesses of the printer in the pull position. L Paper thickness adjustment: Most EPSON impact printers have both front and top paper paths: Front paper path The front paper path has an almost...
... CUT Description Single-sheet position For loading single sheets from the tractor in the read push position. Set the lever to accommodate various thicknesses of the printer in the pull position. L Paper thickness adjustment: Most EPSON impact printers have both front and top paper paths: Front paper path The front paper path has an almost...
Technical Brief (Impact Printers)
Page 4
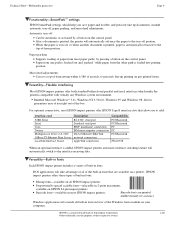
... , paper parking, and microfeed adjustments. Technical Brief-Multimedia projectors Page 4 L LL Functionality-SmartPark™ settings EPSON SmartPark settings, which make the printers compatible with virtually any Windows system environment. After a document is printed, the printer will take advantage of all EPSON impact printers Proportionally-spaced scalable fonts-selectable in fonts that allow you save paper and trouble, and...
... , paper parking, and microfeed adjustments. Technical Brief-Multimedia projectors Page 4 L LL Functionality-SmartPark™ settings EPSON SmartPark settings, which make the printers compatible with virtually any Windows system environment. After a document is printed, the printer will take advantage of all EPSON impact printers Proportionally-spaced scalable fonts-selectable in fonts that allow you save paper and trouble, and...

Technical Brief (Impact Printers)
Page 5
Technical Brief-Multimedia projectors Page 5 Versatility-Computer-based set-up EPSON Remote! Start UP Utility Ver. 1.22 Copyright (C) SEIKO EPSON CORP. 1992 Printer: FX-2180 Mode: ESC/P Port: LPT1 Font : Roman Pitch : 10CPI Print Quality : LQ Character Table : PC 437 ... make the necessary changes in the software utility, and download the settings to host computer connection. Utility EPSON Remote! EPSON Sales Training EPSON is the DOS-based printer setup utility that allows you to the Printer Status Monitor. Manual Front : 17 inch Manual Front : 8.5mm Print Direction...
Technical Brief-Multimedia projectors Page 5 Versatility-Computer-based set-up EPSON Remote! Start UP Utility Ver. 1.22 Copyright (C) SEIKO EPSON CORP. 1992 Printer: FX-2180 Mode: ESC/P Port: LPT1 Font : Roman Pitch : 10CPI Print Quality : LQ Character Table : PC 437 ... make the necessary changes in the software utility, and download the settings to host computer connection. Utility EPSON Remote! EPSON Sales Training EPSON is the DOS-based printer setup utility that allows you to the Printer Status Monitor. Manual Front : 17 inch Manual Front : 8.5mm Print Direction...
Product Information Guide
Page 1
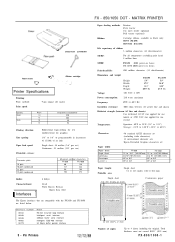
...60°C) Characters: Paper width: Paper Sheet Single Sheet Continuous Envelopes Labels 96 standard ASCII character set (including italic characters) 13 international character sets Epson Extended Graphics characters set FX-850 FX-1050 7.2 to 10.1" (182-257mm) 7.2 to 14.4"(162-366mm) 4 to 10" (101-254...Kbyte Draft NLQ Epson Roman Epson Sans Serif The Epson interfaces that are compatible with the FX-850 and FX-1050 are listed below. Cross-head screwdriver Platen knob q-3 d- Y .: f Ribbon cartridge Printer Specifications Printing Print method: Print speed: 9-pin impact dot matrix ...
...60°C) Characters: Paper width: Paper Sheet Single Sheet Continuous Envelopes Labels 96 standard ASCII character set (including italic characters) 13 international character sets Epson Extended Graphics characters set FX-850 FX-1050 7.2 to 10.1" (182-257mm) 7.2 to 14.4"(162-366mm) 4 to 10" (101-254...Kbyte Draft NLQ Epson Roman Epson Sans Serif The Epson interfaces that are compatible with the FX-850 and FX-1050 are listed below. Cross-head screwdriver Platen knob q-3 d- Y .: f Ribbon cartridge Printer Specifications Printing Print method: Print speed: 9-pin impact dot matrix ...
Product Information Guide
Page 2
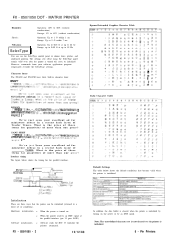
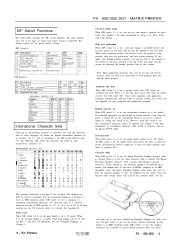
...Epson Extended Graphics Character Table ROMAN !"P 0123456789:;?@ABCDEFGHIJK UlNOPQRSTUVWXYZC\l^-'abcdefghijklmnopqrstuv wxyzt: t- What is the price of these items far quantities of more than one gross? Interface timing The figure below shows the default conditions that the printer can use the SelecType control panel to a fixed set... The FX-850 and FX-1050 have three built-in a recent back issue of conditions). Note: The user-defined character set of Trader Times. reset, or initialized. Initialization There are three ways that become valid when the printer is initialized...
...Epson Extended Graphics Character Table ROMAN !"P 0123456789:;?@ABCDEFGHIJK UlNOPQRSTUVWXYZC\l^-'abcdefghijklmnopqrstuv wxyzt: t- What is the price of these items far quantities of more than one gross? Interface timing The figure below shows the default conditions that the printer can use the SelecType control panel to a fixed set... The FX-850 and FX-1050 have three built-in a recent back issue of conditions). Note: The user-defined character set of Trader Times. reset, or initialized. Initialization There are three ways that become valid when the printer is initialized...
Product Information Guide
Page 3
...-inch margin is off , the printer prints open zeroes (0). FX - 850/1050 - 3 See the Command Summary in the Epson ESC/P mode. Page length When DIP switch 2-1 is on . When it is off, the page length is set can be selected simply by setting this switch is the default. Skip...tables below describe the DIP switch functions. The shaded settings are maintained in this feature causes the printer to carriage returns, the setting you use depends on user-defined characters. User-defined characters are the preset factory settings. FX - 850/1050 DOT - a carriage return code (CR! This ...
...-inch margin is off , the printer prints open zeroes (0). FX - 850/1050 - 3 See the Command Summary in the Epson ESC/P mode. Page length When DIP switch 2-1 is on . When it is off, the page length is set can be selected simply by setting this switch is the default. Skip...tables below describe the DIP switch functions. The shaded settings are maintained in this feature causes the printer to carriage returns, the setting you use depends on user-defined characters. User-defined characters are the preset factory settings. FX - 850/1050 DOT - a carriage return code (CR! This ...
Product Information Guide
Page 4
... fine adjustments to advance the paper. This prints out the DIP switch settings and the characters in the Epson ESC/P mode. By holding down the FORM FEED or LINE FEED button while you turn on the printer, you have an FX-850). FX - 850/1050 - 4 12/12/88 Lights POWER On when the power switch is...
... fine adjustments to advance the paper. This prints out the DIP switch settings and the characters in the Epson ESC/P mode. By holding down the FORM FEED or LINE FEED button while you turn on the printer, you have an FX-850). FX - 850/1050 - 4 12/12/88 Lights POWER On when the power switch is...

Product Information Guide
Page 5
... observing the ACKNLG or BUSY signal. These cables should be less than 0.5 microseconds at signal ground level. Pin Printers 12/12/88 FX-850/1050-5 The indicator light shows which would allow it is LOW. or PS (proportional spacing). l Data transfer must be...PRINTER SelecType The settings you turn off line interface) High DC1 Recv'd High High DC3 Recv'd High High/Low DC1/DC3 Low (no effect) (no effect) cond.) High/Low Pulsed Enabled ea. FONT Press this button to be combined. Pin assignments for another DC1 character, which font has been selected. FX - 850/1050...
... observing the ACKNLG or BUSY signal. These cables should be less than 0.5 microseconds at signal ground level. Pin Printers 12/12/88 FX-850/1050-5 The indicator light shows which would allow it is LOW. or PS (proportional spacing). l Data transfer must be...PRINTER SelecType The settings you turn off line interface) High DC1 Recv'd High High DC3 Recv'd High High/Low DC1/DC3 Low (no effect) (no effect) cond.) High/Low Pulsed Enabled ea. FONT Press this button to be combined. Pin assignments for another DC1 character, which font has been selected. FX - 850/1050...
Product Information Guide
Page 6
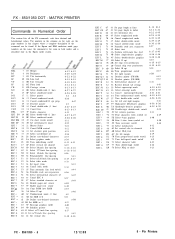
... 32 Programmable line spacing 51 33 Select n/216-inch line spacing ESC 4 ESC 4 52 34 Select italic mode 52 34 Set top of the command can be found. If the Epson and IBM emulation mode page numbers are the same, the command is the same in both modes and is described only... ESC P 80 50 Select 10 cpi ESC P ESC Q 80 50 Turn proportional on/off 81 51 Set right margin ESC Q 3 81 ESC Q 2 2 81 ESC R 82 ESC R 82 51 Deselect printer (FX-850) 51 Deselect printer (FX-1050) 52 International character set ESC ^ 94 5E Select 9-pin graphics ESC ^ 94 5E Print 1 char. DC3 DC4 CAN 19 13...
... 32 Programmable line spacing 51 33 Select n/216-inch line spacing ESC 4 ESC 4 52 34 Select italic mode 52 34 Set top of the command can be found. If the Epson and IBM emulation mode page numbers are the same, the command is the same in both modes and is described only... ESC P 80 50 Select 10 cpi ESC P ESC Q 80 50 Turn proportional on/off 81 51 Set right margin ESC Q 3 81 ESC Q 2 2 81 ESC R 82 ESC R 82 51 Deselect printer (FX-850) 51 Deselect printer (FX-1050) 52 International character set ESC ^ 94 5E Select 9-pin graphics ESC ^ 94 5E Print 1 char. DC3 DC4 CAN 19 13...
Product Information Guide
Page 7
... the buffer hold down the Load/Eject switch at the top of an Epson 81XX series interface option. DIP Switch Settings The default settings will be lines from the SelecType panel. Serial Operation The FX-850/1050 will be checked before using the printer This will have to be identified for the next-best model selection...
... the buffer hold down the Load/Eject switch at the top of an Epson 81XX series interface option. DIP Switch Settings The default settings will be lines from the SelecType panel. Serial Operation The FX-850/1050 will be checked before using the printer This will have to be identified for the next-best model selection...
Product Support Bulletin(s)
Page 4
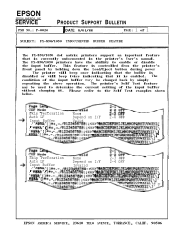
...shown below. EPSON AMERICA SERVICE, 23610 TEL0 AVENUE, TORRANCE, CALIF. 90506 Please refer to enable or disable the input buffer. The printer's Self Test feature may be used to determine the current setting of 1 SUBJECT: FX-850/1050 UNDOCUMENTED BUFFER FEATURE The FX-850/1050 dot matrix printers support an ... disabled or will beep once indicating that the buffer is enabled. This feature is currently undocumented in the printer's User's manual. EPSON EPSON AMERICA, INC. The condition of the input buffer may be changed back by holding down the Load/Eject button during ...
...shown below. EPSON AMERICA SERVICE, 23610 TEL0 AVENUE, TORRANCE, CALIF. 90506 Please refer to enable or disable the input buffer. The printer's Self Test feature may be used to determine the current setting of 1 SUBJECT: FX-850/1050 UNDOCUMENTED BUFFER FEATURE The FX-850/1050 dot matrix printers support an ... disabled or will beep once indicating that the buffer is enabled. This feature is currently undocumented in the printer's User's manual. EPSON EPSON AMERICA, INC. The condition of the input buffer may be changed back by holding down the Load/Eject button during ...
Product Support Bulletin(s)
Page 7
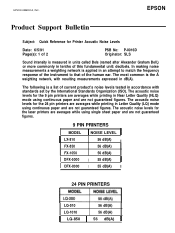
EPSON AMERICA, INC. The following is the A weighting network, with standards set by the International Standards Organization (ISO). The acoustic noise levels for the laser printers are averages while using single sheet paper and are not guaranteed figures. 9 PIN PRINTERS MODEL I LX-810 FX-850 FX-1050 I DFX-5000 I DFX-8000 1 NOISE... LEVEL 56 dB(A) II 56 dB(A) 56 dB(A) I 55 dB(A) II I 55 dB(A) II 24 PIN PRINTERS LQ-510 56 dB(A) LQ-1010 56 dB(A) 11 LQ...
EPSON AMERICA, INC. The following is the A weighting network, with standards set by the International Standards Organization (ISO). The acoustic noise levels for the laser printers are averages while using single sheet paper and are not guaranteed figures. 9 PIN PRINTERS MODEL I LX-810 FX-850 FX-1050 I DFX-5000 I DFX-8000 1 NOISE... LEVEL 56 dB(A) II 56 dB(A) 56 dB(A) I 55 dB(A) II I 55 dB(A) II 24 PIN PRINTERS LQ-510 56 dB(A) LQ-1010 56 dB(A) 11 LQ...
User Manual
Page 4
Table of Contents Introduction 1 Features 1 Options 2 About This Guide 2 1 Setting Up the Printer 1-1 Unpacking the Printer 1-2 Choosing a Place for the Printer 1-5 Assembling the Printer 1-6 Testing the Printer 1-12 Connecting the Printer to Your Computer 1-18 2 Paper Handling 2-1 Using Single Sheets 2-2 Using Continuous Paper 2-4 ...14 Using Short Tear-Off 2-15 Printing on Special Paper 2-17 3 Using the Printer 3-1 Operating the Control Panel 3-2 Setting the DIP Switches 3-5 Selecting Typestyles 3-10 Enhancing Your Printing 3-13 4 Using Software and Graphics 4-1 Using the...
Table of Contents Introduction 1 Features 1 Options 2 About This Guide 2 1 Setting Up the Printer 1-1 Unpacking the Printer 1-2 Choosing a Place for the Printer 1-5 Assembling the Printer 1-6 Testing the Printer 1-12 Connecting the Printer to Your Computer 1-18 2 Paper Handling 2-1 Using Single Sheets 2-2 Using Continuous Paper 2-4 ...14 Using Short Tear-Off 2-15 Printing on Special Paper 2-17 3 Using the Printer 3-1 Operating the Control Panel 3-2 Setting the DIP Switches 3-5 Selecting Typestyles 3-10 Enhancing Your Printing 3-13 4 Using Software and Graphics 4-1 Using the...
User Manual
Page 7
... on installing the boards are given in the section on unpacking, setting up and operating the FX-850 and FX-1050 printers. This unit also can be fed automatically into the printer without reloading. For detailed information on paper handling and general printer operation. options A variety of printer options are available for use of these options, see Chapter...
... on installing the boards are given in the section on unpacking, setting up and operating the FX-850 and FX-1050 printers. This unit also can be fed automatically into the printer without reloading. For detailed information on paper handling and general printer operation. options A variety of printer options are available for use of these options, see Chapter...
User Manual
Page 8
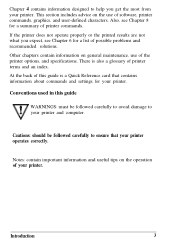
... be followed carefully to avoid damage to ensure that contains information about commands and settings for a summary of your printer. This section includes advice on general maintenance, use of possible problems and recommended solutions. Introduction 3 If the printer does not operate properly or the printed results are not what you get the most...
... be followed carefully to avoid damage to ensure that contains information about commands and settings for a summary of your printer. This section includes advice on general maintenance, use of possible problems and recommended solutions. Introduction 3 If the printer does not operate properly or the printed results are not what you get the most...

User Manual
Page 9
Chapter 1 Setting Up the Printer Unpacking the Printer 1-2 Removing the protective materials 1-3 Choosing a Place for the Printer 1-5 Assembling the Printer 1-6 Installing the platen knob 1-6 Installing the ribbon cartridge 1-8 Attaching the paper guide 1-11 Testing the Printer 1-12 Plugging in the printer 1-13 Loading a sheet of paper 1-13 Running the self test 1-16 Connecting the Printer to Your Computer 1-18 Connecting the parallel interface cable 1-18 Setting Up the Printer l-l
Chapter 1 Setting Up the Printer Unpacking the Printer 1-2 Removing the protective materials 1-3 Choosing a Place for the Printer 1-5 Assembling the Printer 1-6 Installing the platen knob 1-6 Installing the ribbon cartridge 1-8 Attaching the paper guide 1-11 Testing the Printer 1-12 Plugging in the printer 1-13 Loading a sheet of paper 1-13 Running the self test 1-16 Connecting the Printer to Your Computer 1-18 Connecting the parallel interface cable 1-18 Setting Up the Printer l-l

User Manual
Page 10
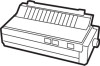
Unpacking the Printer As you unpack the printer, check that none has been damaged during transportation. After removing the parts, store the packaging materials in a piece of the foam packing. Printer Cross-head screwdriver Platen knob Note: You'll find the platen knob in case you have all the parts shown below and that you ever need to transport your printer. 1-2 Setting Up the Printer
Unpacking the Printer As you unpack the printer, check that none has been damaged during transportation. After removing the parts, store the packaging materials in a piece of the foam packing. Printer Cross-head screwdriver Platen knob Note: You'll find the platen knob in case you have all the parts shown below and that you ever need to transport your printer. 1-2 Setting Up the Printer

User Manual
Page 11
Setting Up the Printer 1-3 After removing these items, store them with the other packaging material. 1 Remove the printer cover. 2. Remove the print head protector. These protective items must be removed before you turn on the printer. Removing the protective materials The printer is protected during shipping by two locking tabs and a print head protector.
Setting Up the Printer 1-3 After removing these items, store them with the other packaging material. 1 Remove the printer cover. 2. Remove the print head protector. These protective items must be removed before you turn on the printer. Removing the protective materials The printer is protected during shipping by two locking tabs and a print head protector.
User Manual
Page 12
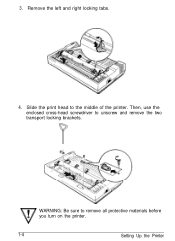
3. WARNING: Be sure to unscrew and remove the two transport locking brackets. Remove the left and right locking tabs. 4. Then, use the enclosed cross-head screwdriver to remove all protective materials before you turn on the printer. 1-4 Setting Up the Printer Slide the print head to the middle of the printer.
3. WARNING: Be sure to unscrew and remove the two transport locking brackets. Remove the left and right locking tabs. 4. Then, use the enclosed cross-head screwdriver to remove all protective materials before you turn on the printer. 1-4 Setting Up the Printer Slide the print head to the middle of the printer.


