
User Manual
Page 8
...: Introduction to Your Printer Printer Part Locations Check the printer part illustrations to your equipment. • Notes contain important information about your printer and this manual. Introduction to Your Printer Refer to these notations as you read your documentation: • Warnings must be followed carefully to avoid bodily injury. • Cautions...
...: Introduction to Your Printer Printer Part Locations Check the printer part illustrations to your equipment. • Notes contain important information about your printer and this manual. Introduction to Your Printer Refer to these notations as you read your documentation: • Warnings must be followed carefully to avoid bodily injury. • Cautions...

User Manual
Page 9
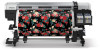
Top and Sides 1 Maintenance cover (left) 2 After heater 3 Media guide bar 4 Handle 5 Roll core holder 6 Roll core holder locking screw 7 Roll support 8 Auto switch 9 Manual switch 10 Adjustment screw 9 Product Parts -
Top and Sides 1 Maintenance cover (left) 2 After heater 3 Media guide bar 4 Handle 5 Roll core holder 6 Roll core holder locking screw 7 Roll support 8 Auto switch 9 Manual switch 10 Adjustment screw 9 Product Parts -

User Manual
Page 46
.... Press the up or down arrow button to align the print head. If you need to select the number of your media, select the Manual(Bi-D) setting. Parent topic: Media Handling Related references Media Setup Menu Settings Aligning the Print Head If your printouts are printing unidirectionally on .... 1. You can store separate alignment values for each type of media you need further alignment, select the Manual(Uni-D) setting. • If you are grainy or out of these adjustment methods and press the OK button: • If you are ...
.... Press the up or down arrow button to align the print head. If you need to select the number of your media, select the Manual(Bi-D) setting. Parent topic: Media Handling Related references Media Setup Menu Settings Aligning the Print Head If your printouts are printing unidirectionally on .... 1. You can store separate alignment values for each type of media you need further alignment, select the Manual(Uni-D) setting. • If you are grainy or out of these adjustment methods and press the OK button: • If you are ...

User Manual
Page 53
• If you are using the auto take -up reel, depending on the printable side of the media: • Move the switch to the position for printable-side-out media. • Move the switch to the position for printable-side-in media. 7. Use the Manual switch shown here to take up the cut media onto the take -up reel, go to use the auto take -up reel with your product. 53 Parent topic: Media Handling Using the Auto Take-up Reel See these sections to the next step. 6. Remove the take -up roll from the product.
• If you are using the auto take -up reel, depending on the printable side of the media: • Move the switch to the position for printable-side-out media. • Move the switch to the position for printable-side-in media. 7. Use the Manual switch shown here to take up the cut media onto the take -up reel, go to use the auto take -up reel with your product. 53 Parent topic: Media Handling Using the Auto Take-up Reel See these sections to the next step. 6. Remove the take -up roll from the product.

User Manual
Page 64
Confirm that the Auto switch is set to the off position, then set the Manual switch to the position to wind the media around the roll core. 64 3.
Confirm that the Auto switch is set to the off position, then set the Manual switch to the position to wind the media around the roll core. 64 3.

User Manual
Page 70
position 70 Confirm that the Auto switch is set to the off position, then set the Manual switch to the to wind the media around the roll core. 3.
position 70 Confirm that the Auto switch is set to the off position, then set the Manual switch to the to wind the media around the roll core. 3.

User Manual
Page 79
... roll length, from 4 to 50 ft (1 to use these menu settings correctly. Enter the length at which the printer will alert you replace it. Select Manual if banding persists after head cleaning and alignment. Setting Media Remaining Select Media Customize Settings RIP Settings Print Media List Options Remaining Setup Length Remaining...
... roll length, from 4 to 50 ft (1 to use these menu settings correctly. Enter the length at which the printer will alert you replace it. Select Manual if banding persists after head cleaning and alignment. Setting Media Remaining Select Media Customize Settings RIP Settings Print Media List Options Remaining Setup Length Remaining...

User Manual
Page 80
Manual(Uni-D): if the previous setting does not improve the results. Select the number of blank areas, from 2 to 8 (... area. Options Head Alignment Heating & Drying Media Suction Head Movement Multi-Strike Printing Roll Type Description Select one direction. Manual(Dual Head): if the previous setting does not improve the results, or if you are grainy or out of focus...: Manual(Bi-D): when printing in one of print head movement: Data Width: increases print speed by basing it on how...
Manual(Uni-D): if the previous setting does not improve the results. Select the number of blank areas, from 2 to 8 (... area. Options Head Alignment Heating & Drying Media Suction Head Movement Multi-Strike Printing Roll Type Description Select one direction. Manual(Dual Head): if the previous setting does not improve the results, or if you are grainy or out of focus...: Manual(Bi-D): when printing in one of print head movement: Data Width: increases print speed by basing it on how...

User Manual
Page 81
... how often tension is measured and automatically adjusted: Periodically: recommended for most media. Select Yes to the platen when the printer is off, select Manual and set the value higher than necessary can cause ink stains inside the printer, reduced print quality, or shorter product life. 81 Select On only... if the media sticks to return all settings for most media. Choosing a larger gap than Lv7. When you select Manual, you can set a value from 0 to 9. Every page: provides more precise tensioning (but slower printing). When you select...
... how often tension is measured and automatically adjusted: Periodically: recommended for most media. Select Yes to the platen when the printer is off, select Manual and set the value higher than necessary can cause ink stains inside the printer, reduced print quality, or shorter product life. 81 Select On only... if the media sticks to return all settings for most media. Choosing a larger gap than Lv7. When you select Manual, you can set a value from 0 to 9. Every page: provides more precise tensioning (but slower printing). When you select...

User Manual
Page 82
... measured and automatically adjusted: Periodically: recommended for most media. Every page: provides more precise tensioning (but slower printing). When you select Manual, you can set a value from 0 to 1.0 mm). Select Auto for most media. Select one direction. When Media Size Check is off, select...(0.1 to 40. Select On only if the media sticks to their default values. If media creases, set the value higher than Lv7. When you select Manual, you can set a value from 1 to 30. 82 If media wrinkles, banding appears, or ink sticks to the back of media setting banks 1...
... measured and automatically adjusted: Periodically: recommended for most media. Every page: provides more precise tensioning (but slower printing). When you select Manual, you can set a value from 0 to 1.0 mm). Select Auto for most media. Select one direction. When Media Size Check is off, select...(0.1 to 40. Select On only if the media sticks to their default values. If media creases, set the value higher than Lv7. When you select Manual, you can set a value from 1 to 30. 82 If media wrinkles, banding appears, or ink sticks to the back of media setting banks 1...

User Manual
Page 86
...panel display. 86 Parent topic: Using the Control Panel Menus Network Setup Menu Settings The Network Setup menu lets you enter network settings manually if necessary. Parent topic: Using the Control Panel Menus Preference Menu Settings The Preference menu specifies language and other settings for the ...printer's controls. The time and date are obtained automatically through DHCP or manually. Select Panel to their default settings. Displays the printer's firmware version. Selects the language used in logs and status sheets.
...panel display. 86 Parent topic: Using the Control Panel Menus Network Setup Menu Settings The Network Setup menu lets you enter network settings manually if necessary. Parent topic: Using the Control Panel Menus Preference Menu Settings The Preference menu specifies language and other settings for the ...printer's controls. The time and date are obtained automatically through DHCP or manually. Select Panel to their default settings. Displays the printer's firmware version. Selects the language used in logs and status sheets.

User Manual
Page 96
Parent topic: Preparing for Maintenance Moving the Print Head for Maintenance Certain maintenance tasks require that you may cause your product to malfunction. 96 Place the cup on a try and pour approximately 0.3 ounce (10 ml) of ink cleaner into the cup. Dip a fresh cleaning stick into the ink cleaner and let any excess drip into the cup. 2. Do not move the print head manually or you move the print head as described here before performing the task. 1. Caution: Always move the print head as described here. Recap the ink cleaner bottle. 3.
Parent topic: Preparing for Maintenance Moving the Print Head for Maintenance Certain maintenance tasks require that you may cause your product to malfunction. 96 Place the cup on a try and pour approximately 0.3 ounce (10 ml) of ink cleaner into the cup. Dip a fresh cleaning stick into the ink cleaner and let any excess drip into the cup. 2. Do not move the print head manually or you move the print head as described here before performing the task. 1. Caution: Always move the print head as described here. Recap the ink cleaner bottle. 3.

User Manual
Page 117
... nozzles: • Set up the product to see the Maintenance menu on the product LCD screen. 2. Nozzles are gaps in the Printer Setup menu. • Manually run a nozzle check from the product control panel, as necessary: • Nozzle Check: Check for clogged nozzles before each print job. Perform the following maintenance...
... nozzles: • Set up the product to see the Maintenance menu on the product LCD screen. 2. Nozzles are gaps in the Printer Setup menu. • Manually run a nozzle check from the product control panel, as necessary: • Nozzle Check: Check for clogged nozzles before each print job. Perform the following maintenance...

User Manual
Page 119
... the OK button. Press the up or down arrow button to confirm that the nozzles are faint or missing even after cleaning the print head, manually clean around the print head inside the product. 1. Print a nozzle check pattern or check your printout to choose one of nozzles in the check pattern...
... the OK button. Press the up or down arrow button to confirm that the nozzles are faint or missing even after cleaning the print head, manually clean around the print head inside the product. 1. Print a nozzle check pattern or check your printout to choose one of nozzles in the check pattern...

User Manual
Page 183
... printer is connected is on . • If you connected your printer to a USB hub, make sure the printer's IP address is set the IP address manually. • Check your wired LAN router or access point to see if the cable is a first-tier hub. If it is appropriate for the port...
... printer is connected is on . • If you connected your printer to a USB hub, make sure the printer's IP address is set the IP address manually. • Check your wired LAN router or access point to see if the cable is a first-tier hub. If it is appropriate for the port...

User Manual
Page 184
... like this may be clogged.) • If you see the message Motor Self Adjustment on the product control panel are correct for the message to Manual and decrease the tension values, or print on thicker media. 184 Wait a few moments for the currently loaded media. • If you printed thin media...
... like this may be clogged.) • If you see the message Motor Self Adjustment on the product control panel are correct for the message to Manual and decrease the tension values, or print on thicker media. 184 Wait a few moments for the currently loaded media. • If you printed thin media...

User Manual
Page 185
... best results, leave this may occur between the pressure rollers: Do the following to reduce creasing: • Set the Feeding Tension setting to Manual and increase the tension values. • Set the Take-up Tension setting to On. Parent topic: Solving Printing Problems Related references Media Setup ... Continues After Media Roll Empties If printing does not stop when the media roll ends, make sure the Media End Check setting is set to Manual and decrease the tension values. • Attach a spacer in the slot of the media loading lever. Parent topic: Solving Printing Problems Related ...
... best results, leave this may occur between the pressure rollers: Do the following to reduce creasing: • Set the Feeding Tension setting to Manual and increase the tension values. • Set the Take-up Tension setting to On. Parent topic: Solving Printing Problems Related references Media Setup ... Continues After Media Roll Empties If printing does not stop when the media roll ends, make sure the Media End Check setting is set to Manual and decrease the tension values. • Attach a spacer in the slot of the media loading lever. Parent topic: Solving Printing Problems Related ...

User Manual
Page 188
Remove any media that remains inside the product. 9. Turn the product back on, load media, run a nozzle check and, if necessary, clean the print heads. Manually rewind the media. 8. Caution: Do not leave the product turned off the torn or creased media from the roll. 7. 5. Raise the media loading lever. 6. Parent topic: Solving Printing Problems 188 Pull the media to the cutter groove and cut off with the print heads in an uncapped position for an extended period. The print heads may dry out and the product may not print properly.
Remove any media that remains inside the product. 9. Turn the product back on, load media, run a nozzle check and, if necessary, clean the print heads. Manually rewind the media. 8. Caution: Do not leave the product turned off the torn or creased media from the roll. 7. 5. Raise the media loading lever. 6. Parent topic: Solving Printing Problems 188 Pull the media to the cutter groove and cut off with the print heads in an uncapped position for an extended period. The print heads may dry out and the product may not print properly.

User Manual
Page 222
...), try these solutions: • Run a nozzle check to Printer Full Width on your computer screen, the colors may require different adjusment values. • Use genuine Epson ink packs and make sure the ink packs have not expired. • Raise the temperature of the print head nozzles are using the... Manual > 500mm Pattern setting. Cleaning the Wipers and Wiper Attachment Points Cleaning the Anti-drying Caps Overall Print Quality Is Poor If you notice that the ...
...), try these solutions: • Run a nozzle check to Printer Full Width on your computer screen, the colors may require different adjusment values. • Use genuine Epson ink packs and make sure the ink packs have not expired. • Raise the temperature of the print head nozzles are using the... Manual > 500mm Pattern setting. Cleaning the Wipers and Wiper Attachment Points Cleaning the Anti-drying Caps Overall Print Quality Is Poor If you notice that the ...

User Manual
Page 233
... in which exceed the limits established by the FCC for a Class A digital device, pursuant to obtain and use a shielded equipment interface cable with the instruction manual, may cause interference levels which case the user will invalidate the FCC Certification of this device must accept any interference received, including interference that may...
... in which exceed the limits established by the FCC for a Class A digital device, pursuant to obtain and use a shielded equipment interface cable with the instruction manual, may cause interference levels which case the user will invalidate the FCC Certification of this device must accept any interference received, including interference that may...


