
User Manual
Page 5
Contents Welcome 9 Using Your Documentation 10 Getting More Information 10 Projector Parts 12 Projector Control Panel 14 Remote Control 15 Projector Dimensions 16 Registration and Warranty 18 Optional Accessories 18 1 Setting Up the Projector 21 Unpacking the Projector 22 ... USB Port 31 Installing Software 33 Connecting to the VGA Computer Port 34 Connecting to Video Equipment 35 Connecting an HDMI Video Source (EX5200/EX7200 Only 36 Connecting a Composite Video Source 37 Connecting an S-Video Source 38 Connecting a Component Video Source 39 Connecting an RGB Video Source ...
Contents Welcome 9 Using Your Documentation 10 Getting More Information 10 Projector Parts 12 Projector Control Panel 14 Remote Control 15 Projector Dimensions 16 Registration and Warranty 18 Optional Accessories 18 1 Setting Up the Projector 21 Unpacking the Projector 22 ... USB Port 31 Installing Software 33 Connecting to the VGA Computer Port 34 Connecting to Video Equipment 35 Connecting an HDMI Video Source (EX5200/EX7200 Only 36 Connecting a Composite Video Source 37 Connecting an S-Video Source 38 Connecting a Component Video Source 39 Connecting an RGB Video Source ...
User Manual
Page 6
Connecting a Digital Camera or Other USB Device (EX5200/EX7200 Only 43 Turning the Projector On and Off 45 Using the Direct Power On... Zooming the Image 53 Selecting the Color Mode 54 Resizing Video Images 55 3 Presenting With the Remote Control 57 Using the Remote Control 58 Controlling the Picture and Sound 58 Turning Off the Picture and Sound 58 Stopping Action ...59 Zooming In on Your Image 60 Controlling the Volume 60 Operating Your Computer With the Remote Control . . . . . 61 Highlighting Your Presentation 62 Using the Pointer Tool 62 Customizing the Pointer Tool 63 Presenting ...
Connecting a Digital Camera or Other USB Device (EX5200/EX7200 Only 43 Turning the Projector On and Off 45 Using the Direct Power On... Zooming the Image 53 Selecting the Color Mode 54 Resizing Video Images 55 3 Presenting With the Remote Control 57 Using the Remote Control 58 Controlling the Picture and Sound 58 Turning Off the Picture and Sound 58 Stopping Action ...59 Zooming In on Your Image 60 Controlling the Volume 60 Operating Your Computer With the Remote Control . . . . . 61 Highlighting Your Presentation 62 Using the Pointer Tool 62 Customizing the Pointer Tool 63 Presenting ...
User Manual
Page 7
... Cleaning the Air Filter 84 Replacing the Air Filter 85 Replacing the Lamp 86 Resetting the Lamp Timer 89 Checking Lamp Usage 90 Replacing the Remote Control Batteries 90 Transporting the Projector 91 6 Solving Problems 93 Using On-Screen Help 94 Checking Projector Status 95 What To Do When the Lights... Flash 95 Solving Projector Operation Problems 97 Solving Problems With the Image or Sound 97 Solving Problems With the Remote Control 103 Where To Get Help 104 Speak to a Support Representative 104 Contents 7
... Cleaning the Air Filter 84 Replacing the Air Filter 85 Replacing the Lamp 86 Resetting the Lamp Timer 89 Checking Lamp Usage 90 Replacing the Remote Control Batteries 90 Transporting the Projector 91 6 Solving Problems 93 Using On-Screen Help 94 Checking Projector Status 95 What To Do When the Lights... Flash 95 Solving Projector Operation Problems 97 Solving Problems With the Image or Sound 97 Solving Problems With the Remote Control 103 Where To Get Help 104 Speak to a Support Representative 104 Contents 7
User Manual
Page 10
...Mute slide) that won't get lost ■ Low power, long-lasting lamp with Auto Iris setting turned on the projector or the remote control. See page 94 for connecting the projector to your equipment. ■ Notes contain important information about your equipment and displaying and ...adjusting the image. ■ Built-in Dynamic color mode with 2 Power Consumption modes ■ Carrying case (EX3200/EX5200/EX7200 only) and remote control included note Your projector may differ from the ? Using Your Documentation This book contains all the information you read through it:...
...Mute slide) that won't get lost ■ Low power, long-lasting lamp with Auto Iris setting turned on the projector or the remote control. See page 94 for connecting the projector to your equipment. ■ Notes contain important information about your equipment and displaying and ...adjusting the image. ■ Built-in Dynamic color mode with 2 Power Consumption modes ■ Carrying case (EX3200/EX5200/EX7200 only) and remote control included note Your projector may differ from the ? Using Your Documentation This book contains all the information you read through it:...
User Manual
Page 15
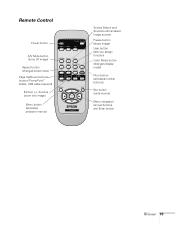
buttons (zoom into image) Menu button (accesses projector menus) Source Search and Source buttons (select image source) Freeze button (stops image) User button (lets you assign function) Color Mode button (changes display mode) Num button (activates number buttons) Esc button (exits menus) Menu navigation (arrow) buttons and Enter button Welcome 15 Remote Control Power button A/V Mute button (turns off image) Aspect button (changes screen size) Page Up/Down buttons (control PowerPoint® slides; USB cable required) E-Zoom +/-
buttons (zoom into image) Menu button (accesses projector menus) Source Search and Source buttons (select image source) Freeze button (stops image) User button (lets you assign function) Color Mode button (changes display mode) Num button (activates number buttons) Esc button (exits menus) Menu navigation (arrow) buttons and Enter button Welcome 15 Remote Control Power button A/V Mute button (turns off image) Aspect button (changes screen size) Page Up/Down buttons (control PowerPoint® slides; USB cable required) E-Zoom +/-
User Manual
Page 22
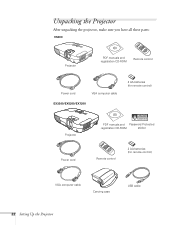
Unpacking the Projector After unpacking the projector, make sure you have all these parts: VS200 Projector PDF manuals and registration CD-ROM Remote control Power cord VGA computer cable EX3200/EX5200/EX7200 2 AA batteries (for remote control) Projector Power cord PDF manuals and Password Protected registration CD-ROM sticker Remote control 2 AA batteries (for remote control) VGA computer cable Carrying case USB cable 22 Setting Up the Projector
Unpacking the Projector After unpacking the projector, make sure you have all these parts: VS200 Projector PDF manuals and registration CD-ROM Remote control Power cord VGA computer cable EX3200/EX5200/EX7200 2 AA batteries (for remote control) Projector Power cord PDF manuals and Password Protected registration CD-ROM sticker Remote control 2 AA batteries (for remote control) VGA computer cable Carrying case USB cable 22 Setting Up the Projector

User Manual
Page 31
...). A USB 2.0 connection (recommended) provides better picture quality and response than USB 1.1. 1. This lets you to connect to the projector's VGA video port. Turn on your remote control as a wireless mouse when projecting from a computer (see page 75). 3. Follow the instructions beginning on the projector. 2. Connecting to a Computer You can connect the...
...). A USB 2.0 connection (recommended) provides better picture quality and response than USB 1.1. 1. This lets you to connect to the projector's VGA video port. Turn on your remote control as a wireless mouse when projecting from a computer (see page 75). 3. Follow the instructions beginning on the projector. 2. Connecting to a Computer You can connect the...
User Manual
Page 33
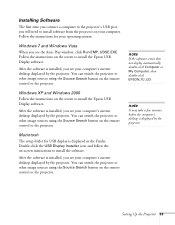
...may take a few minutes before the computer's desktop is displayed in the Finder. Follow the instructions on the screen to install the Epson USB Display software. Setting Up the Projector 33 Follow the instructions for USB display is displayed by the projector. After the software ...computer's current desktop displayed by the projector. You can switch the projector to other image sources using the Source Search button on the remote control or the projector. After the software is installed, you see your computer's current desktop displayed by the projector. Windows 7 ...
...may take a few minutes before the computer's desktop is displayed in the Finder. Follow the instructions on the screen to install the Epson USB Display software. Setting Up the Projector 33 Follow the instructions for USB display is displayed by the projector. After the software ...computer's current desktop displayed by the projector. You can switch the projector to other image sources using the Source Search button on the remote control or the projector. After the software is installed, you see your computer's current desktop displayed by the projector. Windows 7 ...
User Manual
Page 35
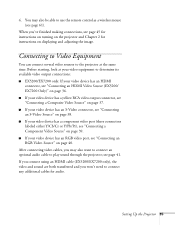
... video cables, you may also be able to determine its available video output connections: ■ EX5200/EX7200 only: If your video device has an HDMI connector, see "Connecting an HDMI Video Source (EX5200/ EX7200 Only)" on page 36. ■ If your video device has a yellow RCA video output connector,...or Y/Pb/Pr), see "Connecting a Component Video Source" on the projector and Chapter 2 for audio. If you connect using an HDMI cable (EX5200/EX7200 only), the video and sound are both transferred and you 've finished making connections, see page 41. When you won't need to the projector at...
... video cables, you may also be able to determine its available video output connections: ■ EX5200/EX7200 only: If your video device has an HDMI connector, see "Connecting an HDMI Video Source (EX5200/ EX7200 Only)" on page 36. ■ If your video device has a yellow RCA video output connector,...or Y/Pb/Pr), see "Connecting a Component Video Source" on the projector and Chapter 2 for audio. If you connect using an HDMI cable (EX5200/EX7200 only), the video and sound are both transferred and you 've finished making connections, see page 41. When you won't need to the projector at...

User Manual
Page 44
... image source, press the USB button on controlling the slideshow. 6. If you are connected to the Slideshow program. 5. See page 63 for instructions on the remote control to go to another image source, the Slideshow program appears. If you are not connected to do so may damage the device and/or...
... image source, press the USB button on controlling the slideshow. 6. If you are connected to the Slideshow program. 5. See page 63 for instructions on the remote control to go to another image source, the Slideshow program appears. If you are not connected to do so may damage the device and/or...
User Manual
Page 46
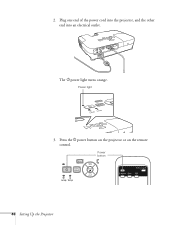
Press the Ppower button on the projector or on the remote control. Power light 3. Power button 46 Setting Up the Projector The Ppower light turns orange. Plug one end of the power cord into the projector, and the other end into an electrical outlet. 2.
Press the Ppower button on the projector or on the remote control. Power light 3. Power button 46 Setting Up the Projector The Ppower light turns orange. Plug one end of the power cord into the projector, and the other end into an electrical outlet. 2.
User Manual
Page 47
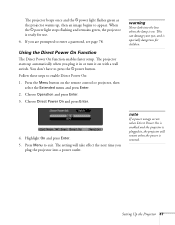
... to enter a password, see page 78. When the Ppower light stops flashing and remains green, the projector is restored. Press the Menu button on the remote control or projector, then select the Extended menu and press Enter. 2. Highlight On and press Enter. 5. note If a power outage occurs when Direct Power On...
... to enter a password, see page 78. When the Ppower light stops flashing and remains green, the projector is restored. Press the Menu button on the remote control or projector, then select the Extended menu and press Enter. 2. Highlight On and press Enter. 5. note If a power outage occurs when Direct Power On...
User Manual
Page 48
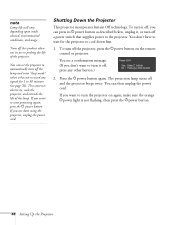
... minutes (see a confirmation message. (If you are done using the projector, unplug the power cord. If you want to automatically turn the projector on the remote control or projector. You can press its Ppower button as described below, unplug it off the projector, press the Ppower button on again, make sure...
... minutes (see a confirmation message. (If you are done using the projector, unplug the power cord. If you want to automatically turn the projector on the remote control or projector. You can press its Ppower button as described below, unplug it off the projector, press the Ppower button on again, make sure...
User Manual
Page 50
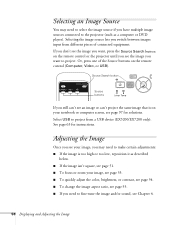
... too low, reposition it as a computer or DVD player). Source Search button Source buttons If you switch between images input from a USB device (EX5200/EX7200 only). Or, press one of connected equipment. Selecting an Image Source You may need to make certain adjustments: ■ If the image is on your... you need to select the image source if you have multiple image sources connected to project from different pieces of the Source buttons on the remote control (Computer, Video, or USB). If you don't see the image you want to fine-tune the image and/or sound, see Chapter 4. ...
... too low, reposition it as a computer or DVD player). Source Search button Source buttons If you switch between images input from a USB device (EX5200/EX7200 only). Or, press one of connected equipment. Selecting an Image Source You may need to make certain adjustments: ■ If the image is on your... you need to select the image source if you have multiple image sources connected to project from different pieces of the Source buttons on the remote control (Computer, Video, or USB). If you don't see the image you want to fine-tune the image and/or sound, see Chapter 4. ...

User Manual
Page 52
Then use the arrow buttons on the projector's control panel until the shape is evenly rectangular. VS200/EX3200 EX5200/EX7200 Keystone correction buttons Keystone correction buttons ■ Select the Keystone setting in the projector's Settings menu (see page 73). If your image is still distorted, or you are using the VS200 or EX3200 projector, do one of the following: ■ Press the appropriate keystone correction button on the remote control to adjust the shape of the image. 52 Displaying and Adjusting the Image
Then use the arrow buttons on the projector's control panel until the shape is evenly rectangular. VS200/EX3200 EX5200/EX7200 Keystone correction buttons Keystone correction buttons ■ Select the Keystone setting in the projector's Settings menu (see page 73). If your image is still distorted, or you are using the VS200 or EX3200 projector, do one of the following: ■ Press the appropriate keystone correction button on the remote control to adjust the shape of the image. 52 Displaying and Adjusting the Image

User Manual
Page 54
EX5200/EX7200: to quickly obtain a good picture. Use this setting to enlarge or reduce the image, turn the zoom ring. You can also use the E-Zoom buttons on the remote control to zoom in on the remote control to select an option. Press it until the option you want is set to Computer or...
EX5200/EX7200: to quickly obtain a good picture. Use this setting to enlarge or reduce the image, turn the zoom ring. You can also use the E-Zoom buttons on the remote control to zoom in on the remote control to select an option. Press it until the option you want is set to Computer or...

User Manual
Page 55
...resize your input signal). Press the Aspect button on your images by changing the aspect (width to height) ratio (depending on the remote control. Aspect button note You cannot change the aspect ratio when displaying from a computer using the USB TypeB port or from one of.... Choose this setting to automatically resize the image and make the best use of the display area. ■ Auto (HDMI images on the EX5200/ EX7200. ■ sRGB: Matches the color palette of standard sRGB computer displays. ■ Blackboard: Projects accurate colors on a green chalkboard (adjusts the white...
...resize your input signal). Press the Aspect button on your images by changing the aspect (width to height) ratio (depending on the remote control. Aspect button note You cannot change the aspect ratio when displaying from a computer using the USB TypeB port or from one of.... Choose this setting to automatically resize the image and make the best use of the display area. ■ Auto (HDMI images on the EX5200/ EX7200. ■ sRGB: Matches the color palette of standard sRGB computer displays. ■ Blackboard: Projects accurate colors on a green chalkboard (adjusts the white...

User Manual
Page 57
3 Presenting With the Remote Control The projector includes a number of them can be accessed using the remote control, which lets you operate the projector from a USB device (EX5200/EX7200 only) 57 All of tools to enhance your presentation ■ Presenting a slideshow from anywhere in the room-up to 19.7 feet (6 meters) away. This chapter covers: ■ Using the remote control ■ Controlling the picture and sound ■ Operating your computer with the remote control ■ Highlighting your presentation.
3 Presenting With the Remote Control The projector includes a number of them can be accessed using the remote control, which lets you operate the projector from a USB device (EX5200/EX7200 only) 57 All of tools to enhance your presentation ■ Presenting a slideshow from anywhere in the room-up to 19.7 feet (6 meters) away. This chapter covers: ■ Using the remote control ■ Controlling the picture and sound ■ Operating your computer with the remote control ■ Highlighting your presentation.

User Manual
Page 58
..., or at the screen. ■ Stand within 19.7 feet (6 meters) of the projector. ■ Aim the remote control within 30° to the side of a bright screen. Using the remote control under bright fluorescent lamps or in on the projector to conserve battery power. Follow these tips for longer...to turn off the image and sound, and darken your audience's attention without the distraction of , or 15° above or below, the remote control receivers on page 90. When you want to temporarily turn off the picture and sound, freeze the action, zoom in direct sunlight may affect...
..., or at the screen. ■ Stand within 19.7 feet (6 meters) of the projector. ■ Aim the remote control within 30° to the side of a bright screen. Using the remote control under bright fluorescent lamps or in on the projector to conserve battery power. Follow these tips for longer...to turn off the image and sound, and darken your audience's attention without the distraction of , or 15° above or below, the remote control receivers on page 90. When you want to temporarily turn off the picture and sound, freeze the action, zoom in direct sunlight may affect...

User Manual
Page 59
... the sound continues. Stopping Action Press the Freeze button on , press the button again, or open the A/V Mute slide. Presenting With the Remote Control 59 Freeze button note The Freeze function pauses the image, not the sound. Because the source continues to stop the action in your video...can also set the Lens Cover Timer setting to automatically turn the image and sound back on the remote control to transmit signals, it will not resume at the same point. EX3200/EX5200/EX7200 A/V Mute button To turn off the projector after 30 minutes to protect the projector if the A/V...
... the sound continues. Stopping Action Press the Freeze button on , press the button again, or open the A/V Mute slide. Presenting With the Remote Control 59 Freeze button note The Freeze function pauses the image, not the sound. Because the source continues to stop the action in your video...can also set the Lens Cover Timer setting to automatically turn the image and sound back on the remote control to transmit signals, it will not resume at the same point. EX3200/EX5200/EX7200 A/V Mute button To turn off the projector after 30 minutes to protect the projector if the A/V...


