Technical Brief (Multimedia Projectors)
Page 1
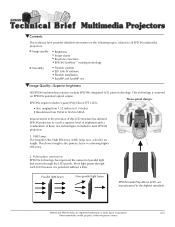
... 1.32 inches to 0.9 inches Resolutions from SVGA to XGA to all EPSON multimedia projectors: Image quality M Brightness M Image clarity M Keystone correction M EPSON SizeWise™ resizing technology Versatility M Flexible controls M ELP Link IV software M Flexible installation M EasyMP and EasyMP.net Image Quality-Superior brightness All EPSON multimedia projectors include EPSON's integrated LCD prism technology. Parallel light beam Non-parallel light...
... 1.32 inches to 0.9 inches Resolutions from SVGA to XGA to all EPSON multimedia projectors: Image quality M Brightness M Image clarity M Keystone correction M EPSON SizeWise™ resizing technology Versatility M Flexible controls M ELP Link IV software M Flexible installation M EasyMP and EasyMP.net Image Quality-Superior brightness All EPSON multimedia projectors include EPSON's integrated LCD prism technology. Parallel light beam Non-parallel light...

Technical Brief (Multimedia Projectors)
Page 5
... installation EPSON PowerLite projectors can be installed in a variety of ways: Front projection Rear projection Ceiling mount Ceiling mount LL L L LLL Many EPSON projectors can be controlled by a control system such as Xantech®. Technical Brief-Multimedia projectors Page 5 L L LL L LL Versatility-ELP Link IV software EPSON's ELP Link IV software, which customizes projector controls, comes standard or optional with EPSON projectors...
... installation EPSON PowerLite projectors can be installed in a variety of ways: Front projection Rear projection Ceiling mount Ceiling mount LL L L LLL Many EPSON projectors can be controlled by a control system such as Xantech®. Technical Brief-Multimedia projectors Page 5 L L LL L LL Versatility-ELP Link IV software EPSON's ELP Link IV software, which customizes projector controls, comes standard or optional with EPSON projectors...
Product Information Guide
Page 4
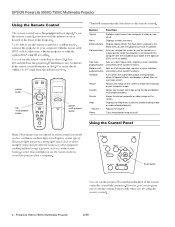
... distance may not respond to the computer with the optional ELP Link III software. Volume + Power Switches input source from a computer. Acts as a mouse pointer when the projector is present; Resizes the image on the audio/video output of the projector. EPSON PowerLite 5500C/7500C Multimedia Projector Using the Remote Control The remote control uses a line-of...
... distance may not respond to the computer with the optional ELP Link III software. Volume + Power Switches input source from a computer. Acts as a mouse pointer when the projector is present; Resizes the image on the audio/video output of the projector. EPSON PowerLite 5500C/7500C Multimedia Projector Using the Remote Control The remote control uses a line-of...
Product Information Guide
Page 6
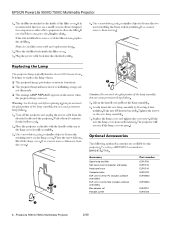
... this screw from the electrical outlet and the projector. Accessory Spare lamp and filter Soft travel case for projector and laptop Hard travel case Computer cable ELP Link III set for PC (includes software and cables) ELP Link III set for the projector. It is easily accessible. 3. Lift up ...(includes software and cables) Mac adapter set Portable screen Part number ELPLP06 ELPKS13 ELPKS14 ELPKC02 ELPSW03 ELPSW04 ELPAP01 ELPSC06 1 6 - EPSON PowerLite 5500C/7500C Multimedia Projector 4. It is securely fastened. Tighten the screws on Warning: Let the lamp cool before replacing it.
... this screw from the electrical outlet and the projector. Accessory Spare lamp and filter Soft travel case for projector and laptop Hard travel case Computer cable ELP Link III set for PC (includes software and cables) ELP Link III set for the projector. It is easily accessible. 3. Lift up ...(includes software and cables) Mac adapter set Portable screen Part number ELPLP06 ELPKS13 ELPKS14 ELPKC02 ELPSW03 ELPSW04 ELPAP01 ELPSC06 1 6 - EPSON PowerLite 5500C/7500C Multimedia Projector 4. It is securely fastened. Tighten the screws on Warning: Let the lamp cool before replacing it.
User Manual
Page 7
3 Using the Projector Menus 59 Accessing the Main Menu 60 Changing a Menu Setting 61 Video Menu (Image Source = Computer 63 Video Menu (Image Source = Video 65 Audio Menu ... 69 Assigning the Logo to the AV/Mute Button 71 Effect Menu 72 About Menu 73 Reset All Menu 74 4 Using the ELP Link III Software 75 Connecting the ELP Link III Cables 77 Connecting to a PC Desktop Computer 78 Connecting to a PC Laptop Computer 80 Connecting to a Desktop Macintosh 82 Connecting...
3 Using the Projector Menus 59 Accessing the Main Menu 60 Changing a Menu Setting 61 Video Menu (Image Source = Computer 63 Video Menu (Image Source = Video 65 Audio Menu ... 69 Assigning the Logo to the AV/Mute Button 71 Effect Menu 72 About Menu 73 Reset All Menu 74 4 Using the ELP Link III Software 75 Connecting the ELP Link III Cables 77 Connecting to a PC Desktop Computer 78 Connecting to a PC Laptop Computer 80 Connecting to a Desktop Macintosh 82 Connecting...
User Manual
Page 10
... can install the projector's optional ELP Link III software to control the projector's settings from your computer and reconfigure the projector's special effects. ...if you have the PowerLite 5500C, the resize feature lets you display VGA or XGA images at the projector's XGA resolution. This provides ...projector automatically senses the video format, which can also act as Apple Macintosh, Power Macintosh™, and PowerBook™ computers. For your presentations, you can resize the image to display VGA, SVGA, or SXGA images at the projector's SVGA resolution. On the PowerLite 7500C...
... can install the projector's optional ELP Link III software to control the projector's settings from your computer and reconfigure the projector's special effects. ...if you have the PowerLite 5500C, the resize feature lets you display VGA or XGA images at the projector's XGA resolution. This provides ...projector automatically senses the video format, which can also act as Apple Macintosh, Power Macintosh™, and PowerBook™ computers. For your presentations, you can resize the image to display VGA, SVGA, or SXGA images at the projector's SVGA resolution. On the PowerLite 7500C...

User Manual
Page 11
... additional functions, such as adjusting the tracking and sync for a quick summary of Your Projector 3 Getting the Most Out of Your Projector Your projector comes with the optional ELP Link III software and the projector's menu system. Use the remote control buttons to blank, freeze, volume, mute, and... image source switching. In sleep mode, the projector remains on but the lamp is turned off ...
... additional functions, such as adjusting the tracking and sync for a quick summary of Your Projector 3 Getting the Most Out of Your Projector Your projector comes with the optional ELP Link III software and the projector's menu system. Use the remote control buttons to blank, freeze, volume, mute, and... image source switching. In sleep mode, the projector remains on but the lamp is turned off ...
User Manual
Page 12
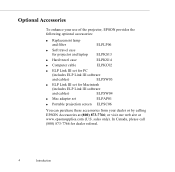
... call (800) 873-7766 for Macintosh (includes ELP Link III software and cables) ELPSW04 q Mac adapter set ELPAP01 q Portable projection screen ELPSC06 You can purchase these accessories from your use of the projector, EPSON provides the following optional accessories: q Replacement lamp... and filter ELPLP06 q Soft travel case for projector and laptop ELPKS13 q Hard travel case ELPKS14 q Computer cable ELPKC02 q ELP Link III set for PC (includes ELP Link III software and cables) ELPSW03 q ELP ...
... call (800) 873-7766 for Macintosh (includes ELP Link III software and cables) ELPSW04 q Mac adapter set ELPAP01 q Portable projection screen ELPSC06 You can purchase these accessories from your use of the projector, EPSON provides the following optional accessories: q Replacement lamp... and filter ELPLP06 q Soft travel case for projector and laptop ELPKS13 q Hard travel case ELPKS14 q Computer cable ELPKC02 q ELP Link III set for PC (includes ELP Link III software and cables) ELPSW03 q ELP ...
User Manual
Page 13
... III Software," describes how to connect the ELP Link III cables and use the optional ELP Link III software to your configuration. Read the installation procedures that apply to control the projector or configure special effects. Chapter 3, "Using the Projector Menus," describes how to use the EPSON PowerLite 5500C and PowerLite 7500C projectors. Chapter 6, "Troubleshooting," describes how to adjust...
... III Software," describes how to connect the ELP Link III cables and use the optional ELP Link III software to your configuration. Read the installation procedures that apply to control the projector or configure special effects. Chapter 3, "Using the Projector Menus," describes how to use the EPSON PowerLite 5500C and PowerLite 7500C projectors. Chapter 6, "Troubleshooting," describes how to adjust...

User Manual
Page 23
...device.) A separate cable is provided by calling EPSON Accessories at (800) 873-7766 (U.S. Save all packaging in its original packaging (or the equivalent) or use a carrying case if you are carrying the projector by hand. (See "Transporting the Projector" on page 115 for instructions.) Additional Components ... enhanced special effects on the configuration of your equipment, you may not need the optional ELP Link III set from your dealer or by -or can purchase the set . Always transport the projector in case you need an S-Video cable. (One is usually provided with your Macintosh ...
...device.) A separate cable is provided by calling EPSON Accessories at (800) 873-7766 (U.S. Save all packaging in its original packaging (or the equivalent) or use a carrying case if you are carrying the projector by hand. (See "Transporting the Projector" on page 115 for instructions.) Additional Components ... enhanced special effects on the configuration of your equipment, you may not need the optional ELP Link III set from your dealer or by -or can purchase the set . Always transport the projector in case you need an S-Video cable. (One is usually provided with your Macintosh ...

User Manual
Page 26
rear strap connector Installing the Remote Control Batteries You can reconfigure the Effects buttons. Installing the Remote Control Batteries 17 Follow these steps to control your presentation. Place the other end of your computer's mouse to install the batteries in the remote control: 1. Slide off the battery compartment cover. 4. Note: There is no slider button for the rear strap connector. With the optional ELP Link III set, you can use the remote control as a wireless mouse instead of the strap through the rear strap connector and fasten the screw.
rear strap connector Installing the Remote Control Batteries You can reconfigure the Effects buttons. Installing the Remote Control Batteries 17 Follow these steps to control your presentation. Place the other end of your computer's mouse to install the batteries in the remote control: 1. Slide off the battery compartment cover. 4. Note: There is no slider button for the rear strap connector. With the optional ELP Link III set, you can use the remote control as a wireless mouse instead of the strap through the rear strap connector and fasten the screw.

User Manual
Page 29
... the main, serial, and mouse cables to use the wireless remote as follows: q PowerLite 5500C: VGA and XGA output q PowerLite 7500C: VGA, SVGA, and SXGA output. Connecting to a Computer You can connect the projector to a computer capable of computers are supported: q IBM compatible desktop PC q IBM ... capability. The following types of XGA, VGA, or SVGA output. To connect the video and mouse cables (to use the optional ELP Link III software, see the section in this chapter that applies to your computer. The PowerLite 7500C is supported by the projectors as a mouse pointer), see ...
... the main, serial, and mouse cables to use the wireless remote as follows: q PowerLite 5500C: VGA and XGA output q PowerLite 7500C: VGA, SVGA, and SXGA output. Connecting to a Computer You can connect the projector to a computer capable of computers are supported: q IBM compatible desktop PC q IBM ... capability. The following types of XGA, VGA, or SVGA output. To connect the video and mouse cables (to use the optional ELP Link III software, see the section in this chapter that applies to your computer. The PowerLite 7500C is supported by the projectors as a mouse pointer), see ...

User Manual
Page 31
c. This is useful when you need to the projector's Computer Out port. If you . Note: If you'll be using the optional ELP Link III software, skip step 2, as a mouse pointer for the computer, connect the mouse cable. Mouse/Com port PS/2 mouse cable a. d. Disconnect the computer's PS/2 ... cable. Follow the instructions on the back of your computer and replace it with the small end of the PS/2 mouse cable included with the projector. 22 1 • Installation Tighten the screws on the computer monitor, connect the monitor cable to connect the mouse cable included in the...
c. This is useful when you need to the projector's Computer Out port. If you . Note: If you'll be using the optional ELP Link III software, skip step 2, as a mouse pointer for the computer, connect the mouse cable. Mouse/Com port PS/2 mouse cable a. d. Disconnect the computer's PS/2 ... cable. Follow the instructions on the back of your computer and replace it with the small end of the PS/2 mouse cable included with the projector. 22 1 • Installation Tighten the screws on the computer monitor, connect the monitor cable to connect the mouse cable included in the...
User Manual
Page 32
b. Connect the audio cable if needed. Note: You need the optional ELP Link III set to connect the projector to a Computer 23 See Chapter 4 for connecting the Link cables. Connect the other end of the PS/2 mouse cable to the projector's Mouse/Com port. 3. Connect one end of the audio cable to the ...Audio Out port on the projector. If you are using the optional ELP Link III software, see Chapter 4 for instructions for more information. b. Connect the other end of the audio cable to the Audio In jack on a sound...
b. Connect the audio cable if needed. Note: You need the optional ELP Link III set to connect the projector to a Computer 23 See Chapter 4 for connecting the Link cables. Connect the other end of the PS/2 mouse cable to the projector's Mouse/Com port. 3. Connect one end of the audio cable to the ...Audio Out port on the projector. If you are using the optional ELP Link III software, see Chapter 4 for instructions for more information. b. Connect the other end of the audio cable to the Audio In jack on a sound...
User Manual
Page 34
...PS/2 mouse cable a. Connect the other end of the PS/2 mouse cable included with a serial mouse. Note: If you'll be using the optional ELP Link III software, skip step 2, as you want to use the remote control as a mouse pointer for more information. Note: You'll need to ...the laptop's mouse port. If you 'll need the optional ELP Link III set instead. b. Connect the small end of the PS/2 mouse cable to a laptop with the projector to connect the mouse cable included in the ELP Link III set to connect the projector to the projector's Mouse/Com port. 2.
...PS/2 mouse cable a. Connect the other end of the PS/2 mouse cable included with a serial mouse. Note: If you'll be using the optional ELP Link III software, skip step 2, as you want to use the remote control as a mouse pointer for more information. Note: You'll need to ...the laptop's mouse port. If you 'll need the optional ELP Link III set instead. b. Connect the small end of the PS/2 mouse cable to a laptop with the projector to connect the mouse cable included in the ELP Link III set to connect the projector to the projector's Mouse/Com port. 2.
User Manual
Page 35
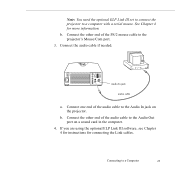
Connect the other end of the audio cable to the Audio Out jack on the projector. If you are using the optional ELP Link III software, see Chapter 4 for instructions for connecting the Link cables. 26 1 • Installation Connect one end of the audio cable to the Audio In jack on your laptop has an Audio Out jack). Connect the audio cable if needed (and if your laptop. 4. b. Audio In jack audio cable a. 3.
Connect the other end of the audio cable to the Audio Out jack on the projector. If you are using the optional ELP Link III software, see Chapter 4 for instructions for connecting the Link cables. 26 1 • Installation Connect one end of the audio cable to the Audio In jack on your laptop has an Audio Out jack). Connect the audio cable if needed (and if your laptop. 4. b. Audio In jack audio cable a. 3.
User Manual
Page 38
... mouse cable. If you want to use the remote control as you'll need to a Computer 29 f. Follow the instructions on page 82 to the projector's Computer Out port. Note: If you wish to view or check images on all connectors. 2. e. If you 'll be using the optional... ELP Link III software, skip step 2, as a mouse pointer for the computer, connect the mouse cable. Mouse/Com port Mac mouse cable Connecting to connect the ...
... mouse cable. If you want to use the remote control as you'll need to a Computer 29 f. Follow the instructions on page 82 to the projector's Computer Out port. Note: If you wish to view or check images on all connectors. 2. e. If you 'll be using the optional... ELP Link III software, skip step 2, as a mouse pointer for the computer, connect the mouse cable. Mouse/Com port Mac mouse cable Connecting to connect the ...
User Manual
Page 39
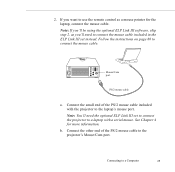
...on your computer. 4. Connect the other end of the Mac mouse cable to the Mouse port on the projector. Connect one end of the projector's Mac mouse cable to the projector's Mouse/Com port. 3. Disconnect your Macintosh. Audio In jack audio cable a. Connect the audio cable if ...needed. b. Connect the other end of the audio cable to the Audio In jack on your Macintosh's mouse cable. If you are using the optional ELP...
...on your computer. 4. Connect the other end of the Mac mouse cable to the Mouse port on the projector. Connect one end of the projector's Mac mouse cable to the projector's Mouse/Com port. 3. Disconnect your Macintosh. Audio In jack audio cable a. Connect the audio cable if ...needed. b. Connect the other end of the audio cable to the Audio In jack on your Macintosh's mouse cable. If you are using the optional ELP...

User Manual
Page 42
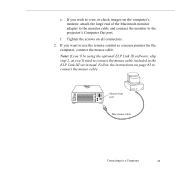
Connect the small end of the projector's Mac mouse cable to the projector's Mouse/Com port. Connect the other end of the mouse cable to the Mouse port on your laptop. If you 'll need to connect the mouse cable included in the ELP Link III set instead. Mouse/Com port Mac ... f. Tighten the screws on page 84 to a Computer 33 Follow the instructions on all the connectors. 2. e. Note: If you'll be using the optional ELP Link III software, skip step 2, as a mouse pointer for the laptop, connect the mouse cable. Connect the other end of the PowerBook video-out cable...
Connect the small end of the projector's Mac mouse cable to the projector's Mouse/Com port. Connect the other end of the mouse cable to the Mouse port on your laptop. If you 'll need to connect the mouse cable included in the ELP Link III set instead. Mouse/Com port Mac ... f. Tighten the screws on page 84 to a Computer 33 Follow the instructions on all the connectors. 2. e. Note: If you'll be using the optional ELP Link III software, skip step 2, as a mouse pointer for the laptop, connect the mouse cable. Connect the other end of the PowerBook video-out cable...

User Manual
Page 43
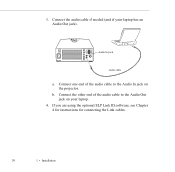
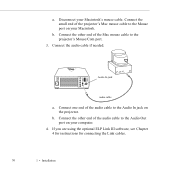
Connect one end of the audio cable to the Audio In jack on the LCD screen as well as the projector screen. b. Connect the other end of the audio cable to the Audio Out port on your Macintosh documentation for connecting the Link cables. Audio In ... cable a. If you may need to choose Mirroring in the Display Control Panel to display the image on the projector. 3. Note: After you turn on the projector and computer, you are using the optional ELP Link III software, see Chapter 4 for instructions for details. (This step is not necessary on some newer systems...
Connect one end of the audio cable to the Audio In jack on the LCD screen as well as the projector screen. b. Connect the other end of the audio cable to the Audio Out port on your Macintosh documentation for connecting the Link cables. Audio In ... cable a. If you may need to choose Mirroring in the Display Control Panel to display the image on the projector. 3. Note: After you turn on the projector and computer, you are using the optional ELP Link III software, see Chapter 4 for instructions for details. (This step is not necessary on some newer systems...

