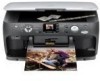
Basics
Page 3
...Loading Paper 6 Copying a Photo or Document 8 Placing the Original on the Glass 8 Copying 9 Making Prints From Slides or Negatives 12 Restoring Color in Faded Photos, Slides, and Negatives 17 Printing From a Memory Card 18 Compatible Cards and Image Formats 19 Inserting the Card 20 Printing ... From Your Computer 28 Printing in Windows 28 Printing With Macintosh OS X 31 Using Special Papers 34 Scanning a Photo, Document, Film, or Slide 35 Maintaining Your Epson Stylus CX7800 38 Checking the Print Head Nozzles 38 Cleaning the Print Head 39 Replacing Ink Cartridges 41 Contents 3
...Loading Paper 6 Copying a Photo or Document 8 Placing the Original on the Glass 8 Copying 9 Making Prints From Slides or Negatives 12 Restoring Color in Faded Photos, Slides, and Negatives 17 Printing From a Memory Card 18 Compatible Cards and Image Formats 19 Inserting the Card 20 Printing ... From Your Computer 28 Printing in Windows 28 Printing With Macintosh OS X 31 Using Special Papers 34 Scanning a Photo, Document, Film, or Slide 35 Maintaining Your Epson Stylus CX7800 38 Checking the Print Head Nozzles 38 Cleaning the Print Head 39 Replacing Ink Cartridges 41 Contents 3

Basics
Page 5
...: Warning: Warnings must be followed carefully to your Epson Stylus CX7800. Of course your Epson Stylus CX7800 can do most of a document or photo ■ Restore color from faded photos, slides, and negatives ■ Print photos stored on -screen User's Guide by selecting the icon for better copying, scanning, and printing. Caution: Cautions must be observed to avoid damage...
...: Warning: Warnings must be followed carefully to your Epson Stylus CX7800. Of course your Epson Stylus CX7800 can do most of a document or photo ■ Restore color from faded photos, slides, and negatives ■ Print photos stored on -screen User's Guide by selecting the icon for better copying, scanning, and printing. Caution: Cautions must be observed to avoid damage...

Basics
Page 12
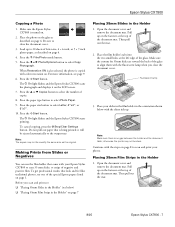
... the document mat. Place the film holder's tabs into the two small holes at the top of the glass to align them with your Epson Stylus CX7800 to scan 35mm slides, or strips of the glass. Fluorescent lamp 12 Copying a Photo or Document Then pull out the mat. 2. Pull up on page 34. Make ...sure the cutouts for 35mm slides are toward the back of the document mat. To get professional results that came with the fluorescent lamp when you scan and print see: ■ "Placing 35mm Slides in the Holder" (see below) ■ "Placing 35mm Film Strips in...
... the document mat. Place the film holder's tabs into the two small holes at the top of the glass to align them with your Epson Stylus CX7800 to scan 35mm slides, or strips of the glass. Fluorescent lamp 12 Copying a Photo or Document Then pull out the mat. 2. Pull up on page 34. Make ...sure the cutouts for 35mm slides are toward the back of the document mat. To get professional results that came with the fluorescent lamp when you scan and print see: ■ "Placing 35mm Slides in the Holder" (see below) ■ "Placing 35mm Film Strips in...

Basics
Page 13
Note: Make sure there is no gap between the holder and the document table; Open the document cover and remove the document mat. Pull up on page 15 to scan and print your slides in the film holder in the Holder 1. Open the film strip cover. Continue with the shiny side up. Place your photos. otherwise the prints may not be clear. Copying a Photo or Document 13 Placing 35mm Film Strips in the orientation shown below with the steps on the fastener at the top of the document mat. Then pull out the mat. 2. 3.
Note: Make sure there is no gap between the holder and the document table; Open the document cover and remove the document mat. Pull up on page 15 to scan and print your slides in the film holder in the Holder 1. Open the film strip cover. Continue with the shiny side up. Place your photos. otherwise the prints may not be clear. Copying a Photo or Document 13 Placing 35mm Film Strips in the orientation shown below with the steps on the fastener at the top of the document mat. Then pull out the mat. 2. 3.

Basics
Page 14
Fluorescent lamp Continue with the shiny side up. (The images should not appear reversed.) Make sure the film slides under the tabs. 4. Slide the strip of the glass. 3. Place the holder's tabs into place. 5. Gently press until it with the fluorescent lamp when you close the document cover. Make sure the film strip is towards the back of the glass to align it clicks into the two small holes at the left edge of film into the holder in the orientation show below with the steps on page 15 to scan and print your photos. 14 Copying a Photo or Document Close the film strip cover.
Fluorescent lamp Continue with the shiny side up. (The images should not appear reversed.) Make sure the film slides under the tabs. 4. Slide the strip of the glass. 3. Place the holder's tabs into place. 5. Gently press until it with the fluorescent lamp when you close the document cover. Make sure the film strip is towards the back of the glass to align it clicks into the two small holes at the left edge of film into the holder in the orientation show below with the steps on page 15 to scan and print your photos. 14 Copying a Photo or Document Close the film strip cover.

Basics
Page 15
... r Photo/Options button to select one of the following types of film: ■ Negative Film: for color negatives ■ Positive Film: for positive color film ■ Slides: for slides ■ B&W Negative Film: for black and white negatives Tip: If your photo back to print of letter...-size, 4 × 6-inch, or 5 × 7-inch photo paper. 3. Press the Film/Photo mode button. 4. Your photos are printed. Copying a Photo or Document 15 Scanning...
... r Photo/Options button to select one of the following types of film: ■ Negative Film: for color negatives ■ Positive Film: for positive color film ■ Slides: for slides ■ B&W Negative Film: for black and white negatives Tip: If your photo back to print of letter...-size, 4 × 6-inch, or 5 × 7-inch photo paper. 3. Press the Film/Photo mode button. 4. Your photos are printed. Copying a Photo or Document 15 Scanning...

Basics
Page 17
...Press the x Start button. Press the u or d Copies button to print. 6. Press the x Start button again. Do not pull out paper that is scanned and a preview of photo you can bring them back to select 4"x 6", or 5"x 7". 7. Copying a Photo or Document 17 The photo or film is... being printed; Restoring Color in Faded Photos, Slides, and Negatives If you have color-faded photos, negatives, or slides, you want to select the type of the photo appears on the LCD screen. 5. Your photos are printed...
...Press the x Start button. Press the u or d Copies button to print. 6. Press the x Start button again. Do not pull out paper that is scanned and a preview of photo you can bring them back to select 4"x 6", or 5"x 7". 7. Copying a Photo or Document 17 The photo or film is... being printed; Restoring Color in Faded Photos, Slides, and Negatives If you have color-faded photos, negatives, or slides, you want to select the type of the photo appears on the LCD screen. 5. Your photos are printed...
Basics
Page 35
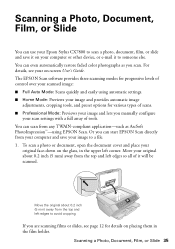
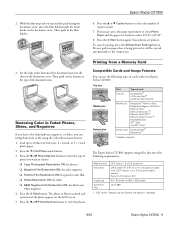
...color photographs as ArcSoft PhotoImpression™-using automatic settings. ■ Home Mode: Previews your image and provides automatic image adjustments, cropping tools, and preset options for details on your computer or other device, or e-mail it will be scanned. Scanning a Photo, Document, Film, or Slide You can scan...your computer and save it on placing them in the upper left edges to someone else. You can use your Epson Stylus CX7800 to scan a photo, document, film, or slide and save your image to a file. 1. Move your original about 0.2 inch (5 mm) away from the top...
...color photographs as ArcSoft PhotoImpression™-using automatic settings. ■ Home Mode: Previews your image and provides automatic image adjustments, cropping tools, and preset options for details on your computer or other device, or e-mail it will be scanned. Scanning a Photo, Document, Film, or Slide You can scan...your computer and save it on placing them in the upper left edges to someone else. You can use your Epson Stylus CX7800 to scan a photo, document, film, or slide and save your image to a file. 1. Move your original about 0.2 inch (5 mm) away from the top...

Basics
Page 36
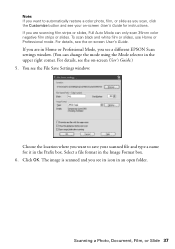
... the File menu, choose Import or Acquire, and select Epson Stylus CX7800. You see page 9. 2. If the Mode setting in the Applications folder. ■ If you are scanning from an application, start EPSON Scan: ■ Windows: Double-click the EPSON Scan icon on your desktop. ■ Macintosh: Double-click EPSON Scan in the upper right corner is set to start...
... the File menu, choose Import or Acquire, and select Epson Stylus CX7800. You see page 9. 2. If the Mode setting in the Applications folder. ■ If you are scanning from an application, start EPSON Scan: ■ Windows: Double-click the EPSON Scan icon on your desktop. ■ Macintosh: Double-click EPSON Scan in the upper right corner is set to start...
Basics
Page 37
.... If you are in Home or Professional Mode, you see a different EPSON Scan settings window. (You can only scan 35mm color negative film strips or slides. The image is scanned and you see the on-screen User's Guide. To scan black and white film or slides, use Home or Professional mode. For details, see its icon in an...
.... If you are in Home or Professional Mode, you see a different EPSON Scan settings window. (You can only scan 35mm color negative film strips or slides. The image is scanned and you see the on-screen User's Guide. To scan black and white film or slides, use Home or Professional mode. For details, see its icon in an...
Basics
Page 49
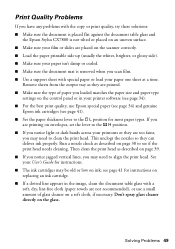
... these solutions: ■ Make sure the document is placed flat against the document table glass and the Epson Stylus CX7800 is not tilted or placed on an uneven surface. ■ Make sure your film or slides are placed on the glass. Remove sheets from the output tray as described on ink; Don't spray glass... the whiter, brighter, or glossy side). ■ Make sure your paper isn't damp or curled. ■ Make sure the document mat is removed when you scan film. ■ Use a support sheet with special paper or load your paper one sheet at a time.
... these solutions: ■ Make sure the document is placed flat against the document table glass and the Epson Stylus CX7800 is not tilted or placed on an uneven surface. ■ Make sure your film or slides are placed on the glass. Remove sheets from the output tray as described on ink; Don't spray glass... the whiter, brighter, or glossy side). ■ Make sure your paper isn't damp or curled. ■ Make sure the document mat is removed when you scan film. ■ Use a support sheet with special paper or load your paper one sheet at a time.

Basics
Page 57
...21, 30, 33 Cartridges, replacing, 41 to 45 Cleaning print head, 39 to 41 Color Management, turning off, 32 Color restoration, 17 ColorSync, 32 Copying documents, 9 to 10 photos, 10 to 11 placing originals, 8 to 9 problems, 48 slides and negatives, 12 to 15 speeding up, 11 thick documents, 9 D Declaration of ... in, 11 E ENERGY STAR, 54 EPSON Scan, 35 to 37 Exif, auto correct, 25 F FCC statement, 53 File formats, 19 Film loading, 12 to 14 printing from, 12 to 15 restoring color, 17 scanning, 35 to 37 Film holder loading film, 12 to 14 loading slides, 12 removing, 16 storing, 16 Fluorescent...
...21, 30, 33 Cartridges, replacing, 41 to 45 Cleaning print head, 39 to 41 Color Management, turning off, 32 Color restoration, 17 ColorSync, 32 Copying documents, 9 to 10 photos, 10 to 11 placing originals, 8 to 9 problems, 48 slides and negatives, 12 to 15 speeding up, 11 thick documents, 9 D Declaration of ... in, 11 E ENERGY STAR, 54 EPSON Scan, 35 to 37 Exif, auto correct, 25 F FCC statement, 53 File formats, 19 Film loading, 12 to 14 printing from, 12 to 15 restoring color, 17 scanning, 35 to 37 Film holder loading film, 12 to 14 loading slides, 12 removing, 16 storing, 16 Fluorescent...
Basics
Page 59
..., 35 to 37 film, 35 to 37 modes, about, 35 photos, 35 to 37 problems, 49 slides, 35 to 37 thick documents, 9 Slides loading, 12 to 13 printing from, 12 to 15 restoring color, 17 scanning, 35 to 37 Stopping printing, 21, 30, 33 Support, 50 T Technical support, 50 Troubleshooting copying, 48 image ...memory card, 47 paper feeding, 48 scanning, 49 Type setting, Windows, 29, 34 U Utilities Cleaning print head, 39 to 41 Nozzle Check, 38 to 39, 40 to 41 W Warranty, 55 to 56 Windows color management settings, 30 page layout settings, 29 printing, 28 to 30 starting EPSON Scan, 36 Type setting, 29, 34 ...
..., 35 to 37 film, 35 to 37 modes, about, 35 photos, 35 to 37 problems, 49 slides, 35 to 37 thick documents, 9 Slides loading, 12 to 13 printing from, 12 to 15 restoring color, 17 scanning, 35 to 37 Stopping printing, 21, 30, 33 Support, 50 T Technical support, 50 Troubleshooting copying, 48 image ...memory card, 47 paper feeding, 48 scanning, 49 Type setting, Windows, 29, 34 U Utilities Cleaning print head, 39 to 41 Nozzle Check, 38 to 39, 40 to 41 W Warranty, 55 to 56 Windows color management settings, 30 page layout settings, 29 printing, 28 to 30 starting EPSON Scan, 36 Type setting, 29, 34 ...
Product Brochure
Page 1
...color preview monitor - Restores faded images with ease using DURABrite® Ultra pigment ink Enjoy great results, fast - This full-featured all without a PC - The high-performance Epson Stylus® CX7800 can quickly scan in as fast as 50 sec* Take control of photos, documents and film - Scans slides... right from photos, documents or film - CX7800 Take your memory card or PictBridge-enabled camera - PC free Make great looking copies of ink usage - Includes convenient individual ink cartridges Restore old faded color photos, slides and negatives - all -in-one can ...
...color preview monitor - Restores faded images with ease using DURABrite® Ultra pigment ink Enjoy great results, fast - This full-featured all without a PC - The high-performance Epson Stylus® CX7800 can quickly scan in as fast as 50 sec* Take control of photos, documents and film - Scans slides... right from photos, documents or film - CX7800 Take your memory card or PictBridge-enabled camera - PC free Make great looking copies of ink usage - Includes convenient individual ink cartridges Restore old faded color photos, slides and negatives - all -in-one can ...
Product Brochure
Page 2
... x 2400 (film, slides, negatives) Color Depth 48-bit color Stand-alone Color Copier Copy Quality Color, black/white Draft, Text, Photo Copy Size 4" x 6," 5" x 7," 8.5" x 11" Copy Quantity 1 - 99 copies (PC-free) System Interface and Connectivity Hi-Speed USB 2.0 Built-in Economy Mode on plain paper. and Easy PhotoFix is a trademark of Epson America, Inc. CX7800 SPECIFICATIONS Printer Printing...
... x 2400 (film, slides, negatives) Color Depth 48-bit color Stand-alone Color Copier Copy Quality Color, black/white Draft, Text, Photo Copy Size 4" x 6," 5" x 7," 8.5" x 11" Copy Quantity 1 - 99 copies (PC-free) System Interface and Connectivity Hi-Speed USB 2.0 Built-in Economy Mode on plain paper. and Easy PhotoFix is a trademark of Epson America, Inc. CX7800 SPECIFICATIONS Printer Printing...
Product Information Guide
Page 7
...professional results that is copied with the fluorescent lamp when you scan and print see: ❏ "Placing 35mm Slides in the Holder" (see page 9. 6. Pull up on page 1. Epson Stylus CX7800 Copying a Photo 1. Make sure the Epson Stylus CX7800 is no gap between the holder and the document table;...color restoration on . 2. Open the document cover and remove the document mat. Place the photo on the glass as the original. For more information, see below with the steps on page 4. 4. Press the x Start button. Place your photos. Then pull out the mat. 8/05 Epson Stylus CX7800...
...professional results that is copied with the fluorescent lamp when you scan and print see: ❏ "Placing 35mm Slides in the Holder" (see page 9. 6. Pull up on page 1. Epson Stylus CX7800 Copying a Photo 1. Make sure the Epson Stylus CX7800 is no gap between the holder and the document table;...color restoration on . 2. Open the document cover and remove the document mat. Place the photo on the glass as the original. For more information, see below with the steps on page 4. 4. Press the x Start button. Place your photos. Then pull out the mat. 8/05 Epson Stylus CX7800...

Product Information Guide
Page 8
...with the fluorescent lamp when you can bring your photos. 2. Load up . (The images should not appear reversed.) Make sure the film slides under the tabs. 4. Press the x Start button. Your photos are printed. Gently press until it with the steps below to view the... Epson Stylus CX7800 2. Open the film strip cover. Scanning and Printing Your Photos 1. Close the film strip cover. Place the holder's tabs into the holder in the orientation show below with color restoration. For more information, see page 9. 5. The film is faded you close the document cover. Press...
...with the fluorescent lamp when you can bring your photos. 2. Load up . (The images should not appear reversed.) Make sure the film slides under the tabs. 4. Press the x Start button. Your photos are printed. Gently press until it with the steps below to view the... Epson Stylus CX7800 2. Open the film strip cover. Scanning and Printing Your Photos 1. Close the film strip cover. Place the holder's tabs into the holder in the orientation show below with color restoration. For more information, see page 9. 5. The film is faded you close the document cover. Press...
Product Information Guide
Page 9
...scanned and a preview of the photo appears on the fastener at the bottom of copies to restore: ❏ Copy Photograph Restoration ON: for photos ❏ Negative Film Restoration ON: for color negatives ❏ Positive Film Restoration ON: for positive color film ❏ Slides Restoration ON: for slides... ❏ B&W Negative Film Restoration ON: for Camera File system" standard 8/05 Epson Stylus CX7800 - 9 Press the l or ...
...scanned and a preview of the photo appears on the fastener at the bottom of copies to restore: ❏ Copy Photograph Restoration ON: for photos ❏ Negative Film Restoration ON: for color negatives ❏ Positive Film Restoration ON: for positive color film ❏ Slides Restoration ON: for slides... ❏ B&W Negative Film Restoration ON: for Camera File system" standard 8/05 Epson Stylus CX7800 - 9 Press the l or ...

Product Information Guide
Page 12
or USB DIRECT-PRINT™compatible, you can even automatically restore faded color photographs as you scan. Make sure your camera to select the photos you loaded). Load the type of paper type, size, and...scan a photo, document, film, or slide and save it straight out of your camera. Note: To cancel printing, press the y Stop/Clear Settings button. 7. If you select Plain Paper, the photos print with a white border. See your Epson Stylus CX7800 to select Letter, 4"x 6", or 5"x7". 6. Scanning a Photo, Document, Film, or Slide You can use (see your Epson Stylus CX7800...
or USB DIRECT-PRINT™compatible, you can even automatically restore faded color photographs as you scan. Make sure your camera to select the photos you loaded). Load the type of paper type, size, and...scan a photo, document, film, or slide and save it straight out of your camera. Note: To cancel printing, press the y Stop/Clear Settings button. 7. If you select Plain Paper, the photos print with a white border. See your Epson Stylus CX7800 to select Letter, 4"x 6", or 5"x7". 6. Scanning a Photo, Document, Film, or Slide You can use (see your Epson Stylus CX7800...

Product Information Guide
Page 13
... the Applications folder. ❏ If you see a different EPSON Scan settings window. (You can only scan 35mm color negative film strips or slides. Move the original about 0.2 inch (5 mm) away from the top and left edges to Full Auto Mode, click the Scan button. Then open folder. 8/05 Epson Stylus CX7800 - 13 Close the document cover gently so you...
... the Applications folder. ❏ If you see a different EPSON Scan settings window. (You can only scan 35mm color negative film strips or slides. Move the original about 0.2 inch (5 mm) away from the top and left edges to Full Auto Mode, click the Scan button. Then open folder. 8/05 Epson Stylus CX7800 - 13 Close the document cover gently so you...


