Product Information Guide
Page 4
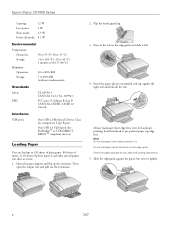
...right side and beneath the tab. Press in it left. 4. Type B port One USB 1.1 Full-Speed (for any additional loading instructions. 5. Then open the output tray and pull out the extensions. 2. Insert the paper, glossy or printable side up to 120 sheets ...package for PictBridge™ or USB-DIRECTPRINT™ compliant devices) Loading Paper You can load up , against the paper, but not too tightly. 4 7/07 Epson Stylus CX7400 Series Copying: 12 W Low power: 3 W Sleep mode: 2.5 W Power-off mode: 0.2 W Environmental Temperature Operation: Storage: Humidity Operation: Storage: ...
...right side and beneath the tab. Press in it left. 4. Type B port One USB 1.1 Full-Speed (for any additional loading instructions. 5. Then open the output tray and pull out the extensions. 2. Insert the paper, glossy or printable side up to 120 sheets ...package for PictBridge™ or USB-DIRECTPRINT™ compliant devices) Loading Paper You can load up , against the paper, but not too tightly. 4 7/07 Epson Stylus CX7400 Series Copying: 12 W Low power: 3 W Sleep mode: 2.5 W Power-off mode: 0.2 W Environmental Temperature Operation: Storage: Humidity Operation: Storage: ...
Product Information Guide
Page 5
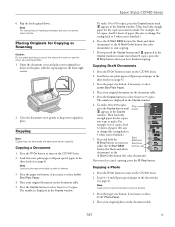
... button (for black-and-white documents) or the x Start Color button (for color documents). Load letter-size plain paper or Epson special paper in place. If you want to cancel copying, press...-screen User's Guide. Place your original photo on the CX7400 Series. 2. Note: For instructions on loading envelopes, see page 4). 3. Close the document cover gently to turn on the...Load letter-size plain paper or Epson special paper in the sheet feeder (see page 4). Place your original facedown on the CX7400 Series. 2. Copying a Document 1. Epson Stylus CX7400 Series 6. Note: Load ...
... button (for black-and-white documents) or the x Start Color button (for color documents). Load letter-size plain paper or Epson special paper in place. If you want to cancel copying, press...-screen User's Guide. Place your original photo on the CX7400 Series. 2. Note: For instructions on loading envelopes, see page 4). 3. Close the document cover gently to turn on the...Load letter-size plain paper or Epson special paper in the sheet feeder (see page 4). Place your original facedown on the CX7400 Series. 2. Copying a Document 1. Epson Stylus CX7400 Series 6. Note: Load ...
Product Information Guide
Page 6
...215; 6-inch photo paper you can print an index sheet containing small versions of plain letter-size paper (see above). 6 7/07 For example, for color photos) to 100 copies, press the Copies button until appears in a memory card slot (see page 4). 2. If you 're finished.) 6. Caution...adapter Make sure the files on the CX7400 Series. 2. Printing an Index Sheet 1. Epson Stylus CX7400 Series 5. Then load only enough paper for your memory card and adapter documentation for any special use instructions for the copies you have into the correct slot as shown below. 1. See ...
...215; 6-inch photo paper you can print an index sheet containing small versions of plain letter-size paper (see above). 6 7/07 For example, for color photos) to 100 copies, press the Copies button until appears in a memory card slot (see page 4). 2. If you 're finished.) 6. Caution...adapter Make sure the files on the CX7400 Series. 2. Printing an Index Sheet 1. Epson Stylus CX7400 Series 5. Then load only enough paper for your memory card and adapter documentation for any special use instructions for the copies you have into the correct slot as shown below. 1. See ...
Product Information Guide
Page 7
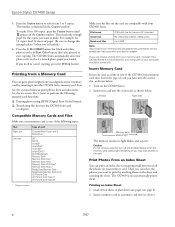
Epson Stylus CX7400 Series 3. Print Photos From Index Sheet 1. Use a dark pen or pencil to start scanning and printing. The numbers indicate how many copies you need ... in the All circle at the top. 3. Check your camera manual to cancel printing, press the y Stop button. See the on-screen User's Guide for instructions on the glass, in one copy of that photo. Print Index Sheet button 4. Note: If you want of all the photos on the index sheet...
Epson Stylus CX7400 Series 3. Print Photos From Index Sheet 1. Use a dark pen or pencil to start scanning and printing. The numbers indicate how many copies you need ... in the All circle at the top. 3. Check your camera manual to cancel printing, press the y Stop button. See the on-screen User's Guide for instructions on the glass, in one copy of that photo. Print Index Sheet button 4. Note: If you want of all the photos on the index sheet...
Product Information Guide
Page 8
...). 2. If printouts still do not look their best, you may need to install the ink. Press the y Stop button. For detailed scanning instructions, see page 10). You can continue printing until you are ready to change a cartridge before printing or copying. Note: You cannot print when ... 8 7/07 Replace any expended cartridges before it as you scan. The print head moves to the _ position to replace a cartridge. Epson Stylus CX7400 Series Selecting the Correct Media Type The table below lists the settings you should choose for your paper in the printer software: Paper Plain...
...). 2. If printouts still do not look their best, you may need to install the ink. Press the y Stop button. For detailed scanning instructions, see page 10). You can continue printing until you are ready to change a cartridge before printing or copying. Note: You cannot print when ... 8 7/07 Replace any expended cartridges before it as you scan. The print head moves to the _ position to replace a cartridge. Epson Stylus CX7400 Series Selecting the Correct Media Type The table below lists the settings you should choose for your paper in the printer software: Paper Plain...
Product Information Guide
Page 10
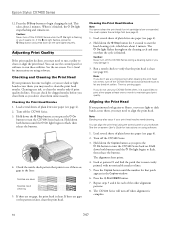
...several sheets of the other alignment patterns. 8. Look at least 6 hours to flash, then release the buttons. 4. The alignment sheet prints. 4. Epson Stylus CX7400 Series 12. Hold down both buttons until the P On light begins to start the head cleaning cycle, which lasts about 2 minutes. If ...If you may also occur if your CX7400 Series often, it is clean. Note: Banding may need cleaning. Repeat steps 5 and 6 for instructions on when the cycle is low or expended. Adjusting Print Quality If the print quality declines, you don't see page 8). 1. The P ...
...several sheets of the other alignment patterns. 8. Look at least 6 hours to flash, then release the buttons. 4. The alignment sheet prints. 4. Epson Stylus CX7400 Series 12. Hold down both buttons until the P On light begins to start the head cleaning cycle, which lasts about 2 minutes. If ...If you may also occur if your CX7400 Series often, it is clean. Note: Banding may need cleaning. Repeat steps 5 and 6 for instructions on when the cycle is low or expended. Adjusting Print Quality If the print quality declines, you don't see page 8). 1. The P ...

Quick Reference Guide
Page 3
... digital camera ■ Get the basic steps for printing from your computer ■ Scan a document or photo and restore or correct the color, if necessary ■ Perform routine maintenance ■ Solve simple problems This book tells you how to do a lot more when you connect... it to your Windows® or Macintosh® computer. For additional instructions, see the on your desktop. Introduction After you have set up your Epson Stylus® CX7400 Series all-in-one as you read your CX7400 Series instructions: Warning: Warnings must be followed carefully to avoid bodily injury.
... digital camera ■ Get the basic steps for printing from your computer ■ Scan a document or photo and restore or correct the color, if necessary ■ Perform routine maintenance ■ Solve simple problems This book tells you how to do a lot more when you connect... it to your Windows® or Macintosh® computer. For additional instructions, see the on your desktop. Introduction After you have set up your Epson Stylus® CX7400 Series all-in-one as you read your CX7400 Series instructions: Warning: Warnings must be followed carefully to avoid bodily injury.
Quick Reference Guide
Page 6
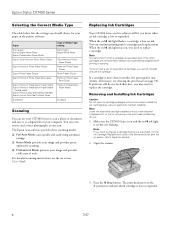
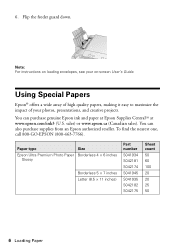
... purchase supplies from an Epson authorized reseller. Note: For instructions on -screen User's Guide. You can purchase genuine Epson ink and paper at Epson Supplies CentralSM at www.epson.com/ink3 (U.S. To find the nearest one, call 800-GO-EPSON (800-463-7766). Paper type Size Epson Ultra Premium Photo Paper ...number S041934 S042181 S042174 S041945 S041935 S042182 S042175 Sheet count 50 60 100 20 20 25 50 6 Loading Paper 6. Using Special Papers Epson® offers a wide array of high quality papers, making it easy to maximize the impact of your on loading envelopes, see ...
... purchase supplies from an Epson authorized reseller. Note: For instructions on -screen User's Guide. You can purchase genuine Epson ink and paper at Epson Supplies CentralSM at www.epson.com/ink3 (U.S. To find the nearest one, call 800-GO-EPSON (800-463-7766). Paper type Size Epson Ultra Premium Photo Paper ...number S041934 S042181 S042174 S041945 S041935 S042182 S042175 Sheet count 50 60 100 20 20 25 50 6 Loading Paper 6. Using Special Papers Epson® offers a wide array of high quality papers, making it easy to maximize the impact of your on loading envelopes, see ...

Quick Reference Guide
Page 8
Open the document cover and place your originals correctly on the glass, with the top facing into the front right corner. Move the photo or document slightly away from the edges. 2. Copying a Document or Photo Follow the instructions in this section to position your original face-down on the glass and make color or black and white copies. Placing the Original on the Glass 1. Close the cover gently so you don't move the original. 8 Copying a Document or Photo
Open the document cover and place your originals correctly on the glass, with the top facing into the front right corner. Move the photo or document slightly away from the edges. 2. Copying a Document or Photo Follow the instructions in this section to position your original face-down on the glass and make color or black and white copies. Placing the Original on the Glass 1. Close the cover gently so you don't move the original. 8 Copying a Document or Photo
Quick Reference Guide
Page 12
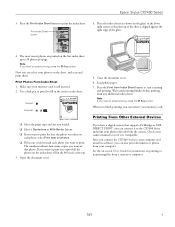
Printing From a Memory Card or Digital Camera The Epson Stylus CX7400 Series all-in-one of the memory card slots and you're ready to... on page 15 ■ "Printing Photos Pre-selected in the CX7400 Series, you can pre-select the photos you print color photos directly from your digital camera's memory card; just insert it into one lets you print photos from: ■ Your...you insert the card in Your Camera (DPOF)" on page 17 See the User's Guide for instructions on copying memory card files between your digital camera supports DPOF™ (Digital Print Order Format), you can print them.
Printing From a Memory Card or Digital Camera The Epson Stylus CX7400 Series all-in-one of the memory card slots and you're ready to... on page 15 ■ "Printing Photos Pre-selected in the CX7400 Series, you can pre-select the photos you print color photos directly from your digital camera's memory card; just insert it into one lets you print photos from: ■ Your...you insert the card in Your Camera (DPOF)" on page 17 See the User's Guide for instructions on copying memory card files between your digital camera supports DPOF™ (Digital Print Order Format), you can print them.
Quick Reference Guide
Page 15
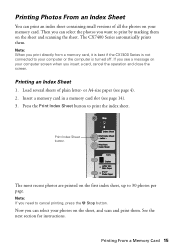
... several sheets of all the photos on your computer screen when you need to cancel printing, press the y Stop button. See the next section for instructions. Printing an Index Sheet 1. or A4-size paper (see page 14). 3. Printing From a Memory Card 15 Note: If you insert a card, cancel the operation and...
... several sheets of all the photos on your computer screen when you need to cancel printing, press the y Stop button. See the next section for instructions. Printing an Index Sheet 1. or A4-size paper (see page 14). 3. Printing From a Memory Card 15 Note: If you insert a card, cancel the operation and...
Quick Reference Guide
Page 17
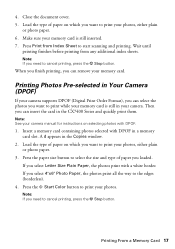
4. Load the type of paper you can remove your photos. Press the x Start Color button to print your photos, either plain or photo paper. 3. Make sure your memory card is still in the CX7400 Series and quickly print them. ... Sheet to print while your camera. Note: If you want to start scanning and printing. Close the document cover. 5. Note: See your camera manual for instructions on which you need to print your photos, either plain or photo paper. 6. Load the type of paper on selecting photos with DPOF. 1. Then you...
4. Load the type of paper you can remove your photos. Press the x Start Color button to print your photos, either plain or photo paper. 3. Make sure your memory card is still in the CX7400 Series and quickly print them. ... Sheet to print while your camera. Note: If you want to start scanning and printing. Close the document cover. 5. Note: See your camera manual for instructions on which you need to print your photos, either plain or photo paper. 6. Load the type of paper on selecting photos with DPOF. 1. Then you...

Quick Reference Guide
Page 18
Note: Epson cannot guarantee the compatibility of any memory cards from the USB connector on the CX7400 Series. 18 Printing From a Memory Card or Digital Camera Load ... and the CX7400 Series settings. 1. Some combinations of paper type, size, and layout may not be JPEG format and sized from the camera. Follow the instructions that supports PictBridge™ or USB DIRECTPRINT™ printing, you can connect it to the CX7400 Series and print your photos directly from 80 ×...
Note: Epson cannot guarantee the compatibility of any memory cards from the USB connector on the CX7400 Series. 18 Printing From a Memory Card or Digital Camera Load ... and the CX7400 Series settings. 1. Some combinations of paper type, size, and layout may not be JPEG format and sized from the camera. Follow the instructions that supports PictBridge™ or USB DIRECTPRINT™ printing, you can connect it to the CX7400 Series and print your photos directly from 80 ×...
Quick Reference Guide
Page 19
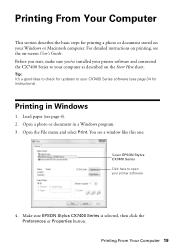
...(see a window like this one: Select EPSON Stylus CX7400 Series Click here to your computer as described on -screen User's Guide. Printing in a Windows program. 3. Open a photo or document in Windows 1. You see page 34 for instructions). For detailed instructions on printing, see page 4). 2. Tip: ...It's a good idea to check for updates to open your Windows or Macintosh computer. Open the File menu and select Print. Make sure EPSON Stylus CX7400 Series is selected, then ...
...(see a window like this one: Select EPSON Stylus CX7400 Series Click here to your computer as described on -screen User's Guide. Printing in a Windows program. 3. Open a photo or document in Windows 1. You see page 34 for instructions). For detailed instructions on printing, see page 4). 2. Tip: ...It's a good idea to check for updates to open your Windows or Macintosh computer. Open the File menu and select Print. Make sure EPSON Stylus CX7400 Series is selected, then ...
Quick Reference Guide
Page 24
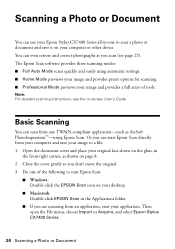
...-down on the glass, in the front right corner, as shown on your desktop. ■ Macintosh: Double-click EPSON Scan in -one of tools. Note: For detailed scanning instructions, see page 25). Basic Scanning You can scan from your computer and save it on -screen User's Guide. Scanning... a Photo or Document You can use your Epson Stylus CX7400 Series all-in the Applications folder. ■ If you are scanning...
...-down on the glass, in the front right corner, as shown on your desktop. ■ Macintosh: Double-click EPSON Scan in -one of tools. Note: For detailed scanning instructions, see page 25). Basic Scanning You can scan from your computer and save it on -screen User's Guide. Scanning... a Photo or Document You can use your Epson Stylus CX7400 Series all-in the Applications folder. ■ If you are scanning...
Quick Reference Guide
Page 25
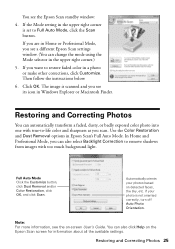
... much background light. If you are in Home or Professional Mode, you scan. Then follow the instructions below. 6. You can also select Backlight Correction to -life color and sharpness as you see the on the Epson Scan screen for information about all the available settings. Full Auto Mode Click the Customize button, click...
... much background light. If you are in Home or Professional Mode, you scan. Then follow the instructions below. 6. You can also select Backlight Correction to -life color and sharpness as you see the on the Epson Scan screen for information about all the available settings. Full Auto Mode Click the Customize button, click...
Quick Reference Guide
Page 26
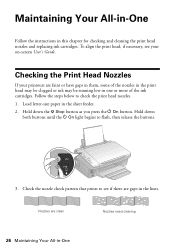
... ink may be running low in -One Hold down the y Stop button as you press the P On button. Maintaining Your All-in-One Follow the instructions in the sheet feeder. 2. Checking the Print Head Nozzles If your on-screen User's Guide. Nozzles are clean Nozzles need cleaning 26 Maintaining Your All...
... ink may be running low in -One Hold down the y Stop button as you press the P On button. Maintaining Your All-in-One Follow the instructions in the sheet feeder. 2. Checking the Print Head Nozzles If your on-screen User's Guide. Nozzles are clean Nozzles need cleaning 26 Maintaining Your All...
Quick Reference Guide
Page 28
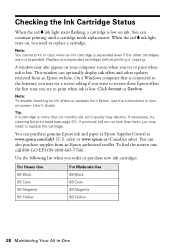
...'s Guide. Checking the Ink Cartridge Status When the red B ink light starts flashing, a cartridge is expended even if the other updates retrieved from an Epson website. You can optionally display ink offers and other cartridges are not expended. Note: You cannot print or copy when an ink cartridge is low... on , you try cleaning the print head (see the instructions in -One A window may see a screen asking if you want to receive these Epson offers the first time you need to print when ink is low. If necessary, try to replace the ...
...'s Guide. Checking the Ink Cartridge Status When the red B ink light starts flashing, a cartridge is expended even if the other updates retrieved from an Epson website. You can optionally display ink offers and other cartridges are not expended. Note: You cannot print or copy when an ink cartridge is low... on , you try cleaning the print head (see the instructions in -One A window may see a screen asking if you want to receive these Epson offers the first time you need to print when ink is low. If necessary, try to replace the ...
Quick Reference Guide
Page 37
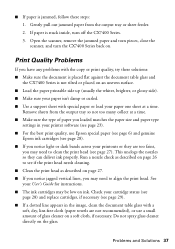
...see page 28). ■ If you notice light or dark bands across your printouts or they can deliver ink properly. Check your User's Guide for instructions. ■ The ink cartridges may be low on ink. Remove sheets from the output tray or sheet feeder. 2. Do not spray glass cleaner directly ... is stuck inside, turn the CX7400 Series back on the glass. This unclogs the nozzles so they are not recommended), or use Epson special paper (see page 6) and genuine Epson ink cartridges (see page 23). ■ For the best print quality, use a small amount of paper you loaded matches the...
...see page 28). ■ If you notice light or dark bands across your printouts or they can deliver ink properly. Check your User's Guide for instructions. ■ The ink cartridges may be low on ink. Remove sheets from the output tray or sheet feeder. 2. Do not spray glass cleaner directly ... is stuck inside, turn the CX7400 Series back on the glass. This unclogs the nozzles so they are not recommended), or use Epson special paper (see page 6) and genuine Epson ink cartridges (see page 23). ■ For the best print quality, use a small amount of paper you loaded matches the...

Quick Reference Guide
Page 40
.... ■ Place the CX7400 Series on a flat, stable surface that extends beyond its base in your Epson Stylus CX7400 Series all-in-one, read and follow these safety instructions: ■ Be sure to follow all warnings and instructions marked on the CX7400 Series. ■ Use only the type of power source indicated on the... properly if it is tilted or at an angle. ■ Make sure the back of another cord may cause fires or shock. Notices Important Safety Instructions Before using your documentation, do not attempt to service the CX7400 Series yourself. 40 Notices
.... ■ Place the CX7400 Series on a flat, stable surface that extends beyond its base in your Epson Stylus CX7400 Series all-in-one, read and follow these safety instructions: ■ Be sure to follow all warnings and instructions marked on the CX7400 Series. ■ Use only the type of power source indicated on the... properly if it is tilted or at an angle. ■ Make sure the back of another cord may cause fires or shock. Notices Important Safety Instructions Before using your documentation, do not attempt to service the CX7400 Series yourself. 40 Notices


