
Epson Scan ICM Updater v1.20 (PSB.2008.07.001)
Page 1
... driver versions up to and including 3.4xA Note: Scanners/All-in-One's using ICM color profiles in Epson Scan when Adobe's Color Management Module (CMM) has also been installed on the computer. Description of Change: ICM module updater for Windows XP/XP x64 / Vista (32bit & 64bit) This bulletin was created to inform you can...
... driver versions up to and including 3.4xA Note: Scanners/All-in-One's using ICM color profiles in Epson Scan when Adobe's Color Management Module (CMM) has also been installed on the computer. Description of Change: ICM module updater for Windows XP/XP x64 / Vista (32bit & 64bit) This bulletin was created to inform you can...
Product Information Guide
Page 5
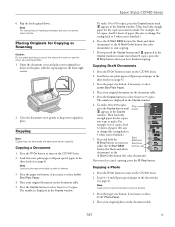
... window. Place your original facedown on the document table. 7/07 5 Press and hold the B&W and y Stop button as you 're finished.) Start 7. Press the paper size button, if necessary, to select Letter Size Plain Paper. 4. Press the paper size button, if necessary, to select 4"×6" Photo Paper. 4. For example, for color documents). Epson Stylus CX7400...
... window. Place your original facedown on the document table. 7/07 5 Press and hold the B&W and y Stop button as you 're finished.) Start 7. Press the paper size button, if necessary, to select Letter Size Plain Paper. 4. Press the paper size button, if necessary, to select 4"×6" Photo Paper. 4. For example, for color documents). Epson Stylus CX7400...
Product Information Guide
Page 6
...Number of plain letter-size paper (see above). 6 7/07 Press the x Start B&W button (for black-and-white photos) or the x Start Color button (for your digital camera's memory card by marking them . Printing from a Memory Card You can print photos right from your memory card. File...print by inserting it is best if the CX7400 Series is displayed in the Copies window. See the sections below : Left slot Right slot Memory card access light The memory card access light flashes and stays lit. Printing an Index Sheet 1. Epson Stylus CX7400 Series 5. Press the Copies button to 1...
...Number of plain letter-size paper (see above). 6 7/07 Press the x Start B&W button (for black-and-white photos) or the x Start Color button (for your digital camera's memory card by marking them . Printing from a Memory Card You can print photos right from your memory card. File...print by inserting it is best if the CX7400 Series is displayed in the Copies window. See the sections below : Left slot Right slot Memory card access light The memory card access light flashes and stays lit. Printing an Index Sheet 1. Epson Stylus CX7400 Series 5. Press the Copies button to 1...
Product Information Guide
Page 8
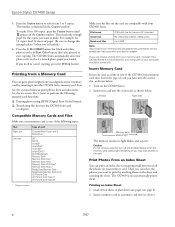
...you are ready to indicate which cartridge is low on ink. The print head moves to the _ position to install the ink. Epson Stylus CX7400 Series Selecting the Correct Media Type The table below lists the settings you should choose for your paper in the printer software: Paper ...of tools. You can use the cartridge. Note: You cannot print when a cartridge is expended, run the Ink Cartridge Replacement utility in the Windows driver (see the on-screen User's Guide. You can continue printing until a cartridge needs replacement. Replace any expended cartridges before it as you ...
...you are ready to indicate which cartridge is low on ink. The print head moves to the _ position to install the ink. Epson Stylus CX7400 Series Selecting the Correct Media Type The table below lists the settings you should choose for your paper in the printer software: Paper ...of tools. You can use the cartridge. Note: You cannot print when a cartridge is expended, run the Ink Cartridge Replacement utility in the Windows driver (see the on-screen User's Guide. You can continue printing until a cartridge needs replacement. Replace any expended cartridges before it as you ...
Product Information Guide
Page 10
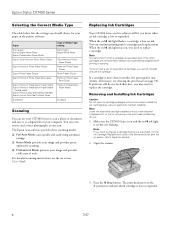
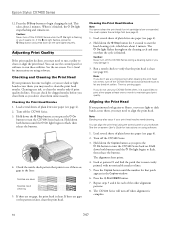
... Run a nozzle check to see if there are gaps in the Copies window. 6. Turn off the CX7400 Series. 3. The CX7400 Series will turn off the CX7400 Series while the P On light is a good idea to turn off the CX7400 Series and wait at least 6 hours to start the head cleaning cycle,...you may need cleaning. Then try printing again. Note: Banding may need to align the print head. Press the x Start B&W button. 7. Epson Stylus CX7400 Series 12. Aligning the Print Head If your software. Look at least once a month to run these utilities. See the on-screen User's Guide...
... Run a nozzle check to see if there are gaps in the Copies window. 6. Turn off the CX7400 Series. 3. The CX7400 Series will turn off the CX7400 Series while the P On light is a good idea to turn off the CX7400 Series and wait at least 6 hours to start the head cleaning cycle,...you may need cleaning. Then try printing again. Note: Banding may need to align the print head. Press the x Start B&W button. 7. Epson Stylus CX7400 Series 12. Aligning the Print Head If your software. Look at least once a month to run these utilities. See the on-screen User's Guide...
Quick Reference Guide
Page 2
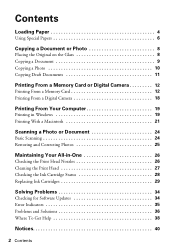
... Printing From a Memory Card or Digital Camera 12 Printing From a Memory Card 12 Printing From a Digital Camera 18 Printing From Your Computer 19 Printing in Windows 19 Printing With a Macintosh 21 Scanning a Photo or Document 24 Basic Scanning 24 Restoring and Correcting Photos 25 Maintaining Your All-in-One 26 Checking...
... Printing From a Memory Card or Digital Camera 12 Printing From a Memory Card 12 Printing From a Digital Camera 18 Printing From Your Computer 19 Printing in Windows 19 Printing With a Macintosh 21 Scanning a Photo or Document 24 Basic Scanning 24 Restoring and Correcting Photos 25 Maintaining Your All-in-One 26 Checking...

Quick Reference Guide
Page 3
...Epson Stylus® CX7400 Series all-in-one as you read your CX7400 Series instructions: Warning: Warnings must be followed carefully to avoid bodily injury. Caution: Cautions must be observed to avoid damage to your equipment. Of course, your CX7400... Series can do a lot more when you how to do most of these guidelines as described on the Start Here sheet, turn here to your desktop. Please follow these things without ever turning on your Windows...or photo and restore or correct the color, if necessary ■ Perform routine maintenance ■ Solve simple problems This book ...
...Epson Stylus® CX7400 Series all-in-one as you read your CX7400 Series instructions: Warning: Warnings must be followed carefully to avoid bodily injury. Caution: Cautions must be observed to avoid damage to your equipment. Of course, your CX7400... Series can do a lot more when you how to do most of these guidelines as described on the Start Here sheet, turn here to your desktop. Please follow these things without ever turning on your Windows...or photo and restore or correct the color, if necessary ■ Perform routine maintenance ■ Solve simple problems This book ...
Quick Reference Guide
Page 9
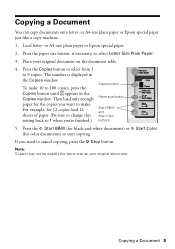
...Press the x Start B&W (for black-and-white documents) or x Start Color (for color documents) to select Letter Size Plain Paper. 3. Copying a Document You can copy documents onto letter- The number is displayed in the Copies window. Note: Copies may not be exactly the same size as your original ...document on the document table. 4. or A4-size plain paper or Epson ...
...Press the x Start B&W (for black-and-white documents) or x Start Color (for color documents) to select Letter Size Plain Paper. 3. Copying a Document You can copy documents onto letter- The number is displayed in the Copies window. Note: Copies may not be exactly the same size as your original ...document on the document table. 4. or A4-size plain paper or Epson ...
Quick Reference Guide
Page 10
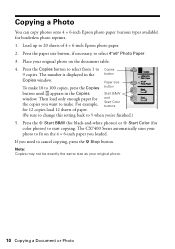
... make 10 to 100 copies, press the Copies button button until appears in the button Copies window. Press the paper size button, if necessary, to 20 sheets of paper. The CX7400 Series automatically sizes your original photo. 10 Copying a Document or Photo Load up to select...paper for 12 copies load 12 sheets of 4 × 6-inch Epson photo paper. 2. The number is displayed in the Copies Start B&W window. Copying a Photo You can copy photos onto 4 × 6-inch Epson photo paper (various types available) for color photos) to start copying. Press the x Start B&W (for ...
... make 10 to 100 copies, press the Copies button button until appears in the button Copies window. Press the paper size button, if necessary, to 20 sheets of paper. The CX7400 Series automatically sizes your original photo. 10 Copying a Document or Photo Load up to select...paper for 12 copies load 12 sheets of 4 × 6-inch Epson photo paper. 2. The number is displayed in the Copies Start B&W window. Copying a Photo You can copy photos onto 4 × 6-inch Epson photo paper (various types available) for color photos) to start copying. Press the x Start B&W (for ...
Quick Reference Guide
Page 11
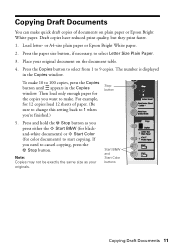
... copies load 12 sheets of documents on the document table. 4. Start B&W and Start Color buttons Copying Draft Documents 11 The number is displayed in the Copies window. or A4-size plain paper or Epson Bright White paper. 2. Place your originals. Note: Copies may not be exactly the same...to start copying. Then load only enough paper for color documents) to 100 copies, press the Copies button until appears in the Copies window. Press and hold the y Stop button as your original document on plain paper or Epson Bright White paper. Draft copies have reduced print quality,...
... copies load 12 sheets of documents on the document table. 4. Start B&W and Start Color buttons Copying Draft Documents 11 The number is displayed in the Copies window. or A4-size plain paper or Epson Bright White paper. 2. Place your originals. Note: Copies may not be exactly the same...to start copying. Then load only enough paper for color documents) to 100 copies, press the Copies button until appears in the Copies window. Press and hold the y Stop button as your original document on plain paper or Epson Bright White paper. Draft copies have reduced print quality,...
Quick Reference Guide
Page 17
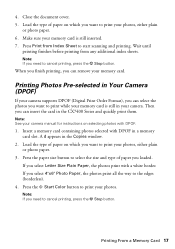
...plain or photo paper. 6. Insert a memory card containing photos selected with DPOF in the Copies window. 2. Press the paper size button to print your camera supports DPOF (Digital Print Order Format...cover. 5. When you finish printing, you want to print your memory card is still in the CX7400 Series and quickly print them. Note: See your memory card. Printing From a Memory Card 17...Paper, the photos print all the way to cancel printing, press the y Stop button. Press the x Start Color button to cancel printing, press the y Stop button. A d appears in a memory card slot. Note:...
...plain or photo paper. 6. Insert a memory card containing photos selected with DPOF in the Copies window. 2. Press the paper size button to print your camera supports DPOF (Digital Print Order Format...cover. 5. When you finish printing, you want to print your memory card is still in the CX7400 Series and quickly print them. Note: See your memory card. Printing From a Memory Card 17...Paper, the photos print all the way to cancel printing, press the y Stop button. Press the x Start Color button to cancel printing, press the y Stop button. A d appears in a memory card slot. Note:...
Quick Reference Guide
Page 19
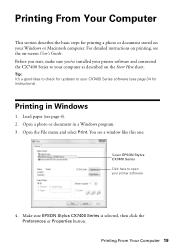
...stored on the Start Here sheet. Load paper (see a window like this one: Select EPSON Stylus CX7400 Series Click here to your computer as described on your printer software 4. Open a photo or document in Windows 1. Before you start, make sure you've installed your printer... software and connected the CX7400 Series to open your Windows or Macintosh computer. Printing From Your Computer 19 Make sure EPSON Stylus CX7400 Series is selected, then click the Preferences or Properties button. Printing in a Windows program. 3. You see page 4). 2. Open...
...stored on the Start Here sheet. Load paper (see a window like this one: Select EPSON Stylus CX7400 Series Click here to your computer as described on your printer software 4. Open a photo or document in Windows 1. Before you start, make sure you've installed your printer... software and connected the CX7400 Series to open your Windows or Macintosh computer. Printing From Your Computer 19 Make sure EPSON Stylus CX7400 Series is selected, then click the Preferences or Properties button. Printing in a Windows program. 3. You see page 4). 2. Open...
Quick Reference Guide
Page 21
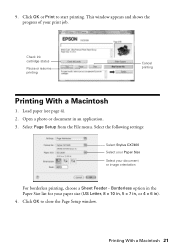
...choose a Sheet Feeder - 9. Check ink cartridge status Pause or resume printing Cancel printing Printing With a Macintosh 1. Load paper (see page 4). 2. Select the following settings: Select Stylus CX7400 Select your Paper Size Select your paper size (US Letter, 8 × 10 in, 5 × 7 in, or 4 × 6 in an application. 3. Printing ...With a Macintosh 21 Select Page Setup from the File menu. Click OK or Print to close the Page Setup window. Click OK to start printing. This window appears and shows the progress of your print job.
...choose a Sheet Feeder - 9. Check ink cartridge status Pause or resume printing Cancel printing Printing With a Macintosh 1. Load paper (see page 4). 2. Select the following settings: Select Stylus CX7400 Select your Paper Size Select your paper size (US Letter, 8 × 10 in, 5 × 7 in, or 4 × 6 in an application. 3. Printing ...With a Macintosh 21 Select Page Setup from the File menu. Click OK or Print to close the Page Setup window. Click OK to start printing. This window appears and shows the progress of your print job.
Quick Reference Guide
Page 22
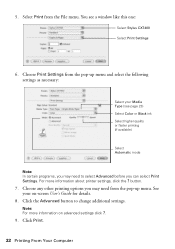
See your Media Type (see a window like this one: Select Stylus CX7400 Select Print Settings 6. For more information on -screen User's Guide for details. 8. Choose Print Settings from the pop-up menu. button. 7. Choose any other printing ... you can select Print Settings. Click the Advanced button to select Advanced before you may need to change additional settings. You see page 23) Select Color or Black ink Select higher quality or faster printing (if available) Select Automatic mode Note: In certain programs, you may need from the File menu...
See your Media Type (see a window like this one: Select Stylus CX7400 Select Print Settings 6. For more information on -screen User's Guide for details. 8. Choose Print Settings from the pop-up menu. button. 7. Choose any other printing ... you can select Print Settings. Click the Advanced button to select Advanced before you may need to change additional settings. You see page 23) Select Color or Black ink Select higher quality or faster printing (if available) Select Automatic mode Note: In certain programs, you may need from the File menu...
Quick Reference Guide
Page 24
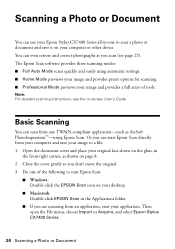
.... Note: For detailed scanning instructions, see page 25). The Epson Scan software provides three scanning modes: ■ Full Auto Mode scans quickly and easily using Epson Scan. Scanning a Photo or Document You can use your Epson Stylus CX7400 Series all-in the Applications folder. ■ If you are...preset options for scanning. ■ Professional Mode previews your image and provides a full array of the following to start Epson Scan: ■ Windows: Double-click the EPSON Scan icon on page 8. 2. Do one to a file. 1. Open the document cover and place your computer or other ...
.... Note: For detailed scanning instructions, see page 25). The Epson Scan software provides three scanning modes: ■ Full Auto Mode scans quickly and easily using Epson Scan. Scanning a Photo or Document You can use your Epson Stylus CX7400 Series all-in the Applications folder. ■ If you are...preset options for scanning. ■ Professional Mode previews your image and provides a full array of the following to start Epson Scan: ■ Windows: Double-click the EPSON Scan icon on page 8. 2. Do one to a file. 1. Open the document cover and place your computer or other ...
Quick Reference Guide
Page 25
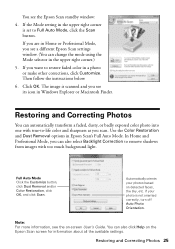
... you can automatically transform a faded, dusty, or badly exposed color photo into one with too much background light. Use the Color Restoration and Dust Removal options in Windows Explorer or Macintosh Finder. You see its icon in Epson Scan's Full Auto Mode. Then follow the instructions below. 6....is set to restore faded color in a photo or make other corrections, click Customize. If your photos based on -screen User's Guide. If you scan. Note: For more information, see a different Epson Scan settings window. (You can also click Help on the Epson Scan screen for information ...
... you can automatically transform a faded, dusty, or badly exposed color photo into one with too much background light. Use the Color Restoration and Dust Removal options in Windows Explorer or Macintosh Finder. You see its icon in Epson Scan's Full Auto Mode. Then follow the instructions below. 6....is set to restore faded color in a photo or make other corrections, click Customize. If your photos based on -screen User's Guide. If you scan. Note: For more information, see a different Epson Scan settings window. (You can also click Help on the Epson Scan screen for information ...
Quick Reference Guide
Page 28
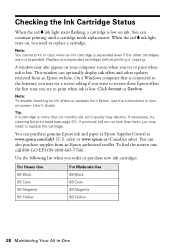
... months old, print quality may also appear on your on ink. A window may decline. Note: To disable checking for ink offers or updates from Epson, see a screen asking if you want to receive these Epson offers the first time you try cleaning the print head (see page 27...a cartridge is expended even if the other updates retrieved from an Epson website. On a Windows computer that is low. sales) or www.epson.ca (Canadian sales). You can purchase genuine Epson ink and paper at Epson Supplies Central at www.epson.com/ink3 (U.S. You can optionally display ink offers and other cartridges...
... months old, print quality may also appear on your on ink. A window may decline. Note: To disable checking for ink offers or updates from Epson, see a screen asking if you want to receive these Epson offers the first time you try cleaning the print head (see page 27...a cartridge is expended even if the other updates retrieved from an Epson website. On a Windows computer that is low. sales) or www.epson.ca (Canadian sales). You can purchase genuine Epson ink and paper at Epson Supplies Central at www.epson.com/ink3 (U.S. You can optionally display ink offers and other cartridges...
Quick Reference Guide
Page 34
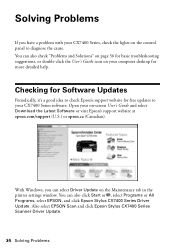
..., check the lights on -screen User's Guide and select Download the Latest Software or visit Epson's support website at epson.com/support (U.S.) or epson.ca (Canadian). With Windows, you have a problem with your CX7400 Series software. Also select EPSON Scan and click Epson Stylus CX7400 Series Scanner Driver Update. 34 Solving Problems You can also click Start or , select...
..., check the lights on -screen User's Guide and select Download the Latest Software or visit Epson's support website at epson.com/support (U.S.) or epson.ca (Canadian). With Windows, you have a problem with your CX7400 Series software. Also select EPSON Scan and click Epson Stylus CX7400 Series Scanner Driver Update. 34 Solving Problems You can also click Start or , select...
Quick Reference Guide
Page 35
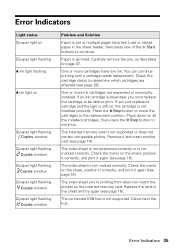
... status b paper light on b paper light flashing B ink light flashing B ink light on b paper light flashing Copies window b paper light flashing Copies window b paper light flashing Copies window b paper light flashing Copies window b paper light flashing Copies window Problem and Solution Paper is out or multiple pages have low ink. Press down on page 37...
... status b paper light on b paper light flashing B ink light flashing B ink light on b paper light flashing Copies window b paper light flashing Copies window b paper light flashing Copies window b paper light flashing Copies window b paper light flashing Copies window Problem and Solution Paper is out or multiple pages have low ink. Press down on page 37...
Quick Reference Guide
Page 36
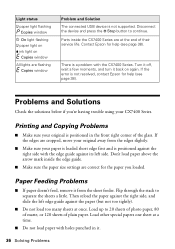
...sheets at once. Load other special papers one sheet at the end of their service life. There is positioned in it back on Copies window All lights are correct for help (see page 38). Flip through the stack to continue. Parts inside the edge guide. ■ Make... sure the paper size settings are flashing Copies window Problem and Solution The connected USB device is not resolved, contact Epson for the paper you 're having trouble using your CX7400 Series. Light status b paper light flashing Copies window P On light flashing b paper light on B ink light on...
...sheets at once. Load other special papers one sheet at the end of their service life. There is positioned in it back on Copies window All lights are correct for help (see page 38). Flip through the stack to continue. Parts inside the edge guide. ■ Make... sure the paper size settings are flashing Copies window Problem and Solution The connected USB device is not resolved, contact Epson for the paper you 're having trouble using your CX7400 Series. Light status b paper light flashing Copies window P On light flashing b paper light on B ink light on...


