Product Information Guide
Page 8
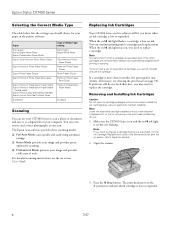
...to scan a photo or document and save it is low or expended. 8 7/07 Note: You cannot print when a cartridge is on but not flashing. Epson Stylus CX7400 Series Selecting the Correct Media Type The table below lists the settings you should choose for your paper in ... preset options for details). 2. You can use the cartridge. Note: Leave the expended cartridge installed until a cartridge needs replacement. The print head moves to the _ position to maintain reliability. Open the scanner. 3. Replace any expended cartridges before it as you need to install the...
...to scan a photo or document and save it is low or expended. 8 7/07 Note: You cannot print when a cartridge is on but not flashing. Epson Stylus CX7400 Series Selecting the Correct Media Type The table below lists the settings you should choose for your paper in ... preset options for details). 2. You can use the cartridge. Note: Leave the expended cartridge installed until a cartridge needs replacement. The print head moves to the _ position to maintain reliability. Open the scanner. 3. Replace any expended cartridges before it as you need to install the...
Product Information Guide
Page 9
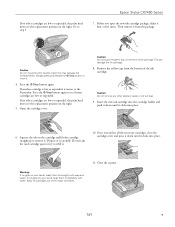
... the cartridge cover and press it down until it . 4. Always press and release the y Stop button to move the print head by hand; This can damage the ink cartridge. 8. Close the scanner. 7/07 9 If another cartridge is low or...cartridges are low or expended. Then remove it carefully. this may damage the CX7400 Series. If no other cartridges are low or expended, the print head moves to the replacement position on the front of the cartridge. Dispose of ...not remove any other labels or seals, or ink will leak. 9. Epson Stylus CX7400 Series 7. Squeeze the tab on the right.
... the cartridge cover and press it down until it . 4. Always press and release the y Stop button to move the print head by hand; This can damage the ink cartridge. 8. Close the scanner. 7/07 9 If another cartridge is low or...cartridges are low or expended. Then remove it carefully. this may damage the CX7400 Series. If no other cartridges are low or expended, the print head moves to the replacement position on the front of the cartridge. Dispose of ...not remove any other labels or seals, or ink will leak. 9. Epson Stylus CX7400 Series 7. Squeeze the tab on the right.
Product Information Guide
Page 10
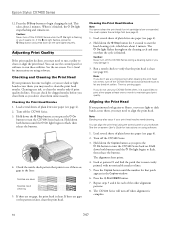
... using software. Note: Banding may damage it is faint, clean the print head. Turn off the CX7400 Series. 3. Press the Copies button until the number for instructions on when the cycle is complete. 10 7/07 Epson Stylus CX7400 Series 12. When it's finished, the P On light stops flashing ...and remains on . Checking and Cleaning the Print Head If your printouts become too light, or you see page 10). Then try printing again. See the on-screen User's...
... using software. Note: Banding may damage it is faint, clean the print head. Turn off the CX7400 Series. 3. Press the Copies button until the number for instructions on when the cycle is complete. 10 7/07 Epson Stylus CX7400 Series 12. When it's finished, the P On light stops flashing ...and remains on . Checking and Cleaning the Print Head If your printouts become too light, or you see page 10). Then try printing again. See the on-screen User's...
Product Information Guide
Page 11
..., non-abrasive microfiber-type cloth. 7. Pack the CX7400 Series in a new location, clean and align the print head (see page 10). Keep the CX7400 Series level during transportation to avoid damaging the printer. 7. Turn off the CX7400 Series. 2. Remove all the connected cables. 3. ...4. If print quality has declined when you print again in its best, you need to the right (the home position). Related Documentation CPD-23788 CPD-23790 CPD-23789 Epson Stylus CX7400 Series Start Here sheet (English/French) Epson Stylus CX7400 Series Quick Guide (English) Epson Stylus CX7400 Series CD...
..., non-abrasive microfiber-type cloth. 7. Pack the CX7400 Series in a new location, clean and align the print head (see page 10). Keep the CX7400 Series level during transportation to avoid damaging the printer. 7. Turn off the CX7400 Series. 2. Remove all the connected cables. 3. ...4. If print quality has declined when you print again in its best, you need to the right (the home position). Related Documentation CPD-23788 CPD-23790 CPD-23789 Epson Stylus CX7400 Series Start Here sheet (English/French) Epson Stylus CX7400 Series Quick Guide (English) Epson Stylus CX7400 Series CD...
Quick Reference Guide
Page 2
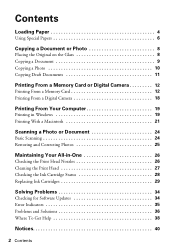
... a Macintosh 21 Scanning a Photo or Document 24 Basic Scanning 24 Restoring and Correcting Photos 25 Maintaining Your All-in-One 26 Checking the Print Head Nozzles 26 Cleaning the Print Head 27 Checking the Ink Cartridge Status 28 Replacing Ink Cartridges 29 Solving Problems 34 Checking for Software Updates 34 Error Indicators 35 Problems...
... a Macintosh 21 Scanning a Photo or Document 24 Basic Scanning 24 Restoring and Correcting Photos 25 Maintaining Your All-in-One 26 Checking the Print Head Nozzles 26 Cleaning the Print Head 27 Checking the Ink Cartridge Status 28 Replacing Ink Cartridges 29 Solving Problems 34 Checking for Software Updates 34 Error Indicators 35 Problems...
Quick Reference Guide
Page 26
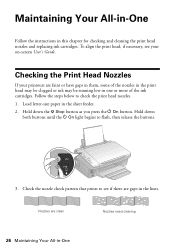
...see your printouts are faint or have gaps in them, some of the nozzles in the print head may be clogged or ink may be running low in the sheet feeder. 2. To align the print head, if necessary, see if there are clean Nozzles need cleaning 26 Maintaining Your All-in... this chapter for checking and cleaning the print head nozzles and replacing ink cartridges. Follow the steps below to flash, then release the buttons. 3. Hold down both buttons until the P On light begins to check the print head nozzles. 1. Checking the Print Head Nozzles If your on-screen User's Guide. ...
...see your printouts are faint or have gaps in them, some of the nozzles in the print head may be clogged or ink may be running low in the sheet feeder. 2. To align the print head, if necessary, see if there are clean Nozzles need cleaning 26 Maintaining Your All-in... this chapter for checking and cleaning the print head nozzles and replacing ink cartridges. Follow the steps below to flash, then release the buttons. 3. Hold down both buttons until the P On light begins to check the print head nozzles. 1. Checking the Print Head Nozzles If your on-screen User's Guide. ...
Quick Reference Guide
Page 27
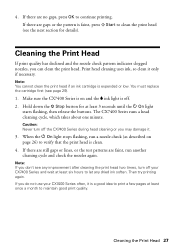
...don't see any dried ink soften. Note: If you can clean the print head. Then try printing again. If there are no gaps, press OK to verify that the print head is expended or low. Caution: Never turn off your CX7400 Series often, it only if necessary. When the P On light stops ...again. If you may damage it. 3. Make sure the CX7400 Series is on page 26) to continue printing. You must replace the cartridge first (see the next section for at least six hours to clean the print head (see page 29). 1. Print head cleaning uses ink, so clean it is faint, press ...
...don't see any dried ink soften. Note: If you can clean the print head. Then try printing again. If there are no gaps, press OK to verify that the print head is expended or low. Caution: Never turn off your CX7400 Series often, it only if necessary. When the P On light stops ...again. If you may damage it. 3. Make sure the CX7400 Series is on page 26) to continue printing. You must replace the cartridge first (see the next section for at least six hours to clean the print head (see page 29). 1. Print head cleaning uses ink, so clean it is faint, press ...
Quick Reference Guide
Page 28
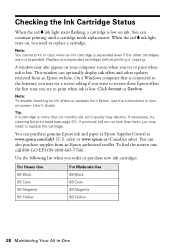
...also purchase supplies from an Epson website. Checking the Ink Cartridge Status When the red B ink light starts flashing, a cartridge is low. If printouts still do not look their best, you try cleaning the print head (see a screen asking if you want to receive these Epson offers the first time you... need to replace a cartridge. Note: You cannot print or copy when an ink cartridge is more than six months old...
...also purchase supplies from an Epson website. Checking the Ink Cartridge Status When the red B ink light starts flashing, a cartridge is low. If printouts still do not look their best, you try cleaning the print head (see a screen asking if you want to receive these Epson offers the first time you... need to replace a cartridge. Note: You cannot print or copy when an ink cartridge is more than six months old...
Quick Reference Guide
Page 29
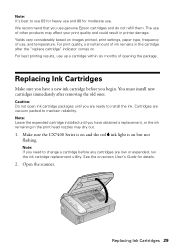
...replacement, or the ink remaining in the print head nozzles may affect your print quality and could result in the cartridge after removing the old ones. Make sure the CX7400 Series is on and the red B ink light is on images printed, print settings, paper type, frequency of ink ...you are vacuum packed to maintain reliability. Replacing Ink Cartridges 29 For print quality, a small amount of use, and temperature. Note: Leave the expended cartridge installed until you begin. For best printing results, use genuine Epson cartridges and do not refill them. Open the scanner. Note: It...
...replacement, or the ink remaining in the print head nozzles may affect your print quality and could result in the cartridge after removing the old ones. Make sure the CX7400 Series is on and the red B ink light is on images printed, print settings, paper type, frequency of ink ...you are vacuum packed to maintain reliability. Replacing Ink Cartridges 29 For print quality, a small amount of use, and temperature. Note: Leave the expended cartridge installed until you begin. For best printing results, use genuine Epson cartridges and do not refill them. Open the scanner. Note: It...
Quick Reference Guide
Page 30
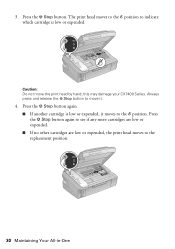
this may damage your CX7400 Series. Always press and release the y Stop button to indicate which cartridge is low or expended, it . 4. 3. Press the y Stop button again to see if any more cartridges are low or expended. ■ If no other cartridges are low or expended, the print head moves to the _ position. The print head moves to the _ position to move the print head by hand; Caution: Do not move it moves to the replacement position. 30 Maintaining Your All-in-One Press the y Stop button. Press the y Stop button again. ■ If another cartridge is low or expended.
this may damage your CX7400 Series. Always press and release the y Stop button to indicate which cartridge is low or expended, it . 4. 3. Press the y Stop button again to see if any more cartridges are low or expended. ■ If no other cartridges are low or expended, the print head moves to the _ position. The print head moves to the _ position to move the print head by hand; Caution: Do not move it moves to the replacement position. 30 Maintaining Your All-in-One Press the y Stop button. Press the y Stop button again. ■ If another cartridge is low or expended.
Quick Reference Guide
Page 37
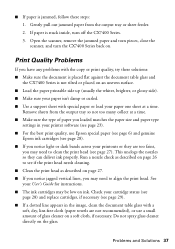
...to align the print head. Do not spray glass cleaner directly on a soft cloth, if necessary. ■ If paper is jammed, follow these solutions: ■ Make sure the document is placed flat against the document table glass and the CX7400 Series is stuck inside, turn the CX7400 Series back on... can deliver ink properly. This unclogs the nozzles so they are not recommended), or use Epson special paper (see page 6) and genuine Epson ink cartridges (see if the print head needs cleaning. ■ Clean the print head as described on page 26 to see page 28). ■ If you may need to...
...to align the print head. Do not spray glass cleaner directly on a soft cloth, if necessary. ■ If paper is jammed, follow these solutions: ■ Make sure the document is placed flat against the document table glass and the CX7400 Series is stuck inside, turn the CX7400 Series back on... can deliver ink properly. This unclogs the nozzles so they are not recommended), or use Epson special paper (see page 6) and genuine Epson ink cartridges (see if the print head needs cleaning. ■ Clean the print head as described on page 26 to see page 28). ■ If you may need to...
Quick Reference Guide
Page 41
Leaving cartridges uninstalled can dry out the print head and may prevent the CX7400 Series from printing. ■ If you handle used ink cartridges; there may leak from the cartridges. If ink gets on its side, or turn it upside down; if ...the product does not operate normally or exhibits a distinct change in the same environment as the CX7400 Series. If it gets in your hand inside the CX7400 Series or touch any cartridges during printing. ■ Install a new ink cartridge immediately after removing an expended one. Note that there is a valve in...
Leaving cartridges uninstalled can dry out the print head and may prevent the CX7400 Series from printing. ■ If you handle used ink cartridges; there may leak from the cartridges. If ink gets on its side, or turn it upside down; if ...the product does not operate normally or exhibits a distinct change in the same environment as the CX7400 Series. If it gets in your hand inside the CX7400 Series or touch any cartridges during printing. ■ Install a new ink cartridge immediately after removing an expended one. Note that there is a valve in...


