Basics
Page 5
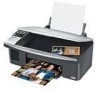
...icon for better copying, scanning, printing, and faxing. 5 Please follow these things without ever turning on your desktop. Note: Notes contain important information about your computer! Introduction After you have set up your Epson Stylus® CX7000F Series all-in-one as described on the Start... your camera ■ Print a basic document or photo from your computer ■ Fax a photo or document ■ Scan a photo or document, including restoring a color photo as you connect it on your CX7000F Series. Tip: Tips contain hints for it to your Windows® or Macintosh®...
...icon for better copying, scanning, printing, and faxing. 5 Please follow these things without ever turning on your desktop. Note: Notes contain important information about your computer! Introduction After you have set up your Epson Stylus® CX7000F Series all-in-one as described on the Start... your camera ■ Print a basic document or photo from your computer ■ Fax a photo or document ■ Scan a photo or document, including restoring a color photo as you connect it on your CX7000F Series. Tip: Tips contain hints for it to your Windows® or Macintosh®...
Basics
Page 29
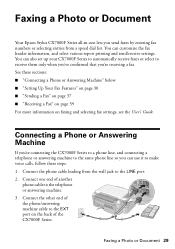
... set up your CX7000F Series to automatically receive faxes or select to the telephone or answering machine. 3. You can customize the fax header information, and select various report printing and send/receive settings. Connect the other end of the phone/answering machine cable to the LINE port. 2. Faxing a Photo or Document Your Epson Stylus CX7000F Series all...
... set up your CX7000F Series to automatically receive faxes or select to the telephone or answering machine. 3. You can customize the fax header information, and select various report printing and send/receive settings. Connect the other end of the phone/answering machine cable to the LINE port. 2. Faxing a Photo or Document Your Epson Stylus CX7000F Series all...

Product Information Guide
Page 10
... the r key if you need to move the cursor to 9, and various symbols. You see this display: Enter Fax Number 2. Press the x Start Color/OK button. Epson cannot guarantee the compatibility of paper type, size, and layout may not be supported. Connect one end of header information... 13 for the cursor (_). 6. Press the x Start Color/OK button again. You return to select Letter, 4"x 6", or 5"x 7". 6. You also need to set up to 28 digits of another phone cable to indicate the two-digit month, day, and year): MM:DD:YY 10. Epson Stylus CX7000F Series 5.
... the r key if you need to move the cursor to 9, and various symbols. You see this display: Enter Fax Number 2. Press the x Start Color/OK button. Epson cannot guarantee the compatibility of paper type, size, and layout may not be supported. Connect one end of header information... 13 for the cursor (_). 6. Press the x Start Color/OK button again. You return to select Letter, 4"x 6", or 5"x 7". 6. You also need to set up to 28 digits of another phone cable to indicate the two-digit month, day, and year): MM:DD:YY 10. Epson Stylus CX7000F Series 5.

Product Information Guide
Page 11
... you send. Indicates the number of rings that is displayed, then press the x Start Color/OK button to 20 digits total. 19. Press the x Start Color/OK button. Press the x Start Color/OK button. 20. Setting and Options DRD All (default) Single Double Triple Double & ...ve loaded. If you 're finished, press the y Cancel/Back button to return to send and receive faxes using the default settings below. Epson Stylus CX7000F Series 12. The display goes blank except for outgoing faxes. default) Legal (8.5 × 14) A4 (8.3 × 11.7) Automatic Reduction On (default) Off ...
... you send. Indicates the number of rings that is displayed, then press the x Start Color/OK button to 20 digits total. 19. Press the x Start Color/OK button. Press the x Start Color/OK button. 20. Setting and Options DRD All (default) Single Double Triple Double & ...ve loaded. If you 're finished, press the y Cancel/Back button to return to send and receive faxes using the default settings below. Epson Stylus CX7000F Series 12. The display goes blank except for outgoing faxes. default) Legal (8.5 × 14) A4 (8.3 × 11.7) Automatic Reduction On (default) Off ...
Product Information Guide
Page 12
...to cancel faxing at a time. You see this display during faxing: Scanning 001 98% Note: If you need to receive faxes manually if you 're sending a color fax, or a large document that also receives voice calls. Receiving a Fax The CX7000F Series automatically receives and prints faxes in ... you selected the Paper Size setting that matches the size of entering a fax number. Then send your connection and settings and try faxing again. Manually Entering or Redialing a Fax Number 1. Epson Stylus CX7000F Series 8. Press the keys on the Automatic Reduction setting you want to ...
...to cancel faxing at a time. You see this display during faxing: Scanning 001 98% Note: If you need to receive faxes manually if you 're sending a color fax, or a large document that also receives voice calls. Receiving a Fax The CX7000F Series automatically receives and prints faxes in ... you selected the Paper Size setting that matches the size of entering a fax number. Then send your connection and settings and try faxing again. Manually Entering or Redialing a Fax Number 1. Epson Stylus CX7000F Series 8. Press the keys on the Automatic Reduction setting you want to ...

Product Information Guide
Page 13
... the File menu, choose Import or Acquire, and select EPSON Stylus CX7000F Series (your program may use your CX7000F Series to scan a photo or document and save your desktop. ❏ Macintosh®: Double-click EPSON Scan in the upper right corner is a fax, press the x Start B&W or x Start Color/OK button to a file. 1. You can remove the...
... the File menu, choose Import or Acquire, and select EPSON Stylus CX7000F Series (your program may use your CX7000F Series to scan a photo or document and save your desktop. ❏ Macintosh®: Double-click EPSON Scan in the upper right corner is a fax, press the x Start B&W or x Start Color/OK button to a file. 1. You can remove the...

Product Information Guide
Page 19
...Select photos correctly and try again (see page 8). Resend using the x Start Color/ OK button to a fax machine that is not supported by the CX7000F Series is low in the CX7000F Series, and turn it . Service required. If the error does not clear, ...Epson Stylus CX7000F Series Start Here sheet Epson Stylus CX7000F Series Basics Guide Epson Stylus CX7000F Series CD-ROM (includes on the index sheet or the sheet includes more of paper. No marks are printing on the memory card. Remove any valid images (see page 7), or place the correct index sheet on paper sheets, press x Start Color...
...Select photos correctly and try again (see page 8). Resend using the x Start Color/ OK button to a fax machine that is not supported by the CX7000F Series is low in the CX7000F Series, and turn it . Service required. If the error does not clear, ...Epson Stylus CX7000F Series Start Here sheet Epson Stylus CX7000F Series Basics Guide Epson Stylus CX7000F Series CD-ROM (includes on the index sheet or the sheet includes more of paper. No marks are printing on the memory card. Remove any valid images (see page 7), or place the correct index sheet on paper sheets, press x Start Color...


