
Epson Scan ICM Updater v1.20 (PSB.2008.07.001)
Page 1
... Change: ICM module updater for Windows XP/XP x64 / Vista (32bit & 64bit) This bulletin was created to inform you can now choose your preferred profile. Description of 1 PSB.2008.07.001 Please re-install the software" Installing the Epson ICM updater fixes the error so you of these color profiles. Description of these...
... Change: ICM module updater for Windows XP/XP x64 / Vista (32bit & 64bit) This bulletin was created to inform you can now choose your preferred profile. Description of 1 PSB.2008.07.001 Please re-install the software" Installing the Epson ICM updater fixes the error so you of these color profiles. Description of these...
Product Brochure
Page 2
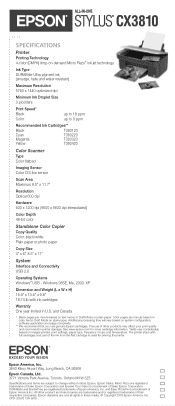
...Epson, Epson Stylus, Micro Piezo are registered trademarks of Epson America Inc. The printer ships with ink cartridges Warranty One year limited in these marks. © Copyright 2005 Epson America, Inc. and Easy PhotoFix is used for more cartridge information. Epson disclaims any and all rights in U.S. Windows... dpi interpolated) Color Depth 48-bit color Standalone Color Copier Copy Quality Color, black/white Plain paper or photo paper Copy Size 4" x 6," 8.5" x 11" System Interface and Connectivity USB 2.0 Operating Systems Windows® USB - See www.epson.com for priming...
...Epson, Epson Stylus, Micro Piezo are registered trademarks of Epson America Inc. The printer ships with ink cartridges Warranty One year limited in these marks. © Copyright 2005 Epson America, Inc. and Easy PhotoFix is used for more cartridge information. Epson disclaims any and all rights in U.S. Windows... dpi interpolated) Color Depth 48-bit color Standalone Color Copier Copy Quality Color, black/white Plain paper or photo paper Copy Size 4" x 6," 8.5" x 11" System Interface and Connectivity USB 2.0 Operating Systems Windows® USB - See www.epson.com for priming...
Product Information Guide
Page 6
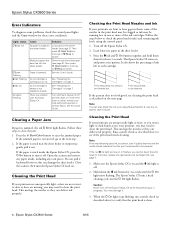
... a test pattern. Press the B ink and P On buttons together and hold them , some problems, check the control panel lights and the Copy window for these steps to clean the print head. Print head does not need to clear the jam: 1. Multiple pages have gaps in them down the...or have been fed into the sheet feeder. Cleaning the Print Head If your local authorized servicer or contact Epson; Make sure the Epson Stylus CX is on the next page. Then press x Start Color to continue or y Stop to eject the jammed paper. this case, replace the appropriate ink cartridge first;...
... a test pattern. Press the B ink and P On buttons together and hold them , some problems, check the control panel lights and the Copy window for these steps to clean the print head. Print head does not need to clear the jam: 1. Multiple pages have gaps in them down the...or have been fed into the sheet feeder. Cleaning the Print Head If your local authorized servicer or contact Epson; Make sure the Epson Stylus CX is on the next page. Then press x Start Color to continue or y Stop to eject the jammed paper. this case, replace the appropriate ink cartridge first;...
Quick Reference Guide
Page 2
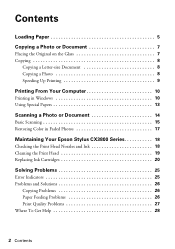
... a Letter-size Document 8 Copying a Photo 8 Speeding Up Printing 9 Printing From Your Computer 10 Printing in Windows 10 Using Special Papers 13 Scanning a Photo or Document 14 Basic Scanning 15 Restoring Color in Faded Photos 17 Maintaining Your Epson Stylus CX3800 Series 18 Checking the Print Head Nozzles and Ink 18 Cleaning the Print Head...
... a Letter-size Document 8 Copying a Photo 8 Speeding Up Printing 9 Printing From Your Computer 10 Printing in Windows 10 Using Special Papers 13 Scanning a Photo or Document 14 Basic Scanning 15 Restoring Color in Faded Photos 17 Maintaining Your Epson Stylus CX3800 Series 18 Checking the Print Head Nozzles and Ink 18 Cleaning the Print Head...
Quick Reference Guide
Page 4
...all-in-one as you read your Epson Stylus CX3800 Series instructions: Warning: Warnings must be followed carefully to avoid bodily injury. For complete instructions on your desktop when you connect it to your Windows® computer-such as improving the color and quality of these things without ever ...turning on your computer! Tip: Tips contain hints for the manual was automatically placed on everything your Epson Stylus CX can do lots more when you ...
...all-in-one as you read your Epson Stylus CX3800 Series instructions: Warning: Warnings must be followed carefully to avoid bodily injury. For complete instructions on your desktop when you connect it to your Windows® computer-such as improving the color and quality of these things without ever ...turning on your computer! Tip: Tips contain hints for the manual was automatically placed on everything your Epson Stylus CX can do lots more when you ...

Quick Reference Guide
Page 10
... for printing a photo or document stored on your application program. 3. Open the photo or document in Windows 1. Load paper (see a window like this one: Select EPSON Stylus CX3800 Series Click here to your printer software 10 Printing From Your Computer Printing From Your Computer This section... in these sections: ■ "Printing in Windows" (below) ■ "Using Special Papers" on -screen User's Guide. You see page 5). 2. Before you start, make sure you've installed your printer software and connected the Epson Stylus CX3800 Series to open your computer as described on...
... for printing a photo or document stored on your application program. 3. Open the photo or document in Windows 1. Load paper (see a window like this one: Select EPSON Stylus CX3800 Series Click here to your printer software 10 Printing From Your Computer Printing From Your Computer This section... in these sections: ■ "Printing in Windows" (below) ■ "Using Special Papers" on -screen User's Guide. You see page 5). 2. Before you start, make sure you've installed your printer software and connected the Epson Stylus CX3800 Series to open your computer as described on...

Quick Reference Guide
Page 12
This window appears and shows the progress of your print settings Note: For more printing options, click the Advanced button. Then select the following settings as necessary: Select a color management method (To choose No Color Adjustment, click ICM first) Select Paper & Quality Options as necessary Click here to select Photo RPM for the best...
This window appears and shows the progress of your print settings Note: For more printing options, click the Advanced button. Then select the following settings as necessary: Select a color management method (To choose No Color Adjustment, click ICM first) Select Paper & Quality Options as necessary Click here to select Photo RPM for the best...

Quick Reference Guide
Page 16
...: If you want to Full Auto Mode, click the Scan button. Select a file format in the upper right corner. For details, see the Epson Scan standby window: 4. Click OK. If the Mode setting in the upper right corner is scanned and you see page 17 for instructions. (If you are in Home... or Professional Mode, you want to automatically restore a color photo as you scan, click the Customize button and see its icon in the Prefix box...
...: If you want to Full Auto Mode, click the Scan button. Select a file format in the upper right corner. For details, see the Epson Scan standby window: 4. Click OK. If the Mode setting in the upper right corner is scanned and you see page 17 for instructions. (If you are in Home... or Professional Mode, you want to automatically restore a color photo as you scan, click the Customize button and see its icon in the Prefix box...

Quick Reference Guide
Page 17
...an old, faded, or badly exposed color photo into one with true-to the Adjustments area, click the Color Restoration button, and click Scan. Scanning a Photo or Document 17 Restoring Color in Epson Scan's Full Auto, Home, and Professional Mode windows: Full Auto Mode Click the Customize ...button, click the Color Restoration button, click OK, and click Scan....
...an old, faded, or badly exposed color photo into one with true-to the Adjustments area, click the Color Restoration button, and click Scan. Scanning a Photo or Document 17 Restoring Color in Epson Scan's Full Auto, Home, and Professional Mode windows: Full Auto Mode Click the Customize ...button, click the Color Restoration button, click OK, and click Scan....


