Setup Guide
Page 4
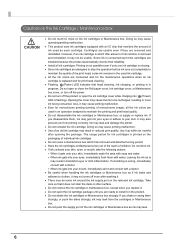
... cables and optional products in the proper direction according to maintain the printing and print head quality. ❏ Do not disassemble the ink cartridge. Cautions on the Ink Cartridge !CAUTION: ❏ Do not touch the IC chip on page 13) ❏ Do not touch the areas inside the product ...transport the product in a tilted, standing or upside-down and unplug the product, and make sure that monitors the amount of individual ink cartridges. ❏ If ink contacts your skin, eyes, or mouth, take the following actions. • When it may fall into your mouth, immediately spit it...
... cables and optional products in the proper direction according to maintain the printing and print head quality. ❏ Do not disassemble the ink cartridge. Cautions on the Ink Cartridge !CAUTION: ❏ Do not touch the IC chip on page 13) ❏ Do not touch the areas inside the product ...transport the product in a tilted, standing or upside-down and unplug the product, and make sure that monitors the amount of individual ink cartridges. ❏ If ink contacts your skin, eyes, or mouth, take the following actions. • When it may fall into your mouth, immediately spit it...
Setup Guide
Page 5
...you touch it. Remove any object that it does not stain the desk or other surface. ❏ Do not remove the ink cartridge, except when you replace it. ❏ Do not open the ink cartridge package until you are not using the power button when you are ready to install it around the... ink supply port on water-repellent paper such as art paper, which prevents the ink from drying. The ink cartridge may cause printing malfunction. English ❏ There may adhere to your fingers on the fixed ...
...you touch it. Remove any object that it does not stain the desk or other surface. ❏ Do not remove the ink cartridge, except when you replace it. ❏ Do not open the ink cartridge package until you are not using the power button when you are ready to install it around the... ink supply port on water-repellent paper such as art paper, which prevents the ink from drying. The ink cartridge may cause printing malfunction. English ❏ There may adhere to your fingers on the fixed ...
Setup Guide
Page 6
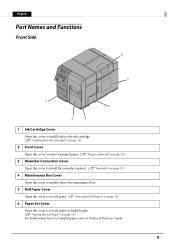
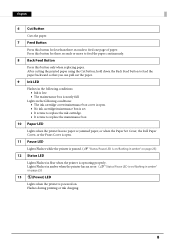
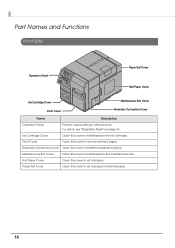
English Part Names and Functions Front Side 6 5 1 4 2 3 1 Ink Cartridge Cover Open this cover to install/replace the ink cartridge. (U "Installing the Ink Cartridge" on page 13) 2 Front Cover Open this cover to remove jammed paper. (U "Paper is jammed" on page 25) 3 Rewinder Connection Cover Open this cover to ...
English Part Names and Functions Front Side 6 5 1 4 2 3 1 Ink Cartridge Cover Open this cover to install/replace the ink cartridge. (U "Installing the Ink Cartridge" on page 13) 2 Front Cover Open this cover to remove jammed paper. (U "Paper is jammed" on page 25) 3 Rewinder Connection Cover Open this cover to ...
Setup Guide
Page 8
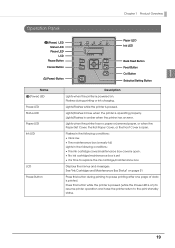
... Flashes during printing or ink charging. 8 After cutting the printed paper using the Cut button, hold down the Back Feed button to feed the paper backward so that you can pull out the paper. 9 Ink LED Flashes in the following conditions: • The ink cartridge cover/maintenance box cover is... open. • No ink cartridge/maintenance box is set. • It is time to replace the ink cartridge. • It is time to feed one page of ...
... Flashes during printing or ink charging. 8 After cutting the printed paper using the Cut button, hold down the Back Feed button to feed the paper backward so that you can pull out the paper. 9 Ink LED Flashes in the following conditions: • The ink cartridge cover/maintenance box cover is... open. • No ink cartridge/maintenance box is set. • It is time to replace the ink cartridge. • It is time to feed one page of ...
Setup Guide
Page 13
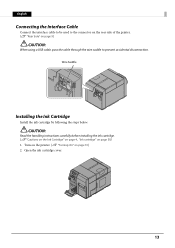
... page 10) 2. Open the ink cartridge cover. 13 English Connecting the Interface Cable Connect the interface cable to be used to prevent accidental disconnection. Wire Saddle Installing the Ink Cartridge Install the ink cartridge by following the steps below. !CAUTION: Read the handling instructions carefully before installing the ink cartridge. (U "Cautions on the Ink Cartridge" on page 4, "Ink cartridge" on page 30) 1.
... page 10) 2. Open the ink cartridge cover. 13 English Connecting the Interface Cable Connect the interface cable to be used to prevent accidental disconnection. Wire Saddle Installing the Ink Cartridge Install the ink cartridge by following the steps below. !CAUTION: Read the handling instructions carefully before installing the ink cartridge. (U "Cautions on the Ink Cartridge" on page 4, "Ink cartridge" on page 30) 1.
Setup Guide
Page 14
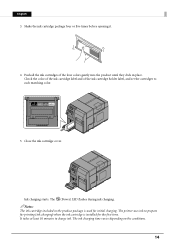
... time. It takes at least 10 minutes to each matching color. 5. The (Power) LED flashes during ink charging. Check the color of the ink cartridge label and of the four colors gently into the product until they click in the product package is installed ...for initial charging. QNotes: The ink cartridge included in place. English 3. Shake the ink cartridge package four or five times before opening it. 4. Push all the ink cartridges of the ink cartridge holder label, and set the cartridges to charge ink. The ink charging time varies depending on the conditions. ...
... time. It takes at least 10 minutes to each matching color. 5. The (Power) LED flashes during ink charging. Check the color of the ink cartridge label and of the four colors gently into the product until they click in the product package is installed ...for initial charging. QNotes: The ink cartridge included in place. English 3. Shake the ink cartridge package four or five times before opening it. 4. Push all the ink cartridges of the ink cartridge holder label, and set the cartridges to charge ink. The ink charging time varies depending on the conditions. ...
Setup Guide
Page 15
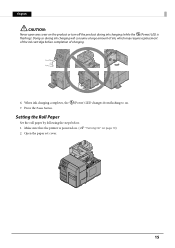
Setting the Roll Paper Set the roll paper by following the steps below. 1. English !CAUTION: Never open any cover on page 10) 2. When ink charging completes, the 7. Make sure that the printer is powered on. (U "Turning On" on the product or turn off the product during ink charging will consume a large amount of ink, which may require replacement of the ink cartridge before completion of charging. 6. Open the paper set cover. 15 Press the Pause button. (Power) LED changes from flashing to on. Doing so during ink charging (while the (Power) LED is flashing).
Setting the Roll Paper Set the roll paper by following the steps below. 1. English !CAUTION: Never open any cover on page 10) 2. When ink charging completes, the 7. Make sure that the printer is powered on. (U "Turning On" on the product or turn off the product during ink charging will consume a large amount of ink, which may require replacement of the ink cartridge before completion of charging. 6. Open the paper set cover. 15 Press the Pause button. (Power) LED changes from flashing to on. Doing so during ink charging (while the (Power) LED is flashing).
Setup Guide
Page 25
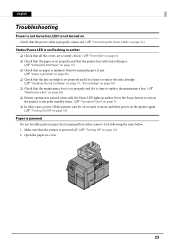
... the printer has sufficient roll paper. (U "Setting the Roll Paper" on page 10) Paper is jammed Do not forcibly pull out paper that the ink cartridge is time to replace the maintenance box. (U "Maintenance Box" on page 10) 2. English Troubleshooting Power is not turned on/LED is not turned ... 12) Status/Pause LED is on/flashing in amber. Open the paper set properly and if it is time to replace the ink cartridge. (U "Installing the Ink Cartridge" on page 13, "Ink cartridge" on page 30) ❏ Check that the maintenance box is set cover. 25 Make sure that the printer is powered off...
... the printer has sufficient roll paper. (U "Setting the Roll Paper" on page 10) Paper is jammed Do not forcibly pull out paper that the ink cartridge is time to replace the maintenance box. (U "Maintenance Box" on page 10) 2. English Troubleshooting Power is not turned on/LED is not turned ... 12) Status/Pause LED is on/flashing in amber. Open the paper set properly and if it is time to replace the ink cartridge. (U "Installing the Ink Cartridge" on page 13, "Ink cartridge" on page 30) ❏ Check that the maintenance box is set cover. 25 Make sure that the printer is powered off...
Setup Guide
Page 29
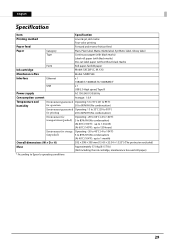
... Type Continuous paper (with black marks) Label roll paper (with black marks) Die-cut label paper (with/without black marks) Form Roll paper, fanfold paper Ink cartridge Model: SJIC26P (C, M, Y, K) Maintenance Box Model: SJMB7500 Interface Ethernet x 1 10BASE-T/100BASE-TX/1000BASE-T USB x 1 USB 2.0 High speed, Type B Power supply AC 100-240 V 50/60...598 × 395 mm {15.43 × 23.54 × 15.55"} (The protrusion excluded) Mass Approximately 37.0 kg {81.57 lb} (Not including the ink cartridge, maintenance box and roll paper) *: According to Epson's operating conditions 29
... Type Continuous paper (with black marks) Label roll paper (with black marks) Die-cut label paper (with/without black marks) Form Roll paper, fanfold paper Ink cartridge Model: SJIC26P (C, M, Y, K) Maintenance Box Model: SJMB7500 Interface Ethernet x 1 10BASE-T/100BASE-TX/1000BASE-T USB x 1 USB 2.0 High speed, Type B Power supply AC 100-240 V 50/60...598 × 395 mm {15.43 × 23.54 × 15.55"} (The protrusion excluded) Mass Approximately 37.0 kg {81.57 lb} (Not including the ink cartridge, maintenance box and roll paper) *: According to Epson's operating conditions 29
Setup Guide
Page 30
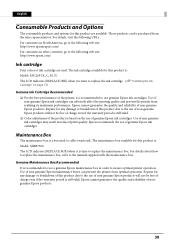
... be purchased from realizing its maximum performance. The maintenance box available for this product is: Model: SJIC26P (K, C, M, Y) The LCD indicates [REPLACE INK] when it is recommended to use genuine Epson ink cartridges. Epson cannot guarantee the quality and reliability of this product due to the manual supplied with the maintenance box. Genuine Maintenance Box Recommended...
... be purchased from realizing its maximum performance. The maintenance box available for this product is: Model: SJIC26P (K, C, M, Y) The LCD indicates [REPLACE INK] when it is recommended to use genuine Epson ink cartridges. Epson cannot guarantee the quality and reliability of this product due to the manual supplied with the maintenance box. Genuine Maintenance Box Recommended...
Technical Reference Guide
Page 6
... are consumed also for the maintenance operations when an ink cartridge is replaced and for ink cartridges is printed on the ink cartridges or Maintenance box. Do not drink ink. If ink contacts your skin. However, if an ink cartridge in which has removed and detached a long period. Store the ink cartridges or Maintenance box out of the reach of...
... are consumed also for the maintenance operations when an ink cartridge is replaced and for ink cartridges is printed on the ink cartridges or Maintenance box. Do not drink ink. If ink contacts your skin. However, if an ink cartridge in which has removed and detached a long period. Store the ink cartridges or Maintenance box out of the reach of...
Technical Reference Guide
Page 7
... you use . If you are not using the product. After installing the ink cartridges, be installed later. When using the power button when you transport the printer without ink cartridges installed, ink may leak. We recommend using the power button, the print head is automatically capped,... which is based on water-repellent paper such as art paper, which prevents the ink from drying. That is in the printer where ink cartridges are installed when transporting the printer. If you touch it may affect the printer or deteriorate ...
... you use . If you are not using the product. After installing the ink cartridges, be installed later. When using the power button when you transport the printer without ink cartridges installed, ink may leak. We recommend using the power button, the print head is automatically capped,... which is based on water-repellent paper such as art paper, which prevents the ink from drying. That is in the printer where ink cartridges are installed when transporting the printer. If you touch it may affect the printer or deteriorate ...
Technical Reference Guide
Page 10
Contents ■ For Safety ...3 Key to Symbols ...3 Cautions on Installation ...3 Cautions on Power Supply...4 Cautions on Handling ...5 Cautions on the Ink Cartridge / Maintenance box 6 Caution Label ...8 ■ Restriction of Use ...9 ■ About this Manual ...9 Aim of the Manual ...9 Manual Content ...9 ■ Contents...10 Product Overview 15...; Nozzle Verification Technology 22 Setting the Nozzle Verification Technology 22 Dot substitution ...24 ■ Periodic auto cleaning ...25 ■ Status/Error Indications ...26 Ink Cartridge and Maintenance Box Status 31 Beeper ...32 10
Contents ■ For Safety ...3 Key to Symbols ...3 Cautions on Installation ...3 Cautions on Power Supply...4 Cautions on Handling ...5 Cautions on the Ink Cartridge / Maintenance box 6 Caution Label ...8 ■ Restriction of Use ...9 ■ About this Manual ...9 Aim of the Manual ...9 Manual Content ...9 ■ Contents...10 Product Overview 15...; Nozzle Verification Technology 22 Setting the Nozzle Verification Technology 22 Dot substitution ...24 ■ Periodic auto cleaning ...25 ■ Status/Error Indications ...26 Ink Cartridge and Maintenance Box Status 31 Beeper ...32 10
Technical Reference Guide
Page 11
...; Connecting the Power Cable 40 ■ Connecting the Interface Cable 41 ■ Turning On/Off ...42 Turning On ...42 Turning Off ...42 ■ Installing the Ink Cartridge 43 ■ Installing the Maintenance box 47 ■ REWINDER ...50 How to install the REWINDER ...50 Removing the rewinder ...51 Attaching the paper leading edge...
...; Connecting the Power Cable 40 ■ Connecting the Interface Cable 41 ■ Turning On/Off ...42 Turning On ...42 Turning Off ...42 ■ Installing the Ink Cartridge 43 ■ Installing the Maintenance box 47 ■ REWINDER ...50 How to install the REWINDER ...50 Removing the rewinder ...51 Attaching the paper leading edge...
Technical Reference Guide
Page 14
... detection method ...196 Print Area and Cutting Position ...197 Electrical Characteristics ...205 Reliability...206 Environmental Conditions...207 External Dimensions...208 ■ Consumable Product Specifications 211 Ink Cartridge ...211 Maintenance Box ...211 ■ Option Specifications ...212 Rewinder (TU-RC7508)...212 ■ LCD Display Specifications for the Number of Printed Copies 213 Display While...
... detection method ...196 Print Area and Cutting Position ...197 Electrical Characteristics ...205 Reliability...206 Environmental Conditions...207 External Dimensions...208 ■ Consumable Product Specifications 211 Ink Cartridge ...211 Maintenance Box ...211 ■ Option Specifications ...212 Rewinder (TU-RC7508)...212 ■ LCD Display Specifications for the Number of Printed Copies 213 Display While...
Technical Reference Guide
Page 18
...this cover to remove jammed paper. Maintenance Box Cover Open this cover to install/replace the maintenance box. Ink Cartridge Cover Open this cover to install/replace the ink cartridge. Rewinder Connection Cover Open this cover to install the rewinder (option). Roll Paper Cover Open this cover ...Operation Panel" on page 19 . Part Names and Functions Front Side Operation Panel Paper Set Cover Roll Paper Cover Ink Cartridge Cover Maintenance Box Cover Front Cover Rewinder Connection Cover Name Description Operation Panel Perform various settings of this product.
...this cover to remove jammed paper. Maintenance Box Cover Open this cover to install/replace the maintenance box. Ink Cartridge Cover Open this cover to install/replace the ink cartridge. Rewinder Connection Cover Open this cover to install the rewinder (option). Roll Paper Cover Open this cover ...Operation Panel" on page 19 . Part Names and Functions Front Side Operation Panel Paper Set Cover Roll Paper Cover Ink Cartridge Cover Maintenance Box Cover Front Cover Rewinder Connection Cover Name Description Operation Panel Perform various settings of this product.
Technical Reference Guide
Page 19
..., the Roll Paper Cover, or the Front Cover is open . No ink cartridge/maintenance box is set. It is time to replace the ink cartridge/maintenance box. Flashes in the following conditions: Ink is low. The maintenance box is nearly full. Lights in the following .../Flashes in amber when the printer has an error. Press this button during printing or ink charging. Lights/Flashes while the printer is paused. Displays the menus and messages. See "Ink Cartridge and Maintenance Box Status" on page 31 Press this button while the printer is paused ...
..., the Roll Paper Cover, or the Front Cover is open . No ink cartridge/maintenance box is set. It is time to replace the ink cartridge/maintenance box. Flashes in the following conditions: Ink is low. The maintenance box is nearly full. Lights in the following .../Flashes in amber when the printer has an error. Press this button during printing or ink charging. Lights/Flashes while the printer is paused. Displays the menus and messages. See "Ink Cartridge and Maintenance Box Status" on page 31 Press this button while the printer is paused ...
Technical Reference Guide
Page 28
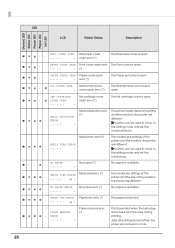
... the core during printing. M/B COVER OPEN Maintenance box ● * * * * * cover open error (*) The Maintenance box cover is open . ● ▼● - INK CARTRIDGE Ink cartridge cover ● COVER OPEN open error (*) * * * * * The Ink cartridge cover is open . NO PAPER ●- - ●- * * * * No paper (*) * No paper is jammed. button can be used to move to the setting...
... the core during printing. M/B COVER OPEN Maintenance box ● * * * * * cover open error (*) The Maintenance box cover is open . ● ▼● - INK CARTRIDGE Ink cartridge cover ● COVER OPEN open error (*) * * * * * The Ink cartridge cover is open . NO PAPER ●- - ●- * * * * No paper (*) * No paper is jammed. button can be used to move to the setting...
Technical Reference Guide
Page 29
... CONTINUE? Caution: Do not turn this product's power OFF until it is low and ink cartridges need to be changed . NO PLEASE USE GENUINE EPSON INK CARTRIDGE * * * * * Non-genuine ink cartridge is not * loaded (*) loaded 29 state (*) * * * * * Autocutting is finished. Check the target ink on the LCD screen. ● ▼● - Chapter 1 Product Overview LED LCD Printer Status...
... CONTINUE? Caution: Do not turn this product's power OFF until it is low and ink cartridges need to be changed . NO PLEASE USE GENUINE EPSON INK CARTRIDGE * * * * * Non-genuine ink cartridge is not * loaded (*) loaded 29 state (*) * * * * * Autocutting is finished. Check the target ink on the LCD screen. ● ▼● - Chapter 1 Product Overview LED LCD Printer Status...
Technical Reference Guide
Page 31
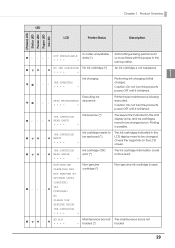
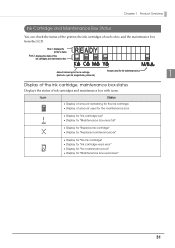
... maintenance box Amount remaining for the ink cartridge (black ink, cyan ink, magenta ink, yellow ink) Amount used for the maintenance box Display for "Ink cartridge low" Display for "Maintenance box near full" Display for "Replace ink cartridge" Display for "Replace maintenance box" Display for "No ink cartridge" Display for "Ink cartridge read area" 31 Icon Status ...
... maintenance box Amount remaining for the ink cartridge (black ink, cyan ink, magenta ink, yellow ink) Amount used for the maintenance box Display for "Ink cartridge low" Display for "Maintenance box near full" Display for "Replace ink cartridge" Display for "Replace maintenance box" Display for "No ink cartridge" Display for "Ink cartridge read area" 31 Icon Status ...

