Setup Guide
Page 4
...the cover may cause electric shock or fire. !CAUTION: ❏ Do not allow them to install them with an IC chip that all ink cartridges. English ❏ Do not connect cables in ways other than those mentioned in this manual. It may cause operating/printing malfunction. ...❏ This product uses ink cartridges equipped with water. Follow the instructions in this manual to fall or collapse, causing breakage and possible injury. ❏ Install the ...
...the cover may cause electric shock or fire. !CAUTION: ❏ Do not allow them to install them with an IC chip that all ink cartridges. English ❏ Do not connect cables in ways other than those mentioned in this manual. It may cause operating/printing malfunction. ...❏ This product uses ink cartridges equipped with water. Follow the instructions in this manual to fall or collapse, causing breakage and possible injury. ❏ Install the ...
Setup Guide
Page 5
... sheets may cause print stains. Take care so that might have fallen into the cartridge installation section. The ink cartridge may leak if you touch it . ❏ Do not open the ink cartridge package until you are not using the power button, the print head is automatically capped, which is ...the power plug or trip the breaker while the power is on. ❏ Printing on water-repellent paper such as art paper, which prevents the ink from drying. English ❏ There may cause printing malfunction. Doing so may be fewer than for printing. Select paper not to damage the section. ...
... sheets may cause print stains. Take care so that might have fallen into the cartridge installation section. The ink cartridge may leak if you touch it . ❏ Do not open the ink cartridge package until you are not using the power button, the print head is automatically capped, which is ...the power plug or trip the breaker while the power is on. ❏ Printing on water-repellent paper such as art paper, which prevents the ink from drying. English ❏ There may cause printing malfunction. Doing so may be fewer than for printing. Select paper not to damage the section. ...
Setup Guide
Page 6
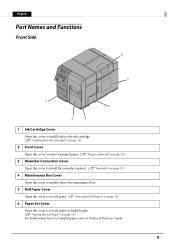
English Part Names and Functions Front Side 6 5 1 4 2 3 1 Ink Cartridge Cover Open this cover to install/replace the ink cartridge. (U "Installing the Ink Cartridge" on page 13) 2 Front Cover Open this cover to remove jammed paper. (U "Paper is jammed" on page 25) 3 Rewinder Connection Cover Open this cover ...
English Part Names and Functions Front Side 6 5 1 4 2 3 1 Ink Cartridge Cover Open this cover to install/replace the ink cartridge. (U "Installing the Ink Cartridge" on page 13) 2 Front Cover Open this cover to remove jammed paper. (U "Paper is jammed" on page 25) 3 Rewinder Connection Cover Open this cover ...
Setup Guide
Page 7
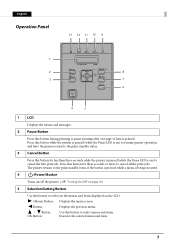
... to select/set the menus and items displayed on ) to cancel the first print job. English Operation Panel 1 2 3 13 12 11 10 9 Status Pause Paper Ink K CM Y M/B Pause Back Feed 8 Menu Cancel OK Feed 7 Cut 6 4 5 1 LCD Displays the menus and messages. 2 Pause Button Press this button during printing to the print...
... to select/set the menus and items displayed on ) to cancel the first print job. English Operation Panel 1 2 3 13 12 11 10 9 Status Pause Paper Ink K CM Y M/B Pause Back Feed 8 Menu Cancel OK Feed 7 Cut 6 4 5 1 LCD Displays the menus and messages. 2 Pause Button Press this button during printing to the print...
Setup Guide
Page 8
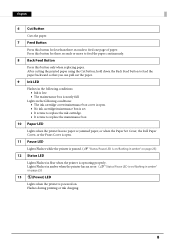
.... After cutting the printed paper using the Cut button, hold down the Back Feed button to feed one page of paper. Flashes during printing or ink charging. 8 English 6 Cut Button Cuts the paper. 7 Feed Button Press this button for less than three seconds to feed the paper backward so ...that you can pull out the paper. 9 Ink LED Flashes in the following conditions: • The ink cartridge cover/maintenance box cover is open. • No ink cartridge/maintenance box is set. • It is time to replace the ink cartridge. • It is time to feed the paper ...
.... After cutting the printed paper using the Cut button, hold down the Back Feed button to feed one page of paper. Flashes during printing or ink charging. 8 English 6 Cut Button Cuts the paper. 7 Feed Button Press this button for less than three seconds to feed the paper backward so ...that you can pull out the paper. 9 Ink LED Flashes in the following conditions: • The ink cartridge cover/maintenance box cover is open. • No ink cartridge/maintenance box is set. • It is time to replace the ink cartridge. • It is time to feed the paper ...
Setup Guide
Page 13
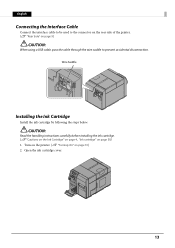
... by following the steps below. !CAUTION: Read the handling instructions carefully before installing the ink cartridge. (U "Cautions on the Ink Cartridge" on page 4, "Ink cartridge" on page 10) 2. Open the ink cartridge cover. 13 Turn on the printer. (U "Turning On" on page 30) 1. English Connecting the Interface Cable Connect the interface cable to be...
... by following the steps below. !CAUTION: Read the handling instructions carefully before installing the ink cartridge. (U "Cautions on the Ink Cartridge" on page 4, "Ink cartridge" on page 10) 2. Open the ink cartridge cover. 13 Turn on the printer. (U "Turning On" on page 30) 1. English Connecting the Interface Cable Connect the interface cable to be...
Setup Guide
Page 14
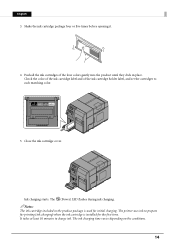
... for initial charging. Ink charging starts. Close the ink cartridge cover. The printer uses ink to prepare for printing (ink charging) when the ink cartridge is used for the first time. The ink charging time varies depending on the conditions. 14 Shake the ink cartridge package four or... five times before opening it. 4. Push all the ink cartridges of the ink cartridge holder label, and set the cartridges to charge ink. The (Power) LED flashes during ink charging. QNotes: The ink cartridge included in place. English...
... for initial charging. Ink charging starts. Close the ink cartridge cover. The printer uses ink to prepare for printing (ink charging) when the ink cartridge is used for the first time. The ink charging time varies depending on the conditions. 14 Shake the ink cartridge package four or... five times before opening it. 4. Push all the ink cartridges of the ink cartridge holder label, and set the cartridges to charge ink. The (Power) LED flashes during ink charging. QNotes: The ink cartridge included in place. English...
Setup Guide
Page 15
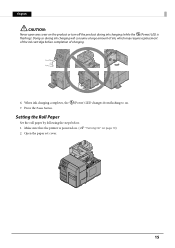
English !CAUTION: Never open any cover on the product or turn off the product during ink charging will consume a large amount of ink, which may require replacement of the ink cartridge before completion of charging. 6. Setting the Roll Paper Set the roll paper by following the steps below. 1. When ink charging completes, the 7. Open the paper set cover. 15 Make sure that the printer is flashing). Press the Pause button. (Power) LED changes from flashing to on page 10) 2. Doing so during ink charging (while the (Power) LED is powered on. (U "Turning On" on .
English !CAUTION: Never open any cover on the product or turn off the product during ink charging will consume a large amount of ink, which may require replacement of the ink cartridge before completion of charging. 6. Setting the Roll Paper Set the roll paper by following the steps below. 1. When ink charging completes, the 7. Open the paper set cover. 15 Make sure that the printer is flashing). Press the Pause button. (Power) LED changes from flashing to on page 10) 2. Doing so during ink charging (while the (Power) LED is powered on. (U "Turning On" on .
Setup Guide
Page 25
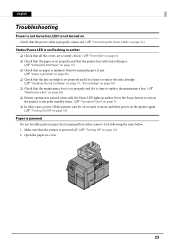
... box is set properly and if it is jammed. Open the paper set properly and if it is time to replace the ink cartridge. (U "Installing the Ink Cartridge" on page 13, "Ink cartridge" on page 30) ❏ Check that the printer is powered off the printer, wait for 10 seconds or more, and... to replace the maintenance box. (U "Maintenance Box" on page 10) 2. Remove jammed paper, if any. (U "Paper is jammed" on page 25) ❏ Check that the ink cartridge is set cover. 25
... box is set properly and if it is jammed. Open the paper set properly and if it is time to replace the ink cartridge. (U "Installing the Ink Cartridge" on page 13, "Ink cartridge" on page 30) ❏ Check that the printer is powered off the printer, wait for 10 seconds or more, and... to replace the maintenance box. (U "Maintenance Box" on page 10) 2. Remove jammed paper, if any. (U "Paper is jammed" on page 25) ❏ Check that the ink cartridge is set cover. 25
Setup Guide
Page 29
... Type Continuous paper (with black marks) Label roll paper (with black marks) Die-cut label paper (with/without black marks) Form Roll paper, fanfold paper Ink cartridge Model: SJIC26P (C, M, Y, K) Maintenance Box Model: SJMB7500 Interface Ethernet x 1 10BASE-T/100BASE-TX/1000BASE-T USB x 1 USB 2.0 High speed, Type B Power supply AC 100-240 V 50/...; 598 × 395 mm {15.43 × 23.54 × 15.55"} (The protrusion excluded) Mass Approximately 37.0 kg {81.57 lb} (Not including the ink cartridge, maintenance box and roll paper) *: According to Epson's operating conditions 29
... Type Continuous paper (with black marks) Label roll paper (with black marks) Die-cut label paper (with/without black marks) Form Roll paper, fanfold paper Ink cartridge Model: SJIC26P (C, M, Y, K) Maintenance Box Model: SJMB7500 Interface Ethernet x 1 10BASE-T/100BASE-TX/1000BASE-T USB x 1 USB 2.0 High speed, Type B Power supply AC 100-240 V 50/...; 598 × 395 mm {15.43 × 23.54 × 15.55"} (The protrusion excluded) Mass Approximately 37.0 kg {81.57 lb} (Not including the ink cartridge, maintenance box and roll paper) *: According to Epson's operating conditions 29
Setup Guide
Page 30
...be purchased from realizing its maximum performance. Genuine Maintenance Box Recommended It is time to use of non-genuine Epson products will not be free of non-genuine Epson ink cartridges can be free of charge even if the warranty period is still valid. ❏ Color adjustment of... the product is recommended to replace the ink cartridge. (U "Installing the Ink Cartridge" on the use of non-genuine Epson products. Use of charge even if the warranty period is a box used . Those products can adversely ...
...be purchased from realizing its maximum performance. Genuine Maintenance Box Recommended It is time to use of non-genuine Epson products will not be free of non-genuine Epson ink cartridges can be free of charge even if the warranty period is still valid. ❏ Color adjustment of... the product is recommended to replace the ink cartridge. (U "Installing the Ink Cartridge" on the use of non-genuine Epson products. Use of charge even if the warranty period is a box used . Those products can adversely ...
Technical Reference Guide
Page 5
...explosive gas may deteriorate or damage plastic. 5 Equipment may fall into this product. Immediately unplug the product and contact your dealer or a Seiko Epson service center for a prolonged period, it could develop problems due to dust building up on benzene, thinner, toluene, or ketones to adhere ... acid, hydrosulfuric, ammonia, chlorine, etc.) may cause electric shock or fire. Therefore, protect the printer with this product may cause the ink to the printer surface as alcohol or paint thinner, or near fire. Doing so may also damage other devices. Do not touch...
...explosive gas may deteriorate or damage plastic. 5 Equipment may fall into this product. Immediately unplug the product and contact your dealer or a Seiko Epson service center for a prolonged period, it could develop problems due to dust building up on benzene, thinner, toluene, or ketones to adhere ... acid, hydrosulfuric, ammonia, chlorine, etc.) may cause electric shock or fire. Therefore, protect the printer with this product may cause the ink to the printer surface as alcohol or paint thinner, or near fire. Doing so may also damage other devices. Do not touch...
Technical Reference Guide
Page 6
... The usage period for print head cleaning. Flashing (Power) LED indicates that monitors the amount of ink used in which little amount of ink remains is printed on the packaging of individual ink cartridges. Do not reuse a maintenance box which has removed and detached a long period. ... are removed and reinstalled. Doing so may cause printing malfunction. Use of the print head, some ink around the ink supply port on the ink cartridges or Maintenance box. Doing so may be usable. Use it up within six months after washing it may leak and damage ...
... The usage period for print head cleaning. Flashing (Power) LED indicates that monitors the amount of ink used in which little amount of ink remains is printed on the packaging of individual ink cartridges. Do not reuse a maintenance box which has removed and detached a long period. ... are removed and reinstalled. Doing so may cause printing malfunction. Use of the print head, some ink around the ink supply port on the ink cartridges or Maintenance box. Doing so may be usable. Use it up within six months after washing it may leak and damage ...
Technical Reference Guide
Page 7
...7 Also, printing on glossy paper may cause finger prints on as it may adhere to get ready for printing. Select paper not to the ink cartridges or Maintenance box as it may leak. We recommend using a genuine Maintenance box. Do not allow foreign objects to be fewer ... before use a non-genuine Maintenance box that does not support this printer, it may deteriorate or damage plastic. When disposing of the ink cartridges or Maintenance box, follow the laws, legislations, and regulations of the printable sheets may be installed later. When using the printer ...
...7 Also, printing on glossy paper may cause finger prints on as it may adhere to get ready for printing. Select paper not to the ink cartridges or Maintenance box as it may leak. We recommend using a genuine Maintenance box. Do not allow foreign objects to be fewer ... before use a non-genuine Maintenance box that does not support this printer, it may deteriorate or damage plastic. When disposing of the ink cartridges or Maintenance box, follow the laws, legislations, and regulations of the printable sheets may be installed later. When using the printer ...
Technical Reference Guide
Page 10
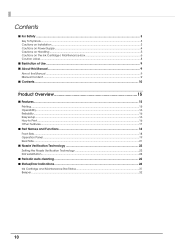
Contents ■ For Safety ...3 Key to Symbols ...3 Cautions on Installation ...3 Cautions on Power Supply...4 Cautions on Handling ...5 Cautions on the Ink Cartridge / Maintenance box 6 Caution Label ...8 ■ Restriction of Use ...9 ■ About this Manual ...9 Aim of the Manual ...9 Manual Content ...9 ■ Contents...10 Product Overview...9632; Nozzle Verification Technology 22 Setting the Nozzle Verification Technology 22 Dot substitution ...24 ■ Periodic auto cleaning ...25 ■ Status/Error Indications ...26 Ink Cartridge and Maintenance Box Status 31 Beeper ...32 10
Contents ■ For Safety ...3 Key to Symbols ...3 Cautions on Installation ...3 Cautions on Power Supply...4 Cautions on Handling ...5 Cautions on the Ink Cartridge / Maintenance box 6 Caution Label ...8 ■ Restriction of Use ...9 ■ About this Manual ...9 Aim of the Manual ...9 Manual Content ...9 ■ Contents...10 Product Overview...9632; Nozzle Verification Technology 22 Setting the Nozzle Verification Technology 22 Dot substitution ...24 ■ Periodic auto cleaning ...25 ■ Status/Error Indications ...26 Ink Cartridge and Maintenance Box Status 31 Beeper ...32 10
Technical Reference Guide
Page 11
...; Connecting the Power Cable 40 ■ Connecting the Interface Cable 41 ■ Turning On/Off ...42 Turning On ...42 Turning Off ...42 ■ Installing the Ink Cartridge 43 ■ Installing the Maintenance box 47 ■ REWINDER ...50 How to install the REWINDER ...50 Removing the rewinder ...51 Attaching the paper leading...
...; Connecting the Power Cable 40 ■ Connecting the Interface Cable 41 ■ Turning On/Off ...42 Turning On ...42 Turning Off ...42 ■ Installing the Ink Cartridge 43 ■ Installing the Maintenance box 47 ■ REWINDER ...50 How to install the REWINDER ...50 Removing the rewinder ...51 Attaching the paper leading...
Technical Reference Guide
Page 13
■ How to Clean the Case 153 ■ Long-term Storage of the Product After Ink Charging 154 Storing the product...154 Restart the printer after long-term storage 155 ■ Precautions when transporting 156 ■ Troubleshooting ...157 Error Processing...supply ...168 Paper is jammed ...169 Application Development Information 173 ■ How to Control the Printer 173 Using label printing application ...173 Using the Epson Inkjet Label Printer SDK 174 Using the ESC/Label commands...174 Changing Printer Settings and Replacing the Printer 175 ■ Software and Manuals ...180 &#...
■ How to Clean the Case 153 ■ Long-term Storage of the Product After Ink Charging 154 Storing the product...154 Restart the printer after long-term storage 155 ■ Precautions when transporting 156 ■ Troubleshooting ...157 Error Processing...supply ...168 Paper is jammed ...169 Application Development Information 173 ■ How to Control the Printer 173 Using label printing application ...173 Using the Epson Inkjet Label Printer SDK 174 Using the ESC/Label commands...174 Changing Printer Settings and Replacing the Printer 175 ■ Software and Manuals ...180 &#...
Technical Reference Guide
Page 14
... detection method ...196 Print Area and Cutting Position ...197 Electrical Characteristics ...205 Reliability...206 Environmental Conditions...207 External Dimensions...208 ■ Consumable Product Specifications 211 Ink Cartridge ...211 Maintenance Box ...211 ■ Option Specifications ...212 Rewinder (TU-RC7508)...212 ■ LCD Display Specifications for the Number of Printed Copies 213 Display...
... detection method ...196 Print Area and Cutting Position ...197 Electrical Characteristics ...205 Reliability...206 Environmental Conditions...207 External Dimensions...208 ■ Consumable Product Specifications 211 Ink Cartridge ...211 Maintenance Box ...211 ■ Option Specifications ...212 Rewinder (TU-RC7508)...212 ■ LCD Display Specifications for the Number of Printed Copies 213 Display...
Technical Reference Guide
Page 15
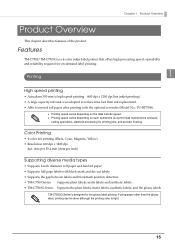
...• Actualizes 300 mm/s high speed printing. (600 dpi x 1200 dpi line inkjet printing) • A large capacity ink tank was adopted to reduce time lost from ink replacement. • Able to rewind roll paper after printing with black mark and die-cut labels • Supports the gap between... labels and blackmark position detection • TM-C7500 Series: Supports plain labels, matte labels and synthetic labels • TM-C7500G Series: Supports...
...• Actualizes 300 mm/s high speed printing. (600 dpi x 1200 dpi line inkjet printing) • A large capacity ink tank was adopted to reduce time lost from ink replacement. • Able to rewind roll paper after printing with black mark and die-cut labels • Supports the gap between... labels and blackmark position detection • TM-C7500 Series: Supports plain labels, matte labels and synthetic labels • TM-C7500G Series: Supports...
Technical Reference Guide
Page 16
...8226; For the label printing applications listed below, we provide dedicated drivers for the TM-C7500/ TM-C7500G series. How to occur. See "Nozzle Verification Technology" on LCD. Operability • The functions...barcodes with commands (ESC/Label) from a .NET environment application. • Epson Inkjet Label Printer SDK (a Windows printer driver is used with a beep sound or flashing of various LED.... Reliability • Uses pigment ink with superior resistance to light and water. • High reliability system equipped with...
...8226; For the label printing applications listed below, we provide dedicated drivers for the TM-C7500/ TM-C7500G series. How to occur. See "Nozzle Verification Technology" on LCD. Operability • The functions...barcodes with commands (ESC/Label) from a .NET environment application. • Epson Inkjet Label Printer SDK (a Windows printer driver is used with a beep sound or flashing of various LED.... Reliability • Uses pigment ink with superior resistance to light and water. • High reliability system equipped with...


