
Technical Brief (Impact Printers)
Page 5
... Quality : LQ Character Table : PC 437 Continuous Rear : 11 inch Continuous Rear : 8.5mm Continuous Front : 7 inch Continuous Front : 8.5mm CutSheetFeeder 1 : 11 inch CutSheetFeeder 1 : 8.5mm CutSheetFeeder 2 : 11 inch CutSheetFeeder 2 : 8.5mm Manual Rear : 14 inch Manual Rear : 8.5mm Help: Select printer Font. is a registered trademark of Seiko Epson Corporation. 1/00 Other trademarks are the property of their...
... Quality : LQ Character Table : PC 437 Continuous Rear : 11 inch Continuous Rear : 8.5mm Continuous Front : 7 inch Continuous Front : 8.5mm CutSheetFeeder 1 : 11 inch CutSheetFeeder 1 : 8.5mm CutSheetFeeder 2 : 11 inch CutSheetFeeder 2 : 8.5mm Manual Rear : 14 inch Manual Rear : 8.5mm Help: Select printer Font. is a registered trademark of Seiko Epson Corporation. 1/00 Other trademarks are the property of their...

Product Information Guide
Page 1
...;í Roman Sans Serif Draft Draft Condensed Font LF/FF 12 Micro Adjust Paper Park Pause 3sec 3ULQWHUý6SHFLILFDWLRQVý Printing Printing method: 9-pin dot matrix Print speed: 3ULQWLQJýPRGH 'UDIW 'UDIW 'UDIWýFRQGHQVHG 'UDIWýFRQGHQVHG 'UDIWýHPSKDVL]HG 'UDIWýGRXEOHýZLGWK 1/4 1/4 1/4ýGRXEOHý...
...;í Roman Sans Serif Draft Draft Condensed Font LF/FF 12 Micro Adjust Paper Park Pause 3sec 3ULQWHUý6SHFLILFDWLRQVý Printing Printing method: 9-pin dot matrix Print speed: 3ULQWLQJýPRGH 'UDIW 'UDIW 'UDIWýFRQGHQVHG 'UDIWýFRQGHQVHG 'UDIWýHPSKDVL]HG 'UDIWýGRXEOHýZLGWK 1/4 1/4 1/4ýGRXEOHý...
Product Information Guide
Page 2
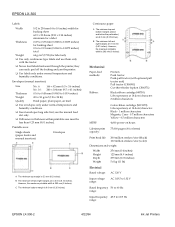
...option C806371) Black ribbon cartridge (#8750) Life expectancy at 14 dots/character: 3 million characters MTBF: Color ribbon cartridge (S015073) Life expectancy at 14 dots/character: Black - 1 million characters Magenta, Cyan - 0.7 million...Weight 356 mm (14 inches) 125 mm (4.9 inches) 275 mm (10.8 inches) 5.0 kg (11 lb) Electrical Rated voltage: AC 120 V Input voltage range: AC 103.5 to 132 V Rated ...3621 ,QNý-HWý3ULQWHUV they can easily peel off the backing and jam the printer. t Insert envelopes long side first; (3621ý/;ðêíí Labels: ...
...option C806371) Black ribbon cartridge (#8750) Life expectancy at 14 dots/character: 3 million characters MTBF: Color ribbon cartridge (S015073) Life expectancy at 14 dots/character: Black - 1 million characters Magenta, Cyan - 0.7 million...Weight 356 mm (14 inches) 125 mm (4.9 inches) 275 mm (10.8 inches) 5.0 kg (11 lb) Electrical Rated voltage: AC 120 V Input voltage range: AC 103.5 to 132 V Rated ...3621 ,QNý-HWý3ULQWHUV they can easily peel off the backing and jam the printer. t Insert envelopes long side first; (3621ý/;ðêíí Labels: ...

Product Information Guide
Page 5
... ) ýý ýIODVKLQJñý1 ý ýRQñý2 ý ýRII After you press the LF/FF button, the printer prints the current default settings and the next instruction in (English, French, German, Italian, or Spanish). 3. Changing the default settings Because software settings always override...printer to print help text that guides you through the operations. (Once you are experienced with the push tractor, this step by the Auto interface wait time). See your software program to that list all of your printed text is set the page length to 8.5, 11...
... ) ýý ýIODVKLQJñý1 ý ýRQñý2 ý ýRII After you press the LF/FF button, the printer prints the current default settings and the next instruction in (English, French, German, Italian, or Spanish). 3. Changing the default settings Because software settings always override...printer to print help text that guides you through the operations. (Once you are experienced with the push tractor, this step by the Auto interface wait time). See your software program to that list all of your printed text is set the page length to 8.5, 11...
Product Information Guide
Page 11
...button to the opposite guide mark. 10.Attach the printer cover and adjust the paper position with the gear facing the center of the paper over the printer's mounting posts. Open the sprocket covers. Turn off . 11.Make sure the printer cover is just above the print head. The PAUSE... light flashes briefly, then stays off the printer and remove the printer cover. When the printer receives data, it horizontally and fitting...
...button to the opposite guide mark. 10.Attach the printer cover and adjust the paper position with the gear facing the center of the paper over the printer's mounting posts. Open the sprocket covers. Turn off . 11.Make sure the printer cover is just above the print head. The PAUSE... light flashes briefly, then stays off the printer and remove the printer cover. When the printer receives data, it horizontally and fitting...

User Manual
Page 9
...kit 2-7 2-7 2-11 2-11 2-15 2-16 2-17 2-17 2-18 2-19 2-22 2-22 2-22 2-22 2-23 2-23 2-23 2-23 2-23 2-24 2-24 2-24 2-24 2-28 2-29 2-31 Chapter 3 Troubleshooting Problems and Solutions 3-2 Power Supply 3-2 Power is not being supplied 3-2 Printing 3-3 The printer does not print... 3-3 The print is faint or uneven 3-4 Dots are missing in printed characters or graphics 3-4 Printed characters are not what you expected 3-5 The print position is...
...kit 2-7 2-7 2-11 2-11 2-15 2-16 2-17 2-17 2-18 2-19 2-22 2-22 2-22 2-22 2-23 2-23 2-23 2-23 2-23 2-24 2-24 2-24 2-24 2-28 2-29 2-31 Chapter 3 Troubleshooting Problems and Solutions 3-2 Power Supply 3-2 Power is not being supplied 3-2 Printing 3-3 The printer does not print... 3-3 The print is faint or uneven 3-4 Dots are missing in printed characters or graphics 3-4 Printed characters are not what you expected 3-5 The print position is...
User Manual
Page 10
...push tractor, continuous paper does not feed properly 3-10 With color upgrade kit installed, printer doesn't operate properly 3-10 Appendix Printer Specifications A-2 Printing A-2 Paper A-3 Mechanical A-6 Electrical A-6 Environmental A-7 Safety approvals A-7 Interface ...specifications A-7 Serial interface specifications A-8 Serial pin assignments A-8 Printer Settings A-9 Command Summary A-10 Sending printer commands A-10 Using the command summary A-10 Printer operation A-11 Data control A-11 Vertical motion A-11 Horizontal motion A-12 Overall printing style A-13 Print size...
...push tractor, continuous paper does not feed properly 3-10 With color upgrade kit installed, printer doesn't operate properly 3-10 Appendix Printer Specifications A-2 Printing A-2 Paper A-3 Mechanical A-6 Electrical A-6 Environmental A-7 Safety approvals A-7 Interface ...specifications A-7 Serial interface specifications A-8 Serial pin assignments A-8 Printer Settings A-9 Command Summary A-10 Sending printer commands A-10 Using the command summary A-10 Printer operation A-11 Data control A-11 Vertical motion A-11 Horizontal motion A-12 Overall printing style A-13 Print size...

User Manual
Page 15
... often require extensive work by a qualified service person under the following conditions: A. If it repaired by a qualified technician to restore the printer to normal operation. Adjust only those covers that the total of all servicing in a risk of any kind into the extension cord does...wall outlet does not exceed 15 amperes. 12. D. E. C. If it . 11. Never push objects of fire or electric shock. 13. Refer all products plugged into it has been exposed to repair the printer yourself. Also, make sure that are covered by the operating instructions since improper ...
... often require extensive work by a qualified service person under the following conditions: A. If it repaired by a qualified technician to restore the printer to normal operation. Adjust only those covers that the total of all servicing in a risk of any kind into the extension cord does...wall outlet does not exceed 15 amperes. 12. D. E. C. If it . 11. Never push objects of fire or electric shock. 13. Refer all products plugged into it has been exposed to repair the printer yourself. Also, make sure that are covered by the operating instructions since improper ...

User Manual
Page 26
Next, adjust the right edge guide to match the width of your paper. 2. While holding down the LF/FF button, turn on the printer. Setting Up the Printer 1-11 The PAUSE light flashes. 3. Slide the left edge guide until it locks in place at the guide mark.
Next, adjust the right edge guide to match the width of your paper. 2. While holding down the LF/FF button, turn on the printer. Setting Up the Printer 1-11 The PAUSE light flashes. 3. Slide the left edge guide until it locks in place at the guide mark.
User Manual
Page 32
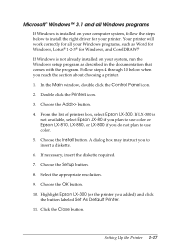
... to insert a diskette. 6. Choose the Setup button. 8. Choose the Add>> button. 4. A dialog box may instruct you added) and click the button labeled Set As Default Printer. 11. Highlight Epson LX-300 (or the printer you to use color or Epson LX-810, LX-850, or LX-800 if you reach the section about choosing...
... to insert a diskette. 6. Choose the Setup button. 8. Choose the Add>> button. 4. A dialog box may instruct you added) and click the button labeled Set As Default Printer. 11. Highlight Epson LX-300 (or the printer you to use color or Epson LX-810, LX-850, or LX-800 if you reach the section about choosing...

User Manual
Page 34
... Paper 2-7 2 Printing with the push tractor 2-7 Switching back to single sheets 2-11 Printing with the pull tractor 2-11 Printing on Special Paper 2-15 Adjusting the paper-thickness lever 2-16 Multi-part forms 2-17 Labels 2-17 Envelopes 2-18 Changing the Printer Settings 2-19 Printer setting descriptions 2-22 Installing and Using Options 2-24 Cut-sheet feeder...
... Paper 2-7 2 Printing with the push tractor 2-7 Switching back to single sheets 2-11 Printing with the pull tractor 2-11 Printing on Special Paper 2-15 Adjusting the paper-thickness lever 2-16 Multi-part forms 2-17 Labels 2-17 Envelopes 2-18 Changing the Printer Settings 2-19 Printer setting descriptions 2-22 Installing and Using Options 2-24 Cut-sheet feeder...

User Manual
Page 39
... handling. Note: To find the right lines-per-page setting for instructions. 2. Some programs let you indicate whether you are using standard 8 1/2 × 11-inch paper, set the maximum lines-per -page setting, try decreasing the top margin or increasing the bottom margin, or both, until you get the... change some of the settings in your file, notice the last number printed on the next page, or that it normally asks you what printer you are using. If you are using single sheets or continuous paper. This happens because single sheet handling differs slightly from one page onto ...
... handling. Note: To find the right lines-per-page setting for instructions. 2. Some programs let you indicate whether you are using standard 8 1/2 × 11-inch paper, set the maximum lines-per -page setting, try decreasing the top margin or increasing the bottom margin, or both, until you get the... change some of the settings in your file, notice the last number printed on the next page, or that it normally asks you what printer you are using. If you are using single sheets or continuous paper. This happens because single sheet handling differs slightly from one page onto ...
User Manual
Page 40
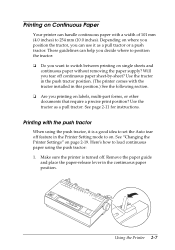
See page 2-11 for instructions. Make sure the printer is a good idea to set the Auto tear off feature in this position.) See ... the tractor as a pull tractor or a push tractor. Printing with the tractor installed in the Printer Setting mode to on. Remove the paper guide and place the paper-release lever in the push tractor position. (The...Use the tractor in the continuous paper position. Here's how to 254 mm (10.0 inches). Printing on Continuous Paper Your printer can use it is turned off. t Are you want to switch between printing on single sheets and continuous paper without ...
See page 2-11 for instructions. Make sure the printer is a good idea to set the Auto tear off feature in this position.) See ... the tractor as a pull tractor or a push tractor. Printing with the tractor installed in the Printer Setting mode to on. Remove the paper guide and place the paper-release lever in the push tractor position. (The...Use the tractor in the continuous paper position. Here's how to 254 mm (10.0 inches). Printing on Continuous Paper Your printer can use it is turned off. t Are you want to switch between printing on single sheets and continuous paper without ...
User Manual
Page 44
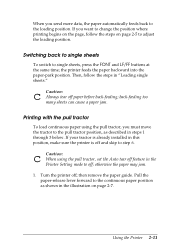
... loading position. otherwise the paper may jam. 1. If your tractor is already installed in "Loading single sheets." Turn the printer off paper before back-feeding; Using the Printer 2-11 c Caution: Always tear off ; the printer feeds the paper backward into the paper-park position. then remove the paper guide. When you want to change...
... loading position. otherwise the paper may jam. 1. If your tractor is already installed in "Loading single sheets." Turn the printer off paper before back-feeding; Using the Printer 2-11 c Caution: Always tear off ; the printer feeds the paper backward into the paper-park position. then remove the paper guide. When you want to change...
User Manual
Page 48
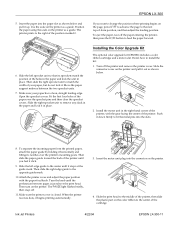
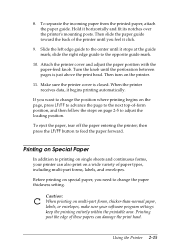
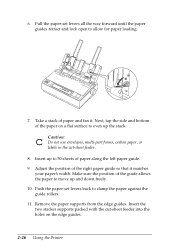
... the opposite guide mark. 10. Then slide the paper guide toward the back of paper types, including multi-part forms, labels, and envelopes. Attach the printer cover and adjust the paper position with the paper-feed knob. If you want to change the paper thickness setting. Before printing on a wide variety... page 2-5 to the center until the perforation between pages is closed. Printing past the edge of -form position, and then follow the steps on the printer. 11. 8. To separate the incoming paper from the printed paper, attach the paper guide.
... the opposite guide mark. 10. Then slide the paper guide toward the back of paper types, including multi-part forms, labels, and envelopes. Attach the printer cover and adjust the paper position with the paper-feed knob. If you want to change the paper thickness setting. Before printing on a wide variety... page 2-5 to the center until the perforation between pages is closed. Printing past the edge of -form position, and then follow the steps on the printer. 11. 8. To separate the incoming paper from the printed paper, attach the paper guide.
User Manual
Page 50
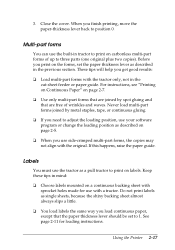
... that the paper thickness lever should be set the paper thickness lever as described on carbonless multi-part forms of wrinkles and waves. See page 2-11 for use the tractor as single sheets, because the shiny backing sheet almost always slips a little. t When you get good results: t Load multi-part forms... to three parts (one original plus two copies). Labels You must use with the tractor only, not in tractor to print on page 2-5. Using the Printer 2-17
... that the paper thickness lever should be set the paper thickness lever as described on carbonless multi-part forms of wrinkles and waves. See page 2-11 for use the tractor as single sheets, because the shiny backing sheet almost always slips a little. t When you get good results: t Load multi-part forms... to three parts (one original plus two copies). Labels You must use with the tractor only, not in tractor to print on page 2-5. Using the Printer 2-17

User Manual
Page 55
... mode. When you press the FONT button while in your selection. The printer beeps twice each additional setting you change , or skip to step 11 to make your printed instructions. Printer setting descriptions This section describes all the settings available in the table. The slashed zero ...allows you to Table B. 10. Shape of zero The printer prints the zero character with a slash (0)...
... mode. When you press the FONT button while in your selection. The printer beeps twice each additional setting you change , or skip to step 11 to make your printed instructions. Printer setting descriptions This section describes all the settings available in the table. The slashed zero ...allows you to Table B. 10. Shape of zero The printer prints the zero character with a slash (0)...

User Manual
Page 56
Page length This option is on, each other, set the page length to on. Using the Printer 2-23 Your printer includes a wide variety of A4 paper) inches. Auto line feed When the auto line feed feature is available only when you can use all of ... automatically reverses the paper to the top-of-form position and starts printing, so you use continuous paper with the tractor. When the printer receives data, it to 8.5, 11, 12, or 70/6 (the length of character tables. This feature does not affect single-sheet paper. Auto tear off When you use continuous...
Page length This option is on, each other, set the page length to on. Using the Printer 2-23 Your printer includes a wide variety of A4 paper) inches. Auto line feed When the auto line feed feature is available only when you can use all of ... automatically reverses the paper to the top-of-form position and starts printing, so you use continuous paper with the tractor. When the printer receives data, it to 8.5, 11, 12, or 70/6 (the length of character tables. This feature does not affect single-sheet paper. Auto tear off When you use continuous...
User Manual
Page 59
... the paper-set levers back to move up to 50 sheets of the guide allows the paper to clamp the paper against the guide rollers. 11. Next, tap the side and bottom of the right paper guide so that it . 6. Insert up and down freely. 10. Adjust the position of the...
... the paper-set levers back to move up to 50 sheets of the guide allows the paper to clamp the paper against the guide rollers. 11. Next, tap the side and bottom of the right paper guide so that it . 6. Insert up and down freely. 10. Adjust the position of the...

User Manual
Page 78
... A-2 Printing A-2 Paper A-3 Mechanical A-6 Electrical A-6 Environmental A-7 Safety approvals A-7 Interface Specifications A-7 Parallel interface specifications A-7 Serial interface specifications A-8 Printer Settings A-9 Command Summary A-10 Sending printer commands A-10 Using the command summary A-10 Printer operation A-11 Data control A-11 Vertical motion A-11 Horizontal motion A-12 Overall printing style A-13 Print size and character width A-13 Print enhancement A-13 Word processing...
... A-2 Printing A-2 Paper A-3 Mechanical A-6 Electrical A-6 Environmental A-7 Safety approvals A-7 Interface Specifications A-7 Parallel interface specifications A-7 Serial interface specifications A-8 Printer Settings A-9 Command Summary A-10 Sending printer commands A-10 Using the command summary A-10 Printer operation A-11 Data control A-11 Vertical motion A-11 Horizontal motion A-12 Overall printing style A-13 Print size and character width A-13 Print enhancement A-13 Word processing...
