Product Brochure
Page 1
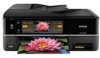
... free up only the buttons you need; two-year limited warranty and free lifetime customer phone support with and without a computer • Epson PreferredSM program - print photos, web-pages, e-mails and more • Built-in memory; Features and Benefits • Smart, 7.8" ...8226; Easily charge portable devices - DX5™ MicroPiezo® technology provides the finest color and detail without labels • Send faxes fast, even in the house • Ultra Hi-Definition prints - Artisan® 810 Print | Copy | Scan | Fax | ULTHRDAPhoto | Wi-Fi® Imagination meets ...
... free up only the buttons you need; two-year limited warranty and free lifetime customer phone support with and without a computer • Epson PreferredSM program - print photos, web-pages, e-mails and more • Built-in memory; Features and Benefits • Smart, 7.8" ...8226; Easily charge portable devices - DX5™ MicroPiezo® technology provides the finest color and detail without labels • Send faxes fast, even in the house • Ultra Hi-Definition prints - Artisan® 810 Print | Copy | Scan | Fax | ULTHRDAPhoto | Wi-Fi® Imagination meets ...
Product Brochure
Page 2
... MMCmicro™††, SmartMedia™†† • Estimated power consumption for priming the all -in -one ink color. Microsoft, Windows, Windows Vista and the Windows logos are trademarks and/or registered trademarks of companies. All other product and...8482; Borderless, classic borders, picture packages, photo ID, 2-up, 4-up, 8-up, 20-up to 50% of Seiko Epson Corporation. Copyright 2009 Epson America, Inc. Artisan 810 Print | Copy | Scan | Fax | ULTHRDAPhoto | Wi-Fi Printing Technology Ink Palette Ink Cartridge Configuration Ink Type Fade ...
... MMCmicro™††, SmartMedia™†† • Estimated power consumption for priming the all -in -one ink color. Microsoft, Windows, Windows Vista and the Windows logos are trademarks and/or registered trademarks of companies. All other product and...8482; Borderless, classic borders, picture packages, photo ID, 2-up, 4-up, 8-up, 20-up to 50% of Seiko Epson Corporation. Copyright 2009 Epson America, Inc. Artisan 810 Print | Copy | Scan | Fax | ULTHRDAPhoto | Wi-Fi Printing Technology Ink Palette Ink Cartridge Configuration Ink Type Fade ...
Quick Guide
Page 1
Artisan® 810 Series Quick Guide Basic Copying, Printing, Scanning, and Faxing Maintenance Solving Problems
Artisan® 810 Series Quick Guide Basic Copying, Printing, Scanning, and Faxing Maintenance Solving Problems
Quick Guide
Page 4
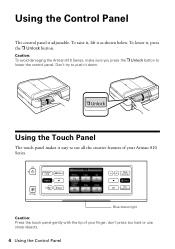
To lower it as shown below. Caution: To avoid damaging the Artisan 810 Series, make sure you press the Unlock button to push it easy to use sharp objects. 4 Using the Control Panel Don't try to lower the control panel. Using the Touch Panel The touch panel makes it down. don't press too hard or use all the creative features of your Artisan 810 Series. Using the Control Panel The control panel is adjustable. Blue status light Caution: Press the touch panel gently with the tip of your finger; To raise it, lift it , press the Unlock button.
To lower it as shown below. Caution: To avoid damaging the Artisan 810 Series, make sure you press the Unlock button to push it easy to use sharp objects. 4 Using the Control Panel Don't try to lower the control panel. Using the Touch Panel The touch panel makes it down. don't press too hard or use all the creative features of your Artisan 810 Series. Using the Control Panel The control panel is adjustable. Blue status light Caution: Press the touch panel gently with the tip of your finger; To raise it, lift it , press the Unlock button.
Quick Guide
Page 5
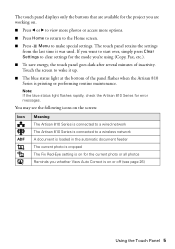
...last time it up. ■ The blue status light at the bottom of inactivity. Note: If the blue status light flashes rapidly, check the Artisan 810 Series for error messages. If you want to start over, simply press Clear Settings to a wireless network A document is loaded in the automatic ...touch panel displays only the buttons that are available for the project you are working on the screen: Icon ADF Meaning The Artisan 810 Series is connected to a wired network The Artisan 810 Series is connected to clear settings for the mode you're using (Copy, Fax, etc.). ■ To save energy...
...last time it up. ■ The blue status light at the bottom of inactivity. Note: If the blue status light flashes rapidly, check the Artisan 810 Series for error messages. If you want to start over, simply press Clear Settings to a wireless network A document is loaded in the automatic ...touch panel displays only the buttons that are available for the project you are working on the screen: Icon ADF Meaning The Artisan 810 Series is connected to a wired network The Artisan 810 Series is connected to clear settings for the mode you're using (Copy, Fax, etc.). ■ To save energy...
Quick Guide
Page 6
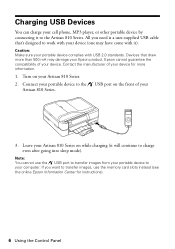
... while charging (it to work with USB 2.0 standards. Devices that 's designed to the Artisan 810 Series. Epson cannot guarantee the compatibility of your device for instructions). 6 Using the Control Panel Contact the manufacturer of your Epson product. Turn on your Artisan 810 Series on the front of your device. If you need is a user-supplied USB...
... while charging (it to work with USB 2.0 standards. Devices that 's designed to the Artisan 810 Series. Epson cannot guarantee the compatibility of your device for instructions). 6 Using the Control Panel Contact the manufacturer of your Epson product. Turn on your Artisan 810 Series on the front of your device. If you need is a user-supplied USB...
Quick Guide
Page 7
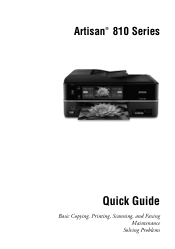
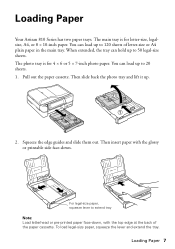
... can load up to 50 legal-size sheets. The main tray is for letter-size, legalsize, A4, or 8 × 10-inch paper. Loading Paper Your Artisan 810 Series has two paper trays.
... can load up to 50 legal-size sheets. The main tray is for letter-size, legalsize, A4, or 8 × 10-inch paper. Loading Paper Your Artisan 810 Series has two paper trays.
Quick Guide
Page 18
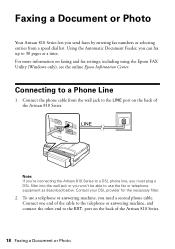
... jack to the LINE port on faxing and fax settings, including using the Epson FAX Utility (Windows only), see the online Epson Information Center. To use the fax or telephone equipment as described below. Connect one end of the Artisan 810 Series. 18 Faxing a Document or Photo port on the back of the cable...
... jack to the LINE port on faxing and fax settings, including using the Epson FAX Utility (Windows only), see the online Epson Information Center. To use the fax or telephone equipment as described below. Connect one end of the Artisan 810 Series. 18 Faxing a Document or Photo port on the back of the cable...
Quick Guide
Page 19
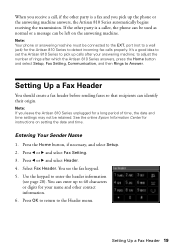
... Epson Information Center for a long period of rings after your name and other contact information. 6. Press l or r and select Header. 4. port (not to enter the header information (see the fax keypad. 5. Press OK to return to the EXT. You can enter up calls after which the Artisan 810 ...fax calls properly. Setting Up a Fax Header 19 When you receive a call, if the other party is a fax and you leave the Artisan 810 Series unplugged for instructions on the answering machine. Setting Up a Fax Header You should create a fax header before sending faxes so that recipients ...
... Epson Information Center for a long period of rings after your name and other contact information. 6. Press l or r and select Header. 4. port (not to enter the header information (see the fax keypad. 5. Press OK to return to the EXT. You can enter up calls after which the Artisan 810 ...fax calls properly. Setting Up a Fax Header 19 When you receive a call, if the other party is a fax and you leave the Artisan 810 Series unplugged for instructions on the answering machine. Setting Up a Fax Header You should create a fax header before sending faxes so that recipients ...

Quick Guide
Page 21
...If you select Color. 5. Sending a Fax You can send a fax by entering a fax number as described below. Place your original(s) for faxing (see a summary of your document on the scanner glass. Note: To redial the last fax number you see the online Epson Information Center. 1.... If you placed your fax transmission settings. 6. Press OK, if desired, to fax another page, press No. Sending a Fax 21 Select Color or B&W. Note: If the fax number is busy, you are scanning with the Automatic Document Feeder (see a redialing message and the Artisan 810...
...If you select Color. 5. Sending a Fax You can send a fax by entering a fax number as described below. Place your original(s) for faxing (see a summary of your document on the scanner glass. Note: To redial the last fax number you see the online Epson Information Center. 1.... If you placed your fax transmission settings. 6. Press OK, if desired, to fax another page, press No. Sending a Fax 21 Select Color or B&W. Note: If the fax number is busy, you are scanning with the Automatic Document Feeder (see a redialing message and the Artisan 810...
Quick Guide
Page 22
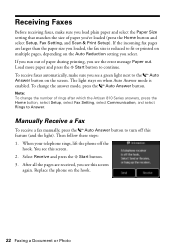
.... 3. To receive faxes automatically, make sure you load plain paper and select the Paper Size setting that matches the size of rings after which the Artisan 810 Series answers, press the Home button, select Setup, select Fax Setting, select Communication, and select Rings to turn off the hook. After all the pages...
.... 3. To receive faxes automatically, make sure you load plain paper and select the Paper Size setting that matches the size of rings after which the Artisan 810 Series answers, press the Home button, select Setup, select Fax Setting, select Communication, and select Rings to turn off the hook. After all the pages...
Quick Guide
Page 23
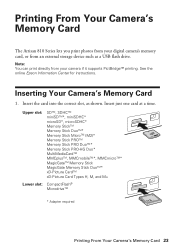
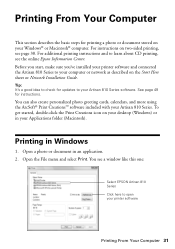
Printing From Your Camera's Memory Card The Artisan 810 Series lets you print photos from your digital camera's memory card, or from your camera if it supports PictBridge™ printing. Inserting Your Camera's Memory ... card into the correct slot, as a USB flash drive. Note: You can print directly from an external storage device such as shown. See the online Epson Information Center for instructions. Insert just one card at a time.
Printing From Your Camera's Memory Card The Artisan 810 Series lets you print photos from your digital camera's memory card, or from your camera if it supports PictBridge™ printing. Inserting Your Camera's Memory ... card into the correct slot, as a USB flash drive. Note: You can print directly from an external storage device such as shown. See the online Epson Information Center for instructions. Insert just one card at a time.
Quick Guide
Page 24
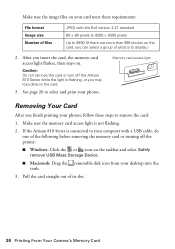
...: File format Image size Number of files JPEG with a USB cable, do one of the following before removing the memory card or turning off the Artisan 810 Series while the light is not flashing. 2. Caution: Do not remove the card or turn off the printer: ■ Windows: Click the or icon on... the taskbar and select Safely remove USB Mass Storage Device. ■ Macintosh: Drag the removable disk icon from your photos. If the Artisan 810 Series is connected to your computer with the Exif version 2.21 standard 80 × 80 pixels to 9200 × 9200 pixels Up to 9990 (If...
...: File format Image size Number of files JPEG with a USB cable, do one of the following before removing the memory card or turning off the Artisan 810 Series while the light is not flashing. 2. Caution: Do not remove the card or turn off the printer: ■ Windows: Click the or icon on... the taskbar and select Safely remove USB Mass Storage Device. ■ Macintosh: Drag the removable disk icon from your photos. If the Artisan 810 Series is connected to your computer with the Exif version 2.21 standard 80 × 80 pixels to 9200 × 9200 pixels Up to 9990 (If...
Quick Guide
Page 25
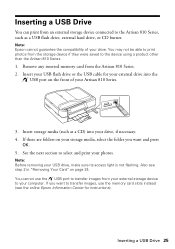
... use the memory card slots instead (see step 2 in "Removing Your Card" on your computer. Also see the online Epson Information Center for your external drive into your Artisan 810 Series. 3. Remove any inserted memory card from the storage device if they were saved to print photos from the... Artisan 810 Series. 2. Note: Epson cannot guarantee the compatibility of your drive, if necessary. 4. Note: Before removing your photos. Inserting a USB Drive 25 If you ...
... use the memory card slots instead (see step 2 in "Removing Your Card" on your computer. Also see the online Epson Information Center for your external drive into your Artisan 810 Series. 3. Remove any inserted memory card from the storage device if they were saved to print photos from the... Artisan 810 Series. 2. Note: Epson cannot guarantee the compatibility of your drive, if necessary. 4. Note: Before removing your photos. Inserting a USB Drive 25 If you ...
Quick Guide
Page 28
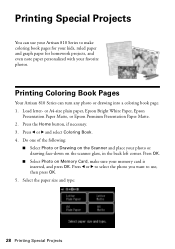
...Epson Premium Presentation Paper Matte. 2. Do one of the following: ■ Select Photo or Drawing on the Scanner and place your photo or drawing face-down on Memory Card, make coloring book pages for your kids, ruled paper and graph paper for homework projects, and even note paper personalized with your Artisan 810... Series to use, then press OK. 5. Select the paper size and type: 28 Printing Special Projects Printing Coloring Book Pages Your Artisan 810 Series can use your favorite photos. Press OK. &#...
...Epson Premium Presentation Paper Matte. 2. Do one of the following: ■ Select Photo or Drawing on the Scanner and place your photo or drawing face-down on Memory Card, make coloring book pages for your kids, ruled paper and graph paper for homework projects, and even note paper personalized with your Artisan 810... Series to use, then press OK. 5. Select the paper size and type: 28 Printing Special Projects Printing Coloring Book Pages Your Artisan 810 Series can use your favorite photos. Press OK. &#...
Quick Guide
Page 29
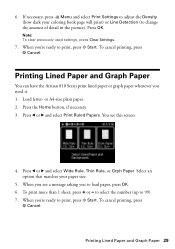
... and Graph Paper 29 Press OK. Select an option that matches your coloring book page will print) or Line Detection (to print, press x Start. To cancel printing, press y Cancel. Printing Lined Paper and Graph Paper You can have the Artisan 810 Series print lined paper or graph paper whenever you see this screen...
... and Graph Paper 29 Press OK. Select an option that matches your coloring book page will print) or Line Detection (to print, press x Start. To cancel printing, press y Cancel. Printing Lined Paper and Graph Paper You can have the Artisan 810 Series print lined paper or graph paper whenever you see this screen...
Quick Guide
Page 31
...the File menu and select Print. For additional printing instructions and to learn about CD printing, see a window like this one: Select EPSON Artisan 810 Series Click here to your computer or network as described on two-sided printing, see page 38. You can also create personalized photo ... Printing From Your Computer 31 For instructions on the Start Here sheet or Network Installation Guide. Tip: It's a good idea to your Artisan 810 Series software. See page 49 for updates to check for instructions. Printing in an application. 2. To get started, double-click the Print...
...the File menu and select Print. For additional printing instructions and to learn about CD printing, see a window like this one: Select EPSON Artisan 810 Series Click here to your computer or network as described on two-sided printing, see page 38. You can also create personalized photo ... Printing From Your Computer 31 For instructions on the Start Here sheet or Network Installation Guide. Tip: It's a good idea to your Artisan 810 Series software. See page 49 for updates to check for instructions. Printing in an application. 2. To get started, double-click the Print...
Quick Guide
Page 32
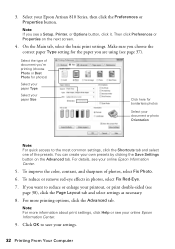
... common settings, click the Shortcuts tab and select one of the presets. To improve the color, contrast, and sharpness of document you want to save your online Epson Information Center. 5. Make sure you choose the correct paper Type setting for borderless photos Select...page 38), click the Page Layout tab and select settings as necessary. 8. Click OK to reduce or enlarge your online Epson Information Center. 9. Select your Epson Artisan 810 Series, then click the Preferences or Properties button. Then click Preferences or Properties on the Advanced tab. 3. To reduce...
... common settings, click the Shortcuts tab and select one of the presets. To improve the color, contrast, and sharpness of document you want to save your online Epson Information Center. 5. Make sure you choose the correct paper Type setting for borderless photos Select...page 38), click the Page Layout tab and select settings as necessary. 8. Click OK to reduce or enlarge your online Epson Information Center. 9. Select your Epson Artisan 810 Series, then click the Preferences or Properties button. Then click Preferences or Properties on the Advanced tab. 3. To reduce...
Quick Guide
Page 33
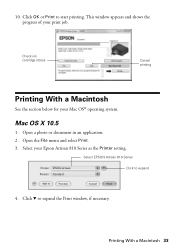
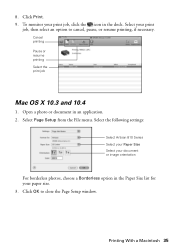
Check ink cartridge status Cancel printing Printing With a Macintosh See the section below for your Epson Artisan 810 Series as the Printer setting. Mac OS X 10.5 1. Click OK or Print to expand 4. Open the File menu and select Print. 3. Select your Mac OS® operating system. Printing With a Macintosh 33 This window appears and shows the progress of your print job. Select EPSON Artisan 810 Series Click to start printing. Click d to expand the Print window, if necessary. Open a photo or document in an application. 2. 10.
Check ink cartridge status Cancel printing Printing With a Macintosh See the section below for your Epson Artisan 810 Series as the Printer setting. Mac OS X 10.5 1. Click OK or Print to expand 4. Open the File menu and select Print. 3. Select your Mac OS® operating system. Printing With a Macintosh 33 This window appears and shows the progress of your print job. Select EPSON Artisan 810 Series Click to start printing. Click d to expand the Print window, if necessary. Open a photo or document in an application. 2. 10.
Quick Guide
Page 35
To monitor your paper size. 3. Cancel printing Pause or resume printing Select the print job Mac OS X 10.3 and 10.4 1. Select the following settings: Select Artisan 810 Series Select your Paper Size Select your document or image orientation For borderless photos, choose a Borderless option in the Paper Size list for your print ...
To monitor your paper size. 3. Cancel printing Pause or resume printing Select the print job Mac OS X 10.3 and 10.4 1. Select the following settings: Select Artisan 810 Series Select your Paper Size Select your document or image orientation For borderless photos, choose a Borderless option in the Paper Size list for your print ...


