Network Installation Guide
Page 2
... 're setting up the printer for the first time, see "Choose Your Connection Type" on page 3. ■ If you installed ink cartridges and loaded paper as described on page 22. 2 Before You Begin Do one of the following: ■ If you're installing the printer for use the printer on the network, follow the instructions in "Install Software" on the Start Here sheet. Then follow the steps in this guide to : epson.com/support/wireless. Tip...
... 're setting up the printer for the first time, see "Choose Your Connection Type" on page 3. ■ If you installed ink cartridges and loaded paper as described on page 22. 2 Before You Begin Do one of the following: ■ If you're installing the printer for use the printer on the network, follow the instructions in "Install Software" on the Start Here sheet. Then follow the steps in this guide to : epson.com/support/wireless. Tip...
Network Installation Guide
Page 7
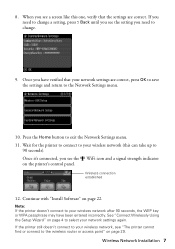
... page 22. When you see the setting you have been entered incorrectly. Wireless connection established 12. If the printer still doesn't connect to your wireless network, see a screen like this can take up to 90 seconds). Continue with "Install Software" on the printer's control panel. Wireless Network Installation 7 Once you need to change . 9. Press the Home button to the Network Settings menu. 10. Once it's connected, you see "The printer cannot find or connect to your network settings...
... page 22. When you see the setting you have been entered incorrectly. Wireless connection established 12. If the printer still doesn't connect to your wireless network, see a screen like this can take up to 90 seconds). Continue with "Install Software" on the printer's control panel. Wireless Network Installation 7 Once you need to change . 9. Press the Home button to the Network Settings menu. 10. Once it's connected, you see "The printer cannot find or connect to your network settings...
Network Installation Guide
Page 14
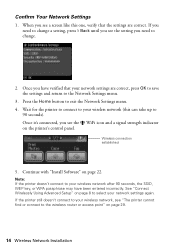
... icon and a signal strength indicator on page 29. 14 Wireless Network Installation Once you see "The printer cannot find or connect to your network settings are correct. If the printer still doesn't connect to your network settings again. See "Connect Wirelessly Using Advanced Setup" on page 22. Wireless connection established 5. Press the Home button to select your wireless network, see a screen like this can take up to the Network Settings menu. 3. Confirm Your Network Settings 1. When you have been...
... icon and a signal strength indicator on page 29. 14 Wireless Network Installation Once you see "The printer cannot find or connect to your network settings are correct. If the printer still doesn't connect to your network settings again. See "Connect Wirelessly Using Advanced Setup" on page 22. Wireless connection established 5. Press the Home button to select your wireless network, see a screen like this can take up to the Network Settings menu. 3. Confirm Your Network Settings 1. When you have been...
Network Installation Guide
Page 29
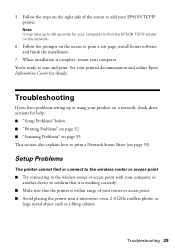
... installation is within range of the screen to scan and print. Setup Problems The printer cannot find the EPSON TCPIP printer on the right side of your computer or another device to confirm that it is working correctly. ■ Make sure that the printer is complete, restart your EPSON TCPIP printer. Troubleshooting If you have problems setting up to find or connect to the wireless router or access point ■ Try connecting to the wireless...
... installation is within range of the screen to scan and print. Setup Problems The printer cannot find the EPSON TCPIP printer on the right side of your computer or another device to confirm that it is working correctly. ■ Make sure that the printer is complete, restart your EPSON TCPIP printer. Troubleshooting If you have problems setting up to find or connect to the wireless router or access point ■ Try connecting to the wireless...
Network Installation Guide
Page 31
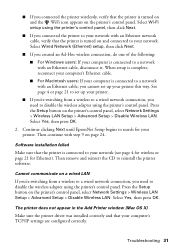
... the printer's control panel, select Network Settings > Wireless LAN Setup > Advanced Setup > Disable Wireless LAN. When setup is complete, reconnect your computer's Ethernet cable. ■ For Macintosh users: If your printer this way. Then remove and reinsert the CD to set up your printer. Software installation failed Make sure that your network. Cannot communicate on and connected to disable the wireless adapter using the printer's control panel. Select Yes, then press OK. 2. The printer does not appear in the Add Printer window (Mac OS X) Make...
... the printer's control panel, select Network Settings > Wireless LAN Setup > Advanced Setup > Disable Wireless LAN. When setup is complete, reconnect your computer's Ethernet cable. ■ For Macintosh users: If your printer this way. Then remove and reinsert the CD to set up your printer. Software installation failed Make sure that your network. Cannot communicate on and connected to disable the wireless adapter using the printer's control panel. Select Yes, then press OK. 2. The printer does not appear in the Add Printer window (Mac OS X) Make...
Network Installation Guide
Page 32
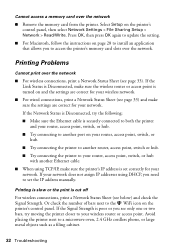
... Status is Disconnected, make sure the printer's IP address is poor or you to your network. Or check the number of bars next to a microwave oven, 2.4 GHz cordless phone, or large metal objects such as a filing cabinet. 32 Troubleshooting Avoid placing the printer next to the WiFi icon on the printer's control panel, then select Network Settings > File Sharing Setup > Network > Read/Write. Cannot access a memory card over the network ■ For wireless connections, print a Network Status Sheet (see page...
... Status is Disconnected, make sure the printer's IP address is poor or you to your network. Or check the number of bars next to a microwave oven, 2.4 GHz cordless phone, or large metal objects such as a filing cabinet. 32 Troubleshooting Avoid placing the printer next to the WiFi icon on the printer's control panel, then select Network Settings > File Sharing Setup > Network > Read/Write. Cannot access a memory card over the network ■ For wireless connections, print a Network Status Sheet (see page...
Network Installation Guide
Page 33
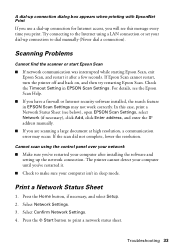
... a Network Status Sheet (see below), open EPSON Scan Settings, select Network (if necessary), click Add, click Enter address, and enter the IP address manually. ■ If you are scanning a large document at high resolution, a communication error may not work correctly. In this message every time you 've restarted it after installing the software and setting up connection to make sure your computer isn't in sleep mode. Cannot scan using a LAN connection or set your dial-up the network connection. Print a Network Status Sheet 1. Select Confirm Network Settings. 4. Troubleshooting 33...
... a Network Status Sheet (see below), open EPSON Scan Settings, select Network (if necessary), click Add, click Enter address, and enter the IP address manually. ■ If you are scanning a large document at high resolution, a communication error may not work correctly. In this message every time you 've restarted it after installing the software and setting up connection to make sure your computer isn't in sleep mode. Cannot scan using a LAN connection or set your dial-up the network connection. Print a Network Status Sheet 1. Select Confirm Network Settings. 4. Troubleshooting 33...
Product Brochure
Page 1
... • Epson PreferredSM program - automatic, two-sided printing, and two automatic paper trays, plus Ethernet networking - Artisan® 810 Print | Copy | Scan | Fax | ULTHRDAPhoto | Wi-Fi® Imagination meets innovation. large display lights up a power outlet; print photos, web-pages, e-mails and more • Built-in as fast as 3 seconds per page; brilliant 4" x 6" photos in Wi-Fi, plus 30-page Automatic Document Feeder to 180 pages in the house • Ultra Hi-Definition prints - print, scan, and access memory card slots1 from...
... • Epson PreferredSM program - automatic, two-sided printing, and two automatic paper trays, plus Ethernet networking - Artisan® 810 Print | Copy | Scan | Fax | ULTHRDAPhoto | Wi-Fi® Imagination meets innovation. large display lights up a power outlet; print photos, web-pages, e-mails and more • Built-in as fast as 3 seconds per page; brilliant 4" x 6" photos in Wi-Fi, plus 30-page Automatic Document Feeder to 180 pages in the house • Ultra Hi-Definition prints - print, scan, and access memory card slots1 from...
Product Brochure
Page 2
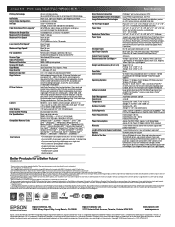
... the control panel or send a fax from the PC2 Color flatbed (CIS line sensor) 4800 dpi 9600 x 9600 dpi interpolated 48-bit color Color, Black/White, Text, Graphics, Photo 1 - 99 copies (PC-free) 8.5" x 14" (Legal) with Auto Document Feeder Auto background removal for both printing and print head maintenance. Epson disclaims any and all rights in these marks. For the latest information regarding Snow Leopard, please visit www.epson.com/support/snowleopard Software Included Epson printer driver, Epson Print CD, Web to Page, Epson Scan...
... the control panel or send a fax from the PC2 Color flatbed (CIS line sensor) 4800 dpi 9600 x 9600 dpi interpolated 48-bit color Color, Black/White, Text, Graphics, Photo 1 - 99 copies (PC-free) 8.5" x 14" (Legal) with Auto Document Feeder Auto background removal for both printing and print head maintenance. Epson disclaims any and all rights in these marks. For the latest information regarding Snow Leopard, please visit www.epson.com/support/snowleopard Software Included Epson printer driver, Epson Print CD, Web to Page, Epson Scan...
Quick Guide
Page 2
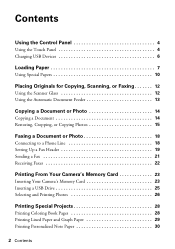
... Using the Control Panel 4 Using the Touch Panel 4 Charging USB Devices 6 Loading Paper 7 Using Special Papers 10 Placing Originals for Copying, Scanning, or Faxing 12 Using the Scanner Glass 12 Using the Automatic Document Feeder 13 Copying a Document or Photo 14 Copying a Document 14 Restoring, Cropping, or Copying Photos 15 Faxing a Document or Photo 18 Connecting to a Phone Line 18 Setting Up a Fax Header 19 Sending a Fax 21 Receiving Faxes 22 Printing From Your Camera's Memory Card 23 Inserting Your Camera's Memory Card 23 Inserting a USB Drive 25 Selecting and Printing...
... Using the Control Panel 4 Using the Touch Panel 4 Charging USB Devices 6 Loading Paper 7 Using Special Papers 10 Placing Originals for Copying, Scanning, or Faxing 12 Using the Scanner Glass 12 Using the Automatic Document Feeder 13 Copying a Document or Photo 14 Copying a Document 14 Restoring, Cropping, or Copying Photos 15 Faxing a Document or Photo 18 Connecting to a Phone Line 18 Setting Up a Fax Header 19 Sending a Fax 21 Receiving Faxes 22 Printing From Your Camera's Memory Card 23 Inserting Your Camera's Memory Card 23 Inserting a USB Drive 25 Selecting and Printing...
Quick Guide
Page 5
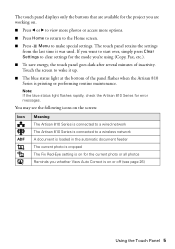
... see page 26) Using the Touch Panel 5 The touch panel displays only the buttons that are working on. ■ Press l or r to view more photos or access more options. ■ Press Home to return to the Home screen. ■ Press x Menu to make special settings. If you want to start over, simply press Clear Settings to a wireless network A document is loaded in the automatic document feeder The current photo is cropped The Fix Red-Eye setting...
... see page 26) Using the Touch Panel 5 The touch panel displays only the buttons that are working on. ■ Press l or r to view more photos or access more options. ■ Press Home to return to the Home screen. ■ Press x Menu to make special settings. If you want to start over, simply press Clear Settings to a wireless network A document is loaded in the automatic document feeder The current photo is cropped The Fix Red-Eye setting...
Quick Guide
Page 6
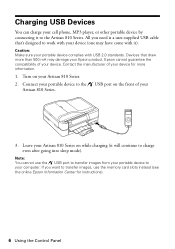
Epson cannot guarantee the compatibility of your device for instructions). 6 Using the Control Panel Turn on the front of your Artisan 810 Series. 3. Caution: Make sure your portable device complies with it). Devices that 's designed to the Artisan 810 Series. If you need is a user-supplied USB cable that draw more information. 1. Leave your Artisan 810 Series on while charging (it will continue to transfer images, use the USB port to transfer images from your portable device to the...
Epson cannot guarantee the compatibility of your device for instructions). 6 Using the Control Panel Turn on the front of your Artisan 810 Series. 3. Caution: Make sure your portable device complies with it). Devices that 's designed to the Artisan 810 Series. If you need is a user-supplied USB cable that draw more information. 1. Leave your Artisan 810 Series on while charging (it will continue to transfer images, use the USB port to transfer images from your portable device to the...
Quick Guide
Page 14
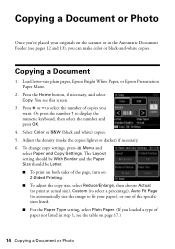
... of the specific sizes listed. ■ For the Paper Type setting, select Plain Paper. (If you loaded a type of paper not listed in the Automatic Document Feeder (see this screen. 3. Press + or - Select Color or B&W (black and white) copies. 5. To change copy settings, press x Menu and select Paper and Copy Settings. The Layout setting should be With Border and the Paper Size should be Letter. ■ To print on both sides of the page, turn on page 17.) 14 Copying a Document or Photo You see pages 12...
... of the specific sizes listed. ■ For the Paper Type setting, select Plain Paper. (If you loaded a type of paper not listed in the Automatic Document Feeder (see this screen. 3. Press + or - Select Color or B&W (black and white) copies. 5. To change copy settings, press x Menu and select Paper and Copy Settings. The Layout setting should be With Border and the Paper Size should be Letter. ■ To print on both sides of the page, turn on page 17.) 14 Copying a Document or Photo You see pages 12...

Quick Guide
Page 21
... recipient's fax machine prints only in black and white even if you don't need to fax another page, press No. Press x Start to begin scanning and faxing your document. (To cancel, press y Cancel.) If you need to fax additional pages, place your fax transmission settings. 6. Press , then use the numeric keypad to enter the fax number (up a speed dial list or to continue. If you are scanning with the Automatic Document Feeder (see a redialing message and the Artisan 810 Series redials...
... recipient's fax machine prints only in black and white even if you don't need to fax another page, press No. Press x Start to begin scanning and faxing your document. (To cancel, press y Cancel.) If you need to fax additional pages, place your fax transmission settings. 6. Press , then use the numeric keypad to enter the fax number (up a speed dial list or to continue. If you are scanning with the Automatic Document Feeder (see a redialing message and the Artisan 810 Series redials...
Quick Guide
Page 25
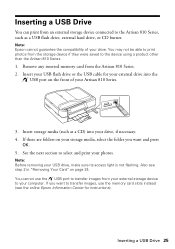
... transfer images, use the USB port to transfer images from the Artisan 810 Series. 2. Inserting a USB Drive 25 Insert your storage media, select the folder you want and press OK. 5. Remove any inserted memory card from your computer. If there are folders on your USB flash drive or the USB cable for instructions). Insert storage media (such as a USB flash drive, external hard drive, or CD burner. You may not be able to print photos from...
... transfer images, use the USB port to transfer images from the Artisan 810 Series. 2. Inserting a USB Drive 25 Insert your storage media, select the folder you want and press OK. 5. Remove any inserted memory card from your computer. If there are folders on your USB flash drive or the USB cable for instructions). Insert storage media (such as a USB flash drive, external hard drive, or CD burner. You may not be able to print photos from...
Quick Guide
Page 29
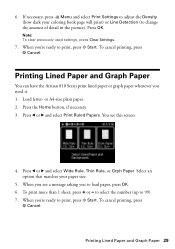
... Grph Paper. Select an option that matches your coloring book page will print) or Line Detection (to adjust the Density (how dark your paper size. 5. When you to 99). 7. If necessary, press x Menu and select Print Settings to change the amount of detail in the picture). or A4-size plain paper. 2. Press the Home button, if necessary. 3. To cancel printing, press y Cancel. 6. Press OK. Note: To clear previously used settings, press Clear Settings. 7. To cancel printing, press y Cancel. Printing Lined Paper...
... Grph Paper. Select an option that matches your coloring book page will print) or Line Detection (to adjust the Density (how dark your paper size. 5. When you to 99). 7. If necessary, press x Menu and select Print Settings to change the amount of detail in the picture). or A4-size plain paper. 2. Press the Home button, if necessary. 3. To cancel printing, press y Cancel. 6. Press OK. Note: To clear previously used settings, press Clear Settings. 7. To cancel printing, press y Cancel. Printing Lined Paper...
Quick Guide
Page 50
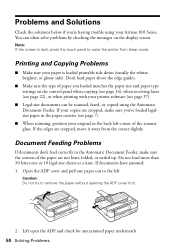
... paper type settings on the display screen. If the edges are not bent, folded, or curled up. Problems and Solutions Check the solutions below if you 've loaded legalsize paper in the paper cassette (see page 37). ■ Legal-size documents can be scanned, faxed, or copied using your copies are cropped, make sure the corners of the scanner glass. Do not load more than 30 letter-size or 10 legal-size sheets at a time. Lift open the ADF...
... paper type settings on the display screen. If the edges are not bent, folded, or curled up. Problems and Solutions Check the solutions below if you 've loaded legalsize paper in the paper cassette (see page 37). ■ Legal-size documents can be scanned, faxed, or copied using your copies are cropped, make sure the corners of the scanner glass. Do not load more than 30 letter-size or 10 legal-size sheets at a time. Lift open the ADF...
Quick Guide
Page 52
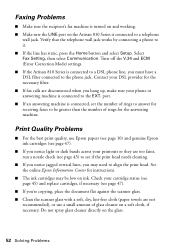
... print quality, use Epson papers (see page 10) and genuine Epson ink cartridges (see page 47). ■ If you notice light or dark bands across your phone or answering machine is connected to the phone jack. Select Fax Setting, then select Communication. Do not spray glass cleaner directly on the glass. 52 Solving Problems Faxing Problems ■ Make sure the recipient's fax machine is turned on and working. ■ Make sure the LINE port on the Artisan 810 Series is connected...
... print quality, use Epson papers (see page 10) and genuine Epson ink cartridges (see page 47). ■ If you notice light or dark bands across your phone or answering machine is connected to the phone jack. Select Fax Setting, then select Communication. Do not spray glass cleaner directly on the glass. 52 Solving Problems Faxing Problems ■ Make sure the recipient's fax machine is turned on and working. ■ Make sure the LINE port on the Artisan 810 Series is connected...
Quick Guide
Page 55
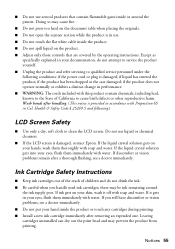
... gets in Cal. Except as specifically explained in accordance with this product contain chemicals, including lead, known to the State of California to clean the LCD screen. Do not use aerosol products that are covered by the operating instructions. if the product has been dropped or the case damaged; Ink Cartridge Safety Instructions ■ Keep ink cartridges out of the reach of...
... gets in Cal. Except as specifically explained in accordance with this product contain chemicals, including lead, known to the State of California to clean the LCD screen. Do not use aerosol products that are covered by the operating instructions. if the product has been dropped or the case damaged; Ink Cartridge Safety Instructions ■ Keep ink cartridges out of the reach of...
Start Here
Page 7
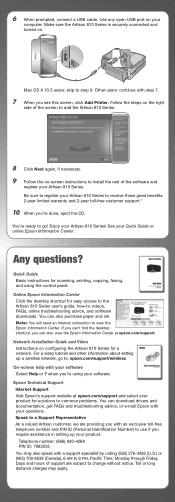
... for scanning, printing, copying, faxing, and using your product. when you see this screen, click Add Printer. Telephone number: (866) 930-4288 PIN ID: 7082255 You may apply. Days and hours of the software and register your Artisan 810 Series! See your computer. Network Installation Guide and Video Instructions on your Quick Guide or online Epson Information Center. Epson Technical Support Internet Support Visit Epson's support website at epson.com/support. 6 When prompted, connect a USB cable. Use any open USB port on configuring the Artisan 810 Series for...
... for scanning, printing, copying, faxing, and using your product. when you see this screen, click Add Printer. Telephone number: (866) 930-4288 PIN ID: 7082255 You may apply. Days and hours of the software and register your Artisan 810 Series! See your computer. Network Installation Guide and Video Instructions on your Quick Guide or online Epson Information Center. Epson Technical Support Internet Support Visit Epson's support website at epson.com/support. 6 When prompted, connect a USB cable. Use any open USB port on configuring the Artisan 810 Series for...


