DuraBrite™ Ink Technical Brief
Page 1
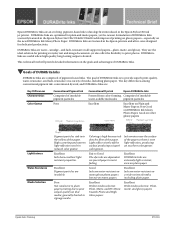
... ideal solution for printing everyday text and image documents, yet also offer the flexibility to poor output quality on that media; The goal of DURABrite Inks is high because ink dyes the fiber of DURABrite Inks (currently featured in the Epson Stylus C80 ink jet printer. The key differences among conventional pigment ink, conventional dye ink, and DURABrite Inks are insoluble. High scattering and uneven light reflection result...
... ideal solution for printing everyday text and image documents, yet also offer the flexibility to poor output quality on that media; The goal of DURABrite Inks is high because ink dyes the fiber of DURABrite Inks (currently featured in the Epson Stylus C80 ink jet printer. The key differences among conventional pigment ink, conventional dye ink, and DURABrite Inks are insoluble. High scattering and uneven light reflection result...
DuraBrite™ Ink Technical Brief
Page 4
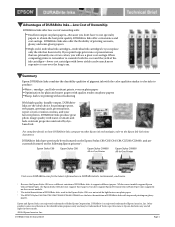
.... High-yield, individual ink cartridges-Individual ink cartridges let you replace only the ink that use specialty papers to the Epson Ink Solutions document. While current models support Epson Glossy Photo Paper, the Epson Stylus C80 does not support those marks. ©2004 Epson America, Inc. When comparing printers, remember to produce: Water-, smudge-, and fade-resistant prints, even on plain paper Optimization for plain and matte papers with quality results on glossy papers Sharp, dark text...
.... High-yield, individual ink cartridges-Individual ink cartridges let you replace only the ink that use specialty papers to the Epson Ink Solutions document. While current models support Epson Glossy Photo Paper, the Epson Stylus C80 does not support those marks. ©2004 Epson America, Inc. When comparing printers, remember to produce: Water-, smudge-, and fade-resistant prints, even on plain paper Optimization for plain and matte papers with quality results on glossy papers Sharp, dark text...

Read This First Booklet (Mac OS X Users)
Page 2
... printer software, then click Continue. Click Install, then click Continue Installation. Double-click the OS X Driver Installer.dmg file. If you set up an administrator password when you installed OS X, you want to install your printer on which you see the drive icon.) 6. The Disk Copy Utility places a drive icon for your printer, such as SP820) to open it. (You may need to close or move the CD-ROM window...
... printer software, then click Continue. Click Install, then click Continue Installation. Double-click the OS X Driver Installer.dmg file. If you set up an administrator password when you installed OS X, you want to install your printer on which you see the drive icon.) 6. The Disk Copy Utility places a drive icon for your printer, such as SP820) to open it. (You may need to close or move the CD-ROM window...

Printer Basics
Page 4
Cleaning the Printer 36 Transporting the Printer 37 PROBLEM SOLVING 39 Printer Parts 40 Diagnosing Printer Problems 41 Checking the Control Panel Lights 41 Running a Printer Check 43 Problems and Solutions 44 Problems Setting Up the Printer or Installing Software 44 Printing Problems 45 Print Quality Problems 46 Problems with Paper Feeding 49 Solving Miscellaneous Printout Problems 50 Uninstalling Printer Software 52 Uninstalling Windows Software 52 Uninstalling Macintosh Software 52 Reinstalling Printer Software 53 Where To Get Help 53 EPSON Technical ...
Cleaning the Printer 36 Transporting the Printer 37 PROBLEM SOLVING 39 Printer Parts 40 Diagnosing Printer Problems 41 Checking the Control Panel Lights 41 Running a Printer Check 43 Problems and Solutions 44 Problems Setting Up the Printer or Installing Software 44 Printing Problems 45 Print Quality Problems 46 Problems with Paper Feeding 49 Solving Miscellaneous Printout Problems 50 Uninstalling Printer Software 52 Uninstalling Windows Software 52 Uninstalling Macintosh Software 52 Reinstalling Printer Software 53 Where To Get Help 53 EPSON Technical ...

Printer Basics
Page 6
... your printer and install its software, see the Start Here sheet. About Your Documentation To set up to image, display conditions, light intensity, humidity, and atmospheric conditions. With resolutions up to 2880 × 720 dpi, it delivers ultra sharp text and clear, vibrant colors at extremely fast print speeds-up your on-screen Reference Guide, as described on accelerated testing of the paper itself. But what makes the EPSON Stylus C80...
... your printer and install its software, see the Start Here sheet. About Your Documentation To set up to image, display conditions, light intensity, humidity, and atmospheric conditions. With resolutions up to 2880 × 720 dpi, it delivers ultra sharp text and clear, vibrant colors at extremely fast print speeds-up your on-screen Reference Guide, as described on accelerated testing of the paper itself. But what makes the EPSON Stylus C80...

Printer Basics
Page 21
... on page 8 (Windows) or page 12 (Macintosh). Printing with Black ink selected. 16 you cannot turn on page 2. PhotoEnhance does not affect your printout. it only affects your original image; Enhancing Photos The printer software includes PhotoEnhance™ options that adjust image brightness and contrast to add special effects. Using PhotoEnhance, Custom, and Advanced Settings When you're printing special projects, you can also use PhotoEnhance, you must select Color ink;
... on page 8 (Windows) or page 12 (Macintosh). Printing with Black ink selected. 16 you cannot turn on page 2. PhotoEnhance does not affect your printout. it only affects your original image; Enhancing Photos The printer software includes PhotoEnhance™ options that adjust image brightness and contrast to add special effects. Using PhotoEnhance, Custom, and Advanced Settings When you're printing special projects, you can also use PhotoEnhance, you must select Color ink;
Printer Basics
Page 30
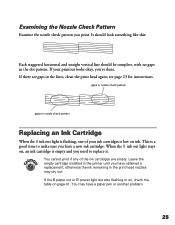
..., check the table on , an ink cartridge is a good time to replace it. When the H ink out light stays on page 41. otherwise the ink remaining in the lines, clean the print head again; see page 23 for instructions. Leave the empty cartridge installed in the printer until you have a new ink cartridge. This is empty and you need to make sure you have a paper jam or another problem. 25 If your ink cartridges is flashing, one of the ink cartridges...
..., check the table on , an ink cartridge is a good time to replace it. When the H ink out light stays on page 41. otherwise the ink remaining in the lines, clean the print head again; see page 23 for instructions. Leave the empty cartridge installed in the printer until you have a new ink cartridge. This is empty and you need to make sure you have a paper jam or another problem. 25 If your ink cartridges is flashing, one of the ink cartridges...

Printer Basics
Page 46
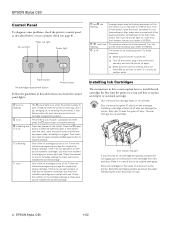
...Panel Lights Ink out light Paper out light Power light Ink cartridge replacement button Paper button Power button Follow the guidelines below when you may have installed a cartridge your printer can diagnose some problems by checking the printer's control panel lights, as described on when the printer is receiving a print job, charging ink, or cleaning the print head. Paper has jammed in this section, or running a printer check, as described in the printer. If that doesn't clear the error, open the printer cover and remove any paper inside, including torn pieces. It flashes...
...Panel Lights Ink out light Paper out light Power light Ink cartridge replacement button Paper button Power button Follow the guidelines below when you may have installed a cartridge your printer can diagnose some problems by checking the printer's control panel lights, as described on when the printer is receiving a print job, charging ink, or cleaning the print head. Paper has jammed in this section, or running a printer check, as described in the printer. If that doesn't clear the error, open the printer cover and remove any paper inside, including torn pieces. It flashes...

Printer Basics
Page 47
... the Start Here sheet. If the error isn't cleared, contact your printer can't use. Close the printer cover and press the H ink cartridge replacement button again to finish installation. Then press the H ink cartridge replacement button to finish installation. I Turn off the printer, open the printer cover and press the H ink cartridge replacement button to move the cartridge holders to replace the empty cartridge. I If the print head is not controlled by a switch or timer. See page 54 for any cartridge that you 've installed the correct cartridge. I Make sure...
... the Start Here sheet. If the error isn't cleared, contact your printer can't use. Close the printer cover and press the H ink cartridge replacement button again to finish installation. Then press the H ink cartridge replacement button to finish installation. I Turn off the printer, open the printer cover and press the H ink cartridge replacement button to move the cartridge holders to replace the empty cartridge. I If the print head is not controlled by a switch or timer. See page 54 for any cartridge that you 've installed the correct cartridge. I Make sure...

Printer Basics
Page 49
... the printer cable is still flashing after ink cartridge installation. Turn off the printer or it may charge improperly and use excess ink the next time you turn off any problems setting up your printer, installing software, or printing. Problems and Solutions Here are some troubleshooting tips if you have any unnecessary extensions and restart your computer. 44 I For Windows NT or 2000, if you see an error message or your printer icon (C80 Series) doesn...
... the printer cable is still flashing after ink cartridge installation. Turn off the printer or it may charge improperly and use excess ink the next time you turn off any problems setting up your printer, installing software, or printing. Problems and Solutions Here are some troubleshooting tips if you have any unnecessary extensions and restart your computer. 44 I For Windows NT or 2000, if you see an error message or your printer icon (C80 Series) doesn...
Printer Basics
Page 50
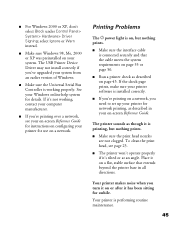
... your printer for network printing, as though it 's not working properly. I Run a printer check as described on a network, you 're printing over a network, see page 23. Printing Problems The Ppower light is printing, but nothing prints. I If you need to set up your system from an earlier version of Windows. Your printer makes noise when you 've upgraded your printer for use on , but nothing prints. Your printer is installed correctly. To clean the print head, see your on-screen Reference Guide...
... your printer for network printing, as though it 's not working properly. I Run a printer check as described on a network, you 're printing over a network, see page 23. Printing Problems The Ppower light is printing, but nothing prints. I If you need to set up your system from an earlier version of Windows. Your printer makes noise when you 've upgraded your printer for use on , but nothing prints. Your printer is installed correctly. To clean the print head, see your on-screen Reference Guide...

Printer Basics
Page 51
... need more than printing with a parallel connection. I Set the Quality/Speed slider to : I The ink cartridges may also need cleaning; see page 31. I Clear space on your hard disk or run a defragmentation utility. I If you 're not using Automatic mode. See your document doesn't include color. I Close open applications that you 're using . To replace an outdated ink cartridge, see page 23 for instructions. Printing is face up. Make sure your system's memory (RAM). I The print head nozzles may slow the printer. I Printing using a USB port...
... need more than printing with a parallel connection. I Set the Quality/Speed slider to : I The ink cartridges may also need cleaning; see page 31. I Clear space on your hard disk or run a defragmentation utility. I If you 're not using Automatic mode. See your document doesn't include color. I Close open applications that you 're using . To replace an outdated ink cartridge, see page 23 for instructions. Printing is face up. Make sure your system's memory (RAM). I The print head nozzles may slow the printer. I Printing using a USB port...

Printer Basics
Page 69
... Mirror images, 50 Monitor3, EPSON, 13 Monitoring ink level, 9, 25, 31 Moving printer, 37 64 N Network printing, 45 Noise, printer, 45 Nozzle check pattern, 24 to 25, 43 P Page Setup dialog box, 11 Paper feeding problems, 49 to 50 thickness lever, 47 type, setting, see Media Type setting Photo Quality Ink Jet Paper, 14 PhotoEnhance setting, 16 to 17 Premium Glossy Photo Paper, 14 Premium Semigloss Photo Paper, 14 Previewing, 10, 14 Print dialog box, 7 Print head aligning, 34 to 35 cleaning, 23 to 24 Print Head Alignment utility, 34 to 35 Print quality problems...
... Mirror images, 50 Monitor3, EPSON, 13 Monitoring ink level, 9, 25, 31 Moving printer, 37 64 N Network printing, 45 Noise, printer, 45 Nozzle check pattern, 24 to 25, 43 P Page Setup dialog box, 11 Paper feeding problems, 49 to 50 thickness lever, 47 type, setting, see Media Type setting Photo Quality Ink Jet Paper, 14 PhotoEnhance setting, 16 to 17 Premium Glossy Photo Paper, 14 Premium Semigloss Photo Paper, 14 Previewing, 10, 14 Print dialog box, 7 Print head aligning, 34 to 35 cleaning, 23 to 24 Print Head Alignment utility, 34 to 35 Print quality problems...
Printer Basics
Page 70
... PhotoEnhance, 16 to 17 Problems installing software, 44 to 45 miscellaneous, 50 to 51 paper feeding, 49 to 50 print quality, 46 to 49 printing, 45 to 46 Progress Meter, 9 Project types, custom, 17 to 18 Q Quality/Speed setting, 8, 12 R Reference Guide, 1, 2 to 4 Reinstalling software, 53 S Safety instructions, 57 to 58 Saving settings, 18 Semigloss media, 14 Service, 53 to 54 Slow printing, 46 Smears, 47 Software problems, solving, 44 to...
... PhotoEnhance, 16 to 17 Problems installing software, 44 to 45 miscellaneous, 50 to 51 paper feeding, 49 to 50 print quality, 46 to 49 printing, 45 to 46 Progress Meter, 9 Project types, custom, 17 to 18 Q Quality/Speed setting, 8, 12 R Reference Guide, 1, 2 to 4 Reinstalling software, 53 S Safety instructions, 57 to 58 Saving settings, 18 Semigloss media, 14 Service, 53 to 54 Slow printing, 46 Smears, 47 Software problems, solving, 44 to...
Product Information Guide
Page 4
... m paper button to replace the empty cartridge. Follow the instructions beginning on the ink cartridge package to make sure you've installed the correct cartridge. Check the number on page 5 to resume printing. Follow the instructions beginning on the cartridge package to install the ink cartridges the first time the printer is receiving a print job, charging ink, or cleaning the print head. Turn the printer off the printer, plug in the power cord securely, and turn the printer back on. This can 't use . It flashes when the printer is set...
... m paper button to replace the empty cartridge. Follow the instructions beginning on the ink cartridge package to make sure you've installed the correct cartridge. Check the number on page 5 to resume printing. Follow the instructions beginning on the cartridge package to install the ink cartridges the first time the printer is receiving a print job, charging ink, or cleaning the print head. Turn the printer off the printer, plug in the power cord securely, and turn the printer back on. This can 't use . It flashes when the printer is set...

Product Information Guide
Page 5
... P power light flash and hear the printer charging your printer not covered by EPSON's warranty. 1/02 EPSON Stylus C80 - 5 Then unwrap the cartridges. Replacing an Ink Cartridge When the H ink out light is flashing, one of the cartridge label should match the sticker on the printer. 2. If print quality doesn't improve after cleaning and aligning the print head, you have obtained a replacement; Wait a moment for all four ink cartridges, and leave them . You cannot print if any noise for instructions. Installing...
... P power light flash and hear the printer charging your printer not covered by EPSON's warranty. 1/02 EPSON Stylus C80 - 5 Then unwrap the cartridges. Replacing an Ink Cartridge When the H ink out light is flashing, one of the cartridge label should match the sticker on the printer. 2. If print quality doesn't improve after cleaning and aligning the print head, you have obtained a replacement; Wait a moment for all four ink cartridges, and leave them . You cannot print if any noise for instructions. Installing...

Product Information Guide
Page 9
... white lines, you may not be on but not flashing. Hold down the m paper button until the P power light starts to determine whether a problem comes from the printer itself or some noise and the Ppower light flashes. If the check page doesn't print, you need to confirm that the print head nozzles are clean. Replace the appropriate ink cartridge instead. 2. Windows: Click the Utility tab. Macintosh: Click the Utility button. 5. Cleaning takes about 30 seconds, during which the printer makes...
... white lines, you may not be on but not flashing. Hold down the m paper button until the P power light starts to determine whether a problem comes from the printer itself or some noise and the Ppower light flashes. If the check page doesn't print, you need to confirm that the print head nozzles are clean. Replace the appropriate ink cartridge instead. 2. Windows: Click the Utility tab. Macintosh: Click the Utility button. 5. Cleaning takes about 30 seconds, during which the printer makes...
Product Information Guide
Page 11
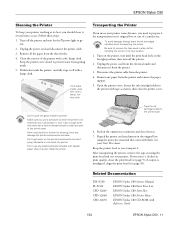
... your printer some distance, you need to go out. 2. See your printer. otherwise you may jam inside the printer. Open the printer cover. Keep the printer level as shown, then close the tray. 7. EPSON Stylus C80 Cleaning the Printer To keep your printer working at its best, you should clean it from the printer 3. Turn off with them. Unplug the power cord and disconnect the printer cable. 3. Make sure you use any cleaning sheets included with Reference Guide 1/02 EPSON Stylus C80 - 11 Don't use a rough...
... your printer some distance, you need to go out. 2. See your printer. otherwise you may jam inside the printer. Open the printer cover. Keep the printer level as shown, then close the tray. 7. EPSON Stylus C80 Cleaning the Printer To keep your printer working at its best, you should clean it from the printer 3. Turn off with them. Unplug the power cord and disconnect the printer cable. 3. Make sure you use any cleaning sheets included with Reference Guide 1/02 EPSON Stylus C80 - 11 Don't use a rough...

Start Here Card
Page 1
... the printer. ink cartridges CD-ROM paper support power cord Printer Basics printer Follow all the tape and packing material from the printer before connecting the cable. If You Have a PC Parallel Port 1 Make sure the printer and computer are turned off . 2 Connect the larger end of the cable to your computer's USB port or a first tier USB hub port. Then plug the power cord into its holder. Install the Ink Cartridges 1 Lower the printer's output tray and open the cover. Keep ink cartridges...
... the printer. ink cartridges CD-ROM paper support power cord Printer Basics printer Follow all the tape and packing material from the printer before connecting the cable. If You Have a PC Parallel Port 1 Make sure the printer and computer are turned off . 2 Connect the larger end of the cable to your computer's USB port or a first tier USB hub port. Then plug the power cord into its holder. Install the Ink Cartridges 1 Lower the printer's output tray and open the cover. Keep ink cartridges...

Start Here Card
Page 2
... left edge guide against the paper support. Don't load paper above this screen, make sure the printer is connected and turned on your monitor, put the EPSON CD-ROM in your desktop, click Share Photos Online at EPSON PhotoCenter. Check to the EPSON PhotoCenter website on EPSON's free photo- Make sure the printer is still turned on, then turn on -screen instructions to share photos on your screen. 5 If you have, then follow the right set , click OK...
... left edge guide against the paper support. Don't load paper above this screen, make sure the printer is connected and turned on your monitor, put the EPSON CD-ROM in your desktop, click Share Photos Online at EPSON PhotoCenter. Check to the EPSON PhotoCenter website on EPSON's free photo- Make sure the printer is still turned on, then turn on -screen instructions to share photos on your screen. 5 If you have, then follow the right set , click OK...


