Product Information Guide
Page 1
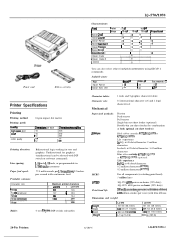
... cartridge Printer Specifications Printing Printing method: Printing speed: Quellly Mgh-speed draft DraR I Letter quality 24-pin impact dot matrix Chemcten per second with continuous feed 1 Maximum prlnted characters I La570 I LO-1070 &I 136 137 j/ 233 96 I 164 Buffer: 0 or 8 Kbytes (DIP-switch selectable) LQ-570/1070 Characterfonts: ! Fort1 I I 1 Epson Drafi Epson Cower Epson Roman 1 Epson San6 Sent Epson Presllge ~Epson Scnpt I Epson Sormt C Epson Orator 1 Epson...
... cartridge Printer Specifications Printing Printing method: Printing speed: Quellly Mgh-speed draft DraR I Letter quality 24-pin impact dot matrix Chemcten per second with continuous feed 1 Maximum prlnted characters I La570 I LO-1070 &I 136 137 j/ 233 96 I 164 Buffer: 0 or 8 Kbytes (DIP-switch selectable) LQ-570/1070 Characterfonts: ! Fort1 I I 1 Epson Drafi Epson Cower Epson Roman 1 Epson San6 Sent Epson Presllge ~Epson Scnpt I Epson Sormt C Epson Orator 1 Epson...
Product Information Guide
Page 3
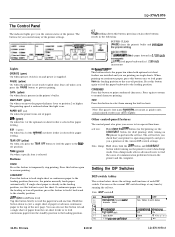
... position. The self test lets you press the PAUSE button to enter data dump mode. Setting the DIP Switches DIP-switch tables The section below 1 Unldwctlonal j Off / None I Lights OPERATE (green) On when operate switch is on 24-Pin Printers 8/20/91 LQ-570/1070-3 Other control-panel features The control panel also gives you move the paper-thickness...
... position. The self test lets you press the PAUSE button to enter data dump mode. Setting the DIP Switches DIP-switch tables The section below 1 Unldwctlonal j Off / None I Lights OPERATE (green) On when operate switch is on 24-Pin Printers 8/20/91 LQ-570/1070-3 Other control-panel features The control panel also gives you move the paper-thickness...
Product Information Guide
Page 4
... also select the following eight additional sets are available only by DIP switch are named after countries and referred to Table 4. The printer reduces the number of the functions you select bidirectional with DIP switches l-2,1-3, and 14, according to as lines or boxes. LQ-570/1070-4 8/20/91 24-Pin Printers fi } - However, turning DIP switch l-5 on , printing is unidirectional even...
... also select the following eight additional sets are available only by DIP switch are named after countries and referred to Table 4. The printer reduces the number of the functions you select bidirectional with DIP switches l-2,1-3, and 14, according to as lines or boxes. LQ-570/1070-4 8/20/91 24-Pin Printers fi } - However, turning DIP switch l-5 on , printing is unidirectional even...
User Manual
Page 8
... for the Printer 1-3 Assembling the Printer 1-5 Testing the Printer 1-10 Connecting the Printer to Your Computer 1-13 Configuring Your Software for the Printer 1-14 Chapter 2 Paper Handling 2-1 Selecting a Paper Feeding Method 2-2 Using Single Sheets 2-4 Using Continuous Paper 2-9 Switching Between Continuous Paper and Single Sheets . . . 2-21 Printing on Special Paper 2-23 Chapter 3 Using the Printer 3-1 Control Panel 3-2 DIP Switches 3-6 Micro...
... for the Printer 1-3 Assembling the Printer 1-5 Testing the Printer 1-10 Connecting the Printer to Your Computer 1-13 Configuring Your Software for the Printer 1-14 Chapter 2 Paper Handling 2-1 Selecting a Paper Feeding Method 2-2 Using Single Sheets 2-4 Using Continuous Paper 2-9 Switching Between Continuous Paper and Single Sheets . . . 2-21 Printing on Special Paper 2-23 Chapter 3 Using the Printer 3-1 Control Panel 3-2 DIP Switches 3-6 Micro...
User Manual
Page 23
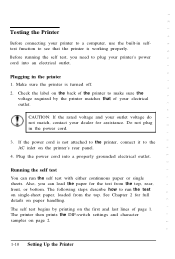
Check the label on single-sheet paper, loaded from the top, rear, front, or bottom. The printer then prints the DIP-switch settings and character samples on paper handling. Do not plug in the printer 1. Running the self test You can load the paper for the test from the top. See Chapter 2 ...for full details on page 2. 1-10 Setting Up the Printer Plug the power cord into an electrical outlet....
Check the label on single-sheet paper, loaded from the top, rear, front, or bottom. The printer then prints the DIP-switch settings and character samples on paper handling. Do not plug in the printer 1. Running the self test You can load the paper for the test from the top. See Chapter 2 ...for full details on page 2. 1-10 Setting Up the Printer Plug the power cord into an electrical outlet....
User Manual
Page 54
Chapter 3 Using the Printer Control Panel 3-2 Lights 3-2 Buttons 3-3 Other control-panel features 3-5 DIP Switches 3-6 Changing a DIP-switch setting 3-6 DIP-switch tables 3-7 DIP-switch functions 3-9 Micro Feed 3-13 Using micro feed 3-13 Adjusting the loading position 3-14 Tear Off 3-16 Tear-off mode 3-16 Using the TEAR OFF button 3-17 Adjusting the tear-off position 3-18 Typestyles 3-19 Character fonts 3-19 Character spacing 3-23 Condensed printing 3-23 Data Dump Mode 3-24 Using the Printer 3-1
Chapter 3 Using the Printer Control Panel 3-2 Lights 3-2 Buttons 3-3 Other control-panel features 3-5 DIP Switches 3-6 Changing a DIP-switch setting 3-6 DIP-switch tables 3-7 DIP-switch functions 3-9 Micro Feed 3-13 Using micro feed 3-13 Adjusting the loading position 3-14 Tear Off 3-16 Tear-off mode 3-16 Using the TEAR OFF button 3-17 Adjusting the tear-off position 3-18 Typestyles 3-19 Character fonts 3-19 Character spacing 3-23 Condensed printing 3-23 Data Dump Mode 3-24 Using the Printer 3-1
User Manual
Page 58
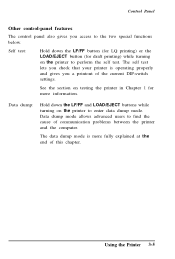
... Hold down the LF/FF and LOAD/EJECT buttons while turning on testing the printer in Chapter 1 for draft printing) while turning on the printer to find the cause of communication problems between the printer and the computer. Data dump mode allows advanced users to perform the self test.... self test lets you check that your printer is more information. Data dump: Hold down the LF/FF button (for LQ printing) or the LOAD/EJECT button (for more fully explained at the end of the current DIP-switch settings. See the section on the printer to the two special functions below.
... Hold down the LF/FF and LOAD/EJECT buttons while turning on testing the printer in Chapter 1 for draft printing) while turning on the printer to find the cause of communication problems between the printer and the computer. Data dump mode allows advanced users to perform the self test.... self test lets you check that your printer is more information. Data dump: Hold down the LF/FF button (for LQ printing) or the LOAD/EJECT button (for more fully explained at the end of the current DIP-switch settings. See the section on the printer to the two special functions below.

User Manual
Page 59
... on DIP-switch functions lists the setting for each switch. 4. Changing a DIP-switch setting To change a DIP-switch setting, follow these steps: 1. Turn off . Open the DIP-switch cover. 3. Use a pointed instrument, such as the graphics character set and page length. The DIP switches are located inside a compartment next to turn on the printer. 3-6 Using the Printer Close the DIP-switch cover. The section on . DIP Switches By setting the two printer's sets of...
... on DIP-switch functions lists the setting for each switch. 4. Changing a DIP-switch setting To change a DIP-switch setting, follow these steps: 1. Turn off . Open the DIP-switch cover. 3. Use a pointed instrument, such as the graphics character set and page length. The DIP switches are located inside a compartment next to turn on the printer. 3-6 Using the Printer Close the DIP-switch cover. The section on . DIP Switches By setting the two printer's sets of...
User Manual
Page 60
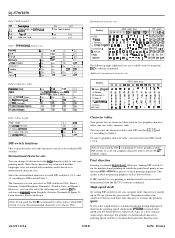
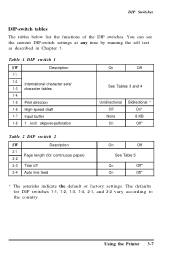
Using the Printer 3-7 Table 1 DIP switch 1 SW Description 1-1 1-2 International character sets/ 1-3 character tables 1-4 1-5 Print direction 1-6 High-speed draft 1-7 Input buffer 1-8 1 -inch skipover-perforation On Off See Tables 3 and 4 Unidirectional Off None On Bidirectional * On* 8 KB Off* Table 2 DIP switch 2 SW Description 2-1 Page length (for DIP switches 1-1, 1-2, 1-3, 1-4, 2-1, and 2-2 vary according to the country. The defaults for continuous paper) 2-2 2-3 Tear off...
Using the Printer 3-7 Table 1 DIP switch 1 SW Description 1-1 1-2 International character sets/ 1-3 character tables 1-4 1-5 Print direction 1-6 High-speed draft 1-7 Input buffer 1-8 1 -inch skipover-perforation On Off See Tables 3 and 4 Unidirectional Off None On Bidirectional * On* 8 KB Off* Table 2 DIP switch 2 SW Description 2-1 Page length (for DIP switches 1-1, 1-2, 1-3, 1-4, 2-1, and 2-2 vary according to the country. The defaults for continuous paper) 2-2 2-3 Tear off...
User Manual
Page 61
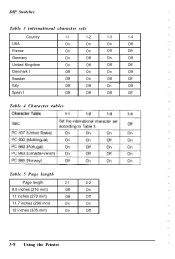
DIP Switches Table 3 international character sets Country USA France Germany United Kingdom Denmark I Sweden Italy Spain I 1-1 1-2 1-3 1-4 On On On Off On On Off Off On Off On Off On Off Off Off Off On On Off Off On Off Off Off Off On Off Off Off Off Off Table 4 Character tables Table 5 Page length Page length 2-1 2-2 8.5 inches (216 mm) Off On 11 inches (279 mm) Off Off 11.7 inches (296 mm) On On 12 inches (305 mm) On Off 3-8 Using the Printer
DIP Switches Table 3 international character sets Country USA France Germany United Kingdom Denmark I Sweden Italy Spain I 1-1 1-2 1-3 1-4 On On On Off On On Off Off On Off On Off On Off Off Off Off On On Off Off On Off Off Off Off On Off Off Off Off Off Table 4 Character tables Table 5 Page length Page length 2-1 2-2 8.5 inches (216 mm) Off On 11 inches (279 mm) Off Off 11.7 inches (296 mm) On On 12 inches (305 mm) On Off 3-8 Using the Printer
User Manual
Page 62
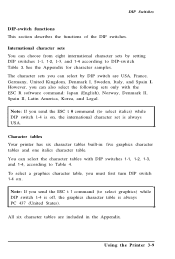
... ESC t 0 command (to DIP-switch Table 3. Using the Printer 3-9 The character sets you can choose from eight international character sets by DIP switch are included in : five graphics character tables and one italics character table. DIP Switches DIP-switch functions This section describes the functions of the DIP switches. See the Appendix for character samples. International character sets You can select by setting DIP switches 1-1, 1-2, 1-3, and 1-4 according...
... ESC t 0 command (to DIP-switch Table 3. Using the Printer 3-9 The character sets you can choose from eight international character sets by DIP switch are included in : five graphics character tables and one italics character table. DIP Switches DIP-switch functions This section describes the functions of the DIP switches. See the Appendix for character samples. International character sets You can select by setting DIP switches 1-1, 1-2, 1-3, and 1-4 according...

User Manual
Page 63
... the number of dots in each draft-font character to 225 cps (characters per second). High-speed draft By setting DIP-switch 1-6 off, you can print draft characters at speeds up to increase the printing speed. Input buffer capacity The printer stores data sent from your computer in one direction only-allows for printing graphics...
... the number of dots in each draft-font character to 225 cps (characters per second). High-speed draft By setting DIP-switch 1-6 off, you can print draft characters at speeds up to increase the printing speed. Input buffer capacity The printer stores data sent from your computer in one direction only-allows for printing graphics...
User Manual
Page 103
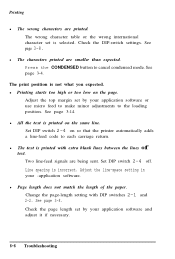
... length of text. Check the DIP-switch settings. Adjust the top margin set by your application software and adjust it if necessary. 6-6 Troubleshooting l All the text is selected. Two line-feed signals are smaller than expected. See page 3-8. l Printing starts too high or too low on so that the printer automatically adds a line-feed code...
... length of text. Check the DIP-switch settings. Adjust the top margin set by your application software and adjust it if necessary. 6-6 Troubleshooting l All the text is selected. Two line-feed signals are smaller than expected. See page 3-8. l Printing starts too high or too low on so that the printer automatically adds a line-feed code...
User Manual
Page 104
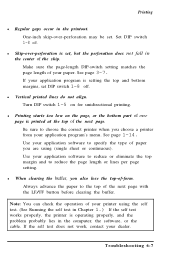
... test. (See Running the self test in the center of the skip. Set DIP switch 1-8 off . Use your application software to the top of your printer using (single sheet or continuous). Troubleshooting 6-7 l Skip-over -perforation may be set. Make sure the page-length DIP-switch setting matches the page length of the next page with the LF/FF...
... test. (See Running the self test in the center of the skip. Set DIP switch 1-8 off . Use your application software to the top of your printer using (single sheet or continuous). Troubleshooting 6-7 l Skip-over -perforation may be set. Make sure the page-length DIP-switch setting matches the page length of the next page with the LF/FF...
User Manual
Page 112
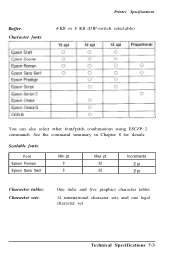
Buffer: Character fonts: Printer Specifications 0 KB or 8 KB (DIP-switch selectable) You can also select other font/pitch combinations using ESC/P 2 commands. See the command summary in Chapter 8 for details. Scalable fonts: Font Epson Roman Epson Sans Serif Min pt 8 8 Max pt 32 32 Increments 2 pt 2 pt Character tables: Character sets: One italic and five graphics character tables 14 international character sets and one legal character set Technical Specifications 7-3
Buffer: Character fonts: Printer Specifications 0 KB or 8 KB (DIP-switch selectable) You can also select other font/pitch combinations using ESC/P 2 commands. See the command summary in Chapter 8 for details. Scalable fonts: Font Epson Roman Epson Sans Serif Min pt 8 8 Max pt 32 32 Increments 2 pt 2 pt Character tables: Character sets: One italic and five graphics character tables 14 international character sets and one legal character set Technical Specifications 7-3
User Manual
Page 120
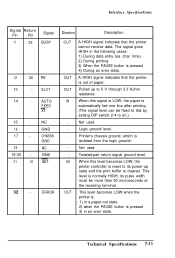
The signal goes HIGH in an error state. When this by setting DIP switch 2-4 to 5 V through 3.3 Kohm resistance. This level is pressed 4) During an error state. AUTO FEED XT 15 - 16 - 17 - 18 - 19-30 - 31 16 NC GND ... is out of paper. time) 2) During printing 3) When the PAUSE button is normally HIGH; Logic ground level. its power-up to on.) Not used . Printer's chassis ground, which is pressed 3) in the following cases: 1) During data entry (ea. Twisted-pair return signal ground level. Technical Specifications 7-11 A HIGH signal indicates ...
The signal goes HIGH in an error state. When this by setting DIP switch 2-4 to 5 V through 3.3 Kohm resistance. This level is pressed 4) During an error state. AUTO FEED XT 15 - 16 - 17 - 18 - 19-30 - 31 16 NC GND ... is out of paper. time) 2) During printing 3) When the PAUSE button is normally HIGH; Logic ground level. its power-up to on.) Not used . Printer's chassis ground, which is pressed 3) in the following cases: 1) During data entry (ea. Twisted-pair return signal ground level. Technical Specifications 7-11 A HIGH signal indicates ...
User Manual
Page 125
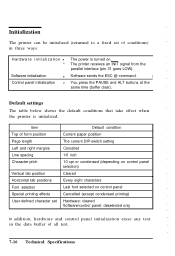
Initialization The printer can be initialized (returned to a fixed set Default condition Current paper position The current DIP-switch setting Cancelled 1/6 inch 10 cpi or condensed (depending on control panel selection) Cleared Every eight characters Last font selected on . I You press the PAUSE and ALT buttons at the same time (buffer clear). Default settings The table below...
Initialization The printer can be initialized (returned to a fixed set Default condition Current paper position The current DIP-switch setting Cancelled 1/6 inch 10 cpi or condensed (depending on control panel selection) Cleared Every eight characters Last font selected on . I You press the PAUSE and ALT buttons at the same time (buffer clear). Default settings The table below...
User Manual
Page 139
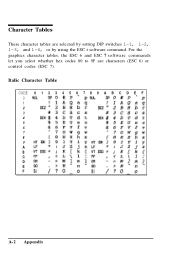
Character Tables These character tables are characters (ESC 6) or control codes (ESC 7). For the graphics character tables, the ESC 6 and ESC 7 software commands let you select whether hex codes 80 to 9F are selected by setting DIP switches 1-1, 1-2, 1-3, and 1-4, or by using the ESC t software command. Italic Character Table CODE 0 1 2 3 4 5 6 7 8 9 A B C D E F 0123456789ABCDEF A-2 Appendix
Character Tables These character tables are characters (ESC 6) or control codes (ESC 7). For the graphics character tables, the ESC 6 and ESC 7 software commands let you select whether hex codes 80 to 9F are selected by setting DIP switches 1-1, 1-2, 1-3, and 1-4, or by using the ESC t software command. Italic Character Table CODE 0 1 2 3 4 5 6 7 8 9 A B C D E F 0123456789ABCDEF A-2 Appendix
User Manual
Page 143
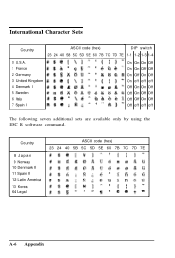
Country 8 Japan 9 Norway 10 Denmark II 11 Spain II 12 Latin America 13 Korea 64 Legal ASCII code (hex) 23 24 40 5B 5C 5D 5E 60 7B 7C 7D 7E A-6 Appendix International Character Sets Country ASCII code (hex) DIP switch 23 24 40 58 5C 5D 5 E 60 7 B 7C 7D 7E 1-1 1-2 1-3 1-4 0 U.S.A. 1 France 2 Germany 3 United Kingdom 4 Denmark I 5 Sweden 6 Italy 7 Spain I On On On Off On On Off Off On Off On Off On off off off Off On On Off Off On Off Off Off Off On Off Off off off off The following seven additional sets are available only by using the ESC R software command.
Country 8 Japan 9 Norway 10 Denmark II 11 Spain II 12 Latin America 13 Korea 64 Legal ASCII code (hex) 23 24 40 5B 5C 5D 5E 60 7B 7C 7D 7E A-6 Appendix International Character Sets Country ASCII code (hex) DIP switch 23 24 40 58 5C 5D 5 E 60 7 B 7C 7D 7E 1-1 1-2 1-3 1-4 0 U.S.A. 1 France 2 Germany 3 United Kingdom 4 Denmark I 5 Sweden 6 Italy 7 Spain I On On On Off On On Off Off On Off On Off On off off off Off On On Off Off On Off Off Off Off On Off Off off off off The following seven additional sets are available only by using the ESC R software command.
User Manual
Page 148
... of the printer's memory used as a buffer and for checking the operation of a page on . When you run the self test, the printer prints its current DIP-switch settings and the characters stored in its default status by sending a command or an INIT signal or by turning the printer off and ...then back on which the printer can print. RAM Random access memory. All data stored...
... of the printer's memory used as a buffer and for checking the operation of a page on . When you run the self test, the printer prints its current DIP-switch settings and the characters stored in its default status by sending a command or an INIT signal or by turning the printer off and ...then back on which the printer can print. RAM Random access memory. All data stored...


