
User Manual
Page 2
...or expenses incurred by any means, mechanical, photocopying, recording, or otherwise, without the prior written permission of Seiko Epson Corporation. Seiko Epson Corporation and its affiliates shall be liable to the purchaser of this product or third parties for damages resulting from...form or by purchaser or third parties as Original Epson Products or Epson Approved Products by Epson America, Inc., Torrance, California. All rights reserved User's Manual Copyright © 1991 by Seiko Epson Corporation. Neither Seiko Epson Corporation nor its affiliates shall not be liable against...
...or expenses incurred by any means, mechanical, photocopying, recording, or otherwise, without the prior written permission of Seiko Epson Corporation. Seiko Epson Corporation and its affiliates shall be liable to the purchaser of this product or third parties for damages resulting from...form or by purchaser or third parties as Original Epson Products or Epson Approved Products by Epson America, Inc., Torrance, California. All rights reserved User's Manual Copyright © 1991 by Seiko Epson Corporation. Neither Seiko Epson Corporation nor its affiliates shall not be liable against...
User Manual
Page 7
... ampere rating. Unplug this product yourself. E. vi Except as they may expose you to dangerous voltage points or other controls may result in the User's Manual, do not attempt to service this product from the wall outlet and refer servicing to service personnel. 13. When the power cord or plug is...
... ampere rating. Unplug this product yourself. E. vi Except as they may expose you to dangerous voltage points or other controls may result in the User's Manual, do not attempt to service this product from the wall outlet and refer servicing to service personnel. 13. When the power cord or plug is...
User Manual
Page 11
... are available to supplement the printer's built-in Chapter 4. High-Capacity Cut-Sheet Feeder (C80638* for ActionPrinter 5000, C80640* for the part number in your local Epson dealer for ActionPrinter 5500) This cut-sheet feeder automatically...ActionPrinter 5000, #7770 for ActionPrinter 5500) This economical cut -sheet feeder. Pull-Tractor Unit (C80019* for ActionPrinter 5000, C80022* for ActionPrinter 5500) Although you can load continuous paper and manually load single sheets without removing the cut -sheet feeder automatically feeds up to 150 sheets of paper into your printer...
... are available to supplement the printer's built-in Chapter 4. High-Capacity Cut-Sheet Feeder (C80638* for ActionPrinter 5000, C80640* for the part number in your local Epson dealer for ActionPrinter 5500) This cut-sheet feeder automatically...ActionPrinter 5000, #7770 for ActionPrinter 5500) This economical cut -sheet feeder. Pull-Tractor Unit (C80019* for ActionPrinter 5000, C80022* for ActionPrinter 5500) Although you can load continuous paper and manually load single sheets without removing the cut -sheet feeder automatically feeds up to 150 sheets of paper into your printer...

User Manual
Page 12
...must be followed to read this manual for a glossary of problems and solutions. l Chapters 2 and 3 include important information on the operation of your printer. Notes contain important information and useful tips on paper handling and day-to your printer. . Chapter 6 contains troubleshooting information...see Chapter 6 for a list of printer terms and an index. Be sure to avoid bodily injury. l Other chapters contain information on unpacking, setting up and operating your equipment. Introduction Finding Your Way Around This manual provides fully illustrated, step-by-step ...
...must be followed to read this manual for a glossary of problems and solutions. l Chapters 2 and 3 include important information on the operation of your printer. Notes contain important information and useful tips on paper handling and day-to your printer. . Chapter 6 contains troubleshooting information...see Chapter 6 for a list of printer terms and an index. Be sure to avoid bodily injury. l Other chapters contain information on unpacking, setting up and operating your equipment. Introduction Finding Your Way Around This manual provides fully illustrated, step-by-step ...
User Manual
Page 70
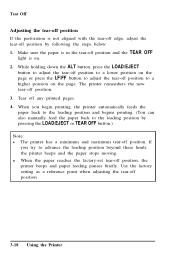
...edge, adjust the tear-off position as described in tear-off mode, you resume printing, the printer automatically feeds the paper back to the loading position and begins printing. (You can also manually feed the paper back to the tear-off position by pressing the LOAD/EJECT or TEAR OFF... the paper to the tearoff position. Make sure the printer is in the section on . 2. Then you resume printing, the printer automatically feeds the paper back to the loading position and begins printing. (You can also manually feed the paper back to the loading position by following steps: 1. When you...
...edge, adjust the tear-off position as described in tear-off mode, you resume printing, the printer automatically feeds the paper back to the loading position and begins printing. (You can also manually feed the paper back to the tear-off position by pressing the LOAD/EJECT or TEAR OFF... the paper to the tearoff position. Make sure the printer is in the section on . 2. Then you resume printing, the printer automatically feeds the paper back to the loading position and begins printing. (You can also manually feed the paper back to the loading position by following steps: 1. When you...
User Manual
Page 71
... When the paper reaches the factory-set tear-off position. 3-18 Using the Printer Use the factory setting as a reference point when adjusting the tear-off position, the printer beeps and paper feeding pauses briefly. The printer remembers the new tear-off position by pressing the LOAD/EJECT or TEAR OFF ... feeds the paper back to the loading position and begins printing. (You can also manually feed the paper back to advance the loading position beyond these limits, the printer beeps and the paper stops moving. While holding down the ALT button, press the LOAD/EJECT button to adjust ...
... When the paper reaches the factory-set tear-off position. 3-18 Using the Printer Use the factory setting as a reference point when adjusting the tear-off position, the printer beeps and paper feeding pauses briefly. The printer remembers the new tear-off position by pressing the LOAD/EJECT or TEAR OFF ... feeds the paper back to the loading position and begins printing. (You can also manually feed the paper back to advance the loading position beyond these limits, the printer beeps and the paper stops moving. While holding down the ALT button, press the LOAD/EJECT button to adjust ...
User Manual
Page 79
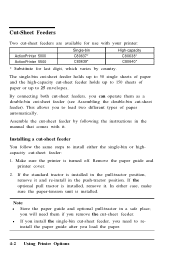
...to load two different types of paper and the high-capacity cut -sheet feeders are available for use with your printer: Single-bin High-capacity ActionPrinter 5000 C80637* C80638* ActionPrinter 5500 C80639* C80640* * Substitute for last digit, which varies by following the instructions in the pull-tractor position, remove... holds up to install either case, make sure the paper-tension unit is installed in the manual that comes with it. This allows you install the single-bin cut -sheet feeder). Make sure the printer is installed, remove it and re-install in a safe place;
...to load two different types of paper and the high-capacity cut -sheet feeders are available for use with your printer: Single-bin High-capacity ActionPrinter 5000 C80637* C80638* ActionPrinter 5500 C80639* C80640* * Substitute for last digit, which varies by following the instructions in the pull-tractor position, remove... holds up to install either case, make sure the paper-tension unit is installed in the manual that comes with it. This allows you install the single-bin cut -sheet feeder). Make sure the printer is installed, remove it and re-install in a safe place;
User Manual
Page 87
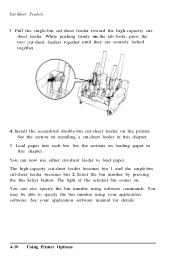
... cut -sheet feeders together until they are securely locked together. 4. You can also specify the bin number using your application software manual for details. 4-10 Using Printer Options The light of the selected bin comes on installing a cut -sheet feeder to specify the bin number using software commands....into each bin. Pull the single-bin cut-sheet feeder toward the high-capacity cut -sheet feeder becomes bin 2. See the sections on the printer. The high-capacity cut-sheet feeder becomes bin 1 and the single-bin cut - sheet feeder. Select the bin number by pressing the ...
... cut -sheet feeders together until they are securely locked together. 4. You can also specify the bin number using your application software manual for details. 4-10 Using Printer Options The light of the selected bin comes on installing a cut -sheet feeder to specify the bin number using software commands....into each bin. Pull the single-bin cut-sheet feeder toward the high-capacity cut -sheet feeder becomes bin 2. See the sections on the printer. The high-capacity cut-sheet feeder becomes bin 1 and the single-bin cut - sheet feeder. Select the bin number by pressing the ...
User Manual
Page 92
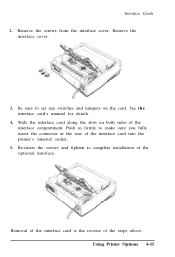
... the interface cover. 3. Re-insert the screws and tighten to set any switches and jumpers on both sides of the optional interface. Using Printer Options 4-15 Be sure to complete installation of the interface compartment. Interface Cards 2. Slide the interface card along the slots on the card.... See the interface card's manual for details. 4. Removal of the interface card is the reverse of the interface card into the printer's internal socket. 5. Push in firmly to make sure you fully insert the connector at the ...
... the interface cover. 3. Re-insert the screws and tighten to set any switches and jumpers on both sides of the optional interface. Using Printer Options 4-15 Be sure to complete installation of the interface compartment. Interface Cards 2. Slide the interface card along the slots on the card.... See the interface card's manual for details. 4. Removal of the interface card is the reverse of the interface card into the printer's internal socket. 5. Push in firmly to make sure you fully insert the connector at the ...
User Manual
Page 93
For all other data transfer conventions, such as word structure and communications protocol, see the C823051/C823061 interface card manual. Handshake timing When the vacant area for data in the input buffer drops to 256 bytes, the printer outputs an X-OFF code or sets the DTR flag to 1 (MARK) to receive data. The...can select from the following baud rates: 150, 300, 600, 1,200, 2,400, 4,800, 9,600, and 19,200 bps (bits per second). Error handling When the printer detects a parity error, it cannot receive data. When the vacant area for data in the buffer increases to 528 bytes, the...
For all other data transfer conventions, such as word structure and communications protocol, see the C823051/C823061 interface card manual. Handshake timing When the vacant area for data in the input buffer drops to 256 bytes, the printer outputs an X-OFF code or sets the DTR flag to 1 (MARK) to receive data. The...can select from the following baud rates: 150, 300, 600, 1,200, 2,400, 4,800, 9,600, and 19,200 bps (bits per second). Error handling When the printer detects a parity error, it cannot receive data. When the vacant area for data in the buffer increases to 528 bytes, the...


