
Product Information Guide
Page 2
B The minimum left margin is 13.5 mm (0.53 inches). ActionPrinter 3250 Single sheets (Manual insertion): Width 148 to 257 mm (5.8 to 10.1 inches) 92 lo 364 mm (3.6 to 14.3 inches) Thickness weight 0.065 to 0.14 mm (0.0026 to 0.0055 ... lb) for one sheet 40 to 58g/m2 (12 to 60.5 Hz 0.6 A 30 W (during self-test printing in draft mode at Dielectric strength: AP-3250-2 3/17/92 24-Pin Printers The maximum printable width is 8.5 mm (0.33 inches). l Load enveIopes with the optional push tractor. Printable area: Single sheets (paper cassette and...
B The minimum left margin is 13.5 mm (0.53 inches). ActionPrinter 3250 Single sheets (Manual insertion): Width 148 to 257 mm (5.8 to 10.1 inches) 92 lo 364 mm (3.6 to 14.3 inches) Thickness weight 0.065 to 0.14 mm (0.0026 to 0.0055 ... lb) for one sheet 40 to 58g/m2 (12 to 60.5 Hz 0.6 A 30 W (during self-test printing in draft mode at Dielectric strength: AP-3250-2 3/17/92 24-Pin Printers The maximum printable width is 8.5 mm (0.33 inches). l Load enveIopes with the optional push tractor. Printable area: Single sheets (paper cassette and...

Product Information Guide
Page 3
...) RFI: US model: FCC class B European model: VDE0871, CISPR PUB.22 Interface specifications Your printer is shown completely. Character available with the default-setting mode or by wing a software command. Therefore... ACKNLG signals TTL compatible 36-pin 57-30360 Amphenol connector or equivalent Default settings ActionPrinter 3250 Character Tables These character tables are selected with ESC (^ To print the characters ...for A4-size paper, 61 lines for letter-size paper, 22 inches for manual insertion Continuous paper: Subject to control panel setting in the default-setting mode ...
...) RFI: US model: FCC class B European model: VDE0871, CISPR PUB.22 Interface specifications Your printer is shown completely. Character available with the default-setting mode or by wing a software command. Therefore... ACKNLG signals TTL compatible 36-pin 57-30360 Amphenol connector or equivalent Default settings ActionPrinter 3250 Character Tables These character tables are selected with ESC (^ To print the characters ...for A4-size paper, 61 lines for letter-size paper, 22 inches for manual insertion Continuous paper: Subject to control panel setting in the default-setting mode ...

Product Information Guide
Page 5
...Epson printer, Standard printer, Draft printer. ribbon mask --- Press the YES and NO buttons to respond and make sure your printer's features, including ESC/P2, choose one of -form position with the cassette. . on . Above cutter -3, -2, -1, +0, +1, +2, +3 Hex dumo. Hold down the YES button while you turn on the printer. ActionPrinter 3250...update, choose another printer as possible. If none of the list as close to 257 mm (10.1 inches) wide with the manual insertion slot. When the printer receives data from the printer. l If the printer runs out of loaded...
...Epson printer, Standard printer, Draft printer. ribbon mask --- Press the YES and NO buttons to respond and make sure your printer's features, including ESC/P2, choose one of -form position with the cassette. . on . Above cutter -3, -2, -1, +0, +1, +2, +3 Hex dumo. Hold down the YES button while you turn on the printer. ActionPrinter 3250...update, choose another printer as possible. If none of the list as close to 257 mm (10.1 inches) wide with the manual insertion slot. When the printer receives data from the printer. l If the printer runs out of loaded...

Product Information Guide
Page 6
ActionPrinter 3250 l When you want to switch to turn on . 2. Make sure the printer is turned off and is 65 lines (A4-size paper) or 61 lines (letter-size paper). Place the printer in while pushing down on the locking tab. l When you hear the unit snap into the slot. Loading paper manually ... paper cassette. Using Continuous Paper with the arrow mark on the rear slot. You can switch to manual insertion or to 254 mm (10 inches) wide. AP-3250-6 3/17/92 24-Pin Printers l The default page length for the paper cassette is in the same way that you do for ...
ActionPrinter 3250 l When you want to switch to turn on . 2. Make sure the printer is turned off and is 65 lines (A4-size paper) or 61 lines (letter-size paper). Place the printer in while pushing down on the locking tab. l When you hear the unit snap into the slot. Loading paper manually ... paper cassette. Using Continuous Paper with the arrow mark on the rear slot. You can switch to manual insertion or to 254 mm (10 inches) wide. AP-3250-6 3/17/92 24-Pin Printers l The default page length for the paper cassette is in the same way that you do for ...
Product Information Guide
Page 8
... for the paper you lower the paper-release lever while continuous paper is ready to the push-tractor position. You can use the manual insertion slot to match the thickness of your application program keeps the printing entirely within the printable area of other paper types, such ...If a single sheet is ready. Use envelopes under normal operating conditions only. Printing on the edge of an envelope can print on the printer's rear. ActionPrinter 3250 CAUTION; If this happens, raise the paperrelease lever and press the FORM FEED and FONT buttons at the same time to revense the paper...
... for the paper you lower the paper-release lever while continuous paper is ready to the push-tractor position. You can use the manual insertion slot to match the thickness of your application program keeps the printing entirely within the printable area of other paper types, such ...If a single sheet is ready. Use envelopes under normal operating conditions only. Printing on the edge of an envelope can print on the printer's rear. ActionPrinter 3250 CAUTION; If this happens, raise the paperrelease lever and press the FORM FEED and FONT buttons at the same time to revense the paper...

Product Information Guide
Page 9
Information Reference List Engineering Change Notices None. Related Documentation TM-AP3250 ActionPrinter 3250 Service Manual PL-AP3250 ActionPrinter 3250 Parts List 4000928 GO1-00 ActionPrinter 3250 User's Guide ActionPrinter 3250 24-Pin Printers AP-3250-9 Product Support Bulletins None. Technical Information Bulletins None.
Information Reference List Engineering Change Notices None. Related Documentation TM-AP3250 ActionPrinter 3250 Service Manual PL-AP3250 ActionPrinter 3250 Parts List 4000928 GO1-00 ActionPrinter 3250 User's Guide ActionPrinter 3250 24-Pin Printers AP-3250-9 Product Support Bulletins None. Technical Information Bulletins None.

Product Support Bulletin(s)
Page 5
...220 and 240 volt versions of 6 14. PSB No: P-0084A Page: 5 of this printer? Can the AP-3250 print on labels. A. Yes, the AP-3250 can print on envelopes? A. Yes, the AP-3250 can print on labels? How can print on legal size paper? No, the AP.... Yes, the AP-3250 can I purchase a 220 or 240 volt version of the printer by using the printer's manual insertion slot. (Note: The printer must be placed in landscape orientation? The envelopes are selected through use of the printer by using the printer's manual insertion slot. (Note: The printer must be placed in...
...220 and 240 volt versions of 6 14. PSB No: P-0084A Page: 5 of this printer? Can the AP-3250 print on labels. A. Yes, the AP-3250 can print on envelopes? A. Yes, the AP-3250 can print on labels? How can print on legal size paper? No, the AP.... Yes, the AP-3250 can I purchase a 220 or 240 volt version of the printer by using the printer's manual insertion slot. (Note: The printer must be placed in landscape orientation? The envelopes are selected through use of the printer by using the printer's manual insertion slot. (Note: The printer must be placed in...
User Manual
Page 5
...printer because they may be walked on the products plugged into your printer... the printer on the label. Do not put your printer near...surface may allow the printer to service personnel. ...printer may touch dangerous voltage points or short out parts that may block the openings. Do not place the printer on the printer.... . This is provided. . If you are not sure of the type of the grounding-type plug. . iii Unplug the printer...printer yourself. Do not defeat the purpose of power available, consult your obsolete outlet. Never place the printer...
...printer because they may be walked on the products plugged into your printer... the printer on the label. Do not put your printer near...surface may allow the printer to service personnel. ...printer may touch dangerous voltage points or short out parts that may block the openings. Do not place the printer on the printer.... . This is provided. . If you are not sure of the type of the grounding-type plug. . iii Unplug the printer...printer yourself. Do not defeat the purpose of power available, consult your obsolete outlet. Never place the printer...

User Manual
Page 6
...printer from the wall outlet and have it repaired by a qualified service person under the following support services through the Epson Consumer Resource Center at (800) 922-8911: Assistance in locating your nearest Authorized Epson Reseller or Service Center Technical assistance with the installation, configuration, and operation of Epson... products Information on ESC/P 2 drivers for your software Sales of the ESC/P Reference manual, which contains comprehensive information on ESC/P 2 Epson technical information library fax service Product ...
...printer from the wall outlet and have it repaired by a qualified service person under the following support services through the Epson Consumer Resource Center at (800) 922-8911: Assistance in locating your nearest Authorized Epson Reseller or Service Center Technical assistance with the installation, configuration, and operation of Epson... products Information on ESC/P 2 drivers for your software Sales of the ESC/P Reference manual, which contains comprehensive information on ESC/P 2 Epson technical information library fax service Product ...
User Manual
Page 12
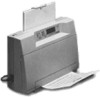
...-per second in paper cassette holds up to 200 characters per -inch output. The printer supports the Epson ESC/P® commands widely used in application programs written for professional results. A range of features. Also you can also insert pages manually without removing either paper supply. * This number varies by country. Easy paper handling...
...-per second in paper cassette holds up to 200 characters per -inch output. The printer supports the Epson ESC/P® commands widely used in application programs written for professional results. A range of features. Also you can also insert pages manually without removing either paper supply. * This number varies by country. Easy paper handling...

User Manual
Page 27
...ActionPrinter 3250 LQ-570 LQ-870 LQ-510/550 LQ-860 LQ-850 LQ-200 LQ-500 LQ-2550 LQ-2500 LQ-800 LQ-1500 ESC/P2 ESC/P If none of these printers...first available of the first four printers on the list below. Because these is listed among your computer or software manual. Note: When you receive an update, choose another printer as possible. Until you print...use most appropriate printer as described above, create and print a test file using the fonts, symbols, features, and formats that includes one of the following: EX, FX, LX, RX, MX, Epson printer, Standard printer, Draft printer.
...ActionPrinter 3250 LQ-570 LQ-870 LQ-510/550 LQ-860 LQ-850 LQ-200 LQ-500 LQ-2550 LQ-2500 LQ-800 LQ-1500 ESC/P2 ESC/P If none of these printers...first available of the first four printers on the list below. Because these is listed among your computer or software manual. Note: When you receive an update, choose another printer as possible. Until you print...use most appropriate printer as described above, create and print a test file using the fonts, symbols, features, and formats that includes one of the following: EX, FX, LX, RX, MX, Epson printer, Standard printer, Draft printer.

User Manual
Page 28
Chapter 2 Paper Handling Printing on Single Sheets 2-2 Tips for using the paper cassette 2-2 Loading paper manually 2-3 Using Continuous Paper with the Optional Push Tractor.. 2-5 Installing the push tractor 2-5 Loading continuous paper 2-7 Tips for using continuous paper 2-10 Using the tear-off ...
Chapter 2 Paper Handling Printing on Single Sheets 2-2 Tips for using the paper cassette 2-2 Loading paper manually 2-3 Using Continuous Paper with the Optional Push Tractor.. 2-5 Installing the push tractor 2-5 Loading continuous paper 2-7 Tips for using continuous paper 2-10 Using the tear-off ...

User Manual
Page 29
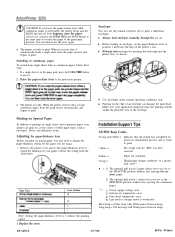
...notches on the ribbon mask indicate the base line of -form position with the gear under the printer cover. If you want to adjust the position. Open the printer cover and turn on the printer and send data. The gear adjustment affects only the loaded page. Printing on Single Sheets You... out of the top and bottom margins. The tips below help you get the best performance when printing with the manual insertion slot. When the printer receives data from 148 mm (5.8 inches) to load the paper. However, most application software programs take care of paper during a print job, ...
...notches on the ribbon mask indicate the base line of -form position with the gear under the printer cover. If you want to adjust the position. Open the printer cover and turn on the printer and send data. The gear adjustment affects only the loaded page. Printing on Single Sheets You... out of the top and bottom margins. The tips below help you get the best performance when printing with the manual insertion slot. When the printer receives data from 148 mm (5.8 inches) to load the paper. However, most application software programs take care of paper during a print job, ...

User Manual
Page 30
... optional push tractor without removing the paper cassette. Printing on Single Sheets l When you 've installed the optional push tractor, remove it before loading paper manually.) 1. l You can change it using your application software or printer commands, if necessary. Place the printer in this chapter. l The default page length for more about...
... optional push tractor without removing the paper cassette. Printing on Single Sheets l When you 've installed the optional push tractor, remove it before loading paper manually.) 1. l You can change it using your application software or printer commands, if necessary. Place the printer in this chapter. l The default page length for more about...

User Manual
Page 31
... a page into the slot, aligning the paper edge with the arrow mark on the printer before you do for paper loaded from the cassette. 2-4 Paper Handling CAUTION: Be sure... without loading the paper. The page loads automatically. Be sure to raise the flap when not using manual insertion. l You can adjust the top-of-form position in the same way that you insert the... page into the slot. If you turn on the printer case. When the printer receives data, it begins printing. The printer loads a page from the cassette. Next, lower the flap on Single Sheets ...
... a page into the slot, aligning the paper edge with the arrow mark on the printer before you do for paper loaded from the cassette. 2-4 Paper Handling CAUTION: Be sure... without loading the paper. The page loads automatically. Be sure to raise the flap when not using manual insertion. l You can adjust the top-of-form position in the same way that you insert the... page into the slot. If you turn on the printer case. When the printer receives data, it begins printing. The printer loads a page from the cassette. Next, lower the flap on Single Sheets ...

User Manual
Page 43
...conditions only. l Printing on the printer's rear. l Always feed envelopes by inserting the wide edge into the printer first, as shown. Make sure your application program keeps the printing entirely within the printable area of an envelope can use the manual insertion slot to position 1 and...damage the print head. To load an envelope, follow the steps described in "Loading paper manually" earlier in this chapter. For more information on individual envelopes. l Always load envelopes manually through the rear slot. l Before loading an envelope, set the paper-thickness lever to ...
...conditions only. l Printing on the printer's rear. l Always feed envelopes by inserting the wide edge into the printer first, as shown. Make sure your application program keeps the printing entirely within the printable area of an envelope can use the manual insertion slot to position 1 and...damage the print head. To load an envelope, follow the steps described in "Loading paper manually" earlier in this chapter. For more information on individual envelopes. l Always load envelopes manually through the rear slot. l Before loading an envelope, set the paper-thickness lever to ...

User Manual
Page 61
... expected. l Single sheets do not feed properly from the manual insertion slot. See "Running the Self Test" in the computer, the software, or the interface cable. l The print is not being supplied. See 3-22. If the self test does not work, contact your printer using the self test. See 3-17. l Printed characters...
... expected. l Single sheets do not feed properly from the manual insertion slot. See "Running the Self Test" in the computer, the software, or the interface cable. l The print is not being supplied. See 3-22. If the self test does not work, contact your printer using the self test. See 3-17. l Printed characters...

User Manual
Page 67
... new sheet straight into the paper slot. l The paper may be too far to the push tractor. 3-22 Using the Printer l Pages do not feed properly from the manual insertion slot. Reattach the paper to the right. Check that is within the specified range. See the paper specifications in the ...Appendix. The paper has come off the printer and pull out the paper. Remove the paper cassette and make sure the...
... new sheet straight into the paper slot. l The paper may be too far to the push tractor. 3-22 Using the Printer l Pages do not feed properly from the manual insertion slot. Reattach the paper to the right. Check that is within the specified range. See the paper specifications in the ...Appendix. The paper has come off the printer and pull out the paper. Remove the paper cassette and make sure the...

User Manual
Page 72
... 45 to 75 g/m2 (12 to 20 lb) l Use envelopes only under normal conditions. l Load envelopes with the optional push tractor. Technical Specifications Single sheets (Manual insertion): Width 148 to 257 mm (5.8 to 10.1 inches) Length 92 to 364 mm (3.6 to 14.3 inches) Thickness 0.065 to 0.14 mm (0.0026 to ...0063 to 0.0075 inches) total 68 g/m2 (17 lb) l Use continuous type labels only with the longer side inserted into the rear slot by manual insertion only. If you notice increases in multi-part forms l Use only two-part carbonless multi-part forms and use them only with the optional...
... 45 to 75 g/m2 (12 to 20 lb) l Use envelopes only under normal conditions. l Load envelopes with the optional push tractor. Technical Specifications Single sheets (Manual insertion): Width 148 to 257 mm (5.8 to 10.1 inches) Length 92 to 364 mm (3.6 to 14.3 inches) Thickness 0.065 to 0.14 mm (0.0026 to ...0063 to 0.0075 inches) total 68 g/m2 (17 lb) l Use continuous type labels only with the longer side inserted into the rear slot by manual insertion only. If you notice increases in multi-part forms l Use only two-part carbonless multi-part forms and use them only with the optional...

User Manual
Page 73
The minimum right margin is: 3.8 mm (0.15 inches) for the A4-size paper cassette 9.7 mm (0.38 inches) for the letter-size paper cassette 3 mm (0.12 inches) for manual insertion However, the maximum printable width is 3 mm (0.12 inches). B The minimum left margin is 203 mm (8 inches). C The minimum bottom margin is 8.5 mm (0.33 inches). Technical Specifications Printable area: Single sheets (paper cassette and manual insertion) and envelopes A The minimum top margin is 13.5 mm (0.53 inches). Appendix A-5
The minimum right margin is: 3.8 mm (0.15 inches) for the A4-size paper cassette 9.7 mm (0.38 inches) for the letter-size paper cassette 3 mm (0.12 inches) for manual insertion However, the maximum printable width is 3 mm (0.12 inches). B The minimum left margin is 203 mm (8 inches). C The minimum bottom margin is 8.5 mm (0.33 inches). Technical Specifications Printable area: Single sheets (paper cassette and manual insertion) and envelopes A The minimum top margin is 13.5 mm (0.53 inches). Appendix A-5


