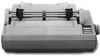
User Guide
Page 3
...This Manual 2 Where to Get Help 2 Chapter 1 Setting Up Identifying Printer Parts 1-1 Selecting a Place for the Printer 1-2 Installing the Paper Feed Knob 1-3 Installing the Ribbon 1-3 Replacing the Ribbon 1-6 Plugging in the Printer 1-7 Using Continuous-feed Paper 1-7 Using Single-sheet Paper 1-15 Operating the Control Panel 1-19 Connecting the Apex80 to Your Computer 1-23 Chapter 2 Using the Apex80 with Application Programs Printer Selection Menus 2-1 Computer-Printer Communication 2-2 Word Processors 2-3 Spreadsheets 2 -4 Graphics Programs 2-6 Programming Languages...
...This Manual 2 Where to Get Help 2 Chapter 1 Setting Up Identifying Printer Parts 1-1 Selecting a Place for the Printer 1-2 Installing the Paper Feed Knob 1-3 Installing the Ribbon 1-3 Replacing the Ribbon 1-6 Plugging in the Printer 1-7 Using Continuous-feed Paper 1-7 Using Single-sheet Paper 1-15 Operating the Control Panel 1-19 Connecting the Apex80 to Your Computer 1-23 Chapter 2 Using the Apex80 with Application Programs Printer Selection Menus 2-1 Computer-Printer Communication 2-2 Word Processors 2-3 Spreadsheets 2 -4 Graphics Programs 2-6 Programming Languages...

User Guide
Page 5
... Error Warnings C-4 Data Dump Mode C-4 Coding Solutions C-6 Solutions for Specific Systems C-7 Maintaining Your Printer C-9 Appendix D Defaults and DIP Switches Default and Initialization Settings D-1 DIP Switch Settings D-2 International Character Sets D-3 Appendix E Choosing and Setting Up Optional Interfaces Compatible Interfaces E-1 Choosing an Interface E-1 Installing an Interface E-2 Serial Interface Settings E-8 Appendix F Technical Specifications Printing F- 1 Paper F-1 Mechanical F-2 Electrical F- 2 Environment F-3 Parallel Interface F-3 Data Transfer...
... Error Warnings C-4 Data Dump Mode C-4 Coding Solutions C-6 Solutions for Specific Systems C-7 Maintaining Your Printer C-9 Appendix D Defaults and DIP Switches Default and Initialization Settings D-1 DIP Switch Settings D-2 International Character Sets D-3 Appendix E Choosing and Setting Up Optional Interfaces Compatible Interfaces E-1 Choosing an Interface E-1 Installing an Interface E-2 Serial Interface Settings E-8 Appendix F Technical Specifications Printing F- 1 Paper F-1 Mechanical F-2 Electrical F- 2 Environment F-3 Parallel Interface F-3 Data Transfer...

User Guide
Page 13
... place. Remove the front lid. 2. Replacing the Ribbon When your printing becomes light and you plug in your Apex80. Figure 1-5. Lay the lid down and press to snap it into the slots near the front corners of the printer is off before you need to insert the new ribbon cartridge. Make sure that the power switch on the left side of the printer.
... place. Remove the front lid. 2. Replacing the Ribbon When your printing becomes light and you plug in your Apex80. Figure 1-5. Lay the lid down and press to snap it into the slots near the front corners of the printer is off before you need to insert the new ribbon cartridge. Make sure that the power switch on the left side of the printer.

User Guide
Page 14
... sides (continuous-feed paper). Pop out the tractor unit slot cover, which can adjust the tractor unit to accommodate widths of paper ranging from 4 to 10 inches, including the pin feed holes. You can only be loaded when the tractor unit is removed. Setting Up 1-7 If you have received your tractor unit. Using Continuous-feed Paper The following section covers use of continuous-feed paper with your printer with the tractor unit installed, simply install...
... sides (continuous-feed paper). Pop out the tractor unit slot cover, which can adjust the tractor unit to accommodate widths of paper ranging from 4 to 10 inches, including the pin feed holes. You can only be loaded when the tractor unit is removed. Setting Up 1-7 If you have received your tractor unit. Using Continuous-feed Paper The following section covers use of continuous-feed paper with your printer with the tractor unit installed, simply install...
User Guide
Page 19
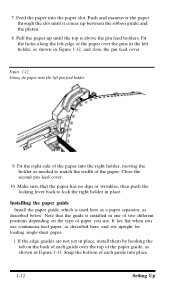
.... Make sure that the guide is used here as a paper separator, as shown in one of two different positions depending on the back of the paper into place. 1-12 Setting Up 7. Fitting the paper into the paper slot. Fit the right side of each guide into the right holder, moving the holder as described here, and sits upright for loading single-sheet paper. 1. Feed...
.... Make sure that the guide is used here as a paper separator, as shown in one of two different positions depending on the back of the paper into place. 1-12 Setting Up 7. Fitting the paper into the paper slot. Fit the right side of each guide into the right holder, moving the holder as described here, and sits upright for loading single-sheet paper. 1. Feed...

User Guide
Page 22
...-printed pages and leave th paper in an upright position. Open the pin feed covers and pull the paper off the unit. 4. This action unsnaps the front legs of the tractor unit and enables you must prepare the printer by following the above instructions. Pull the paper guide toward you can reach the tractor feed unit. 3. Using Single-sheet Paper The automatic loading feature handles individual sheets quickly and easily. Setting Up 1.15 Remove...
...-printed pages and leave th paper in an upright position. Open the pin feed covers and pull the paper off the unit. 4. This action unsnaps the front legs of the tractor unit and enables you must prepare the printer by following the above instructions. Pull the paper guide toward you can reach the tractor feed unit. 3. Using Single-sheet Paper The automatic loading feature handles individual sheets quickly and easily. Setting Up 1.15 Remove...

User Guide
Page 26
... stops sending characters at the control panel. (See Figure 1-19.) Setting Up 1-19 Reloading during printing When you print a document more than 0.01 inches. The factory setting for the paper thickness lever, located inside the front lid on the left side of no need to load a new sheet at the end of the paper. When this case, the ON LINE light may remain on the left side, accommodates both single sheets and multiple...
... stops sending characters at the control panel. (See Figure 1-19.) Setting Up 1-19 Reloading during printing When you print a document more than 0.01 inches. The factory setting for the paper thickness lever, located inside the front lid on the left side of no need to load a new sheet at the end of the paper. When this case, the ON LINE light may remain on the left side, accommodates both single sheets and multiple...
User Guide
Page 32
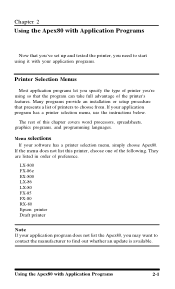
... you've set up and tested the printer, you need to start using so that presents a list of printers to find out whether an update is available. Many programs provide an installation or setup procedure that the program can take full advantage of the printer's features. LX-800 FX-86e EX-800 LX-86 LX-80 FX-85 FX-80 RX-80 Epson printer Draft printer Note...
... you've set up and tested the printer, you need to start using so that presents a list of printers to find out whether an update is available. Many programs provide an installation or setup procedure that the program can take full advantage of the printer's features. LX-800 FX-86e EX-800 LX-86 LX-80 FX-85 FX-80 RX-80 Epson printer Draft printer Note...
User Guide
Page 33
..., which is the standard numbering system based on the methods to use are communicating properly. Further details on units of ten, using control codes to select printer functions for an application program or programming language, check the manual for such functions as sounding the beeper and performing carriage returns. A quick test After setting up your application program, print a sample document to be sure the two...
..., which is the standard numbering system based on the methods to use are communicating properly. Further details on units of ten, using control codes to select printer functions for an application program or programming language, check the manual for such functions as sounding the beeper and performing carriage returns. A quick test After setting up your application program, print a sample document to be sure the two...

User Guide
Page 38
...); Individual printer control codes can be sent by the text to be printed." "E" LPRINT CHR$ (&H1B); If you can see Appendix C. Sending printer commands with BASIC You can send printer commands with most computer systems. In most forms of BASIC, and in particular Microsoft® BASIC, the normal method of producing printed output is included with any programming language. The command...
...); Individual printer control codes can be sent by the text to be printed." "E" LPRINT CHR$ (&H1B); If you can see Appendix C. Sending printer commands with BASIC You can send printer commands with most computer systems. In most forms of BASIC, and in particular Microsoft® BASIC, the normal method of producing printed output is included with any programming language. The command...

User Guide
Page 41
... you left off. These programs cancel previous typestyle settings by sending certain printer codes before printing. Press the FORM FEED button. 5. Press the ON/OFF LINE button once to control the printing of an entire file or document, not an individual line or word. Press the LINE FEED button. 6. Therefore, if SelecType does not work with SelecType, you can use the program's print options function instead of a few points, however...
... you left off. These programs cancel previous typestyle settings by sending certain printer codes before printing. Press the FORM FEED button. 5. Press the ON/OFF LINE button once to control the printing of an entire file or document, not an individual line or word. Press the LINE FEED button. 6. Therefore, if SelecType does not work with SelecType, you can use the program's print options function instead of a few points, however...
User Guide
Page 42
... a mode with files that have such codes, but if your Apex80 follows the SelecType instructions for example, you use SelecType to print a document in emphasized type, anything you print after that will be emphasized unless you first turn the printer off or until you send a software command that overrides it. (In general, software commands override SelecType settings.) If, for only part of a document, print codes in the document or file you turn...
... a mode with files that have such codes, but if your Apex80 follows the SelecType instructions for example, you use SelecType to print a document in emphasized type, anything you print after that will be emphasized unless you first turn the printer off or until you send a software command that overrides it. (In general, software commands override SelecType settings.) If, for only part of a document, print codes in the document or file you turn...

User Guide
Page 62
... forms its main graphics mode the Apex80 prints one number for each column. In its images with patterns of the nine pins. To keep the print head from leaving gaps between the graphics lines as it does between lines. The images printed by the Apex80 can, therefore, be changed to eliminate the space between the text lines, the line spacing must send codes for dot patterns...
... forms its main graphics mode the Apex80 prints one number for each column. In its images with patterns of the nine pins. To keep the print head from leaving gaps between the graphics lines as it does between lines. The images printed by the Apex80 can, therefore, be changed to eliminate the space between the text lines, the line spacing must send codes for dot patterns...

User Guide
Page 112
... connected. The first section uses a columnar format to match solutions with problems. Other sections cover beeper error warnings, hexadecimal data dumping, coding and 7-bit solutions, and specific solutions for assistance: 1-800-421 -5426. Problem Printer does not print Solution Make sure that the printer and computer are using the correct cable. If the printer still does not print, try the self test procedure (see Chapter 1). Appendix C Problem Solving and Maintenance...
... connected. The first section uses a columnar format to match solutions with problems. Other sections cover beeper error warnings, hexadecimal data dumping, coding and 7-bit solutions, and specific solutions for assistance: 1-800-421 -5426. Problem Printer does not print Solution Make sure that the printer and computer are using the correct cable. If the printer still does not print, try the self test procedure (see Chapter 1). Appendix C Problem Solving and Maintenance...

User Guide
Page 113
... your software is also possible for a large amount of printing, it may need to 1-8. Cancel emphasized mode; See the instructions on the page. If they are international characters, check the settings of DIP switches 1-6 to be corrected by changing the setting of this appendix. It is correctly installed and that does not solve the problem, you have been using the ribbon for a long time or...
... your software is also possible for a large amount of printing, it may need to 1-8. Cancel emphasized mode; See the instructions on the page. If they are international characters, check the settings of DIP switches 1-6 to be corrected by changing the setting of this appendix. It is correctly installed and that does not solve the problem, you have been using the ribbon for a long time or...

User Guide
Page 115
... can use a longer page as a backing sheet. These systems stop the printing when no paper is loaded correctly, turn the printer back on and try to overcome this mode, turn on this problem, or you run a program, either DIP switch cable pin 12 ignore both the FORM FEED and LINE FEED buttons. Each line has three parts: the line number (four digits), the hexadecimal codes (up to see that the paper is loaded correctly. Problem Solution...
... can use a longer page as a backing sheet. These systems stop the printing when no paper is loaded correctly, turn the printer back on and try to overcome this mode, turn on this problem, or you run a program, either DIP switch cable pin 12 ignore both the FORM FEED and LINE FEED buttons. Each line has three parts: the line number (four digits), the hexadecimal codes (up to see that the paper is loaded correctly. Problem Solution...
User Guide
Page 117
... problems in data dump mode and then run on a system that a code creates problems for a space. The following test program lets you check to several 20s, the code for your BASIC language changes some ways to ASCII equivalents. Remember to press the ON/OFF LINE button to the printer. Therefore, you determine which is sending. Because each computer system deals with the list of hex codes...
... problems in data dump mode and then run on a system that a code creates problems for a space. The following test program lets you check to several 20s, the code for your BASIC language changes some ways to ASCII equivalents. Remember to press the ON/OFF LINE button to the printer. Therefore, you determine which is sending. Because each computer system deals with the list of hex codes...

User Guide
Page 119
..., it . C-8 Problem Solving and Maintenance Such a card is to 80 characters per row. You can divert all subsequent output to the printer, up to purchase a new printer interface card from your dealer. You can cancel this by typing: PRINT CHR$(9)"I" or PR#0 The problem is that the Apex80 uses CHR$(9) to activate horizontal tabulation and can change your printer initialization code to change your initialization code to the...
..., it . C-8 Problem Solving and Maintenance Such a card is to 80 characters per row. You can divert all subsequent output to the printer, up to purchase a new printer interface card from your dealer. You can cancel this by typing: PRINT CHR$(9)"I" or PR#0 The problem is that the Apex80 uses CHR$(9) to activate horizontal tabulation and can change your printer initialization code to change your initialization code to the...
User Guide
Page 121
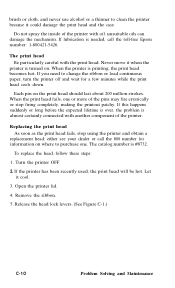
... the print head. When the printer is #8732. When the print head fails, one . Turn the printer OFF 2. Let it could damage the print head and the case. If you need to change the ribbon or load continuous paper, turn the printer off and wait for information on . Replacing the print head As soon as the print head fails, stop firing completely, making the printout patchy. The catalog number is printing, the print head becomes hot. Remove...
... the print head. When the printer is #8732. When the print head fails, one . Turn the printer OFF 2. Let it could damage the print head and the case. If you need to change the ribbon or load continuous paper, turn the printer off and wait for information on . Replacing the print head As soon as the print head fails, stop firing completely, making the printout patchy. The catalog number is printing, the print head becomes hot. Remove...

User Guide
Page 143
...A-4-6 Computer-printer communication, 2-2-3 connection, 1-23-24 Condensed, 3-2,4-2-3 D Data dump, C-4-6 Defaults, D-1 DIP switches, 4-1-2,4-4, D-2-4 Dot graphics, 2-6,6-1-12 Double-strike, 3-2, 4-3 Double-wide, 4-2-3 DRAFT/LINE FEED button, 1-21 Draft mode, 1-20-22, 4-1 E Edge guides, 1-12-13, 1-16-17 Elite, 3-2, 4-2 Emphasized, 3-2, 4-3 Epson Character Graphics, 4-4. For page references for Information Interchange, 2-2 ASCII, 2-2 AUTO LOAD, 1-17-19, 1-21 Automatic paper loading, 1-17-19 Connecting printer to computer, 1-23-24 Continuous-feed paper, 1-2, 1-7-15 Control codes, 2-2. Index...
...A-4-6 Computer-printer communication, 2-2-3 connection, 1-23-24 Condensed, 3-2,4-2-3 D Data dump, C-4-6 Defaults, D-1 DIP switches, 4-1-2,4-4, D-2-4 Dot graphics, 2-6,6-1-12 Double-strike, 3-2, 4-3 Double-wide, 4-2-3 DRAFT/LINE FEED button, 1-21 Draft mode, 1-20-22, 4-1 E Edge guides, 1-12-13, 1-16-17 Elite, 3-2, 4-2 Emphasized, 3-2, 4-3 Epson Character Graphics, 4-4. For page references for Information Interchange, 2-2 ASCII, 2-2 AUTO LOAD, 1-17-19, 1-21 Automatic paper loading, 1-17-19 Connecting printer to computer, 1-23-24 Continuous-feed paper, 1-2, 1-7-15 Control codes, 2-2. Index...


