Getting Started - ColorBurst RIP
Page 2
If you are using the Epson Stylus Pro 7800 or 9800 printer, you need to attach the included USB key to set up the ColorBurst RIP, see one of the following files: ■ Mac OS X: Applications > ColorBurst Epson > Utilities > SpectralVision > SpectralVision.pdf ■ Windows: My Computer > C:\ColorBurst Epson > SpectralVision.pdf Note: The file names may be slightly different, depending...
If you are using the Epson Stylus Pro 7800 or 9800 printer, you need to attach the included USB key to set up the ColorBurst RIP, see one of the following files: ■ Mac OS X: Applications > ColorBurst Epson > Utilities > SpectralVision > SpectralVision.pdf ■ Windows: My Computer > C:\ColorBurst Epson > SpectralVision.pdf Note: The file names may be slightly different, depending...
Printer Guide
Page 6
... 66 Printing on Posterboard 67 Adjusting the Platen Gap for Thick or Thin Paper 69 Using the Paper Basket 70 Catching Printouts From the Epson Stylus Pro 7800 71 Catching Printouts in Front of the Epson Stylus Pro 9800 72 Catching Printouts Under the Epson Stylus Pro 9800 73 Optimizing the Settings for Your Paper 75 Creating Paper Configurations 75 Printing Your...
... 66 Printing on Posterboard 67 Adjusting the Platen Gap for Thick or Thin Paper 69 Using the Paper Basket 70 Catching Printouts From the Epson Stylus Pro 7800 71 Catching Printouts in Front of the Epson Stylus Pro 9800 72 Catching Printouts Under the Epson Stylus Pro 9800 73 Optimizing the Settings for Your Paper 75 Creating Paper Configurations 75 Printing Your...
Printer Guide
Page 10
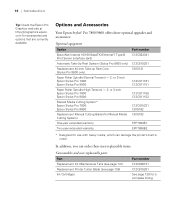
... for accessories and options that are currently available. or 3-inch Epson Stylus Pro 7800: Epson Stylus Pro 9800: Paper Roller Spindle (High Tension) - 2- com for use with heavy media, which can order these optional upgrades and accessories...Stylus Pro 9800 only) Replacement 44-inch Take-up Reel Core (Stylus Pro 9800 only) Paper Roller Spindle (Normal Tension) - 2- Options and Accessories Your Epson Stylus® Pro 7800/9800 offers these user-replaceable items: Consumables and user-replaceable parts Part Replacement Ink Maintenance Tank (see page 141) Replacement Printer...
... for accessories and options that are currently available. or 3-inch Epson Stylus Pro 7800: Epson Stylus Pro 9800: Paper Roller Spindle (High Tension) - 2- com for use with heavy media, which can order these optional upgrades and accessories...Stylus Pro 9800 only) Replacement 44-inch Take-up Reel Core (Stylus Pro 9800 only) Paper Roller Spindle (Normal Tension) - 2- Options and Accessories Your Epson Stylus® Pro 7800/9800 offers these user-replaceable items: Consumables and user-replaceable parts Part Replacement Ink Maintenance Tank (see page 141) Replacement Printer...
Printer Guide
Page 13
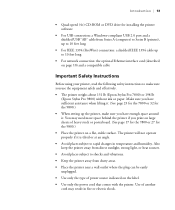
...Introduction | 13 • Quad-speed (4×) CD-ROM or DVD drive for the 9800.) • Place the printer on a flat, stable surface. Use of another cord may need more space behind the printer if you print on large sheets of power source indicated on page 10) and a ...; For network connection: the optional Ethernet interface card (described on the label. • Use only the power cord that comes with the printer. Make sure you use the equipment safely and effectively. • The printer weighs about 131 lb (Epson Stylus Pro 7800) or 198 lb (Epson Stylus Pro 9800) without ink or paper.
...Introduction | 13 • Quad-speed (4×) CD-ROM or DVD drive for the 9800.) • Place the printer on a flat, stable surface. Use of another cord may need more space behind the printer if you print on large sheets of power source indicated on page 10) and a ...; For network connection: the optional Ethernet interface card (described on the label. • Use only the power cord that comes with the printer. Make sure you use the equipment safely and effectively. • The printer weighs about 131 lb (Epson Stylus Pro 7800) or 198 lb (Epson Stylus Pro 9800) without ink or paper.

Printer Guide
Page 17
... Follow these steps to direct sunlight, excessive heat, moisture, or dust. Note: When choosing a place for the printer, leave adequate room for using the Epson Stylus Pro 7800: 8 in. 6 in. 24 in. 12 in. If you have the Epson Stylus Pro 9800, see page 27 instead. The following information: • Unpacking and assembly • Connecting the power cord •...
... Follow these steps to direct sunlight, excessive heat, moisture, or dust. Note: When choosing a place for the printer, leave adequate room for using the Epson Stylus Pro 7800: 8 in. 6 in. 24 in. 12 in. If you have the Epson Stylus Pro 9800, see page 27 instead. The following information: • Unpacking and assembly • Connecting the power cord •...
Printer Guide
Page 27
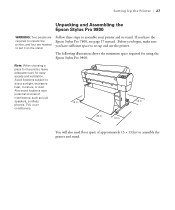
The following illustration shows the minimum space required for using the Epson Stylus Pro 9800: Note: When choosing a place for the printer, leave adequate room for easy access and ventilation. Avoid locations subject to assemble the printer and stand. 1-27 You will also need floor space of interference...12 in. 24 in. 12 in. Setting Up the Printer | 27 Unpacking and Assembling the Epson Stylus Pro 9800 WARNING: Two people are required to unpack the printer, and four are needed to set up and use the printer. Also avoid locations near potential sources of approximately 13 ×...
The following illustration shows the minimum space required for using the Epson Stylus Pro 9800: Note: When choosing a place for the printer, leave adequate room for easy access and ventilation. Avoid locations subject to assemble the printer and stand. 1-27 You will also need floor space of interference...12 in. 24 in. 12 in. Setting Up the Printer | 27 Unpacking and Assembling the Epson Stylus Pro 9800 WARNING: Two people are required to unpack the printer, and four are needed to set up and use the printer. Also avoid locations near potential sources of approximately 13 ×...
Printer Guide
Page 37
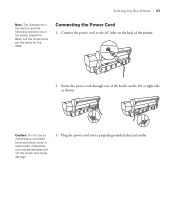
Setting Up the Printer | 37 Note: The illustrations in this section and the following sections show the Epson Stylus Pro 9800, but the instructions are the same for the 7800. Connecting the Power Cord 1. Connect the power cord to the AC inlet on the back of ... the left or right side as shown. Plug the power cord into a properly grounded electrical outlet. 1-37 Caution: Do not use an outlet that is controlled by an automatic timer or wall switch. Otherwise, you may accidentally shut off the printer and cause damage. 3. Route the power cord through one of the...
Setting Up the Printer | 37 Note: The illustrations in this section and the following sections show the Epson Stylus Pro 9800, but the instructions are the same for the 7800. Connecting the Power Cord 1. Connect the power cord to the AC inlet on the back of ... the left or right side as shown. Plug the power cord into a properly grounded electrical outlet. 1-37 Caution: Do not use an outlet that is controlled by an automatic timer or wall switch. Otherwise, you may accidentally shut off the printer and cause damage. 3. Route the power cord through one of the...

Printer Guide
Page 47
Click your printer name, then click Add. 1-47 The Stylus Pro 7800 or 9800 appears on the screen. Tip: If you are using-either EPSON USB, EPSON FireWire, or EPSON TCP/IP. Setting Up the Printer | 47 3. Click the Add icon at the top of the Printer List window. 4. Type a new name and click Apply Changes. 5. Pull down the menu and select the connection you want to rename the printer for easier identification, select the printer name in the list and click Show Info.
Click your printer name, then click Add. 1-47 The Stylus Pro 7800 or 9800 appears on the screen. Tip: If you are using-either EPSON USB, EPSON FireWire, or EPSON TCP/IP. Setting Up the Printer | 47 3. Click the Add icon at the top of the Printer List window. 4. Type a new name and click Apply Changes. 5. Pull down the menu and select the connection you want to rename the printer for easier identification, select the printer name in the list and click Show Info.
Printer Guide
Page 49
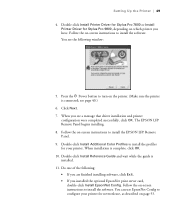
...Printer Driver for Stylus Pro 7800 or Install Printer Driver for Stylus Pro 9800, depending on -screen instructions to install the profiles for your printer for network use EpsonNet Config to turn on page 53. 1-49 see a message that driver installation and printer configuration were completed successfully, click OK. The EPSON... guide is complete, click OK. 10. Follow the on -screen instructions to install the EPSON LFP Remote Panel. 9. Double-click Install Additional Color Profiles to install the software. Setting Up the Printer | 49 4. When you have. Follow the on which...
...Printer Driver for Stylus Pro 7800 or Install Printer Driver for Stylus Pro 9800, depending on -screen instructions to install the profiles for your printer for network use EpsonNet Config to turn on page 53. 1-49 see a message that driver installation and printer configuration were completed successfully, click OK. The EPSON... guide is complete, click OK. 10. Follow the on -screen instructions to install the EPSON LFP Remote Panel. 9. Double-click Install Additional Color Profiles to install the software. Setting Up the Printer | 49 4. When you have. Follow the on which...
Printer Guide
Page 55
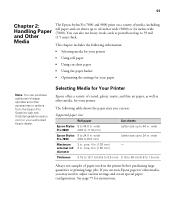
...diameter Thickness 3.15 to 19.7 mil (0.8 to 0.5 mm) 3.15 to 59 mil (0.8 to 44 in the printer before purchasing large quantities or printing large jobs. wide Pro 9800 (203 to 1118 mm) Letter size up to adjust various settings and create special paper configurations. This chapter includes...Media The Epson Stylus Pro 7800 and 9800 print on a variety of media, including roll paper and cut sheet paper • Using the paper basket • Optimizing the settings for your paper Note: You can also use non-Epson paper or other accessories or options from the Epson Pro Graphics web...
...diameter Thickness 3.15 to 19.7 mil (0.8 to 0.5 mm) 3.15 to 59 mil (0.8 to 44 in the printer before purchasing large quantities or printing large jobs. wide Pro 9800 (203 to 1118 mm) Letter size up to adjust various settings and create special paper configurations. This chapter includes...Media The Epson Stylus Pro 7800 and 9800 print on a variety of media, including roll paper and cut sheet paper • Using the paper basket • Optimizing the settings for your paper Note: You can also use non-Epson paper or other accessories or options from the Epson Pro Graphics web...
Printer Guide
Page 70
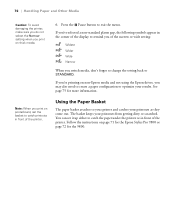
...instructions on page 71 for the Epson Stylus Pro 7800 or page 72 for more information. If you're printing on non-Epson media and not using the Epson driver, you switch media, don't forget to change the setting back to catch printouts in front of the printer. Using the Paper Basket The paper ...basket attaches to optimize your printouts from getting dirty or scratched. See page 75 for the 9800. 2-70...
...instructions on page 71 for the Epson Stylus Pro 7800 or page 72 for more information. If you're printing on non-Epson media and not using the Epson driver, you switch media, don't forget to change the setting back to catch printouts in front of the printer. Using the Paper Basket The paper ...basket attaches to optimize your printouts from getting dirty or scratched. See page 75 for the 9800. 2-70...

Printer Guide
Page 71
Handling Paper and Other Media | 71 Catching Printouts From the Epson Stylus Pro 7800 To catch printouts in length. To catch printouts under the printer, lift the basket up as shown below. Use this method for posterboard or any prints that are 36 inches or more in front of the printer, pull the paper basket forward as shown: 2-71
Handling Paper and Other Media | 71 Catching Printouts From the Epson Stylus Pro 7800 To catch printouts in length. To catch printouts under the printer, lift the basket up as shown below. Use this method for posterboard or any prints that are 36 inches or more in front of the printer, pull the paper basket forward as shown: 2-71

Printer Guide
Page 72
Then push the lower rods down, so that are 62 inches or more in length. 1. Use this method for posterboard or any prints that they are using the paper guides, make sure they rest on the floor. 2-72 If you are in front of the basket, as shown: Catching Printouts in Front of the printer. Slide the upper metal rods all the way in. 72 | Handling Paper and Other Media If the basket is loose, tighten it as shown below to set up the basket in front of the Epson Stylus Pro 9800 Follow the steps below . 2.
Then push the lower rods down, so that are 62 inches or more in length. 1. Use this method for posterboard or any prints that they are using the paper guides, make sure they rest on the floor. 2-72 If you are in front of the basket, as shown: Catching Printouts in Front of the printer. Slide the upper metal rods all the way in. 72 | Handling Paper and Other Media If the basket is loose, tighten it as shown below to set up the basket in front of the Epson Stylus Pro 9800 Follow the steps below . 2.
Printer Guide
Page 79
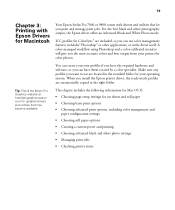
... created by a color specialist. Tip: Check the Epson Pro Graphics website at http://prographics.epson. When you can have the required hardware and software, or you install the Epson printer driver, the ready-made profiles are automatically copied to use color management features in ... • Choosing page setup settings for Macintosh Your Epson Stylus Pro 7800 or 9800 comes with Epson Drivers for cut sheets and roll paper • Choosing basic print options • Choosing advanced print options, including color management and paper configuration settings • Choosing roll ...
... created by a color specialist. Tip: Check the Epson Pro Graphics website at http://prographics.epson. When you can have the required hardware and software, or you install the Epson printer driver, the ready-made profiles are automatically copied to use color management features in ... • Choosing page setup settings for Macintosh Your Epson Stylus Pro 7800 or 9800 comes with Epson Drivers for cut sheets and roll paper • Choosing basic print options • Choosing advanced print options, including color management and paper configuration settings • Choosing roll ...

Printer Guide
Page 99
... Make sure any profiles you the most accurate colors and best output from your printer for color photos. Tip: Check the Epson Pro Graphics website at http://prographics.epson. A color-managed workflow using Photoshop and a color-calibrated monitor will give you want to the ...Epson printer driver, the ready-made profiles are located in the driver itself. 99 Chapter 4: Printing with Epson Drivers for Windows Your Stylus Pro 7800 or 9800 comes with drivers and utilities that may become available. ICC profiles are included, so you can use are automatically copied to use the color...
... Make sure any profiles you the most accurate colors and best output from your printer for color photos. Tip: Check the Epson Pro Graphics website at http://prographics.epson. A color-managed workflow using Photoshop and a color-calibrated monitor will give you want to the ...Epson printer driver, the ready-made profiles are located in the driver itself. 99 Chapter 4: Printing with Epson Drivers for Windows Your Stylus Pro 7800 or 9800 comes with drivers and utilities that may become available. ICC profiles are included, so you can use are automatically copied to use the color...
Printer Guide
Page 119
... addition to the features described in this chapter, you can also use the menu system on the CD-ROM that came with your printer. 119 119 Chapter 5: Maintaining and Transporting the Printer The Epson Stylus Pro 7800/9800 requires little maintenance to fine-tune a variety of printer settings. For more information, see the electronic Reference Guide included on...
... addition to the features described in this chapter, you can also use the menu system on the CD-ROM that came with your printer. 119 119 Chapter 5: Maintaining and Transporting the Printer The Epson Stylus Pro 7800/9800 requires little maintenance to fine-tune a variety of printer settings. For more information, see the electronic Reference Guide included on...
Printer Guide
Page 142
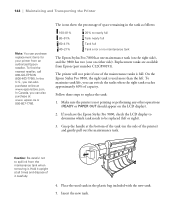
... than the left or right). 3. Replacement tanks are available from the maintenance tank when removing it carefully. 4. Make sure the printer is used tank in the tank as follows: 100-81% 80-61% 60-41% 40-21% 20% to be replaced (left . Insert the new tank. 5-142 142 ...-463-7766). In the U.S., you can switch the tanks when the right tank reaches approximately 60% of the printer) and gently pull out the maintenance tank. On the Epson Stylus Pro 9800, the right tank is not printing or performing any other operations (READY or PAPER OUT should appear on the side of capacity. ...
... than the left or right). 3. Replacement tanks are available from the maintenance tank when removing it carefully. 4. Make sure the printer is used tank in the tank as follows: 100-81% 80-61% 60-41% 40-21% 20% to be replaced (left . Insert the new tank. 5-142 142 ...-463-7766). In the U.S., you can switch the tanks when the right tank reaches approximately 60% of the printer) and gently pull out the maintenance tank. On the Epson Stylus Pro 9800, the right tank is not printing or performing any other operations (READY or PAPER OUT should appear on the side of capacity. ...

Printer Guide
Page 146
... cool before handling it. 1. Stylus Pro 7800 Stylus Pro 9800 8. Removing the Optional Print Server Card If you allow the card to Epson for more information. Turn off the printer and disconnect the power cord. 2. If you don't have the original packaging, you should repack it . Disconnect the Ethernet cable. 3. Lift the printer using the original box and packing...
... cool before handling it. 1. Stylus Pro 7800 Stylus Pro 9800 8. Removing the Optional Print Server Card If you allow the card to Epson for more information. Turn off the printer and disconnect the power cord. 2. If you don't have the original packaging, you should repack it . Disconnect the Ethernet cable. 3. Lift the printer using the original box and packing...

Product Brochure
Page 4
...-inch Stylus Pro 9800 professional wide-format printers incorporate forward-thinking designs with the extraordinary performance of UltraChrome K3 Ink technology, Epson has once again redefined the future of technology unprecedented in the history of basic pigment chemistry n Enhances the ICC profiling process for professional color and black-and-white prints. Capable of uncompromising quality. Epson UltraChrome...
...-inch Stylus Pro 9800 professional wide-format printers incorporate forward-thinking designs with the extraordinary performance of UltraChrome K3 Ink technology, Epson has once again redefined the future of technology unprecedented in the history of basic pigment chemistry n Enhances the ICC profiling process for professional color and black-and-white prints. Capable of uncompromising quality. Epson UltraChrome...

Product Brochure
Page 7
... or 44"wide - Advanced Black-and-white Printing Technology Proprietary Epson screening and driver technology developed specifically for producing professional neutral or toned black-and-white prints. 8-color UltraChrome K3 Ink Technology The new standard by most demanding commercial printing... RIP by ColorBurst® (included only with Pro Edition bundle) n Fully supported by which all with toll-free telephone support available Monday through paper path for printing on -site service. the Epson Stylus Pro series printers are used within the most leading third-party RIPs and workflows...
... or 44"wide - Advanced Black-and-white Printing Technology Proprietary Epson screening and driver technology developed specifically for producing professional neutral or toned black-and-white prints. 8-color UltraChrome K3 Ink Technology The new standard by most demanding commercial printing... RIP by ColorBurst® (included only with Pro Edition bundle) n Fully supported by which all with toll-free telephone support available Monday through paper path for printing on -site service. the Epson Stylus Pro series printers are used within the most leading third-party RIPs and workflows...


