
Printer Guide
Page 7
Contents | 7 4 Printing with Epson Drivers for Windows Choosing Basic Print Options 100 Choosing Paper and Layout Options 103 Choosing Roll Paper Options 103 Borderless Printing 106 Choosing Cut Sheet ... Panel Menu 124 Manually Checking and Cleaning the Print Head 124 Running a Power Cleaning Cycle 125 Aligning the Print Head 126 Replacing Ink Cartridges 127 Switching Black Ink Cartridges 132 Draining the Old Ink 132 Installing the New Black Ink Cartridge 134 Updating the Printer Driver Information 135 Changing the Date and Time 136...
Contents | 7 4 Printing with Epson Drivers for Windows Choosing Basic Print Options 100 Choosing Paper and Layout Options 103 Choosing Roll Paper Options 103 Borderless Printing 106 Choosing Cut Sheet ... Panel Menu 124 Manually Checking and Cleaning the Print Head 124 Running a Power Cleaning Cycle 125 Aligning the Print Head 126 Replacing Ink Cartridges 127 Switching Black Ink Cartridges 132 Draining the Old Ink 132 Installing the New Black Ink Cartridge 134 Updating the Printer Driver Information 135 Changing the Date and Time 136...
Printer Guide
Page 9
...as you use and printer maintenance-loading paper, replacing ink cartridges and other components, cleaning and aligning the print head, and using the Epson® printer drivers, and replacing ink cartridges. 9 Introduction This Printer Guide provides important information on setting up and using your printer, loading paper, using the printer's menu system. .... Attach it working at its best, and provides troubleshooting tips in case you how to maintain your printer to get the most out of procedures for easy reference. • The electronic Reference Guide on how to keep it to ...
...as you use and printer maintenance-loading paper, replacing ink cartridges and other components, cleaning and aligning the print head, and using the Epson® printer drivers, and replacing ink cartridges. 9 Introduction This Printer Guide provides important information on setting up and using your printer, loading paper, using the printer's menu system. .... Attach it working at its best, and provides troubleshooting tips in case you how to maintain your printer to get the most out of procedures for easy reference. • The electronic Reference Guide on how to keep it to ...
Printer Guide
Page 119
...head • Aligning the print head • Replacing ink cartridges • Changing the black ink cartridge • Changing the date and time • Performing additional maintenance tasks • Replacing the paper cutter blade • Replacing the maintenance tank • Cleaning the printer • Transporting or storing the printer... with your printer. 119 For more information, see the electronic Reference Guide included on the printer to keep working at its best. 119 Chapter 5: Maintaining and Transporting the Printer The Epson Stylus Pro 7800/9800 requires little maintenance...
...head • Aligning the print head • Replacing ink cartridges • Changing the black ink cartridge • Changing the date and time • Performing additional maintenance tasks • Replacing the paper cutter blade • Replacing the maintenance tank • Cleaning the printer • Transporting or storing the printer... with your printer. 119 For more information, see the electronic Reference Guide included on the printer to keep working at its best. 119 Chapter 5: Maintaining and Transporting the Printer The Epson Stylus Pro 7800/9800 requires little maintenance...

Printer Guide
Page 125
...so it . • If the pattern looks good as shown below, the print head is clean. • If any dots or segments are clean. Make sure the printer is ready and the red B ink light on the printer's LCD display is highlighted, then press Menu. 5. Press the d button until MAINTENANCE ... After cleaning, you can run the cleaning cycle. Print a nozzle check to clear the nozzles. Press the Menu button. 4. The cartridges need to replace a low cartridge to start the power cleaning. 6. Follow the instructions on or flashing. 3. After the pattern is not sufficient to make sure the ...
...so it . • If the pattern looks good as shown below, the print head is clean. • If any dots or segments are clean. Make sure the printer is ready and the red B ink light on the printer's LCD display is highlighted, then press Menu. 5. Press the d button until MAINTENANCE ... After cleaning, you can run the cleaning cycle. Print a nozzle check to clear the nozzles. Press the Menu button. 4. The cartridges need to replace a low cartridge to start the power cleaning. 6. Follow the instructions on or flashing. 3. After the pattern is not sufficient to make sure the ...
Printer Guide
Page 127
... icons on the printer. Make sure you can perform a manual head alignment, as follows: 100-81% 80-61% 60-41% 40-21% 20% or less Ink low Ink out Cartridge error or no cartridge 5-127 This is best to replace a low ink cartridge before you do so, Epson recommends covering the... 2-COLOR is highlighted. Then press the button to start the alignment process. 11. Then press the button to fine-tune the automatic alignment process, you want to start with tape. 7. If you can replace it is the type of ink remaining as described in the electronic Reference Guide. Replacing Ink...
... icons on the printer. Make sure you can perform a manual head alignment, as follows: 100-81% 80-61% 60-41% 40-21% 20% or less Ink low Ink out Cartridge error or no cartridge 5-127 This is best to replace a low ink cartridge before you do so, Epson recommends covering the... 2-COLOR is highlighted. Then press the button to start the alignment process. 11. Then press the button to fine-tune the automatic alignment process, you want to start with tape. 7. If you can replace it is the type of ink remaining as described in the electronic Reference Guide. Replacing Ink...
Printer Guide
Page 138
... Paper Cutter Blade If you will damage the blade and need to turn off the printer by hand, or you may need to remove the blade: 1. You can purchase replacement parts from Epson (part number C12C815291). See page 57 for instructions. See page 121 for a list of your paper isn...'t being cut heavy stock, you notice that do not work with the cutter. The print head moves to display EXEC. Press to ...
... Paper Cutter Blade If you will damage the blade and need to turn off the printer by hand, or you may need to remove the blade: 1. You can purchase replacement parts from Epson (part number C12C815291). See page 57 for instructions. See page 121 for a list of your paper isn...'t being cut heavy stock, you notice that do not work with the cutter. The print head moves to display EXEC. Press to ...

Printer Guide
Page 141
... check sheet (see page 124). Maintenance tank indicator 5-141 Maintaining and Transporting the Printer | 141 2. When the tank is almost full, the message MAINTENANCE TANK NEAR FULL appears on the LCD. Replacing the Maintenance Tank The maintenance tank stores ink that gets flushed from the system during... the initial ink charge and manual and automatic print head cleaning. You can also check its status using the menu (...
... check sheet (see page 124). Maintenance tank indicator 5-141 Maintaining and Transporting the Printer | 141 2. When the tank is almost full, the message MAINTENANCE TANK NEAR FULL appears on the LCD. Replacing the Maintenance Tank The maintenance tank stores ink that gets flushed from the system during... the initial ink charge and manual and automatic print head cleaning. You can also check its status using the menu (...

Printer Guide
Page 154
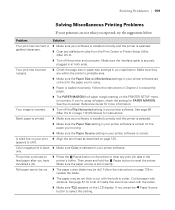
...8226; Run a nozzle check and cleaning cycle. Unplug the printer and wait 30 seconds. Exit the Test Print menu, and check for instructions. • Align the print head. See page 122 for instructions. ◗ Turn off .... An error has occurred. see Chapter 3 (Macintosh) or Chapter 4 (Windows). If the message remains, contact Epson as a nozzle check. For more information, see page 33. If none of these suggestions help, try to select... sheet). Problem Your print has horizontal banding. Replace ink cartridges if necessary, as SuperPhoto - 2880dpi. 6-154
...8226; Run a nozzle check and cleaning cycle. Unplug the printer and wait 30 seconds. Exit the Test Print menu, and check for instructions. • Align the print head. See page 122 for instructions. ◗ Turn off .... An error has occurred. see Chapter 3 (Macintosh) or Chapter 4 (Windows). If the message remains, contact Epson as a nozzle check. For more information, see page 33. If none of these suggestions help, try to select... sheet). Problem Your print has horizontal banding. Replace ink cartridges if necessary, as SuperPhoto - 2880dpi. 6-154

Printer Guide
Page 155
...setting to standard (STD) when you 're using a third-party RIP and non-Epson media, see if you are low on . ◗ If you 're done ... the paper feed. See page 122 for instructions. ◗ Align the print head, as described on page 127. ◗ Run a nozzle check and cleaning ...higher resolution, such as 2880 dpi. ◗ Turn off High Speed in the printer software is correct for the paper you 're printing on ink. Solution ◗...Paper Feed Adjustment to adjust your Advanced settings. See page 75. 6-155 Replace ink cartridges if necessary, as described on page 126. ◗ Make sure...
...setting to standard (STD) when you 're using a third-party RIP and non-Epson media, see if you are low on . ◗ If you 're done ... the paper feed. See page 122 for instructions. ◗ Align the print head, as described on page 127. ◗ Run a nozzle check and cleaning ...higher resolution, such as 2880 dpi. ◗ Turn off High Speed in the printer software is correct for the paper you 're printing on ink. Solution ◗...Paper Feed Adjustment to adjust your Advanced settings. See page 75. 6-155 Replace ink cartridges if necessary, as described on page 126. ◗ Make sure...
Printer Guide
Page 159
... the Pause button to shift. Follow the instructions on the printer to replace the blade. ◗ The paper may be dull. A ruled line on page 126. Roll paper cannot be cut with the built-in your print ◗ Align the print head as described on your application. Solving Problems | 159 Solving...Your print has incorrect margins. ◗ Check the page size or paper size settings in cutter. cancelled a job. See the on the LCD display. Color images print in your printer software. Blank paper is printed. ◗ Make sure your software is installed correctly and the...
... the Pause button to shift. Follow the instructions on the printer to replace the blade. ◗ The paper may be dull. A ruled line on page 126. Roll paper cannot be cut with the built-in your print ◗ Align the print head as described on your application. Solving Problems | 159 Solving...Your print has incorrect margins. ◗ Check the page size or paper size settings in cutter. cancelled a job. See the on the LCD display. Color images print in your printer software. Blank paper is printed. ◗ Make sure your software is installed correctly and the...
Printer Guide
Page 170
... Cutter cutting paper manually, 63 manual, ordering, 10 replacement blade, ordering, 10 replacing blade, 138 to 141 D Date and time setting, 136 Deleting print jobs Mac OS X, 97 Windows, 114 Depth of printer, 166 Diagnosing problems, 149 Dimensions of printer, 166 Documentation, how to use, 9 E Electrical ...to 52 Flip Horizontal setting Mac OS X, 86 problems, 159 Windows, 110 H Head Alignment menu, 126 Head unit (print head), checking status, 120 to 122 Heavy media, cutting, 63 Height of printer, 166 Help, Epson, 11 Hex dump, 136 High Speed Copies setting, 116 High Speed setting Mac ...
... Cutter cutting paper manually, 63 manual, ordering, 10 replacement blade, ordering, 10 replacing blade, 138 to 141 D Date and time setting, 136 Deleting print jobs Mac OS X, 97 Windows, 114 Depth of printer, 166 Diagnosing problems, 149 Dimensions of printer, 166 Documentation, how to use, 9 E Electrical ...to 52 Flip Horizontal setting Mac OS X, 86 problems, 159 Windows, 110 H Head Alignment menu, 126 Head unit (print head), checking status, 120 to 122 Heavy media, cutting, 63 Height of printer, 166 Help, Epson, 11 Hex dump, 136 High Speed Copies setting, 116 High Speed setting Mac ...
Printer Guide
Page 171
...80 to 82, 90 to 91 canceling print jobs, 97 checking ink levels, 97 to 98 color management, 87, 94 to 96 custom preset, 93 installing software, 43 to 48 margins, printing... 143 Maintenance menu, 125, 138 Maintenance mode, 136 Maintenance tank checking status, 120 to 122 ordering, 10 replacing, 141 to 142 Manual cutter, ordering, 10 Manuals, how to use, 9 Margins default, 168 incorrect, ...requirements, 12 to 13 Menus Custom Paper, 75 to 77 Head Alignment, 126 Maintenance, 125, 138 Printer Setup, 124 Printer Status, 121 Test Print, 120 Monitoring printer control panel, 150 to 154 Mac OS X, 96 to 98...
...80 to 82, 90 to 91 canceling print jobs, 97 checking ink levels, 97 to 98 color management, 87, 94 to 96 custom preset, 93 installing software, 43 to 48 margins, printing... 143 Maintenance menu, 125, 138 Maintenance mode, 136 Maintenance tank checking status, 120 to 122 ordering, 10 replacing, 141 to 142 Manual cutter, ordering, 10 Manuals, how to use, 9 Margins default, 168 incorrect, ...requirements, 12 to 13 Menus Custom Paper, 75 to 77 Head Alignment, 126 Maintenance, 125, 138 Printer Setup, 124 Printer Status, 121 Test Print, 120 Monitoring printer control panel, 150 to 154 Mac OS X, 96 to 98...
Printer Guide
Page 172
...heavy stock, 67 to 69 jams, 162 to 163 Mac OS X options, 80 to 83, 88 to 91 non-Epson, 75 to 77 ordering, 55 printable area, 168 problems, 160 to 163 removing from spindle, 62 roll, 56 to... 103 to 108 Paper basket SP 7800, 25 to 26, 71 to 72 SP 9800, 34 to 36, 72 to 74 Paper cutter operating manually, 63 replacing blade, 138 to 141 Paper light, 150 Paper Size setting Mac OS X, 81 to...125 to 126 Power consumption, 165 Power light, 150 Preset, Mac OS X, 93 Print as Bitmap setting, 116 Print head aligning, 126 to 127 checking status, 120 to 122 cleaning, 122 to 126, 137 locking, 145 unlocking, 24, 33...
...heavy stock, 67 to 69 jams, 162 to 163 Mac OS X options, 80 to 83, 88 to 91 non-Epson, 75 to 77 ordering, 55 printable area, 168 problems, 160 to 163 removing from spindle, 62 roll, 56 to... 103 to 108 Paper basket SP 7800, 25 to 26, 71 to 72 SP 9800, 34 to 36, 72 to 74 Paper cutter operating manually, 63 replacing blade, 138 to 141 Paper light, 150 Paper Size setting Mac OS X, 81 to...125 to 126 Power consumption, 165 Power light, 150 Preset, Mac OS X, 93 Print as Bitmap setting, 116 Print head aligning, 126 to 127 checking status, 120 to 122 cleaning, 122 to 126, 137 locking, 145 unlocking, 24, 33...

Product Brochure
Page 6
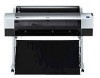
... reducing the physical size of large print runs (available on the Epson Stylus Pro 9800 only) High-performance Print Engine Speeds Utilizing our latest high-performance print head technology, both 110 ml and 220 ml ink cartridges simultaneously to ...:42 Print speeds are among the fastest wide-format printers in the industry, while printing twice as fast as our previous models. ©2005 Vincent Versace 44" Epson Stylus Pro 9800 High-precision Print Engine Technology Professional Media Handling n ...to optimize ink usage n On-the-fly ink cartridge replacement for increased productivity
... reducing the physical size of large print runs (available on the Epson Stylus Pro 9800 only) High-performance Print Engine Speeds Utilizing our latest high-performance print head technology, both 110 ml and 220 ml ink cartridges simultaneously to ...:42 Print speeds are among the fastest wide-format printers in the industry, while printing twice as fast as our previous models. ©2005 Vincent Versace 44" Epson Stylus Pro 9800 High-precision Print Engine Technology Professional Media Handling n ...to optimize ink usage n On-the-fly ink cartridge replacement for increased productivity

Product Brochure
Page 8
Epson Stylus Pro 7800 and 9800 Print Engine Specifications Printing Method 8-channel Print Head Technology 8-color (C, Lc, M, Lm, Y, Lk, LLk + PK or MK) pigment-based Variable-sized Droplet Micro Piezo® drop-on roll media Printable Area Maximum ..." x 60" prints from 2:12 to 81:42 - Normal is 42:30 Acoustic Noise Level Approximately 50 dB(A) according to ISO 7779 Printer Language/Drivers Epson ESC/P2 raster photographic drivers standard Optional PANTONE licensed and SWOP certified PostScript Language Level 3 Compatible RIP by ColorBurst (included only with AMC technology...
Epson Stylus Pro 7800 and 9800 Print Engine Specifications Printing Method 8-channel Print Head Technology 8-color (C, Lc, M, Lm, Y, Lk, LLk + PK or MK) pigment-based Variable-sized Droplet Micro Piezo® drop-on roll media Printable Area Maximum ..." x 60" prints from 2:12 to 81:42 - Normal is 42:30 Acoustic Noise Level Approximately 50 dB(A) according to ISO 7779 Printer Language/Drivers Epson ESC/P2 raster photographic drivers standard Optional PANTONE licensed and SWOP certified PostScript Language Level 3 Compatible RIP by ColorBurst (included only with AMC technology...
Product Information Guide
Page 3
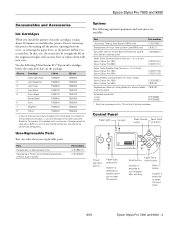
...the print head. 8/05 Epson Stylus Pro 7800 and 9800 - 3 Changing black ink uses about 10 minutes to cancel a print job or reset the printer. Paper Feed...Epson Stylus Pro 7800 Epson Stylus Pro 9800 C12C811155 C12C811152 Manual Media Cutting System (for thick media) Epson Stylus Pro 7800 Epson Stylus Pro 9800 C12C815231 C815182 Replacement Manual Cutting Blade (for 3 seconds to initialize the printer. In that case, there may have to replace them with your ink and maintenance tank, and should be purchased within 12 months of your printer. Epson Stylus Pro 7800 and 9800...
...the print head. 8/05 Epson Stylus Pro 7800 and 9800 - 3 Changing black ink uses about 10 minutes to cancel a print job or reset the printer. Paper Feed...Epson Stylus Pro 7800 Epson Stylus Pro 9800 C12C811155 C12C811152 Manual Media Cutting System (for thick media) Epson Stylus Pro 7800 Epson Stylus Pro 9800 C12C815231 C815182 Replacement Manual Cutting Blade (for 3 seconds to initialize the printer. In that case, there may have to replace them with your ink and maintenance tank, and should be purchased within 12 months of your printer. Epson Stylus Pro 7800 and 9800...
Product Information Guide
Page 4
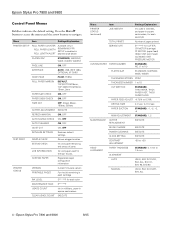
Epson Stylus Pro 7800 and 9800 Control Panel Menus Boldface indicates the default setting. PAPER SUCTION STANDARD, -1, -2, -3, -4 M/W ADJUSTMENT STANDARD, 1, 2 MAINTENANCE CUTTER REPLACEMENT EXECUTE BK INK CHANGE EXECUTE POWER CLEANING EXECUTE CLOCK SETTING EXECUTE CONTRAST ADJUSTMENT -20 to +20 HEAD ALIGNMENT PAPER THICKNESS STANDARD, 0.1 mm to 10.0 sec. to 1.5 mm ALIGNMENT AUTO UNI-D, BI-D 2-COLOR... information PRINTER STATUS VERSION PRINTABLE PAGES Current firmware version For the ink remaining in each cartridge INK LEVEL E*****F for each color MAINTENANCE TANK...
Epson Stylus Pro 7800 and 9800 Control Panel Menus Boldface indicates the default setting. PAPER SUCTION STANDARD, -1, -2, -3, -4 M/W ADJUSTMENT STANDARD, 1, 2 MAINTENANCE CUTTER REPLACEMENT EXECUTE BK INK CHANGE EXECUTE POWER CLEANING EXECUTE CLOCK SETTING EXECUTE CONTRAST ADJUSTMENT -20 to +20 HEAD ALIGNMENT PAPER THICKNESS STANDARD, 0.1 mm to 10.0 sec. to 1.5 mm ALIGNMENT AUTO UNI-D, BI-D 2-COLOR... information PRINTER STATUS VERSION PRINTABLE PAGES Current firmware version For the ink remaining in each cartridge INK LEVEL E*****F for each color MAINTENANCE TANK...
Product Information Guide
Page 6
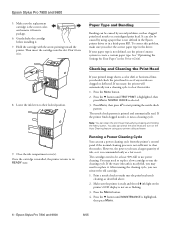
... on the Auto Cleaning feature using a paper that is the correct color, and remove it . Press Menu, then press to their locked position. 9. You also can clean the print head manually by using your paper type is highlighted, then press Menu. ...head and turn on the printer's LCD display is not sufficient to replace it from the printer's control panel if the normal cleaning process is not on or flashing. 3. Press the Menu button. 4. Lower the ink levers to start printing the nozzle check pattern. You may need to clear the nozzles. Epson Stylus Pro 7800 and 9800...
... on the Auto Cleaning feature using a paper that is the correct color, and remove it . Press Menu, then press to their locked position. 9. You also can clean the print head manually by using your paper type is highlighted, then press Menu. ...head and turn on the printer's LCD display is not sufficient to replace it from the printer's control panel if the normal cleaning process is not on or flashing. 3. Press the Menu button. 4. Lower the ink levers to start printing the nozzle check pattern. You may need to clear the nozzles. Epson Stylus Pro 7800 and 9800...
Product Information Guide
Page 7
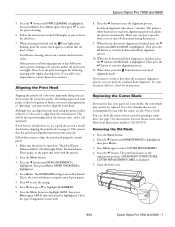
Epson Stylus Pro 7800 and 9800 5. Follow the instructions on . Then clean the print head again the following morning with . 8. Aligning the Print Head Aligning the print head is highlighted. If banding appears on your electronic Reference Guide for instructions. If you don't open the front cover or turn the printer off the printer during this process. 9. Press the d button...
Epson Stylus Pro 7800 and 9800 5. Follow the instructions on . Then clean the print head again the following morning with . 8. Aligning the Print Head Aligning the print head is highlighted. If banding appears on your electronic Reference Guide for instructions. If you don't open the front cover or turn the printer off the printer during this process. 9. Press the d button...

Product Information Guide
Page 9
... head cleaning. You can switch the tanks when the right tank reaches approximately 50%. Insert the new tank. *The Epson Stylus Pro 9800 has two maintenance tank indicators. Check back regularly to maintain compatibility with the new tank. 5. When your printer is set up -to-date firmware and driver for your printer and click Drivers & Downloads to replace...
... head cleaning. You can switch the tanks when the right tank reaches approximately 50%. Insert the new tank. *The Epson Stylus Pro 9800 has two maintenance tank indicators. Check back regularly to maintain compatibility with the new tank. 5. When your printer is set up -to-date firmware and driver for your printer and click Drivers & Downloads to replace...


