
Installation Guide - Express Digital. Darkroom
Page 2
... that match the paper you 're finished configuring your printer, see the next section to the software window. Click the Advanced tab and make sure your Epson Stylus Pro Portrait Edition printer is set up the ExpressDigital Darkroom CoreTM Edition for Epson software, see the Epson® Start Here poster or Printer Guide to set to enable and configure the...
... that match the paper you 're finished configuring your printer, see the next section to the software window. Click the Advanced tab and make sure your Epson Stylus Pro Portrait Edition printer is set up the ExpressDigital Darkroom CoreTM Edition for Epson software, see the Epson® Start Here poster or Printer Guide to set to enable and configure the...

Installation Guide - Express Digital. Darkroom
Page 3
... setting up your Darkroom Core Edition for Black and White Photo Printing Follow the steps below to configure your Printer Options to reconfigure the printer for Epson software is open the Epson printer driver and select Advanced B&W Photo under the Color setting. Finishing the Installation 2 Note: For more information on selecting Advanced B&W Photo mode settings, see the...
... setting up your Darkroom Core Edition for Black and White Photo Printing Follow the steps below to configure your Printer Options to reconfigure the printer for Epson software is open the Epson printer driver and select Advanced B&W Photo under the Color setting. Finishing the Installation 2 Note: For more information on selecting Advanced B&W Photo mode settings, see the...
Getting Started - ColorBurst RIP installation
Page 2
... paths may be slightly different, depending on your Epson Stylus® Pro manual to the computer that will run the RIP server. Before setting up the Epson Stylus Pro printer on -screen instructions. Getting Started The enclosed DVD includes the ColorBurst® RIP server software and client PPD (PostScript® Printer Description) software, as well as the SpectralVision™ utility...
... paths may be slightly different, depending on your Epson Stylus® Pro manual to the computer that will run the RIP server. Before setting up the Epson Stylus Pro printer on -screen instructions. Getting Started The enclosed DVD includes the ColorBurst® RIP server software and client PPD (PostScript® Printer Description) software, as well as the SpectralVision™ utility...
Getting Started - ColorBurst RIP installation
Page 11
21. Select ColorBurst, then click Next. 23. You're ready to print to install the software. 25. Leave the default name or enter a new name in the Printer name box. At the end of the installation, click Finish. 26. Click OK. 22. Restart your computer. Then click Next. 24. Follow the on-screen instructions to the ColorBurst RIP. 10
21. Select ColorBurst, then click Next. 23. You're ready to print to install the software. 25. Leave the default name or enter a new name in the Printer name box. At the end of the installation, click Finish. 26. Click OK. 22. Restart your computer. Then click Next. 24. Follow the on-screen instructions to the ColorBurst RIP. 10
Printer Guide
Page 5
... 14 1 Setting Up the Printer On a Network Connecting to the Network 15 Configuring the Network Interface 16 Installing the Software for Macintosh 17 Adding the Printer in Mac OS X 10.4.x 19 Adding the Printer in Mac OS X 10.3.9 20 Installing the Software for Windows 22 Adding the ...Network Port 22 Installing the Printer Software 27 2 Handling Paper and Other Media Selecting Media for Your Printer 29 Guidelines for Using Epson...
... 14 1 Setting Up the Printer On a Network Connecting to the Network 15 Configuring the Network Interface 16 Installing the Software for Macintosh 17 Adding the Printer in Mac OS X 10.4.x 19 Adding the Printer in Mac OS X 10.3.9 20 Installing the Software for Windows 22 Adding the ...Network Port 22 Installing the Printer Software 27 2 Handling Paper and Other Media Selecting Media for Your Printer 29 Guidelines for Using Epson...
Printer Guide
Page 9
...ink cartridges and performing other maintenance procedures, and how to troubleshoot problems. For additional information, see Chapter 1 in this Printer Guide for software installation instructions. • The on-screen Network Guide on the CD-ROM describes how to set up and configure the... printer for the best printing results, and install the printer software in this book: WARNINGS must be followed carefully to your printer correctly. You can read the guide using your printer, install the software for a USB connection, and load paper. ...
...ink cartridges and performing other maintenance procedures, and how to troubleshoot problems. For additional information, see Chapter 1 in this Printer Guide for software installation instructions. • The on-screen Network Guide on the CD-ROM describes how to set up and configure the... printer for the best printing results, and install the printer software in this book: WARNINGS must be followed carefully to your printer correctly. You can read the guide using your printer, install the software for a USB connection, and load paper. ...

Printer Guide
Page 10
...-speed (4×) or faster CD-ROM or DVD drive for installing the printer software • For USB connection: a Windows-compliant USB Hi-Speed 2.0 port and a shielded USB "AB" cable from Series A (computer) to Series B (printer), up to 10 feet long • For network connection: Ethernet-equipped...Quad-speed (4×) or faster CD-ROM or DVD drive for installing the printer software • For USB connection: a compliant USB Hi-Speed 2.0 port and a shielded USB "AB" cable from Series A (computer) to Series B (printer), up to 10 feet long • For Ethernet connection: Ethernet-equipped ...
...-speed (4×) or faster CD-ROM or DVD drive for installing the printer software • For USB connection: a Windows-compliant USB Hi-Speed 2.0 port and a shielded USB "AB" cable from Series A (computer) to Series B (printer), up to 10 feet long • For network connection: Ethernet-equipped...Quad-speed (4×) or faster CD-ROM or DVD drive for installing the printer software • For USB connection: a compliant USB Hi-Speed 2.0 port and a shielded USB "AB" cable from Series A (computer) to Series B (printer), up to 10 feet long • For Ethernet connection: Ethernet-equipped ...

Printer Guide
Page 15
...end to configure it. See "Configuring the Network Interface" on page 16 for connecting the printer. 15 Chapter 1: Setting Up the Printer On a Network If you are using the printer on the printer. To connect directly to your computer's USB port, see the Start Here sheet. Once ...RJ-45 "straight-through" network cable. Turn on a network, follow the instructions in this chapter to: • Connect the printer to the network • Configure the network interface • Install the printer software To connect the printer directly to the printer's Ethernet port. Turn off the...
...end to configure it. See "Configuring the Network Interface" on page 16 for connecting the printer. 15 Chapter 1: Setting Up the Printer On a Network If you are using the printer on the printer. To connect directly to your computer's USB port, see the Start Here sheet. Once ...RJ-45 "straight-through" network cable. Turn on a network, follow the instructions in this chapter to: • Connect the printer to the network • Configure the network interface • Install the printer software To connect the printer directly to the printer's Ethernet port. Turn off the...

Printer Guide
Page 17
...then press r. 17. When you have changed the value of the last octet, press r. Installing the Software for Windows" on the Epson support site at least three sheets of your printer. 2. Setting Up the Printer On a Network | 17 12. Press u or d to change each octet value, then press r ...the next octet. Press Enter to print the network status sheet and verify that you have at epson.com/support. Insert the printer software CD-ROM. Press d to open its window. 3. Double-click the Epson installer icon. 1-17 Press u or d to change each octet value, then press r to ...
...then press r. 17. When you have changed the value of the last octet, press r. Installing the Software for Windows" on the Epson support site at least three sheets of your printer. 2. Setting Up the Printer On a Network | 17 12. Press u or d to change each octet value, then press r ...the next octet. Press Enter to print the network status sheet and verify that you have at epson.com/support. Insert the printer software CD-ROM. Press d to open its window. 3. Double-click the Epson installer icon. 1-17 Press u or d to change each octet value, then press r to ...

Printer Guide
Page 18
18 | Setting Up the Printer On a Network 4. Double-click User's Guide and Network Guide and wait while the guides are installed. 5. Restart your password again and follow the on page ... -screen instructions to install your software. 7. Enter your printer. 1-18 Remove the printer software CD-ROM and continue with the instructions on -screen instructions to install the EPSON LFP Remote Panel. 8. Click Exit to add your password again and follow the on -screen instructions to install EpsonNet Config. 9. Double-click Stylus Pro 3800 Driver. 6. Enter your Macintosh when...
18 | Setting Up the Printer On a Network 4. Double-click User's Guide and Network Guide and wait while the guides are installed. 5. Restart your password again and follow the on page ... -screen instructions to install your software. 7. Enter your printer. 1-18 Remove the printer software CD-ROM and continue with the instructions on -screen instructions to install the EPSON LFP Remote Panel. 8. Click Exit to add your password again and follow the on -screen instructions to install EpsonNet Config. 9. Double-click Stylus Pro 3800 Driver. 6. Enter your Macintosh when...
Printer Guide
Page 22
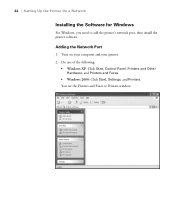
Turn on your computer and your printer. 2. Do one of the following: • Windows XP: Click Start, Control Panel, Printers and Other Hardware, and Printers and Faxes. • Windows 2000: Click Start, Settings, and Printers. 22 | Setting Up the Printer On a Network Installing the Software for Windows For Windows, you need to add the printer's network port, then install the printer software. You see the Printers and Faxes or Printers window: 1-22 Adding the Network Port 1.
Turn on your computer and your printer. 2. Do one of the following: • Windows XP: Click Start, Control Panel, Printers and Other Hardware, and Printers and Faxes. • Windows 2000: Click Start, Settings, and Printers. 22 | Setting Up the Printer On a Network Installing the Software for Windows For Windows, you need to add the printer's network port, then install the printer software. You see the Printers and Faxes or Printers window: 1-22 Adding the Network Port 1.

Printer Guide
Page 26
Now continue with "Installing the Printer Software" on the network status sheet, then click Finish. 10. Make sure that the Device matches the Print Server Name or IP Address shown on page 27. 1-26 Verify that Standard and Generic Network Card are selected, then click Next. 9. Click the Close button to close all the open windows on your screen. 26 | Setting Up the Printer On a Network 8.
Now continue with "Installing the Printer Software" on the network status sheet, then click Finish. 10. Make sure that the Device matches the Print Server Name or IP Address shown on page 27. 1-26 Verify that Standard and Generic Network Card are selected, then click Next. 9. Click the Close button to close all the open windows on your screen. 26 | Setting Up the Printer On a Network 8.

Printer Guide
Page 27
Insert the printer software CD-ROM. 2. The installer starts automatically. (If necessary, double-click My Computer or click Start, then My Computer. Double-click Stylus Pro 3800 Driver for Ethernet. 4. Setting Up the Printer On a Network | 27 Installing the Printer Software 1. Then double-click your CD-ROM icon to start the installer.) 3. When you see a window like this one, click Manual. 1-27
Insert the printer software CD-ROM. 2. The installer starts automatically. (If necessary, double-click My Computer or click Start, then My Computer. Double-click Stylus Pro 3800 Driver for Ethernet. 4. Setting Up the Printer On a Network | 27 Installing the Printer Software 1. Then double-click your CD-ROM icon to start the installer.) 3. When you see a window like this one, click Manual. 1-27

Printer Guide
Page 28
Select the network port you see a message that driver installation and printer configuration were completed successfully, click OK. 7. 28 | Setting Up the Printer On a Network 5. The EPSON LFP Remote Panel begins installing. Follow the on-screen instructions. 8. Click Exit to your desktop. 9. When you created for the printer, then click OK. 6. Double-click User's Guide and Network Guide and wait while the guides are copied to close the installer, then remove the printer software CD-ROM. 1-28
Select the network port you see a message that driver installation and printer configuration were completed successfully, click OK. 7. 28 | Setting Up the Printer On a Network 5. The EPSON LFP Remote Panel begins installing. Follow the on-screen instructions. 8. Click Exit to your desktop. 9. When you created for the printer, then click OK. 6. Double-click User's Guide and Network Guide and wait while the guides are copied to close the installer, then remove the printer software CD-ROM. 1-28
Printer Guide
Page 31
...for instructions. • Always select the correct paper source in both the printer driver software and on selecting the paper source in your bare hands. See page 50 (Macintosh) or page 68 (Windows) for Using Epson Media Follow these guidelines, as well as those included in your paper package,... when printing on Epson paper and other media: • Avoid touching the printable surface with your printer software. • Keep unused media in its original packaging and store it flat in a cool, dry place to high ...
...for instructions. • Always select the correct paper source in both the printer driver software and on selecting the paper source in your bare hands. See page 50 (Macintosh) or page 68 (Windows) for Using Epson Media Follow these guidelines, as well as those included in your paper package,... when printing on Epson paper and other media: • Avoid touching the printable surface with your printer software. • Keep unused media in its original packaging and store it flat in a cool, dry place to high ...
Printer Guide
Page 45
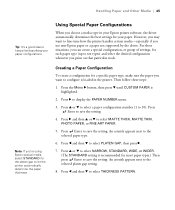
... menu. 3. Press u or d to select NARROW, STANDARD, WIDE, or WIDER. (The STANDARD setting is recommended for the platen gap to let the printer automatically determine the paper thickness. For these steps: 1. An asterisk appears next to save the setting. Note: If you choose a media type in the....) Then press Enter to save the setting. 4. Handling Paper and Other Media | 45 Tip: It's a good idea to keep a list describing your Epson printer software, the driver automatically determines the best settings for a specific paper type, make sure the paper you want to fine-tune how the...
... menu. 3. Press u or d to select NARROW, STANDARD, WIDE, or WIDER. (The STANDARD setting is recommended for the platen gap to let the printer automatically determine the paper thickness. For these steps: 1. An asterisk appears next to save the setting. Note: If you choose a media type in the....) Then press Enter to save the setting. 4. Handling Paper and Other Media | 45 Tip: It's a good idea to keep a list describing your Epson printer software, the driver automatically determines the best settings for a specific paper type, make sure the paper you want to fine-tune how the...
Printer Guide
Page 47
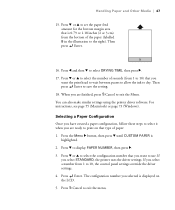
... (Macintosh) or page 73 (Windows). The configuration number you are ready to dry. Then press Enter. 16. You can also make similar settings using the printer driver software. Then press Enter to select DRYING TIME, then press r. 17. Press d to exit the menu. 2-47 Press + Cancel to display PAPER NUMBER, then press...
... (Macintosh) or page 73 (Windows). The configuration number you are ready to dry. Then press Enter. 16. You can also make similar settings using the printer driver software. Then press Enter to select DRYING TIME, then press r. 17. Press d to exit the menu. 2-47 Press + Cancel to display PAPER NUMBER, then press...

Printer Guide
Page 49
... print jobs • Checking the printer status 49 This chapter includes the following information for Macintosh Your Epson Stylus Pro 3800 comes with drivers and utilities that may become available. Tip: Check the Epson Pro Graphics website at prographics.epson.com for ColorSync® are located...white photography output, the Epson Stylus Pro 3800 driver offers Advanced Black and White mode. A color-managed workflow using Photoshop will produce the most accurate colors and best photographic output for your own profiles if you have the required hardware and software, or you want to...
... print jobs • Checking the printer status 49 This chapter includes the following information for Macintosh Your Epson Stylus Pro 3800 comes with drivers and utilities that may become available. Tip: Check the Epson Pro Graphics website at prographics.epson.com for ColorSync® are located...white photography output, the Epson Stylus Pro 3800 driver offers Advanced Black and White mode. A color-managed workflow using Photoshop will produce the most accurate colors and best photographic output for your own profiles if you have the required hardware and software, or you want to...
Printer Guide
Page 50
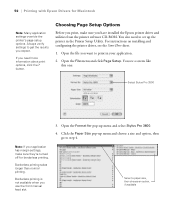
... Setup. Note: If your application. 2. Open the Format for pop-up the printer in your application has margin settings, make sure you have installed the Epson printer driver and utilities from the printer software CD-ROM. Choosing Page Setup Options Before you print, make sure they're turned... printer's page setup options. You also need more information about print options, click the ? Click the Paper Size pop-up menu and choose a size and option, then go to set up menu and select Stylus Pro 3800. 4. Borderless printing takes longer than normal printing. 50 | Printing with Epson ...
... Setup. Note: If your application. 2. Open the Format for pop-up the printer in your application has margin settings, make sure you have installed the Epson printer driver and utilities from the printer software CD-ROM. Choosing Page Setup Options Before you print, make sure they're turned... printer's page setup options. You also need more information about print options, click the ? Click the Paper Size pop-up menu and choose a size and option, then go to set up menu and select Stylus Pro 3800. 4. Borderless printing takes longer than normal printing. 50 | Printing with Epson ...
Printer Guide
Page 55
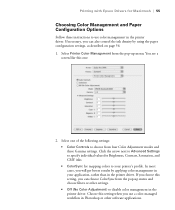
...with Epson Drivers for mapping colors to disable color management in the printer driver. Select Printer Color Management from the pop-up menu. Click the arrow next to Advanced Settings to specify individual values for Brightness, Contrast, Saturation, and CMY inks. • ColorSync for Macintosh | 55 Choosing Color Management... Options Follow these instructions to choose from four Color Adjustment modes and three Gamma settings. In most cases, you can choose ColorSync from the pop-up menu and choose filters or other software applications. If necessary, you will get better ...
...with Epson Drivers for mapping colors to disable color management in the printer driver. Select Printer Color Management from the pop-up menu. Click the arrow next to Advanced Settings to specify individual values for Brightness, Contrast, Saturation, and CMY inks. • ColorSync for Macintosh | 55 Choosing Color Management... Options Follow these instructions to choose from four Color Adjustment modes and three Gamma settings. In most cases, you can choose ColorSync from the pop-up menu and choose filters or other software applications. If necessary, you will get better ...


