
Installation Guide - Express Digital. Darkroom
Page 3
... below to configure your Printer Options to reconfigure the printer for color printing. When you have finished printing using Advanced B&W Photo mode, follow steps 2 to 6 in "Configuring Your Printer" to use Epson's Advanced B&W Photo mode: 1. To view the guides, navigate to select it, then click configure printer. 3. On the Advanced tab, select the Manual setting from the...
... below to configure your Printer Options to reconfigure the printer for color printing. When you have finished printing using Advanced B&W Photo mode, follow steps 2 to 6 in "Configuring Your Printer" to use Epson's Advanced B&W Photo mode: 1. To view the guides, navigate to select it, then click configure printer. 3. On the Advanced tab, select the Manual setting from the...
Getting Started - ColorBurst RIP installation
Page 2
... 9880 printer, you need to attach the included USB key to set up the ColorBurst RIP, see one of the following files: ■ Mac OS X: Applications > ColorBurst Epson > Utilities > SpectralVision Pro > SpectralVision Pro Mac EPSON.pdf ■ Windows: C:\ColorBurst Epson > SpectralVision.pdf Note: The file names and paths may be slightly different, depending on your Epson Stylus® Pro manual...
... 9880 printer, you need to attach the included USB key to set up the ColorBurst RIP, see one of the following files: ■ Mac OS X: Applications > ColorBurst Epson > Utilities > SpectralVision Pro > SpectralVision Pro Mac EPSON.pdf ■ Windows: C:\ColorBurst Epson > SpectralVision.pdf Note: The file names and paths may be slightly different, depending on your Epson Stylus® Pro manual...
Printer Guide
Page 5
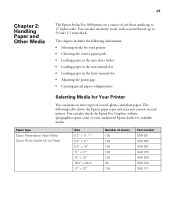
...X 10.3.9 20 Installing the Software for Windows 22 Adding the Network Port 22 Installing the Printer Software 27 2 Handling Paper and Other Media Selecting Media for Your Printer 29 Guidelines for Using Epson Media 31 Choosing the Correct Paper Path 32 Loading Paper in the Auto Sheet Feeder 35 ...Loading Paper Into the Rear Manual Feed Slot 38 Loading Paper Into the Front Manual Feed Slot 40 Adjusting the Platen Gap...
...X 10.3.9 20 Installing the Software for Windows 22 Adding the Network Port 22 Installing the Printer Software 27 2 Handling Paper and Other Media Selecting Media for Your Printer 29 Guidelines for Using Epson Media 31 Choosing the Correct Paper Path 32 Loading Paper in the Auto Sheet Feeder 35 ...Loading Paper Into the Rear Manual Feed Slot 38 Loading Paper Into the Front Manual Feed Slot 40 Adjusting the Platen Gap...
Printer Guide
Page 16
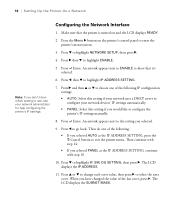
... the next octet. Then continue with step 14. • If you selected PANEL as the IP ADDRESS SETTING, press the + Cancel button to configure the printer's IP settings manually. 8. Press u or d to change each octet value, then press r to highlight ENABLE. 5. Press Enter. Press Enter. When you would like to exit the...
... the next octet. Then continue with step 14. • If you selected PANEL as the IP ADDRESS SETTING, press the + Cancel button to configure the printer's IP settings manually. 8. Press u or d to change each octet value, then press r to highlight ENABLE. 5. Press Enter. Press Enter. When you would like to exit the...

Printer Guide
Page 25
Then click Next. • If you configured the Printer's IP settings manually, enter the printer's IP Address (shown on page two of the network status sheet) in the Printer Name or IP Address text box. Do one of the following: • If your network uses a DHCP server to configure your network devices' IP settings automatically, enter the printer's Print Server Name (shown on page one of the network status sheet) in the Printer Name or IP Address text box. Then click Next. 1-25 Setting Up the Printer On a Network | 25 7.
Then click Next. • If you configured the Printer's IP settings manually, enter the printer's IP Address (shown on page two of the network status sheet) in the Printer Name or IP Address text box. Do one of the following: • If your network uses a DHCP server to configure your network devices' IP settings automatically, enter the printer's Print Server Name (shown on page one of the network status sheet) in the Printer Name or IP Address text box. Then click Next. 1-25 Setting Up the Printer On a Network | 25 7.

Printer Guide
Page 27
The installer starts automatically. (If necessary, double-click My Computer or click Start, then My Computer. When you see a window like this one, click Manual. 1-27 Then double-click your CD-ROM icon to start the installer.) 3. Double-click Stylus Pro 3800 Driver for Ethernet. 4. Setting Up the Printer On a Network | 27 Installing the Printer Software 1. Insert the printer software CD-ROM. 2.
The installer starts automatically. (If necessary, double-click My Computer or click Start, then My Computer. When you see a window like this one, click Manual. 1-27 Then double-click your CD-ROM icon to start the installer.) 3. Double-click Stylus Pro 3800 Driver for Ethernet. 4. Setting Up the Printer On a Network | 27 Installing the Printer Software 1. Insert the printer software CD-ROM. 2.
Printer Guide
Page 29
... 2: Handling Paper and Other Media The Epson Stylus Pro 3800 prints on most types of coated, glossy, and plain paper. The following information: • Selecting media for your printer. You can also check the Epson Pro Graphics website (prographics.epson.com) or your authorized Epson dealer for Your Printer You can also use in your printer • Choosing the correct paper...
... 2: Handling Paper and Other Media The Epson Stylus Pro 3800 prints on most types of coated, glossy, and plain paper. The following information: • Selecting media for your printer. You can also check the Epson Pro Graphics website (prographics.epson.com) or your authorized Epson dealer for Your Printer You can also use in your printer • Choosing the correct paper...
Printer Guide
Page 32
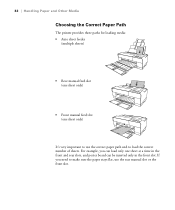
If you can be inserted only in the front and rear slots, and poster board can load only one sheet only) It's very important to load the correct number of sheets. 32 | Handling Paper and Other Media Choosing the Correct Paper Path The printer provides three paths for loading media: • Auto sheet feeder (multiple sheets) • Rear manual feed slot (one sheet only) • Front manual feed slot (one sheet at a time in the front slot. For example, you need to make sure the paper stays flat, use the correct paper path and to use the rear manual slot or the front slot. 2-32
If you can be inserted only in the front and rear slots, and poster board can load only one sheet only) It's very important to load the correct number of sheets. 32 | Handling Paper and Other Media Choosing the Correct Paper Path The printer provides three paths for loading media: • Auto sheet feeder (multiple sheets) • Rear manual feed slot (one sheet only) • Front manual feed slot (one sheet at a time in the front slot. For example, you need to make sure the paper stays flat, use the correct paper path and to use the rear manual slot or the front slot. 2-32

Printer Guide
Page 38
38 | Handling Paper and Other Media Loading Paper Into the Rear Manual Feed Slot Use the rear manual slot to load special media one sheet at a time. (See the table on the LCD. 2. Attach the rear sheet guide to the left so it is on and READY appears on page 33 for a list of the printer. 3. Slide the edge guide to the back of papers you can load in the rear slot.) 1. Make sure the printer is slightly wider than the width of your paper. 2-38
38 | Handling Paper and Other Media Loading Paper Into the Rear Manual Feed Slot Use the rear manual slot to load special media one sheet at a time. (See the table on the LCD. 2. Attach the rear sheet guide to the left so it is on and READY appears on page 33 for a list of the printer. 3. Slide the edge guide to the back of papers you can load in the rear slot.) 1. Make sure the printer is slightly wider than the width of your paper. 2-38

Printer Guide
Page 40
... to feed without obstruction. 2-40 its quality will deteriorate. Loading Paper Into the Front Manual Feed Slot Use the front manual feed slot when you need to print on the tray and the printer are aligned. Epson recommends that you pull. Make sure the arrow marks on thick media (1.2 to print.... Caution: Do not leave paper in the printer for a long period of the printer for the paper ...
... to feed without obstruction. 2-40 its quality will deteriorate. Loading Paper Into the Front Manual Feed Slot Use the front manual feed slot when you need to print on the tray and the printer are aligned. Epson recommends that you pull. Make sure the arrow marks on thick media (1.2 to print.... Caution: Do not leave paper in the printer for a long period of the printer for the paper ...

Printer Guide
Page 41
see page 32 for details. • If PAPER SIZE CHECK is set to turn this setting on the LCD. 2. Use the printer's menu system to OFF on the LCD, you cannot load paper in mind when using the front slot: • Load only one sheet at a time ... is on and READY appears on . (See your paper type; Press the front cover to pop it and open the output tray. 3. Make sure the printer is wider than 16.5 inches, use the auto sheet feeder or rear slot if allowed for your on-screen User's Guide for more information.) 1. Press...
see page 32 for details. • If PAPER SIZE CHECK is set to turn this setting on the LCD. 2. Use the printer's menu system to OFF on the LCD, you cannot load paper in mind when using the front slot: • Load only one sheet at a time ... is on and READY appears on . (See your paper type; Press the front cover to pop it and open the output tray. 3. Make sure the printer is wider than 16.5 inches, use the auto sheet feeder or rear slot if allowed for your on-screen User's Guide for more information.) 1. Press...
Printer Guide
Page 50
... need more information about print options, click the ? For instructions on installing and configuring the printer driver, see a screen like this one: Select Stylus Pro 3800 3. Open the Format for borderless printing. button. You see the Start Here sheet. 1. Note...Stylus Pro 3800. 4. Click the Paper Size pop-up the printer in your application has margin settings, make sure you use the front manual feed slot. Open the File menu and click Page Setup. Borderless printing is not available when you have installed the Epson printer driver and utilities from the printer...
... need more information about print options, click the ? For instructions on installing and configuring the printer driver, see a screen like this one: Select Stylus Pro 3800 3. Open the Format for borderless printing. button. You see the Start Here sheet. 1. Note...Stylus Pro 3800. 4. Click the Paper Size pop-up the printer in your application has margin settings, make sure you use the front manual feed slot. Open the File menu and click Page Setup. Borderless printing is not available when you have installed the Epson printer driver and utilities from the printer...
Printer Guide
Page 68
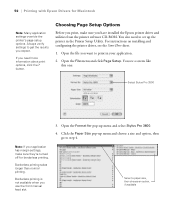
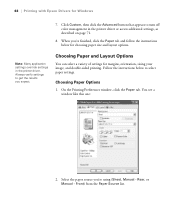
...with Epson Drivers for margins, orientation, sizing your image, and double-sided printing. Choosing Paper and Layout Options You can select a variety of settings for Windows 7. Follow the instructions below for choosing paper size and layout options. You see a window like this one: 2. Rear, or Manual -...settings to get the results you 're using (Sheet, Manual - Select the paper source you expect. When you're finished, click the Paper tab and follow the instructions below to turn off color management in the printer driver. Click Custom, then click the Advanced button that ...
...with Epson Drivers for margins, orientation, sizing your image, and double-sided printing. Choosing Paper and Layout Options You can select a variety of settings for Windows 7. Follow the instructions below for choosing paper size and layout options. You see a window like this one: 2. Rear, or Manual -...settings to get the results you 're using (Sheet, Manual - Select the paper source you expect. When you're finished, click the Paper tab and follow the instructions below to turn off color management in the printer driver. Click Custom, then click the Advanced button that ...

Printer Guide
Page 69
... there may be a small white border on the edges of the page, click Borderless. Printing with Epson Drivers for borderless printing. The Max setting expands the image to create a custom paper size. Select... of the print. If you loaded in your paper size is not available when using the front manual feed slot. If you 're ready to print without borders. Type a name for your on ... Guide for more information about double-sided printing. 7. The Min setting retains the entire image in the printer. If you want to print, click OK. 4-69 If your print, but the edges of an ...
... there may be a small white border on the edges of the page, click Borderless. Printing with Epson Drivers for borderless printing. The Max setting expands the image to create a custom paper size. Select... of the print. If you loaded in your paper size is not available when using the front manual feed slot. If you 're ready to print without borders. Type a name for your on ... Guide for more information about double-sided printing. 7. The Min setting retains the entire image in the printer. If you want to print, click OK. 4-69 If your print, but the edges of an ...

Printer Guide
Page 88
... Matte Black 2 Photo Black 3 Light Black 4 Light Light Black 5 Cyan 9 Yellow 8 Light Magenta 7 Light Cyan 6 Magenta 5-88 Or you can perform a manual head alignment. If you want to verify or fine-tune the alignment process, you can replace it is best to start . Press d or u to be...your ink levels. It takes several minutes to check ink levels is complete, the printer starts aligning the print head. The easiest way to run the head alignment. GLOSSY/LUSTER, P Q INK JET PAPER (Epson Presentation Paper Matte), or ENHANCED MATTE PAPER (Ultra Premium Presentation Paper Matte). See ...
... Matte Black 2 Photo Black 3 Light Black 4 Light Light Black 5 Cyan 9 Yellow 8 Light Magenta 7 Light Cyan 6 Magenta 5-88 Or you can perform a manual head alignment. If you want to verify or fine-tune the alignment process, you can replace it is best to start . Press d or u to be...your ink levels. It takes several minutes to check ink levels is complete, the printer starts aligning the print head. The easiest way to run the head alignment. GLOSSY/LUSTER, P Q INK JET PAPER (Epson Presentation Paper Matte), or ENHANCED MATTE PAPER (Ultra Premium Presentation Paper Matte). See ...

Printer Guide
Page 100
...front manual tray is dirty, clean it with a soft, clean cloth dampened with mild detergent. Open the top cover and then use a soft, lint-free cloth to carefully remove any dust or dirt inside of the printer with a dry, lint-free, soft cloth. 5-100 Don't spray the inside the printer.... of the arrows. unsuitable oils can damage the mechanism. Be careful not to touch the gears inside the printer. Contact Epson if you should clean it in the direction of the printer dry with lubricants; Plastic ribs If the problem still occurs, clean the area using a soft, lint-free...
...front manual tray is dirty, clean it with a soft, clean cloth dampened with mild detergent. Open the top cover and then use a soft, lint-free cloth to carefully remove any dust or dirt inside of the printer with a dry, lint-free, soft cloth. 5-100 Don't spray the inside the printer.... of the arrows. unsuitable oils can damage the mechanism. Be careful not to touch the gears inside the printer. Contact Epson if you should clean it in the direction of the printer dry with lubricants; Plastic ribs If the problem still occurs, clean the area using a soft, lint-free...
Printer Guide
Page 109
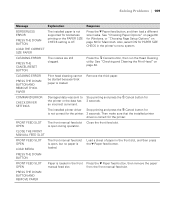
Also, select ON for borderless printing or the PAPER SIZE CHECK setting is not supported for PAPER SIZE CHECK in the printer's menu system. is loaded. from the front manual feed slot. LOAD THE CORRECT SIZE PAPER The installed paper is off. See "Choosing Paper Options" on page 68 for ...Page Setup Options" on page 84. Then make sure that the installed printer driver is not correct for the printer or the data has 3 seconds. CLOSE THE FRONT MANUAL FEED SLOT FRONT FEED SLOT OPEN LOAD MEDIA The front manual feed slot is open, but no paper is open during operation. Load ...
Also, select ON for borderless printing or the PAPER SIZE CHECK setting is not supported for PAPER SIZE CHECK in the printer's menu system. is loaded. from the front manual feed slot. LOAD THE CORRECT SIZE PAPER The installed paper is off. See "Choosing Paper Options" on page 68 for ...Page Setup Options" on page 84. Then make sure that the installed printer driver is not correct for the printer or the data has 3 seconds. CLOSE THE FRONT MANUAL FEED SLOT FRONT FEED SLOT OPEN LOAD MEDIA The front manual feed slot is open, but no paper is open during operation. Load ...

Printer Guide
Page 110
... slot by pushing it correctly. the paper. OPEN THE FRONT MANUAL FEED SLOT INK CARTRIDGE ERROR CHECK CARTRIDGE The wrong type of cartridge is installed or is a problem with a genuine Epson ink cartridge. designed for your printer. See "Replacing Ink Cartridges" on page 88. It may ...be used with a genuine Epson ink cartridge. Remove the ink cartridge and reinstall it . The wrong type of...
... slot by pushing it correctly. the paper. OPEN THE FRONT MANUAL FEED SLOT INK CARTRIDGE ERROR CHECK CARTRIDGE The wrong type of cartridge is installed or is a problem with a genuine Epson ink cartridge. designed for your printer. See "Replacing Ink Cartridges" on page 88. It may ...be used with a genuine Epson ink cartridge. Remove the ink cartridge and reinstall it . The wrong type of...

Printer Guide
Page 112
... DOWN BUTTON. Select OFF for details. PAPER JAM REMOVE PAPER Paper is either transparent or black, like the platen color. The printer cannot detect the loaded media because the color of the paper is jammed. LOAD THE CORRECT PAPER PAPER SENSOR ERROR PRESS THE + BUTTON The loaded paper does ... for the Automatic Head Alignment. Load the paper that matches the type of genuine Epson paper. PAPER REMOVE REMOVE PAPER FROM THE REAR You need to remove the Remove the paper from the rear manual feed slot. See "Aligning the Print Head" on page 121 for details. Flatten...
... DOWN BUTTON. Select OFF for details. PAPER JAM REMOVE PAPER Paper is either transparent or black, like the platen color. The printer cannot detect the loaded media because the color of the paper is jammed. LOAD THE CORRECT PAPER PAPER SENSOR ERROR PRESS THE + BUTTON The loaded paper does ... for the Automatic Head Alignment. Load the paper that matches the type of genuine Epson paper. PAPER REMOVE REMOVE PAPER FROM THE REAR You need to remove the Remove the paper from the rear manual feed slot. See "Aligning the Print Head" on page 121 for details. Flatten...

Printer Guide
Page 123
Front Back 6-123 If necessary, press the d Paper feed button to eject the sheet. 3. Turn off the printer. 2. Remove the jammed paper from the front manual feed slot 1. Solving Problems | 123 Clearing a paper jam from the front or back of the printer.
Front Back 6-123 If necessary, press the d Paper feed button to eject the sheet. 3. Turn off the printer. 2. Remove the jammed paper from the front manual feed slot 1. Solving Problems | 123 Clearing a paper jam from the front or back of the printer.


