
Installation Guide - Express Digital. Darkroom
Page 2
... the Darkroom Core Edition for Epson software is installed, make sure your Epson Stylus Pro Portrait Edition printer is turned on the next page. 1 Getting Started Select Printer Options, select your CD or DVD drive and follow the steps below to enable and configure the printer. 1. When you would like to print black and white photos, see...
... the Darkroom Core Edition for Epson software is installed, make sure your Epson Stylus Pro Portrait Edition printer is turned on the next page. 1 Getting Started Select Printer Options, select your CD or DVD drive and follow the steps below to enable and configure the printer. 1. When you would like to print black and white photos, see...

Installation Guide - Express Digital. Darkroom
Page 3
... B&W Photo mode: 1. When you have finished selecting settings in "Configuring Your Printer" to configure your Darkroom Core Edition for color printing. Configuring Your Printer for Epson software is open the Epson printer driver and select Advanced B&W Photo under the Color setting. Make sure that the Darkroom Core Edition for Black and White Photo Printing Follow the steps...
... B&W Photo mode: 1. When you have finished selecting settings in "Configuring Your Printer" to configure your Darkroom Core Edition for color printing. Configuring Your Printer for Epson software is open the Epson printer driver and select Advanced B&W Photo under the Color setting. Make sure that the Darkroom Core Edition for Black and White Photo Printing Follow the steps...
Getting Started - ColorBurst RIP installation
Page 2
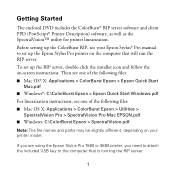
... file names and paths may be slightly different, depending on -screen instructions. If you are using the Epson Stylus Pro 7880 or 9880 printer, you need to attach the included USB key to set up the Epson Stylus Pro printer on the computer that is running the RIP server. 1 Getting Started The enclosed DVD includes the ColorBurst®...
... file names and paths may be slightly different, depending on -screen instructions. If you are using the Epson Stylus Pro 7880 or 9880 printer, you need to attach the included USB key to set up the Epson Stylus Pro printer on the computer that is running the RIP server. 1 Getting Started The enclosed DVD includes the ColorBurst®...

Getting Started - ColorBurst RIP installation
Page 4
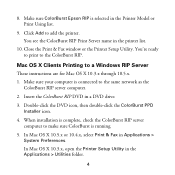
Click the button (Mac OS X 10.5.x or 10.4.x) or Add (Mac OS X 10.3.x). In Mac OS X 10.3.x, open the Printer Setup Utility in the list. When installation is complete, check the ColorBurst RIP server computer to make sure ColorBurst RIP is connected to a Mac ... 10.4.x, the ColorBurst RIP print server name appears in the Applications > Utilities folder. 6. In Mac OS X 10.3.x, select Rendezvous from the Bonjour or Rendezvous printers. 3 Double-click the DVD icon, then double-click the ColorBurst PPD Installer icon. 4. Mac OS X Clients Printing to the same network as the ColorBurst ...
Click the button (Mac OS X 10.5.x or 10.4.x) or Add (Mac OS X 10.3.x). In Mac OS X 10.3.x, open the Printer Setup Utility in the list. When installation is complete, check the ColorBurst RIP server computer to make sure ColorBurst RIP is connected to a Mac ... 10.4.x, the ColorBurst RIP print server name appears in the Applications > Utilities folder. 6. In Mac OS X 10.3.x, select Rendezvous from the Bonjour or Rendezvous printers. 3 Double-click the DVD icon, then double-click the ColorBurst PPD Installer icon. 4. Mac OS X Clients Printing to the same network as the ColorBurst ...
Getting Started - ColorBurst RIP installation
Page 5
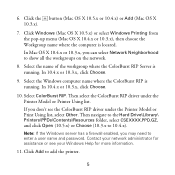
...icon, then double-click the ColorBurst PPD Installer icon. 4. Close the Print & Fax window or the Printer Setup Utility. You're ready to print to a Windows RIP Server These instructions are for Mac OS... folder. 4 In Mac OS X 10.3.x, open the Printer Setup Utility in a DVD drive. 3. 8. In Mac OS X 10.5.x or 10.4.x, select Print & Fax in the printer list. 10. Click Add to the same network as ...ColorBurst RIP server computer to make sure ColorBurst is selected in the Printer Model or Print Using list. 9. You see the ColorBurst RIP Print Server name in Applications >...
...icon, then double-click the ColorBurst PPD Installer icon. 4. Close the Print & Fax window or the Printer Setup Utility. You're ready to print to a Windows RIP Server These instructions are for Mac OS... folder. 4 In Mac OS X 10.3.x, open the Printer Setup Utility in a DVD drive. 3. 8. In Mac OS X 10.5.x or 10.4.x, select Print & Fax in the printer list. 10. Click Add to the same network as ...ColorBurst RIP server computer to make sure ColorBurst is selected in the Printer Model or Print Using list. 9. You see the ColorBurst RIP Print Server name in Applications >...
Getting Started - ColorBurst RIP installation
Page 6
...If you can select Network Neighborhood to enter a user name and password. Select ColorBurst RIP. Then select the ColorBurst RIP driver under the Printer Model or Print Using list, select Other. Contact your Windows Help for assistance or see the ColorBurst RIP driver under the... the workgroup where the ColorBurst RIP Server is located. Then navigate to the Hard Drive\Library\ Printers\PPDs\Contents\Resources folder, select CSEXXXX.PPD.GZ, and click Open (10.5.x) or Choose (10.3.x to add the printer. 5 Click the button (Mac OS X 10.5.x or 10.4.x) or Add (Mac OS X 10.3.x). 7. ...
...If you can select Network Neighborhood to enter a user name and password. Select ColorBurst RIP. Then select the ColorBurst RIP driver under the Printer Model or Print Using list, select Other. Contact your Windows Help for assistance or see the ColorBurst RIP driver under the... the workgroup where the ColorBurst RIP Server is located. Then navigate to the Hard Drive\Library\ Printers\PPDs\Contents\Resources folder, select CSEXXXX.PPD.GZ, and click Open (10.5.x) or Choose (10.3.x to add the printer. 5 Click the button (Mac OS X 10.5.x or 10.4.x) or Add (Mac OS X 10.3.x). 7. ...
Getting Started - ColorBurst RIP installation
Page 7
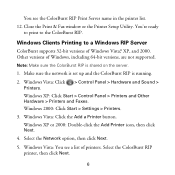
... supported. Note: Make sure the ColorBurst RIP is running. 2. Windows Vista: Click Printers. > Control Panel > Hardware and Sound > Windows XP: Click Start > Control Panel > Printers and Other Hardware > Printers and Faxes. Select the ColorBurst RIP printer, then click Next. 6 Other versions of printers. Select the Network option, then click Next. 5. Windows Vista: Click the Add...
... supported. Note: Make sure the ColorBurst RIP is running. 2. Windows Vista: Click Printers. > Control Panel > Hardware and Sound > Windows XP: Click Start > Control Panel > Printers and Other Hardware > Printers and Faxes. Select the ColorBurst RIP printer, then click Next. 6 Other versions of printers. Select the Network option, then click Next. 5. Windows Vista: Click the Add...
Getting Started - ColorBurst RIP installation
Page 8
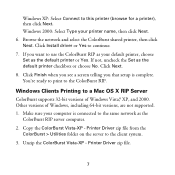
... or choose No. Click Install driver or Yes to the ColorBurst RIP. Click Finish when you see a screen telling you want to this printer (browse for a printer), then click Next. You're ready to print to continue. 7. Unzip the ColorBurst Vista-XP - Make sure your computer is complete. Copy the... zip file from the ColorBurst > Utilities folder on the server to the same network as the ColorBurst RIP server computer. 2. Printer Driver zip file. 7 Windows Clients Printing to a Mac OS X RIP Server ColorBurst supports 32-bit versions of Windows, including 64-bit versions, are not ...
... or choose No. Click Install driver or Yes to the ColorBurst RIP. Click Finish when you see a screen telling you want to this printer (browse for a printer), then click Next. You're ready to print to continue. 7. Unzip the ColorBurst Vista-XP - Make sure your computer is complete. Copy the... zip file from the ColorBurst > Utilities folder on the server to the same network as the ColorBurst RIP server computer. 2. Printer Driver zip file. 7 Windows Clients Printing to a Mac OS X RIP Server ColorBurst supports 32-bit versions of Windows, including 64-bit versions, are not ...
Getting Started - ColorBurst RIP installation
Page 9
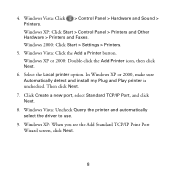
...XP or 2000, make sure Automatically detect and install my Plug and Play printer is unchecked. Click Create a new port, select Standard TCP/IP Port, and click Next. 8. Windows Vista: Uncheck Query the printer and automatically select the driver to use. 9. Windows XP: When you... see the Add Standard TCP/IP Print Port Wizard screen, click Next. 8 Windows Vista: Click the Add a Printer button. Select the Local printer option. Windows Vista: Click Printers. > Control Panel > Hardware...
...XP or 2000, make sure Automatically detect and install my Plug and Play printer is unchecked. Click Create a new port, select Standard TCP/IP Port, and click Next. 8. Windows Vista: Uncheck Query the printer and automatically select the driver to use. 9. Windows XP: When you... see the Add Standard TCP/IP Print Port Wizard screen, click Next. 8 Windows Vista: Click the Add a Printer button. Select the Local printer option. Windows Vista: Click Printers. > Control Panel > Hardware...

Getting Started - ColorBurst RIP installation
Page 10
... Enabled checkbox is case-sensitive; Windows XP or 2000: Click Finish to the folder that you unzipped. Browse to close the Add Standard TCP/IP Printer Port Wizard. 18. Select Custom, then click the Settings button. 12. The name is unchecked. 15. Windows Vista: Click Next. Enter the IP address for...
... Enabled checkbox is case-sensitive; Windows XP or 2000: Click Finish to the folder that you unzipped. Browse to close the Add Standard TCP/IP Printer Port Wizard. 18. Select Custom, then click the Settings button. 12. The name is unchecked. 15. Windows Vista: Click Next. Enter the IP address for...
Getting Started - ColorBurst RIP installation
Page 11
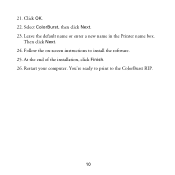
21. Then click Next. 24. Select ColorBurst, then click Next. 23. Follow the on-screen instructions to the ColorBurst RIP. 10 You're ready to print to install the software. 25. Leave the default name or enter a new name in the Printer name box. Click OK. 22. Restart your computer. At the end of the installation, click Finish. 26.
21. Then click Next. 24. Select ColorBurst, then click Next. 23. Follow the on-screen instructions to the ColorBurst RIP. 10 You're ready to print to install the software. 25. Leave the default name or enter a new name in the Printer name box. Click OK. 22. Restart your computer. At the end of the installation, click Finish. 26.
Printer Guide
Page 2
...Epson and Epson Stylus are registered trademarks, and Epson UltraChromeK3 and Exceed Your Vision are trademarks of Seiko Epson Corporation. The information contained herein is designed only for use of this information as Original Epson Products or Epson Approved Products by Seiko Epson Corporation. © 2006 Epson America, Inc. 10/06 2 CPD-22652 Epson...for identification purposes only and may be liable to strictly comply with these Epson printers. Epson is a trademark, and Epson Preferred and Epson Store are for damages, losses, costs, or expenses incurred by any means...
...Epson and Epson Stylus are registered trademarks, and Epson UltraChromeK3 and Exceed Your Vision are trademarks of Seiko Epson Corporation. The information contained herein is designed only for use of this information as Original Epson Products or Epson Approved Products by Seiko Epson Corporation. © 2006 Epson America, Inc. 10/06 2 CPD-22652 Epson...for identification purposes only and may be liable to strictly comply with these Epson printers. Epson is a trademark, and Epson Preferred and Epson Store are for damages, losses, costs, or expenses incurred by any means...
Printer Guide
Page 5
... 10 Options and Supplies 11 Where To Get Help 12 Important Safety Instructions 12 Ink Cartridge Safety Instructions 14 1 Setting Up the Printer On a Network Connecting to the Network 15 Configuring the Network Interface 16 Installing the Software for Macintosh 17 Adding the...OS X 10.3.9 20 Installing the Software for Windows 22 Adding the Network Port 22 Installing the Printer Software 27 2 Handling Paper and Other Media Selecting Media for Your Printer 29 Guidelines for Using Epson Media 31 Choosing the Correct Paper Path 32 Loading Paper in the Auto Sheet Feeder 35 Loading...
... 10 Options and Supplies 11 Where To Get Help 12 Important Safety Instructions 12 Ink Cartridge Safety Instructions 14 1 Setting Up the Printer On a Network Connecting to the Network 15 Configuring the Network Interface 16 Installing the Software for Macintosh 17 Adding the...OS X 10.3.9 20 Installing the Software for Windows 22 Adding the Network Port 22 Installing the Printer Software 27 2 Handling Paper and Other Media Selecting Media for Your Printer 29 Guidelines for Using Epson Media 31 Choosing the Correct Paper Path 32 Loading Paper in the Auto Sheet Feeder 35 Loading...
Printer Guide
Page 6
...52 Choosing Color Management and Paper Configuration Options . . . . . 55 Choosing Expansion Settings 57 Creating a Custom Preset and Printing 58 Choosing Advanced Black and White Photo Settings 59 Managing Print Jobs 61 Checking Ink and Maintenance Status 62 4 Printing with Epson Drivers for...Using the Progress Meter 76 Setting Monitoring Preferences and Optimizing Print Speed . . . . . 77 5 Maintaining and Transporting the Printer Checking Printer Status and Part Life 82 Printing Status Information 82 Viewing Status Information 83 Checking and Cleaning the Print Head 84 Running a ...
...52 Choosing Color Management and Paper Configuration Options . . . . . 55 Choosing Expansion Settings 57 Creating a Custom Preset and Printing 58 Choosing Advanced Black and White Photo Settings 59 Managing Print Jobs 61 Checking Ink and Maintenance Status 62 4 Printing with Epson Drivers for...Using the Progress Meter 76 Setting Monitoring Preferences and Optimizing Print Speed . . . . . 77 5 Maintaining and Transporting the Printer Checking Printer Status and Part Life 82 Printing Status Information 82 Viewing Status Information 83 Checking and Cleaning the Print Head 84 Running a ...
Printer Guide
Page 7
Contents | 7 Transporting or Storing the Printer 101 Preparing the Printer for Shipment 101 Setting Up the Printer After Transportation 101 Uninstalling and Reinstalling the Printer Driver 102 Macintosh 102 Windows 102 Updating Your Printer Firmware 103 Downloading the Firmware 103 Updating the Firmware 103 6 Solving Problems Diagnosing Problems 107... Paper Feed or Paper Jam Problems 121 A Specifications Printing 125 Environmental 126 Electrical 126 Dimensions and Weight 126 Printer Interfaces 127 Safety Approvals 127 Media 127 Printable Area 128 Ink Cartridges 128 Index -7
Contents | 7 Transporting or Storing the Printer 101 Preparing the Printer for Shipment 101 Setting Up the Printer After Transportation 101 Uninstalling and Reinstalling the Printer Driver 102 Macintosh 102 Windows 102 Updating Your Printer Firmware 103 Downloading the Firmware 103 Updating the Firmware 103 6 Solving Problems Diagnosing Problems 107... Paper Feed or Paper Jam Problems 121 A Specifications Printing 125 Environmental 126 Electrical 126 Dimensions and Weight 126 Printer Interfaces 127 Safety Approvals 127 Media 127 Printable Area 128 Ink Cartridges 128 Index -7
Printer Guide
Page 9
... your ink cartridges and performing other maintenance procedures, and how to troubleshoot problems. For additional information, see Chapter 1 in this Printer Guide for software installation instructions. • The on-screen Network Guide on the CD-ROM describes how to select and load paper...174; or Microsoft® Internet Explorer, versions 4.0 or later. Cautions must be observed to avoid damage to set up your printer correctly. 9 Introduction This Printer Guide provides basic information for use on a network. • The on-screen User's Guide on the CD-ROM provides complete...
... your ink cartridges and performing other maintenance procedures, and how to troubleshoot problems. For additional information, see Chapter 1 in this Printer Guide for software installation instructions. • The on-screen Network Guide on the CD-ROM describes how to select and load paper...174; or Microsoft® Internet Explorer, versions 4.0 or later. Cautions must be observed to avoid damage to set up your printer correctly. 9 Introduction This Printer Guide provides basic information for use on a network. • The on-screen User's Guide on the CD-ROM provides complete...

Printer Guide
Page 10
...of free hard disk space for processing files • Quad-speed (4×) or faster CD-ROM or DVD drive for installing the printer software • For USB connection: a Windows-compliant USB Hi-Speed 2.0 port and a shielded USB "AB" cable from Series A (computer) to Series...10.4.x • PowerPC G5, Intel, or higher processor • At least 1GB of free hard disk space to malfunction. Macintosh System Requirements To use your printer in either a stand-alone or peer-to-peer network environment, your system should meet these requirements: • IBM®-compatible PC with a Pentium®...
...of free hard disk space for processing files • Quad-speed (4×) or faster CD-ROM or DVD drive for installing the printer software • For USB connection: a Windows-compliant USB Hi-Speed 2.0 port and a shielded USB "AB" cable from Series A (computer) to Series...10.4.x • PowerPC G5, Intel, or higher processor • At least 1GB of free hard disk space to malfunction. Macintosh System Requirements To use your printer in either a stand-alone or peer-to-peer network environment, your system should meet these requirements: • IBM®-compatible PC with a Pentium®...

Printer Guide
Page 12
...safety instructions to rapid changes in temperature and humidity. Where To Get Help Epson provides technical support and information on a flat, stable surface that came with the Epson Preferred Protection Plan information that is larger than the printer. Dial (888) 377-6611, 6 AM to change without notice. ... make sure you have your Unit ID number, which is tilted or at epson.com/support. You'll also need more space behind the printer if you use the equipment safely and effectively. • The printer weighs about 43 pounds (20 kilograms) and should be easily unplugged. 12 ...
...safety instructions to rapid changes in temperature and humidity. Where To Get Help Epson provides technical support and information on a flat, stable surface that came with the Epson Preferred Protection Plan information that is larger than the printer. Dial (888) 377-6611, 6 AM to change without notice. ... make sure you have your Unit ID number, which is tilted or at epson.com/support. You'll also need more space behind the printer if you use the equipment safely and effectively. • The printer weighs about 43 pounds (20 kilograms) and should be easily unplugged. 12 ...
Printer Guide
Page 13
... the wall outlet's ampere rating. • Do not block or cover the openings in performance. 13 Take care not to spill liquid on the printer. • Do not attempt to qualified service personnel under the following conditions: The power cord or plug is designed for use an extension cord with... the printer, make sure it with other equipment may result in fire or electric shock. • Do not use a damaged or frayed power cord. • If...
... the wall outlet's ampere rating. • Do not block or cover the openings in performance. 13 Take care not to spill liquid on the printer. • Do not attempt to qualified service personnel under the following conditions: The power cord or plug is designed for use an extension cord with... the printer, make sure it with other equipment may result in fire or electric shock. • Do not use a damaged or frayed power cord. • If...

Printer Guide
Page 14
... not shake cartridges that have been installed previously with soap and water. However, each time the cartridge is inserted, some ink is consumed because the printer automatically performs a reliability check. • If you to refill them immediately with water. • Shake an ink cartridge well before installing it for best results...
... not shake cartridges that have been installed previously with soap and water. However, each time the cartridge is inserted, some ink is consumed because the printer automatically performs a reliability check. • If you to refill them immediately with water. • Shake an ink cartridge well before installing it for best results...


