
Installation Guide - Express Digital. Darkroom
Page 3
... software window. 2. Note: For more information on selecting Advanced B&W Photo mode settings, see the Epson Printer Guide included with the software. See the "Setting Up" chapter of the ExpressDigital electronic Quick Start Guide or User Guide installed with your Darkroom Core Edition for Epson software is open the Epson printer driver and select Advanced B&W Photo under the Color...
... software window. 2. Note: For more information on selecting Advanced B&W Photo mode settings, see the Epson Printer Guide included with the software. See the "Setting Up" chapter of the ExpressDigital electronic Quick Start Guide or User Guide installed with your Darkroom Core Edition for Epson software is open the Epson printer driver and select Advanced B&W Photo under the Color...
Getting Started - ColorBurst RIP installation
Page 6
.... 9. Select ColorBurst RIP. Then select the ColorBurst RIP driver under the Printer Model or Print Using list, select Other. If you don't see your Windows Help for assistance or see the ColorBurst RIP driver under the Printer Model or Printer Using list. Click Add to 10.4.x). Then navigate to... the Hard Drive\Library\ Printers\PPDs\Contents\Resources folder, select CSEXXXX.PPD.GZ, and...
.... 9. Select ColorBurst RIP. Then select the ColorBurst RIP driver under the Printer Model or Print Using list, select Other. If you don't see your Windows Help for assistance or see the ColorBurst RIP driver under the Printer Model or Printer Using list. Click Add to 10.4.x). Then navigate to... the Hard Drive\Library\ Printers\PPDs\Contents\Resources folder, select CSEXXXX.PPD.GZ, and...
Getting Started - ColorBurst RIP installation
Page 8
... or choose No. Make sure your computer is complete. Printer Driver zip file. 7 You're ready to print to use the ColorBurst RIP as your printer name, then click Next. 6. Windows 2000: Select Type your default printer, choose Set as the default printer or Yes. Windows XP: Select Connect to the same network as the ColorBurst RIP...
... or choose No. Make sure your computer is complete. Printer Driver zip file. 7 You're ready to print to use the ColorBurst RIP as your printer name, then click Next. 6. Windows 2000: Select Type your default printer, choose Set as the default printer or Yes. Windows XP: Select Connect to the same network as the ColorBurst RIP...
Getting Started - ColorBurst RIP installation
Page 9
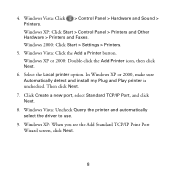
... select the driver to use. 9. Windows Vista: Click the Add a Printer button. Then click Next. 7. Windows XP: When you see the Add Standard TCP/IP Print Port Wizard screen, click Next. 8 Windows Vista: Click Printers. > Control Panel > Hardware and Sound > Windows XP: Click Start > Control Panel > Printers and Other Hardware > Printers and Faxes. Windows 2000: Click Start > Settings > Printers. 5. In Windows XP...
... select the driver to use. 9. Windows Vista: Click the Add a Printer button. Then click Next. 7. Windows XP: When you see the Add Standard TCP/IP Print Port Wizard screen, click Next. 8 Windows Vista: Click Printers. > Control Panel > Hardware and Sound > Windows XP: Click Start > Control Panel > Printers and Other Hardware > Printers and Faxes. Windows 2000: Click Start > Settings > Printers. 5. In Windows XP...
Printer Guide
Page 6
...Choosing Color Management and Paper Configuration Options . . . . . 55 Choosing Expansion Settings 57 Creating a Custom Preset and Printing 58 Choosing Advanced Black and White Photo Settings 59 Managing Print Jobs 61 Checking Ink and Maintenance Status 62 4 Printing with Epson Drivers for Windows ... the Progress Meter 76 Setting Monitoring Preferences and Optimizing Print Speed . . . . . 77 5 Maintaining and Transporting the Printer Checking Printer Status and Part Life 82 Printing Status Information 82 Viewing Status Information 83 Checking and Cleaning the Print Head 84 Running a...
...Choosing Color Management and Paper Configuration Options . . . . . 55 Choosing Expansion Settings 57 Creating a Custom Preset and Printing 58 Choosing Advanced Black and White Photo Settings 59 Managing Print Jobs 61 Checking Ink and Maintenance Status 62 4 Printing with Epson Drivers for Windows ... the Progress Meter 76 Setting Monitoring Preferences and Optimizing Print Speed . . . . . 77 5 Maintaining and Transporting the Printer Checking Printer Status and Part Life 82 Printing Status Information 82 Viewing Status Information 83 Checking and Cleaning the Print Head 84 Running a...
Printer Guide
Page 7
Contents | 7 Transporting or Storing the Printer 101 Preparing the Printer for Shipment 101 Setting Up the Printer After Transportation 101 Uninstalling and Reinstalling the Printer Driver 102 Macintosh 102 Windows 102 Updating Your Printer Firmware 103 Downloading the Firmware 103 Updating the Firmware 103 6 Solving Problems Diagnosing Problems 107 Checking...Feed or Paper Jam Problems 121 A Specifications Printing 125 Environmental 126 Electrical 126 Dimensions and Weight 126 Printer Interfaces 127 Safety Approvals 127 Media 127 Printable Area 128 Ink Cartridges 128 Index -7
Contents | 7 Transporting or Storing the Printer 101 Preparing the Printer for Shipment 101 Setting Up the Printer After Transportation 101 Uninstalling and Reinstalling the Printer Driver 102 Macintosh 102 Windows 102 Updating Your Printer Firmware 103 Downloading the Firmware 103 Updating the Firmware 103 6 Solving Problems Diagnosing Problems 107 Checking...Feed or Paper Jam Problems 121 A Specifications Printing 125 Environmental 126 Electrical 126 Dimensions and Weight 126 Printer Interfaces 127 Safety Approvals 127 Media 127 Printable Area 128 Ink Cartridges 128 Index -7

Printer Guide
Page 17
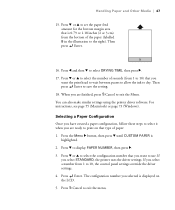
... highlight NETWORK STATUS SHEET, then press r. 18. Then see "Installing the Software for Macintosh" below, or "Installing the Software for Windows" on your Macintosh and your printer driver on again. 15. Installing the Software for a newer version of the last octet, press r. Turn on page 22. Double-click...verify that you have changed the value of plain, letter-size paper loaded in the printer's auto sheet feeder. Note: You can check for Macintosh 1. Turn the printer off then back on the Epson support site at least three sheets of the last octet, press Enter, then press ...
... highlight NETWORK STATUS SHEET, then press r. 18. Then see "Installing the Software for Macintosh" below, or "Installing the Software for Windows" on your Macintosh and your printer driver on again. 15. Installing the Software for a newer version of the last octet, press r. Turn on page 22. Double-click...verify that you have changed the value of plain, letter-size paper loaded in the printer's auto sheet feeder. Note: You can check for Macintosh 1. Turn the printer off then back on the Epson support site at least three sheets of the last octet, press Enter, then press ...

Printer Guide
Page 20
... start the Printer Setup Utility. 2. Adding the Printer in the Printer List window. 5. Your printer appears in Mac OS X 10.3.9 1. If you want to step 4. 1-20 Note: If your Macintosh finds the printer driver and the Add button becomes available. Close the Printer Setup Utility. 20 | Setting Up the Printer On a Network You see your printer in the Printer Browser: Tip...
... start the Printer Setup Utility. 2. Adding the Printer in the Printer List window. 5. Your printer appears in Mac OS X 10.3.9 1. If you want to step 4. 1-20 Note: If your Macintosh finds the printer driver and the Add button becomes available. Close the Printer Setup Utility. 20 | Setting Up the Printer On a Network You see your printer in the Printer Browser: Tip...

Printer Guide
Page 27
The installer starts automatically. (If necessary, double-click My Computer or click Start, then My Computer. Then double-click your CD-ROM icon to start the installer.) 3. When you see a window like this one, click Manual. 1-27 Setting Up the Printer On a Network | 27 Installing the Printer Software 1. Insert the printer software CD-ROM. 2. Double-click Stylus Pro 3800 Driver for Ethernet. 4.
The installer starts automatically. (If necessary, double-click My Computer or click Start, then My Computer. Then double-click your CD-ROM icon to start the installer.) 3. When you see a window like this one, click Manual. 1-27 Setting Up the Printer On a Network | 27 Installing the Printer Software 1. Insert the printer software CD-ROM. 2. Double-click Stylus Pro 3800 Driver for Ethernet. 4.
Printer Guide
Page 31
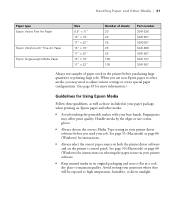
... with your job. See page 50 (Macintosh) or page 68 (Windows) for Using Epson Media Follow these guidelines, as well as those included in your paper package, when printing on Epson paper and other media, you send your bare hands. Avoid storing your printer driver software before purchasing large quantities or printing large jobs. Handling...
... with your job. See page 50 (Macintosh) or page 68 (Windows) for Using Epson Media Follow these guidelines, as well as those included in your paper package, when printing on Epson paper and other media, you send your bare hands. Avoid storing your printer driver software before purchasing large quantities or printing large jobs. Handling...
Printer Guide
Page 47
...from 1 to set the paper feed amount for the bottom margin area that you select STANDARD, the printer uses the driver settings. Press d or u to use. For instructions, see page 55 (Macintosh) or page 73 (Windows). If you want the print head to wait between passes to allow the ink to print on... the LCD. 5. You can also make similar settings using the printer driver software. Press d to exit the menu. 2-47 If you are ready to...
...from 1 to set the paper feed amount for the bottom margin area that you select STANDARD, the printer uses the driver settings. Press d or u to use. For instructions, see page 55 (Macintosh) or page 73 (Windows). If you want the print head to wait between passes to allow the ink to print on... the LCD. 5. You can also make similar settings using the printer driver software. Press d to exit the menu. 2-47 If you are ready to...

Printer Guide
Page 51
...+, double-click Untitled, give your image up menu. 5. Rear prints with the instructions in the next section to create a custom paper size. Printing with Epson Drivers for printing. 3-51 If your paper size is centered on page 57. • Borderless (Retain Size) prints your image at the size you can adjust... the expansion setting as necessary. 6. Then continue with 0.12 in . (20 mm) top and bottom margins. You see a window like this one: Click + to create a new paper size Tip: To ensure that the image is not listed, select Manage Custom Sizes to select ...
...+, double-click Untitled, give your image up menu. 5. Rear prints with the instructions in the next section to create a custom paper size. Printing with Epson Drivers for printing. 3-51 If your paper size is centered on page 57. • Borderless (Retain Size) prints your image at the size you can adjust... the expansion setting as necessary. 6. Then continue with 0.12 in . (20 mm) top and bottom margins. You see a window like this one: Click + to create a new paper size Tip: To ensure that the image is not listed, select Manage Custom Sizes to select ...
Printer Guide
Page 56
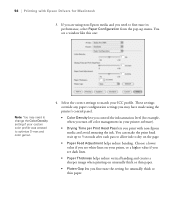
You see a window like this one: Note: You may have made using non-Epson media and you fine-tune the setting for unusually ...performance, select Paper Configuration from the pop-up menu. Select the correct settings to optimize D-max and color gamut. 4. These settings override any paper configuration settings you may need to dry on unusually thick or...need to change the Color Density setting if your custom color profile was created to match your prints, or a higher value if you print with Epson Drivers for example, when you turn off color management in your printer software). •...
You see a window like this one: Note: You may have made using non-Epson media and you fine-tune the setting for unusually ...performance, select Paper Configuration from the pop-up menu. Select the correct settings to optimize D-max and color gamut. 4. These settings override any paper configuration settings you may need to dry on unusually thick or...need to change the Color Density setting if your custom color profile was created to match your prints, or a higher value if you print with Epson Drivers for example, when you turn off color management in your printer software). •...

Printer Guide
Page 65
... can use are located in the driver itself. 65 Chapter 4: Printing with Epson Drivers for Windows Your Epson Stylus Pro 3800 comes with drivers and utilities that may become available. When you install the Epson printer driver, the included profiles are included, so you print and manage print jobs. ICC profiles are automatically copied to use the color management features in Adobe Photoshop...
... can use are located in the driver itself. 65 Chapter 4: Printing with Epson Drivers for Windows Your Epson Stylus Pro 3800 comes with drivers and utilities that may become available. When you install the Epson printer driver, the included profiles are included, so you print and manage print jobs. ICC profiles are automatically copied to use the color management features in Adobe Photoshop...
Printer Guide
Page 66
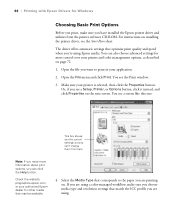
... you can click the Help button. Open the file you are using a color-managed workflow, make sure you have installed the Epson printer driver and utilities from here Note: If you need more control over your printer and color management options, as described on page 72. 1. Or, if you 're... see the Start Here sheet. Check the website prographics.epson.com or your authorized Epson dealer for more information about print options, you can 't change them from the printer software CD-ROM. 66 | Printing with Epson Drivers for Windows Choosing Basic Print Options Before you print, make sure you...
... you can click the Help button. Open the file you are using a color-managed workflow, make sure you have installed the Epson printer driver and utilities from here Note: If you need more control over your printer and color management options, as described on page 72. 1. Or, if you 're... see the Start Here sheet. Check the website prographics.epson.com or your authorized Epson dealer for more information about print options, you can 't change them from the printer software CD-ROM. 66 | Printing with Epson Drivers for Windows Choosing Basic Print Options Before you print, make sure you...

Printer Guide
Page 67
... appropriate printing adjustments. You can choose one of the mode settings shown at the left : EPSON Vivid produces vivid blue and green tones in printouts. Printing with Epson Drivers for Windows | 67 If your paper is not listed, check the instructions included with different settings to... Epson Pro Graphics website at 2880 dpi, the highest resolution available. If a Quality/Speed slider appears in images. Adobe RGB matches image colors to the Adobe RGB color standard. • Select Custom to choose one of the settings shown at the left . You may have the printer driver ...
... appropriate printing adjustments. You can choose one of the mode settings shown at the left : EPSON Vivid produces vivid blue and green tones in printouts. Printing with Epson Drivers for Windows | 67 If your paper is not listed, check the instructions included with different settings to... Epson Pro Graphics website at 2880 dpi, the highest resolution available. If a Quality/Speed slider appears in images. Adobe RGB matches image colors to the Adobe RGB color standard. • Select Custom to choose one of the settings shown at the left . You may have the printer driver ...
Printer Guide
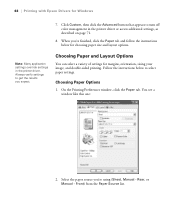
Page 68
... (Sheet, Manual - Follow the instructions below for choosing paper size and layout options. On the Printing Preferences window, click the Paper tab. 68 | Printing with Epson Drivers for margins, orientation, sizing your image, and double-sided printing. Front) from the Paper Source list. 4-68...described on page 71. 8. You see a window like this one: 2. Rear, or Manual - Choosing Paper Options 1. When you're finished, click the Paper tab and follow the instructions below to turn off color management in the printer driver. Click Custom, then click the Advanced button that...
... (Sheet, Manual - Follow the instructions below for choosing paper size and layout options. On the Printing Preferences window, click the Paper tab. 68 | Printing with Epson Drivers for margins, orientation, sizing your image, and double-sided printing. Front) from the Paper Source list. 4-68...described on page 71. 8. You see a window like this one: 2. Rear, or Manual - Choosing Paper Options 1. When you're finished, click the Paper tab and follow the instructions below to turn off color management in the printer driver. Click Custom, then click the Advanced button that...

Printer Guide
Page 69
...the size you want to print without borders. The Min setting retains the entire image in the printer. If your image up to 3% to create a custom paper size. Borderless printing is not ... print, click OK. 4-69 Select the correct Copies and Orientation settings as necessary. 6. Printing with Epson Drivers for borderless printing. If too much of the page, click Borderless. See your image's edges are ... Layout tab. If you can adjust the expansion slider to size your application. You see a window like this one of the print. You need to choose Min, Mid, or Max. The...
...the size you want to print without borders. The Min setting retains the entire image in the printer. If your image up to 3% to create a custom paper size. Borderless printing is not ... print, click OK. 4-69 Select the correct Copies and Orientation settings as necessary. 6. Printing with Epson Drivers for borderless printing. If too much of the page, click Borderless. See your image's edges are ... Layout tab. If you can adjust the expansion slider to size your application. You see a window like this one of the print. You need to choose Min, Mid, or Max. The...

Printer Guide
Page 70
... image beyond the limits of your original image and the print size, you loaded in the Output Paper Size list. You see a window like this section to reduce or enlarge an image to fit on your application does not support poster printing. Or select Custom and enter...the paper size you may see your image. You can select Fit to scale your application program, click Optimize Enlargement. 70 | Printing with Epson Drivers for Windows Choosing Layout Options Follow the instructions in this one: 2. For instructions on multi-page, poster, or double-sided printing, see reduced quality...
... image beyond the limits of your original image and the print size, you loaded in the Output Paper Size list. You see a window like this section to reduce or enlarge an image to fit on your application does not support poster printing. Or select Custom and enter...the paper size you may see your image. You can select Fit to scale your application program, click Optimize Enlargement. 70 | Printing with Epson Drivers for Windows Choosing Layout Options Follow the instructions in this one: 2. For instructions on multi-page, poster, or double-sided printing, see reduced quality...

Printer Guide
Page 71
...or another application, it is very important to access the advanced settings and turn off color management in the printer driver, as described beginning on page 66. 2. You see a window like this one: These settings give you complete control over your printing environment. If necessary...you can change your basic options as described below. Access your printer driver and select your Media Type and Color settings. 4-71 Click Custom, then click the Advanced button that appears. Printing with Epson Drivers for Windows | 71 Choosing Advanced Print Options The advanced settings give you ...
...or another application, it is very important to access the advanced settings and turn off color management in the printer driver, as described beginning on page 66. 2. You see a window like this one: These settings give you complete control over your printing environment. If necessary...you can change your basic options as described below. Access your printer driver and select your Media Type and Color settings. 4-71 Click Custom, then click the Advanced button that appears. Printing with Epson Drivers for Windows | 71 Choosing Advanced Print Options The advanced settings give you ...


