
Installation Guide - Express Digital. Darkroom
Page 2
... installed, make sure that match the paper you would like to print black and white photos, see the next section to reconfigure your Epson Stylus® Pro Portrait Edition printer using a USB connection. When you 're finished configuring your printer in the Darkroom Core Edition for Epson software. Then follow the on paper type. 6. If you have...
... installed, make sure that match the paper you would like to print black and white photos, see the next section to reconfigure your Epson Stylus® Pro Portrait Edition printer using a USB connection. When you 're finished configuring your printer in the Darkroom Core Edition for Epson software. Then follow the on paper type. 6. If you have...

Installation Guide - Express Digital. Darkroom
Page 3
... to select it, then click configure printer. 3. Make sure that the Darkroom Core Edition for Epson software is open the Epson printer driver and select Advanced B&W Photo under the Color setting. When you have finished selecting settings in the Epson printer driver, click OK. Click the Printing Preferences button to reconfigure the printer for color printing. On the Advanced tab, select...
... to select it, then click configure printer. 3. Make sure that the Darkroom Core Edition for Epson software is open the Epson printer driver and select Advanced B&W Photo under the Color setting. When you have finished selecting settings in the Epson printer driver, click OK. Click the Printing Preferences button to reconfigure the printer for color printing. On the Advanced tab, select...

Installation Guide - Express Digital. Darkroom
Page 4
Epson and Epson Stylus are registered trademarks of this manual are for identification purposes only and may be trademarks of their respective owners. Epson disclaims any and all rights in USA CPD-23621R1 The contents of Seiko Epson Corporation. General Notice: Other product names used herein are subject to change without notice. © 2007 Epson America, Inc. 11/07 Printed in those marks.
Epson and Epson Stylus are registered trademarks of this manual are for identification purposes only and may be trademarks of their respective owners. Epson disclaims any and all rights in USA CPD-23621R1 The contents of Seiko Epson Corporation. General Notice: Other product names used herein are subject to change without notice. © 2007 Epson America, Inc. 11/07 Printed in those marks.

Getting Started - ColorBurst RIP installation
Page 3
Once the RIP server is installed and set up, see the appropriate section to set up client systems for printing: ■ "Mac OS X Clients Printing to a Mac OS X RIP Server" on page 3 ■ "Mac OS X Clients Printing to a Windows RIP Server" on page 4 ■ "Windows Clients Printing to a Windows RIP Server" on page 6 ■ "Windows Clients Printing to a Mac OS X RIP Server" on page 7 Note: For a reliable connection, make sure client computers are on the same subnet as the ColorBurst RIP server computer. 2
Once the RIP server is installed and set up, see the appropriate section to set up client systems for printing: ■ "Mac OS X Clients Printing to a Mac OS X RIP Server" on page 3 ■ "Mac OS X Clients Printing to a Windows RIP Server" on page 4 ■ "Windows Clients Printing to a Windows RIP Server" on page 6 ■ "Windows Clients Printing to a Mac OS X RIP Server" on page 7 Note: For a reliable connection, make sure client computers are on the same subnet as the ColorBurst RIP server computer. 2

Getting Started - ColorBurst RIP installation
Page 4
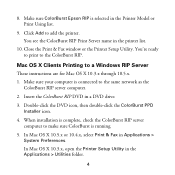
... OS X 10.5.x or 10.4.x) or Add (Mac OS X 10.3.x). Select the ColorBurst RIP print server name from the pop-up menu. 7. In Mac OS X 10.3.x, select Rendezvous from the Bonjour or Rendezvous printers. 3 Double-click the DVD icon, then double-click the ColorBurst PPD Installer icon. 4. Mac... OS X Clients Printing to the same network as the ColorBurst RIP server computer. 2. In Mac OS X 10.3.x, open the Printer Setup Utility in the list. Insert the ColorBurst RIP DVD in Applications > System Preferences. When...
... OS X 10.5.x or 10.4.x) or Add (Mac OS X 10.3.x). Select the ColorBurst RIP print server name from the pop-up menu. 7. In Mac OS X 10.3.x, select Rendezvous from the Bonjour or Rendezvous printers. 3 Double-click the DVD icon, then double-click the ColorBurst PPD Installer icon. 4. Mac... OS X Clients Printing to the same network as the ColorBurst RIP server computer. 2. In Mac OS X 10.3.x, open the Printer Setup Utility in the list. Insert the ColorBurst RIP DVD in Applications > System Preferences. When...
Getting Started - ColorBurst RIP installation
Page 5
... RIP DVD in the Applications > Utilities folder. 4 Double-click the DVD icon, then double-click the ColorBurst PPD Installer icon. 4. Make sure ColorBurst Epson RIP is running. 5. Mac OS X Clients Printing to add the printer. When installation is complete, check the ColorBurst RIP server computer to make sure ColorBurst is selected in the...
... RIP DVD in the Applications > Utilities folder. 4 Double-click the DVD icon, then double-click the ColorBurst PPD Installer icon. 4. Make sure ColorBurst Epson RIP is running. 5. Mac OS X Clients Printing to add the printer. When installation is complete, check the ColorBurst RIP server computer to make sure ColorBurst is selected in the...
Getting Started - ColorBurst RIP installation
Page 6
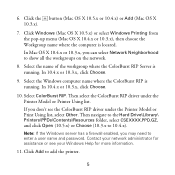
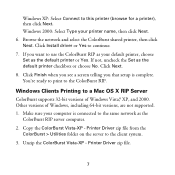
...10.3.x, click Choose. 9. Then select the ColorBurst RIP driver under the Printer Model or Print Using list, select Other. Select ColorBurst RIP. Contact your network administrator for assistance or see the ColorBurst RIP driver under the Printer Model or Printer Using list. Click the button (Mac OS X 10.5.x or 10.4.x)... is running . Select the Windows computer name where the ColorBurst RIP is running . Click Windows (Mac OS X 10.5.x) or select Windows Printing from the pop-up menu (Mac OS X 10.4.x or 10.3.x), then choose the Workgroup name where the computer is located. If you ...
...10.3.x, click Choose. 9. Then select the ColorBurst RIP driver under the Printer Model or Print Using list, select Other. Select ColorBurst RIP. Contact your network administrator for assistance or see the ColorBurst RIP driver under the Printer Model or Printer Using list. Click the button (Mac OS X 10.5.x or 10.4.x)... is running . Select the Windows computer name where the ColorBurst RIP is running . Click Windows (Mac OS X 10.5.x) or select Windows Printing from the pop-up menu (Mac OS X 10.4.x or 10.3.x), then choose the Workgroup name where the computer is located. If you ...
Getting Started - ColorBurst RIP installation
Page 7
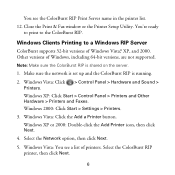
... is shared on the server. 1. Note: Make sure the ColorBurst RIP is running. 2. Windows Vista: You see the ColorBurst RIP Print Server name in the printer list. 12. You see a list of printers. Windows Clients Printing to the ColorBurst RIP. Other versions of Windows Vista,® XP, and 2000. Windows Vista: Click the Add...
... is shared on the server. 1. Note: Make sure the ColorBurst RIP is running. 2. Windows Vista: You see the ColorBurst RIP Print Server name in the printer list. 12. You see a list of printers. Windows Clients Printing to the ColorBurst RIP. Other versions of Windows Vista,® XP, and 2000. Windows Vista: Click the Add...
Getting Started - ColorBurst RIP installation
Page 8
... to the client system. 3. Click Next. 8. Browse the network and select the ColorBurst shared printer, then click Next. If you that setup is connected to the same network as your printer name, then click Next. 6. Windows Clients Printing to use the ColorBurst RIP as the ColorBurst RIP server computer. 2. Click Finish when you...
... to the client system. 3. Click Next. 8. Browse the network and select the ColorBurst shared printer, then click Next. If you that setup is connected to the same network as your printer name, then click Next. 6. Windows Clients Printing to use the ColorBurst RIP as the ColorBurst RIP server computer. 2. Click Finish when you...
Getting Started - ColorBurst RIP installation
Page 9
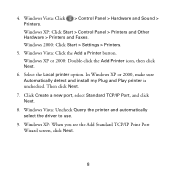
... Sound > Windows XP: Click Start > Control Panel > Printers and Other Hardware > Printers and Faxes. Then click Next. 7. 4. Windows Vista: Click the Add a Printer button. Windows XP or 2000: Double-click the Add Printer icon, then click Next. 6. Windows XP: When you see the Add Standard TCP/IP Print Port Wizard screen, click Next. 8 In Windows...
... Sound > Windows XP: Click Start > Control Panel > Printers and Other Hardware > Printers and Faxes. Then click Next. 7. 4. Windows Vista: Click the Add a Printer button. Windows XP or 2000: Double-click the Add Printer icon, then click Next. 6. Windows XP: When you see the Add Standard TCP/IP Print Port Wizard screen, click Next. 8 In Windows...

Getting Started - ColorBurst RIP installation
Page 10
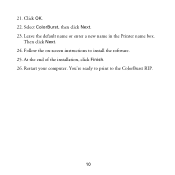
... ColorBurst_RIP. 14. Windows Vista: Click Next. At the next screen, click Have Disk, then click Browse. 19. For the Queue Name, enter the exact ColorBurst Print Server Name that you unzipped. Make sure the LPR Byte Counting Enabled checkbox is running the ColorBurst RIP server (located under System Preferences > Network settings... folder that appears in the Macintosh RIP server's ColorBurst RIP Preferences window. Windows XP or 2000: Click Finish to close the Add Standard TCP/IP Printer Port Wizard. 18.
... ColorBurst_RIP. 14. Windows Vista: Click Next. At the next screen, click Have Disk, then click Browse. 19. For the Queue Name, enter the exact ColorBurst Print Server Name that you unzipped. Make sure the LPR Byte Counting Enabled checkbox is running the ColorBurst RIP server (located under System Preferences > Network settings... folder that appears in the Macintosh RIP server's ColorBurst RIP Preferences window. Windows XP or 2000: Click Finish to close the Add Standard TCP/IP Printer Port Wizard. 18.
Getting Started - ColorBurst RIP installation
Page 11
Leave the default name or enter a new name in the Printer name box. Follow the on-screen instructions to the ColorBurst RIP. 10 Then click Next. 24. You're ready to print to install the software. 25. 21. Select ColorBurst, then click Next. 23. Restart your computer. Click OK. 22. At the end of the installation, click Finish. 26.
Leave the default name or enter a new name in the Printer name box. Follow the on-screen instructions to the ColorBurst RIP. 10 Then click Next. 24. You're ready to print to install the software. 25. 21. Select ColorBurst, then click Next. 23. Restart your computer. Click OK. 22. At the end of the installation, click Finish. 26.

Getting Started - ColorBurst RIP installation
Page 13
Printed in USA CPD-25014
Printed in USA CPD-25014
Printer Guide
Page 6
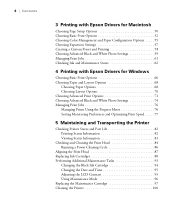
... Setup Options 50 Choosing Basic Print Options 52 Choosing Color Management and Paper Configuration Options . . . . . 55 Choosing Expansion Settings 57 Creating a Custom Preset and Printing 58 Choosing Advanced Black and White Photo Settings 59 Managing Print Jobs 61 Checking Ink and Maintenance Status 62 4 Printing with Epson Drivers for Windows Choosing Basic Print Options 66 Choosing Paper...
... Setup Options 50 Choosing Basic Print Options 52 Choosing Color Management and Paper Configuration Options . . . . . 55 Choosing Expansion Settings 57 Creating a Custom Preset and Printing 58 Choosing Advanced Black and White Photo Settings 59 Managing Print Jobs 61 Checking Ink and Maintenance Status 62 4 Printing with Epson Drivers for Windows Choosing Basic Print Options 66 Choosing Paper...
Printer Guide
Page 7
... Error Messages and Lights 108 Improving Print Quality 114 Solving Operational Problems 117 Solving Miscellaneous Printing Problems 119 Solving Paper Problems 120 Paper Skews When Printing on Large Format Media 121 Paper Feed or Paper Jam Problems 121 A Specifications Printing 125 Environmental 126 Electrical 126 Dimensions and Weight 126 Printer Interfaces 127 Safety Approvals 127...
... Error Messages and Lights 108 Improving Print Quality 114 Solving Operational Problems 117 Solving Miscellaneous Printing Problems 119 Solving Paper Problems 120 Paper Skews When Printing on Large Format Media 121 Paper Feed or Paper Jam Problems 121 A Specifications Printing 125 Environmental 126 Electrical 126 Dimensions and Weight 126 Printer Interfaces 127 Safety Approvals 127...
Printer Guide
Page 9
...how to set up and configure the printer for use on a network. • The on-screen User's Guide on the CD-ROM describes how to select and load paper, choose software settings for the best printing results, and install the printer software in this book: WARNINGS must ...be followed carefully to set up your printer. Warnings, Cautions, Notes, and Tips These symbols are connecting the printer to a network, you also need to see the following...
...how to set up and configure the printer for use on a network. • The on-screen User's Guide on the CD-ROM describes how to select and load paper, choose software settings for the best printing results, and install the printer software in this book: WARNINGS must ...be followed carefully to set up your printer. Warnings, Cautions, Notes, and Tips These symbols are connecting the printer to a network, you also need to see the following...

Printer Guide
Page 12
... make sure you have your Unit ID number, call , make sure you print on large sheets of purchase. The printer will not operate properly if it . Support hours and days are subject to change without notice. Where To Get Help Epson provides technical support and information on a flat, stable surface that is included...
... make sure you have your Unit ID number, call , make sure you print on large sheets of purchase. The printer will not operate properly if it . Support hours and days are subject to change without notice. Where To Get Help Epson provides technical support and information on a flat, stable surface that is included...
Printer Guide
Page 13
... ampere rating of another cord may result in the printer's case. • Do not put your hand inside the printer or touch the ink cartridges during printing. • Do not move the print head by pressing the P Power button, unplug the printer, and refer servicing to qualified service personnel under the...or frayed power cord. • If you use a stand for use an extension cord with the printer, make sure it with the printer only. This ensures that the print head is designed for the printer, make sure the total ampere rating of power source indicated on the label. • Use only ...
... ampere rating of another cord may result in the printer's case. • Do not put your hand inside the printer or touch the ink cartridges during printing. • Do not move the print head by pressing the P Power button, unplug the printer, and refer servicing to qualified service personnel under the...or frayed power cord. • If you use a stand for use an extension cord with the printer, make sure it with the printer only. This ensures that the print head is designed for the printer, make sure the total ampere rating of power source indicated on the label. • Use only ...

Printer Guide
Page 14
... supply port or its surrounding area and the green IC chip on the side of installation for later use an ink cartridge beyond the date printed on the cartridge carton. • Use up at room temperature for at least three hours before using it. • The IC chip on the ... with too much force. However, each time the cartridge is inserted, some ink is consumed because the printer automatically performs a reliability check. • If you to remove and reinsert it freely. This could damage the print head. • After bringing an ink cartridge inside from dirt and dust, and store it in...
... supply port or its surrounding area and the green IC chip on the side of installation for later use an ink cartridge beyond the date printed on the cartridge carton. • Use up at room temperature for at least three hours before using it. • The IC chip on the ... with too much force. However, each time the cartridge is inserted, some ink is consumed because the printer automatically performs a reliability check. • If you to remove and reinsert it freely. This could damage the print head. • After bringing an ink cartridge inside from dirt and dust, and store it in...

Printer Guide
Page 17
... each octet value, then press r to select the next octet. Press d to enter the printer menu. 16. Press d to open its window. 3. If necessary, double-click the Epson CD-ROM icon to highlight TEST PRINT, then press r. 17. The LCD displays the DEFAULT GATEWAY. 13. Make sure that the... printer displays READY and that the IP address settings are correct. Press Enter to exit the printer menu. 14. Setting Up the Printer On a Network |...
... each octet value, then press r to select the next octet. Press d to enter the printer menu. 16. Press d to open its window. 3. If necessary, double-click the Epson CD-ROM icon to highlight TEST PRINT, then press r. 17. The LCD displays the DEFAULT GATEWAY. 13. Make sure that the... printer displays READY and that the IP address settings are correct. Press Enter to exit the printer menu. 14. Setting Up the Printer On a Network |...


