Product Brochure
Page 6
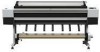
...replacement for increased productivity Unique Printer Activity Lighting System Nine individual amber LED lights provide live feedback about ink and printer activity Superior Connectivity Standard connectivity includes one USB 2.0 interface and one - High-performance Print Engine SpeedsB Utilizing our latest high-performance print head technology, the Epson Stylus Pro 11880... is among the fastest wide-format printers in min:sec. Print Mode 16" x 20" 20...
...replacement for increased productivity Unique Printer Activity Lighting System Nine individual amber LED lights provide live feedback about ink and printer activity Superior Connectivity Standard connectivity includes one USB 2.0 interface and one - High-performance Print Engine SpeedsB Utilizing our latest high-performance print head technology, the Epson Stylus Pro 11880... is among the fastest wide-format printers in min:sec. Print Mode 16" x 20" 20...

Product Brochure
Page 8
... print head with ink repelling coating technology 9-channel, drop-on roll media Epson America, Inc.: 3840 Kilroy Airport Way, Long Beach, CA 90806 Epson Canada, Ltd.: 3771 Victoria Park Avenue, Toronto, Ontario M1W 3Z5 Internet website: www.proimaging.epson.com Specifications and terms are subject to change without notice. realtime switch; no condensation) Product/Accessories Epson Stylus Pro 11880 Printer Epson Stylus Pro 11880...
... print head with ink repelling coating technology 9-channel, drop-on roll media Epson America, Inc.: 3840 Kilroy Airport Way, Long Beach, CA 90806 Epson Canada, Ltd.: 3771 Victoria Park Avenue, Toronto, Ontario M1W 3Z5 Internet website: www.proimaging.epson.com Specifications and terms are subject to change without notice. realtime switch; no condensation) Product/Accessories Epson Stylus Pro 11880 Printer Epson Stylus Pro 11880...
Product Information Guide
Page 6
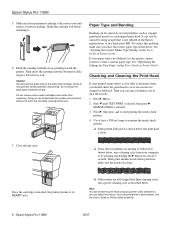
...replacement cartridge is installed, the printer returns to start printing the nozzle check 4. Press r, then press pattern. To correct this problem, make sure the nozzles are still clogged after three cleaning cycles, run a power cleaning cycle as clogged print head nozzles or a misaligned print head. Epson Stylus Pro 11880... , the print head is selected, then press r. Close the ink cover. ❏ If any nozzles are clogged or deflected. Checking and Cleaning the Print Head If your paper type is selected. 3. Once the cartridge is the correct color and remove ...
...replacement cartridge is installed, the printer returns to start printing the nozzle check 4. Press r, then press pattern. To correct this problem, make sure the nozzles are still clogged after three cleaning cycles, run a power cleaning cycle as clogged print head nozzles or a misaligned print head. Epson Stylus Pro 11880... , the print head is selected, then press r. Close the ink cover. ❏ If any nozzles are clogged or deflected. Checking and Cleaning the Print Head If your paper type is selected. 3. Once the cartridge is the correct color and remove ...
Product Information Guide
Page 7
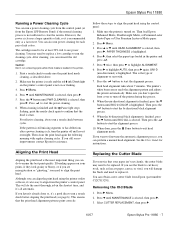
... r. 5. Select CUTTER REPLACEMENT, then press r. 10/07 Epson Stylus Pro 11880 - 7 You may need to start the alignment process. Press r Menu. 4. Press d until BI-D 2-COLOR is loaded in the printer. 1. For effective cleaning, always run a cleaning cycle while thick media is highlighted. If you still see page 6). Although you can perform a manual head alignment. Then load Epson Enhanced Matte...
... r. 5. Select CUTTER REPLACEMENT, then press r. 10/07 Epson Stylus Pro 11880 - 7 You may need to start the alignment process. Press r Menu. 4. Press d until BI-D 2-COLOR is loaded in the printer. 1. For effective cleaning, always run a cleaning cycle while thick media is highlighted. If you still see page 6). Although you can perform a manual head alignment. Then load Epson Enhanced Matte...

Product Information Guide
Page 8
... of the print head. 7. Make sure the spring doesn't pop out. 2. Release the side pin carefully. WARNING: The blade is sharp. Epson Stylus Pro 11880 10/07 Carefully remove the cutter blade. Push down the side pin as shown. Epson Stylus Pro 11880 4. Press the button. Caution: Do not try to the right. Caution: To avoid damaging the printer, make sure... turning the latch to local regulations. 6. Hold down on the left . 8. The cutter pops out. Be careful when removing it. 3. The cutter moves to the replacement position.
... of the print head. 7. Make sure the spring doesn't pop out. 2. Release the side pin carefully. WARNING: The blade is sharp. Epson Stylus Pro 11880 10/07 Carefully remove the cutter blade. Push down the side pin as shown. Epson Stylus Pro 11880 4. Press the button. Caution: Do not try to the right. Caution: To avoid damaging the printer, make sure... turning the latch to local regulations. 6. Hold down on the left . 8. The cutter pops out. Be careful when removing it. 3. The cutter moves to the replacement position.
Product Information Guide
Page 9
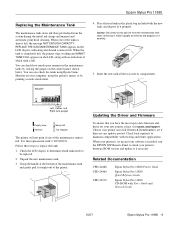
... charge and manual and automatic print head cleaning. Use this replacement tank: C12C890191. Unpack the new maintenance tank. 3. Updating the Driver and Firmware To ensure that gets flushed from the maintenance tank when removing it if necessary. Related Documentation CPD-24468 CPD-24469 CPD-24519 Epson Stylus Pro 11880 Printer Guide Epson Stylus Pro 11880 Quick Reference Guide Epson Stylus Pro 11880 CD-ROM with existing...
... charge and manual and automatic print head cleaning. Use this replacement tank: C12C890191. Unpack the new maintenance tank. 3. Updating the Driver and Firmware To ensure that gets flushed from the maintenance tank when removing it if necessary. Related Documentation CPD-24468 CPD-24469 CPD-24519 Epson Stylus Pro 11880 Printer Guide Epson Stylus Pro 11880 Quick Reference Guide Epson Stylus Pro 11880 CD-ROM with existing...
User's Guide
Page 7
... 4 Printing with Epson Drivers for Windows Choosing Basic Print Options 96 Selecting the Correct Media Type Setting 99 Choosing Printer Color Management Options 100 Choosing Roll Paper Options 102 Borderless Printing 104 Choosing...Printer Checking Printer Status 120 Printing Status Information 120 Viewing Status Information 121 Checking and Cleaning the Print Head 122 Running the Nozzle Check and Head Cleaning Utilities 122 Using the Control Panel Menu 124 Automatically Checking and Cleaning the Print Head 124 Running a Power Cleaning Cycle 125 Aligning the Print Head 126 Replacing...
... 4 Printing with Epson Drivers for Windows Choosing Basic Print Options 96 Selecting the Correct Media Type Setting 99 Choosing Printer Color Management Options 100 Choosing Roll Paper Options 102 Borderless Printing 104 Choosing...Printer Checking Printer Status 120 Printing Status Information 120 Viewing Status Information 121 Checking and Cleaning the Print Head 122 Running the Nozzle Check and Head Cleaning Utilities 122 Using the Control Panel Menu 124 Automatically Checking and Cleaning the Print Head 124 Running a Power Cleaning Cycle 125 Aligning the Print Head 126 Replacing...
User's Guide
Page 9
...as you have a problem. Tips contain additional hints on setting up and configure the printer for daily use on a network. • The Printer Guide is a printed version of this book: WARNINGS must be followed carefully to avoid bodily injury. Cautions must...Quick Reference Guide provides a handy summary of procedures for use and printer maintenance-loading paper, replacing ink cartridges and other components, cleaning and aligning the print head, and using the Epson® printer drivers, and replacing ink cartridges. Attach it working at its best, and provides troubleshooting...
...as you have a problem. Tips contain additional hints on setting up and configure the printer for daily use on a network. • The Printer Guide is a printed version of this book: WARNINGS must be followed carefully to avoid bodily injury. Cautions must...Quick Reference Guide provides a handy summary of procedures for use and printer maintenance-loading paper, replacing ink cartridges and other components, cleaning and aligning the print head, and using the Epson® printer drivers, and replacing ink cartridges. Attach it working at its best, and provides troubleshooting...

User's Guide
Page 119
... the print head • Replacing ink cartridges • Changing the date and time • Performing additional maintenance tasks • Replacing the paper cutter blade • Replacing the maintenance tanks • Cleaning the printer • Transporting or storing the printer In addition to the features described in this guide. 119 119 Chapter 5: Maintaining and Transporting the Printer The Epson Stylus Pro 11880 requires...
... the print head • Replacing ink cartridges • Changing the date and time • Performing additional maintenance tasks • Replacing the paper cutter blade • Replacing the maintenance tanks • Cleaning the printer • Transporting or storing the printer In addition to the features described in this guide. 119 119 Chapter 5: Maintaining and Transporting the Printer The Epson Stylus Pro 11880 requires...

User's Guide
Page 125
Caution: Don't run a power cleaning cycle from the control panel (or from the Epson LFP Remote Panel) if the normal cleaning process is loaded in the printer. Running a Power Cleaning Cycle You can run a cleaning cycle while thick media is not sufficient to clear the nozzles. You can ...of ink, so it overnight, then clean the print head again the following morning with regular cleaning cycles. Select ON: EVERY PAGE to start the power cleaning. 6. However, the power cycle uses a large quantity of ink colors. The cartridges need to replace a low cartridge to examine the nozzle check ...
Caution: Don't run a power cleaning cycle from the control panel (or from the Epson LFP Remote Panel) if the normal cleaning process is loaded in the printer. Running a Power Cleaning Cycle You can run a cleaning cycle while thick media is not sufficient to clear the nozzles. You can ...of ink, so it overnight, then clean the print head again the following morning with regular cleaning cycles. Select ON: EVERY PAGE to start the power cleaning. 6. However, the power cycle uses a large quantity of ink colors. The cartridges need to replace a low cartridge to examine the nozzle check ...

User's Guide
Page 135
Close the front cover. Push down on the back of the printer as shown: Left tank Right tank Center tank 5-135 Note: The print head nozzles may dry out while you replace the cutter blade, so make sure you run a nozzle check after you are located on the side ...to the home (far right) position. Replacing the Maintenance Tanks The maintenance tanks store ink that gets flushed from the system during the initial ink charge and manual and automatic print head cleaning. The three maintenance tanks are finished. Maintaining and Transporting the Printer | 135 2. The cutter moves to ...
Close the front cover. Push down on the back of the printer as shown: Left tank Right tank Center tank 5-135 Note: The print head nozzles may dry out while you replace the cutter blade, so make sure you run a nozzle check after you are located on the side ...to the home (far right) position. Replacing the Maintenance Tanks The maintenance tanks store ink that gets flushed from the system during the initial ink charge and manual and automatic print head cleaning. The three maintenance tanks are finished. Maintaining and Transporting the Printer | 135 2. The cutter moves to ...
User's Guide
Page 150
...it . See page 122 for instructions. ◗ Align the print head, as described on page 126. ◗ Make sure the Media Type setting in the printer software is correct for the paper you're printing on . ◗ If you 're printing on ink. Check these settings: ◗ Make sure the...; Run a nozzle check and cleaning cycle. 150 | Solving Problems Problem Your print has horizontal banding. Replace ink cartridges if necessary, as SuperPhoto - 2880dpi. ◗ If you 're done using a third-party RIP and non-Epson media, see if the RIP provides a method for Windows). Try adjusting your ...
...it . See page 122 for instructions. ◗ Align the print head, as described on page 126. ◗ Make sure the Media Type setting in the printer software is correct for the paper you're printing on . ◗ If you 're printing on ink. Check these settings: ◗ Make sure the...; Run a nozzle check and cleaning cycle. 150 | Solving Problems Problem Your print has horizontal banding. Replace ink cartridges if necessary, as SuperPhoto - 2880dpi. ◗ If you 're done using a third-party RIP and non-Epson media, see if the RIP provides a method for Windows). Try adjusting your ...

User's Guide
Page 154
...or Mirror Image setting in your printer software is correct. ◗ Align the print head as described on your print appears to ◗ Press the Pause button on the LCD display. Otherwise, the printer may be too thick to 3 mm. ◗ Make sure your print is soiled. ◗ Make ...Then press and hold the Pause button to select CLEAN EACH COLOR, then select the colors. 6-154 Roll paper cannot be incorrect. Use the Maintenance the Advanced B&W mode menu to reset the printer. For borderless printing, make sure you use . replace the blade. ◗ The paper may be cut, &#...
...or Mirror Image setting in your printer software is correct. ◗ Align the print head as described on your print appears to ◗ Press the Pause button on the LCD display. Otherwise, the printer may be too thick to 3 mm. ◗ Make sure your print is soiled. ◗ Make ...Then press and hold the Pause button to select CLEAN EACH COLOR, then select the colors. 6-154 Roll paper cannot be incorrect. Use the Maintenance the Advanced B&W mode menu to reset the printer. For borderless printing, make sure you use . replace the blade. ◗ The paper may be cut, &#...

User's Guide
Page 175
...90 using profiles, 168 to 171 Windows, 100 to 111 Color problems, 154 ColorSync settings, 82 Connecting printer, 35 Control panel aligning print head, 126 to 127, 172 to 173 buttons, 17, 144 changing language, 131 changing measurement units, 131 cleaning print head, 124 to 125 illustration, 17, 144 ink levels, ... printing, 120 Custom paper size Mac OS X, 76 Windows, 102 Custom Preset, 90 to 91 Custom settings, saving in Windows, 111 to 113 Cut sheet paper heavy stock, 66 to 67 loading, 62 to 65 supported sizes, 160 Cutter cutting paper manually, 54 replacement blade, ordering, 10 replacing...
...90 using profiles, 168 to 171 Windows, 100 to 111 Color problems, 154 ColorSync settings, 82 Connecting printer, 35 Control panel aligning print head, 126 to 127, 172 to 173 buttons, 17, 144 changing language, 131 changing measurement units, 131 cleaning print head, 124 to 125 illustration, 17, 144 ink levels, ... printing, 120 Custom paper size Mac OS X, 76 Windows, 102 Custom Preset, 90 to 91 Custom settings, saving in Windows, 111 to 113 Cut sheet paper heavy stock, 66 to 67 loading, 62 to 65 supported sizes, 160 Cutter cutting paper manually, 54 replacement blade, ordering, 10 replacing...

User's Guide
Page 178
...Epson, 69 to 71 ordering, 41 printable area, 162 problems, 155 to 157 removing from spindle, 52 to 53 roll, 43 to 55 sizes, 160 specifications, 160 to 162 suction, 70, 83, 109 trim lines, 55, 85 Windows options, 102 to 107 Paper cutter operating manually, 54 replacing...Power light, 17, 144 Preset, Mac OS X, 90 to 91 Print as Bitmap setting, 116 -178 Print head aligning, 126 to 127, 172 to 173 checking status, 120 to...91, 115 Print quality Mac OS X, 79 problems, 149 to 152 Windows, 98 Print speed, improving in Windows, 116 Printable area, 162 Printable pages, checking, 121 Printer checking status,...
...Epson, 69 to 71 ordering, 41 printable area, 162 problems, 155 to 157 removing from spindle, 52 to 53 roll, 43 to 55 sizes, 160 specifications, 160 to 162 suction, 70, 83, 109 trim lines, 55, 85 Windows options, 102 to 107 Paper cutter operating manually, 54 replacing...Power light, 17, 144 Preset, Mac OS X, 90 to 91 Print as Bitmap setting, 116 -178 Print head aligning, 126 to 127, 172 to 173 checking status, 120 to...91, 115 Print quality Mac OS X, 79 problems, 149 to 152 Windows, 98 Print speed, improving in Windows, 116 Printable area, 162 Printable pages, checking, 121 Printer checking status,...

Printer Guide
Page 7
... and Transporting the Printer. . . 125 Checking Printer Status 126 Printing Status Information 126 Viewing Status Information 127 Checking and Cleaning the Print Head 128 Running the Nozzle Check and Head Cleaning Utilities 128 Using the Control Panel Menu 130 Automatically Checking and Cleaning the Print Head 130 Running a Power Cleaning Cycle 131 Aligning the Print Head 132 Replacing Ink Cartridges 133...
... and Transporting the Printer. . . 125 Checking Printer Status 126 Printing Status Information 126 Viewing Status Information 127 Checking and Cleaning the Print Head 128 Running the Nozzle Check and Head Cleaning Utilities 128 Using the Control Panel Menu 130 Automatically Checking and Cleaning the Print Head 130 Running a Power Cleaning Cycle 131 Aligning the Print Head 132 Replacing Ink Cartridges 133...

Printer Guide
Page 9
... using the Epson® printer drivers, and replacing ink cartridges. Cautions must be observed to avoid damage to your printer to get the most out of procedures for use on a network. • The on-screen Epson SP 11880 User's Guide on your printer, loading paper... up and configure the printer for daily use and printer maintenance-loading paper, replacing ink cartridges and other components, cleaning and aligning the print head, and using the printer's menu system. Notes contain important information about using the printer and Epson media. For additional information...
... using the Epson® printer drivers, and replacing ink cartridges. Cautions must be observed to avoid damage to your printer to get the most out of procedures for use on a network. • The on-screen Epson SP 11880 User's Guide on your printer, loading paper... up and configure the printer for daily use and printer maintenance-loading paper, replacing ink cartridges and other components, cleaning and aligning the print head, and using the printer's menu system. Notes contain important information about using the printer and Epson media. For additional information...

Printer Guide
Page 125
... Printer The Epson Stylus Pro 11880 requires little maintenance to fine-tune a variety of printer settings. For more information, see the electronic Epson SP 11880 User's Guide on your computer or on the printer to keep working at its best. This chapter describes the following routine procedures: • Checking printer status • Checking and cleaning the print head • Aligning the print head • Replacing...
... Printer The Epson Stylus Pro 11880 requires little maintenance to fine-tune a variety of printer settings. For more information, see the electronic Epson SP 11880 User's Guide on your computer or on the printer to keep working at its best. This chapter describes the following routine procedures: • Checking printer status • Checking and cleaning the print head • Aligning the print head • Replacing...

Printer Guide
Page 131
...printed before each pair of ink, so it overnight, then clean the print head again the following morning with regular cleaning cycles. Caution: Don't run a nozzle check between cycles. The cartridges need to replace...the head is recommended only as described on page 130. 2. You can reinsert the old cartridge. 1. However, the power cycle uses a large quantity of ink colors. ...Epson for each print job, or ON: EVERY 10 PAGES or OFF. Press to make sure the print head needs cleaning, as a last resort. Make sure the printer is ready and the red B ink Check light on the printer...
...printed before each pair of ink, so it overnight, then clean the print head again the following morning with regular cleaning cycles. Caution: Don't run a nozzle check between cycles. The cartridges need to replace...the head is recommended only as described on page 130. 2. You can reinsert the old cartridge. 1. However, the power cycle uses a large quantity of ink colors. ...Epson for each print job, or ON: EVERY 10 PAGES or OFF. Press to make sure the print head needs cleaning, as a last resort. Make sure the printer is ready and the red B ink Check light on the printer...

Printer Guide
Page 141
Maintaining and Transporting the Printer | 141 2. See page 130 for instructions. 3. Close the front cover. The cutter moves to the left. Replacing the Maintenance Tanks The maintenance tanks store ink that gets flushed from the system during the initial ink charge and manual and automatic print head cleaning. Note: The print head nozzles may dry out while...
Maintaining and Transporting the Printer | 141 2. See page 130 for instructions. 3. Close the front cover. The cutter moves to the left. Replacing the Maintenance Tanks The maintenance tanks store ink that gets flushed from the system during the initial ink charge and manual and automatic print head cleaning. Note: The print head nozzles may dry out while...


