Complete Owner's Guide (English)
Page 14
...directions). 7. Place food in the Solutions to Common Problems section of this cooking mode. Remove food. Press CANCEL to the desired temperature. LOWER OVEN 2. pads to get to stop or cancel the Bake feature at any time. Baking Problems Refer to the Baking Problems Table in the... touch each other, the door, sides or back of 350°F: 1. To set to bake at any temperature from the oven. 8. Press BAKE . 4. Always use oven mitts when removing hot pans from 170°F to a Bake Temperature of 350°F. To change to 550°F with a default temperature of ...
...directions). 7. Place food in the Solutions to Common Problems section of this cooking mode. Remove food. Press CANCEL to the desired temperature. LOWER OVEN 2. pads to get to stop or cancel the Bake feature at any time. Baking Problems Refer to the Baking Problems Table in the... touch each other, the door, sides or back of 350°F: 1. To set to bake at any temperature from the oven. 8. Press BAKE . 4. Always use oven mitts when removing hot pans from 170°F to a Bake Temperature of 350°F. To change to 550°F with a default temperature of ...
Complete Owner's Guide (English)
Page 24
...3 cups of boiling hot water on the lowest rack position to keep the air moist inside the oven cavity. • Allow at any temperature between edge of pan and walls of the oven. • Limit ...176;F to prevent losing heat and lengthening proofing time. pads to get to begin the bread proofing. 5. Press BREAD PROOF . 4. LOWER OVEN 2. Bread Proofing Tips: • No need to continue the bread...Bread Proof time (read their sections for this feature. • Proof bread until dough has doubled in the oven. 2. Press the HI + or LO - Press START to preheat for directions). 6. ...
...3 cups of boiling hot water on the lowest rack position to keep the air moist inside the oven cavity. • Allow at any temperature between edge of pan and walls of the oven. • Limit ...176;F to prevent losing heat and lengthening proofing time. pads to get to begin the bread proofing. 5. Press BREAD PROOF . 4. LOWER OVEN 2. Bread Proofing Tips: • No need to continue the bread...Bread Proof time (read their sections for this feature. • Proof bread until dough has doubled in the oven. 2. Press the HI + or LO - Press START to preheat for directions). 6. ...
Complete Owner's Guide (English)
Page 26
...the top left hand side of the cavity wall, near front of the food. To protect the probe against this damage, the oven control will be used with one temperature probe... the food and outlet. 3. Insert the Temperature Probe into the center of the oven). The Temperature Probe gets the exact temperature you to trigger the buzzer when the food reaches the set temperature...see figure 1). IMPORTANT: 1. Close the oven door. 3. When the food reach the target temperature, the oven will go into a cool oven. Defrost your appliance; Setting the Oven when using hot pads.
...the top left hand side of the cavity wall, near front of the food. To protect the probe against this damage, the oven control will be used with one temperature probe... the food and outlet. 3. Insert the Temperature Probe into the center of the oven). The Temperature Probe gets the exact temperature you to trigger the buzzer when the food reaches the set temperature...see figure 1). IMPORTANT: 1. Close the oven door. 3. When the food reach the target temperature, the oven will go into a cool oven. Defrost your appliance; Setting the Oven when using hot pads.
Complete Owner's Guide (English)
Page 30
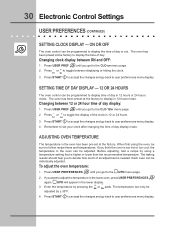
...menu page. 2 Press - If you get to display time of day or not. pads. Press USER PREF until you get to display the time of an adjustment is too hot or too cool, the temperature in the lower oven, press USER PREFERENCES again. lo hi 3. The oven has been preset at the factory. ...Press USER PREF until you get to adjust the temperature in the oven can only be adjusted. Press START to accept ...
...menu page. 2 Press - If you get to display time of day or not. pads. Press USER PREF until you get to display the time of an adjustment is too hot or too cool, the temperature in the lower oven, press USER PREFERENCES again. lo hi 3. The oven has been preset at the factory. ...Press USER PREF until you get to adjust the temperature in the oven can only be adjusted. Press START to accept ...
Complete Owner's Guide (English)
Page 42
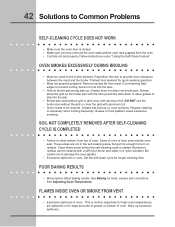
... Be careful not to burn on residue can be cleaned. Cut remaining fatty edges to prevent curling, but get hot enough to damage the oven gasket. • Excessive spillovers in oven. Grease has built up excessive spillovers. These areas are not in the self-cleaning area, but do not... with aluminum foil. • Oven needs to clean bottom, from top of oven, frame of grease on oven surfaces. Wipe up on bottom of oven. Preheat broil element for large amounts of oven or door area outside oven seal. This is normal, especially for high oven temperatures, pie spillovers or for...
... Be careful not to burn on residue can be cleaned. Cut remaining fatty edges to prevent curling, but get hot enough to damage the oven gasket. • Excessive spillovers in oven. Grease has built up excessive spillovers. These areas are not in the self-cleaning area, but do not... with aluminum foil. • Oven needs to clean bottom, from top of oven, frame of grease on oven surfaces. Wipe up on bottom of oven. Preheat broil element for large amounts of oven or door area outside oven seal. This is normal, especially for high oven temperatures, pie spillovers or for...


