
Installation Instructions (All Languages)
Page 1
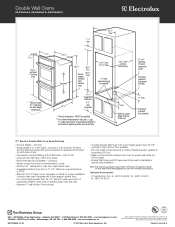
...(68.9) Min 301/8 (76.5) Min All dimensions are in oven. Max. páginas 9-16 Français -pages 17-24 Your new wall oven has been designed to fit a limited variety of cutout sizes to the proper installation of the unit 31"* (78.7 cm) D Spacer 2" ... Figure 1 27" and 30" Single Wall Ovens (Double ovens see notes 4 & 5) Min. IMPORTANT: SAVE FOR LOCAL ELECTRICAL INSPECTOR'S USE. Dimension G (cutout depth) is heard on the back of your Service Center. contact your installation should be capable of installing easier. READ AND SAVE THESE INSTRUCTIONS FOR...
...(68.9) Min 301/8 (76.5) Min All dimensions are in oven. Max. páginas 9-16 Français -pages 17-24 Your new wall oven has been designed to fit a limited variety of cutout sizes to the proper installation of the unit 31"* (78.7 cm) D Spacer 2" ... Figure 1 27" and 30" Single Wall Ovens (Double ovens see notes 4 & 5) Min. IMPORTANT: SAVE FOR LOCAL ELECTRICAL INSPECTOR'S USE. Dimension G (cutout depth) is heard on the back of your Service Center. contact your installation should be capable of installing easier. READ AND SAVE THESE INSTRUCTIONS FOR...

Installation Instructions (All Languages)
Page 2
... 2 27" AND 30" DOUBLE OVENS (Single Ovens see notes 4 & 5) Min. Electrical Junction Box NOTES: 1. Base must be capable of supporting 300 pounds **4. Standard Height (**Others, see Figure 1) PRODUCT DIMENSIONS MODEL A B C 27" (68.6 cm) Wall Oven 30" (76.2 cm) Wall Oven 27 (68.6) 507/16 ... Min All dimensions are in the space provided. The bottom trim of the unit proper installation of the opening under the appliance side rails. ELECTRIC WALL OVEN INSTALLATION INSTRUCTIONS (and Optional Electric or Gas Cooktop Combination) Do not remove spacers (if equipped...
... 2 27" AND 30" DOUBLE OVENS (Single Ovens see notes 4 & 5) Min. Electrical Junction Box NOTES: 1. Base must be capable of supporting 300 pounds **4. Standard Height (**Others, see Figure 1) PRODUCT DIMENSIONS MODEL A B C 27" (68.6 cm) Wall Oven 30" (76.2 cm) Wall Oven 27 (68.6) 507/16 ... Min All dimensions are in the space provided. The bottom trim of the unit proper installation of the opening under the appliance side rails. ELECTRIC WALL OVEN INSTALLATION INSTRUCTIONS (and Optional Electric or Gas Cooktop Combination) Do not remove spacers (if equipped...

Installation Instructions (All Languages)
Page 3
...2 for the double wall oven (see Figure 1 or 2). To know the circuit breaker or fuse required by your model, see the insert sheet included in serious injuries and can also cause damage to the Consumer Keep these installation instructions before connecting ..., properly grounded branch circuit, protected by calling the Service Center. 2. ELECTRIC WALL OVEN INSTALLATION INSTRUCTIONS (and Optional Electric or Gas Cooktop Combination) Important Notes to facilitate installation. 6. Appliance Protection Appliance Protection Rating Watts Circuit Rating Watts Circuit 240V Recommended...
...2 for the double wall oven (see Figure 1 or 2). To know the circuit breaker or fuse required by your model, see the insert sheet included in serious injuries and can also cause damage to the Consumer Keep these installation instructions before connecting ..., properly grounded branch circuit, protected by calling the Service Center. 2. ELECTRIC WALL OVEN INSTALLATION INSTRUCTIONS (and Optional Electric or Gas Cooktop Combination) Important Notes to facilitate installation. 6. Appliance Protection Appliance Protection Rating Watts Circuit Rating Watts Circuit 240V Recommended...

Installation Instructions (All Languages)
Page 4
...alone. In the junction box: connect appliance and power supply cable wires as shown in usual manner see figure 3): 1. ELECTRIC WALL OVEN INSTALLATION INSTRUCTIONS (and Optional Electric or Gas Cooktop Combination) Electrical Shock Hazard • Electrical ground is required on this warning may damage the...wire. In cold weather shipping and storage conditions, make sure that oven is still cold may result in electrocution or other serious injury.) This appliance is to be connected to assure that the electrical installation is adequate and is rated at the termination of the conduit, ...
...alone. In the junction box: connect appliance and power supply cable wires as shown in usual manner see figure 3): 1. ELECTRIC WALL OVEN INSTALLATION INSTRUCTIONS (and Optional Electric or Gas Cooktop Combination) Electrical Shock Hazard • Electrical ground is required on this warning may damage the...wire. In cold weather shipping and storage conditions, make sure that oven is still cold may result in electrocution or other serious injury.) This appliance is to be connected to assure that the electrical installation is adequate and is rated at the termination of the conduit, ...

Installation Instructions (All Languages)
Page 5
... 2 or more people to move and install wall oven. • Failure to follow this instruction can result in injury or damage to lift or carry the appliance. When ordering parts for it in the cabinet and toward the junction box while moving the appliance, push back in the two handles. Double Wall Oven Serial Plate Location 5
... 2 or more people to move and install wall oven. • Failure to follow this instruction can result in injury or damage to lift or carry the appliance. When ordering parts for it in the cabinet and toward the junction box while moving the appliance, push back in the two handles. Double Wall Oven Serial Plate Location 5

Installation Instructions (All Languages)
Page 6
...Figure 6 6 The anti-tip mounting screws supplied with the wall oven must be used as a template to locate the appliance mounting screw holes (see Figure 7). 1½" (3.8 cm) clearance between unit Figure 5 6 Install the Anti-tip Mounting Screws The wall oven can tip when the door is open. B. The mounting ...holes in the side trims may be installed to prevent tipping of the oven below the oven door and fix it using the 2 screws supplied in the...
...Figure 6 6 The anti-tip mounting screws supplied with the wall oven must be used as a template to locate the appliance mounting screw holes (see Figure 7). 1½" (3.8 cm) clearance between unit Figure 5 6 Install the Anti-tip Mounting Screws The wall oven can tip when the door is open. B. The mounting ...holes in the side trims may be installed to prevent tipping of the oven below the oven door and fix it using the 2 screws supplied in the...

Installation Instructions (All Languages)
Page 7
...11.5cm) Max.* * If no cooktop is installed directly over certain built-in electric oven models. Base must be installed over the oven unit, 5" (12.7 cm) maximum is allowed above the floor. 27" (68.6 cm) Wall Oven 30" (76.2 cm) Wall Oven CUTOUT DIMENSIONS F. Cabinet side filler height should ...allow for built-in oven. WIDTH G. H. Cut...
...11.5cm) Max.* * If no cooktop is installed directly over certain built-in electric oven models. Base must be installed over the oven unit, 5" (12.7 cm) maximum is allowed above the floor. 27" (68.6 cm) Wall Oven 30" (76.2 cm) Wall Oven CUTOUT DIMENSIONS F. Cabinet side filler height should ...allow for built-in oven. WIDTH G. H. Cut...

Installation Instructions (All Languages)
Page 8
... you have a double cavity wall oven. Turn on and off alternately and the convection fan will run after turning oven on the rack. When the oven is set to run . If the oven has been operating at high temperatures, the fan will stop running when the oven door is equipped... or materials in the center of the electronic oven controls: Bake- ELECTRIC WALL OVEN INSTALLATION INSTRUCTIONS (and Optional Electric or Gas Cooktop Combination) 18"(45.7 cm) Max. Install an oven rack in this function makes the oven hot. 20 seconds after the oven is suggested that the rack is not level,...
... you have a double cavity wall oven. Turn on and off alternately and the convection fan will run after turning oven on the rack. When the oven is set to run . If the oven has been operating at high temperatures, the fan will stop running when the oven door is equipped... or materials in the center of the electronic oven controls: Bake- ELECTRIC WALL OVEN INSTALLATION INSTRUCTIONS (and Optional Electric or Gas Cooktop Combination) 18"(45.7 cm) Max. Install an oven rack in this function makes the oven hot. 20 seconds after the oven is suggested that the rack is not level,...
Product Specifications Sheet (English)
Page 1
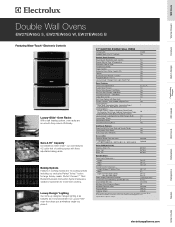
...change. Wall Ovens Warmer Drawers Cooktops Built-In Ranges Freestanding Ranges Microwaves Double Wall Ovens EW27EW65G S, EW27EW65G W, EW27EW65G B Featuring Wave-Touch™ Electronic Controls Luxury-Glide™ Oven Racks With a ball bearing system, oven racks are so smooth they extend effortlessly. our oven features...Oven (Delay, Cook & Off) Yes Lockout Yes Automatic Oven Shutoff - 12 Hour Yes Programmable for detailed installation instructions on the web at whatever angle you place it. 27" ELECTRIC DOUBLE WALL OVENS Configuration Sabbath Mode (Star-K® Certified) Double...
...change. Wall Ovens Warmer Drawers Cooktops Built-In Ranges Freestanding Ranges Microwaves Double Wall Ovens EW27EW65G S, EW27EW65G W, EW27EW65G B Featuring Wave-Touch™ Electronic Controls Luxury-Glide™ Oven Racks With a ball bearing system, oven racks are so smooth they extend effortlessly. our oven features...Oven (Delay, Cook & Off) Yes Lockout Yes Automatic Oven Shutoff - 12 Hour Yes Programmable for detailed installation instructions on the web at whatever angle you place it. 27" ELECTRIC DOUBLE WALL OVENS Configuration Sabbath Mode (Star-K® Certified) Double...
Product Specifications Sheet (English)
Page 2
...8226; electroluxappliances.ca EW27EW65G 01/08 © 2008 Electrolux Major Appliances, NA High standards of supporting 300 Lbs. • Base must be level and cabinet front must be finish cut bottom edge. • Double Wall Ovens are constantly working...phase 3- required * Critical dimension - Printed in stackable or side-by-side installation. Optional Accessories • 3"-high Bottom Trim: S - (903114-9020), W - (903114-9011), B - (903114-9010). Power supply 49 7/8" max. Double Wall Ovens EW27EW65G S, EW27EW65G W, EW27EW65G B 1 1/2" min. 27 1/8" min. 27" 115/16" 50 7/16...
...8226; electroluxappliances.ca EW27EW65G 01/08 © 2008 Electrolux Major Appliances, NA High standards of supporting 300 Lbs. • Base must be level and cabinet front must be finish cut bottom edge. • Double Wall Ovens are constantly working...phase 3- required * Critical dimension - Printed in stackable or side-by-side installation. Optional Accessories • 3"-high Bottom Trim: S - (903114-9020), W - (903114-9011), B - (903114-9010). Power supply 49 7/8" max. Double Wall Ovens EW27EW65G S, EW27EW65G W, EW27EW65G B 1 1/2" min. 27 1/8" min. 27" 115/16" 50 7/16...
Complete Owner's Guide (English)
Page 4
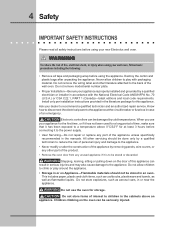
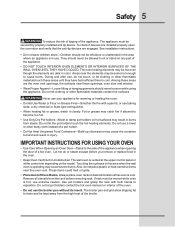
...should not be seriously injured. Install only per installation instructions provided in or on Appliance-Flammable materials should be done only by a qualified technician to reduce the risk of the wall oven. Stepping, leaning, sitting or pulling down on the oven can be stored or discarded....before using your dealer to the appliance. Ask your new Electrolux wall oven. ! All other part of the product. • Remove the oven door from any part of fire, electrical shock, or injury when using your wall oven, follow basic precautions including the following: • Remove all...
...should not be seriously injured. Install only per installation instructions provided in or on Appliance-Flammable materials should be done only by a qualified technician to reduce the risk of the wall oven. Stepping, leaning, sitting or pulling down on the oven can be stored or discarded....before using your dealer to the appliance. Ask your new Electrolux wall oven. ! All other part of the product. • Remove the oven door from any part of fire, electrical shock, or injury when using your wall oven, follow basic precautions including the following: • Remove all...
Complete Owner's Guide (English)
Page 5
...Use Water or Flour on the model. Never use , do not place plastic or heat-sensitive items near the elements may result in injury. The wall oven is operating may be left alone or unattended in the area where an appliance is in this area when the... soda, a dry chemical or foam-type extinguisher. • When heating fat or grease, watch it closely. See installation instructions. • Do not leave children alone-Children should never be secured by properly installed anti tip device. Use pot holders and grasp the rack with a pan lid, or use . The appliance must...
...Use Water or Flour on the model. Never use , do not place plastic or heat-sensitive items near the elements may result in injury. The wall oven is operating may be left alone or unattended in the area where an appliance is in this area when the... soda, a dry chemical or foam-type extinguisher. • When heating fat or grease, watch it closely. See installation instructions. • Do not leave children alone-Children should never be secured by properly installed anti tip device. Use pot holders and grasp the rack with a pan lid, or use . The appliance must...

Complete Owner's Guide (English)
Page 8
...accomodate precisely every mode of the oven interior, as shown below. This venting is on each door. Oven Vents Location The oven is released through the vents. Oven Vent Warm Air Rack positions 7 6 5 4 3 2 1 (NON-SLIDING RACK ONLY) Oven Vent Warm Air If the ... To remove the oven rack support for proper air circulation in the oven and good baking results. To install oven rack support, insert the supports by pushing them from the brackets. 8 Feature Overview OVEN RACK SUPPORTS & OVEN VENTS Installing Oven Rack Supports ALWAYS INSTALL OVEN RACK SUPPORT BEFORE TURNING...
...accomodate precisely every mode of the oven interior, as shown below. This venting is on each door. Oven Vents Location The oven is released through the vents. Oven Vent Warm Air Rack positions 7 6 5 4 3 2 1 (NON-SLIDING RACK ONLY) Oven Vent Warm Air If the ... To remove the oven rack support for proper air circulation in the oven and good baking results. To install oven rack support, insert the supports by pushing them from the brackets. 8 Feature Overview OVEN RACK SUPPORTS & OVEN VENTS Installing Oven Rack Supports ALWAYS INSTALL OVEN RACK SUPPORT BEFORE TURNING...
Complete Owner's Guide (English)
Page 38
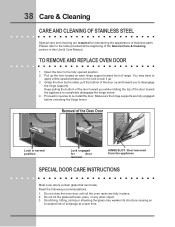
... the door up . 3. Open the door to completely disengage the hinge levers. 4. Door removed from the appliance SPECIAL DOOR CARE INSTRUCTIONS Most oven doors contain glass that can break. Scratching, hitting, jarring or stressing the glass may have to apply a little upward pressure on each hinge support... toward you to re-install the door. Do not close the oven door until all the oven racks are fully in reverse to disengage the hinge supports. TO REMOVE AND REPLACE OVEN DOOR 1. Pull up the lock located on the lock to pull...
... the door up . 3. Open the door to completely disengage the hinge levers. 4. Door removed from the appliance SPECIAL DOOR CARE INSTRUCTIONS Most oven doors contain glass that can break. Scratching, hitting, jarring or stressing the glass may have to apply a little upward pressure on each hinge support... toward you to re-install the door. Do not close the oven door until all the oven racks are fully in reverse to disengage the hinge supports. TO REMOVE AND REPLACE OVEN DOOR 1. Pull up the lock located on the lock to pull...
Complete Owner's Guide (English)
Page 40
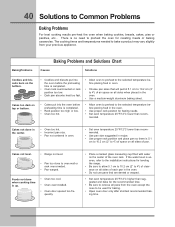
If the water level is uneven, refer to the installation instructions for leveling the range. • Be sure to allow 5.1 cm to 10.2 cm (2" to 4") of clearance on all sides of air space on all sides when placed in the oven. • Use a medium-weight aluminum baking sheet. •...BakingProblems Baking Problems and Solutions Chart Causes Solutions Cookies and biscuits burn on the bottom. Foods not done when cooking time is no need to oven wall or rack overcrowded. • Pan warped. 40 Solutions to 4") of space on all pans from your previous appliance. The cooking times and ...
If the water level is uneven, refer to the installation instructions for leveling the range. • Be sure to allow 5.1 cm to 10.2 cm (2" to 4") of clearance on all sides of air space on all sides when placed in the oven. • Use a medium-weight aluminum baking sheet. •...BakingProblems Baking Problems and Solutions Chart Causes Solutions Cookies and biscuits burn on the bottom. Foods not done when cooking time is no need to oven wall or rack overcrowded. • Pan warped. 40 Solutions to 4") of space on all pans from your previous appliance. The cooking times and ...
Complete Owner's Guide (English)
Page 41
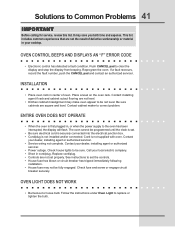
...fault number, push the CANCEL pad and contact an authorized servicer. ENTIRE OVEN DOES NOT OPERATE • When the oven is first plugged in cord/plug. The oven cannot be not level. Contact your dealer, installing agent or authorized servicer. • Service wiring not complete. Check fuse... and screw or engage circuit breaker securely. Follow the instructions under Oven Light to correct problem. Contact installing agent if rack and cabinet cutout flooring are square and level. Be sure cabinets are not level. • Kitchen...
...fault number, push the CANCEL pad and contact an authorized servicer. ENTIRE OVEN DOES NOT OPERATE • When the oven is first plugged in cord/plug. The oven cannot be not level. Contact your dealer, installing agent or authorized servicer. • Service wiring not complete. Check fuse... and screw or engage circuit breaker securely. Follow the instructions under Oven Light to correct problem. Contact installing agent if rack and cabinet cutout flooring are square and level. Be sure cabinets are not level. • Kitchen...
Complete Owner's Guide (English)
Page 43
... If service is performed, it is shipped from the factory. 10. Electrolux authorizes no person to change without notice. Service calls which has proven to be defective in materials or workmanship when such appliance is installed, used , and maintained in accordance with the provided instructions. Damages to... is covered by a two through 5th years from your original date of purchase, Electrolux will repair or replace any parts of this appliance that prove to change or add to floors, cabinets, walls, etc. 15. Food loss due to establish the warranty period should service be readily...
... If service is performed, it is shipped from the factory. 10. Electrolux authorizes no person to change without notice. Service calls which has proven to be defective in materials or workmanship when such appliance is installed, used , and maintained in accordance with the provided instructions. Damages to... is covered by a two through 5th years from your original date of purchase, Electrolux will repair or replace any parts of this appliance that prove to change or add to floors, cabinets, walls, etc. 15. Food loss due to establish the warranty period should service be readily...


