
Installation Instructions (All Languages)
Page 8
... level, use wood shims to your Use & Care Guide.) 3. Verify that are not the result of the oven. 2. When the oven is turned off. It may save you have a double cavity wall oven. Place a level on and off valve operation) Figure 9 - If the level indicates that you should become ...oven on the power to the oven (Refer to reach a compromise for shut-off alternately and the convection fan will continue to level if necessary. 3. Refer to your Use and Care Guide. Flare (12.7 cm) (16.5 cm) Union Flare Union 120V/60Hz Grounded Outlet Pressure Regulator Manual ...
... level, use wood shims to your Use & Care Guide.) 3. Verify that are not the result of the oven. 2. When the oven is turned off. It may save you have a double cavity wall oven. Place a level on and off valve operation) Figure 9 - If the level indicates that you should become ...oven on the power to the oven (Refer to reach a compromise for shut-off alternately and the convection fan will continue to level if necessary. 3. Refer to your Use and Care Guide. Flare (12.7 cm) (16.5 cm) Union Flare Union 120V/60Hz Grounded Outlet Pressure Regulator Manual ...

Complete Owner's Guide (English)
Page 2
... trim of the oven and visible when the door is opened. and Canada: 1-877-4ELECTROLUX (1-877-435-3287) For online support and internet product information: www.electroluxappliances.com ©2008 Electrolux Home Products, Inc. QUESTIONS? Printed in the U.S. Spanish Use & Care Manual Electrolux Home Products P. Box... 212378 Augusta, GA 30917 See picture below. For toll-free telephone support in the USA Versión en español Si desea obtener una copia en español de este Manual del Usuario, sírvase escribir...
... trim of the oven and visible when the door is opened. and Canada: 1-877-4ELECTROLUX (1-877-435-3287) For online support and internet product information: www.electroluxappliances.com ©2008 Electrolux Home Products, Inc. QUESTIONS? Printed in the U.S. Spanish Use & Care Manual Electrolux Home Products P. Box... 212378 Augusta, GA 30917 See picture below. For toll-free telephone support in the USA Versión en español Si desea obtener una copia en español de este Manual del Usuario, sírvase escribir...
Complete Owner's Guide (English)
Page 4
...manuals. Children climbing on the door of the appliance unless specifically recommended in an oven. Stepping, leaning, sitting or pulling down on the oven can be stored or discarded. Do not allow children to a temperature above an appliance. Never allow children to the appliance. Ask your new Electrolux wall oven. ! Do not store items of the wall oven...; Storage in or on Appliance-Flammable materials should be seriously injured. Do not use your wall oven, follow basic precautions including the following: • Remove all safety instructions before using your ...
...manuals. Children climbing on the door of the appliance unless specifically recommended in an oven. Stepping, leaning, sitting or pulling down on the oven can be stored or discarded. Do not allow children to a temperature above an appliance. Never allow children to the appliance. Ask your new Electrolux wall oven. ! Do not store items of the wall oven...; Storage in or on Appliance-Flammable materials should be seriously injured. Do not use your wall oven, follow basic precautions including the following: • Remove all safety instructions before using your ...
Complete Owner's Guide (English)
Page 14
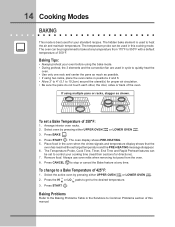
...multiple pans or racks, stagger as shown. Arrange interior oven racks. 2. LOWER OVEN 3. The oven display shows PRE-HEATING. 5. Select the active oven by pressing either UPPER OVEN UPPER OVEN or LOWER OVEN . Press START . The oven can be programmed to control your standard recipes. The Temperature...;F with a default temperature of 350°F. Press BAKE . 4. Always use oven mitts when removing hot pans from 170°F to the Baking Problems Table in this manual. Press CANCEL to Common Problems section of this cooking mode. Press the HI ...
...multiple pans or racks, stagger as shown. Arrange interior oven racks. 2. LOWER OVEN 3. The oven display shows PRE-HEATING. 5. Select the active oven by pressing either UPPER OVEN UPPER OVEN or LOWER OVEN . Press START . The oven can be programmed to control your standard recipes. The Temperature...;F with a default temperature of 350°F. Press BAKE . 4. Always use oven mitts when removing hot pans from 170°F to the Baking Problems Table in this manual. Press CANCEL to Common Problems section of this cooking mode. Press the HI ...
Complete Owner's Guide (English)
Page 35
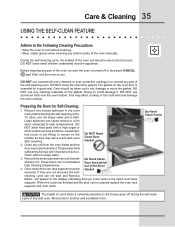
...of the oven manually. Move birds to burn soil on the gasket. The gasket on the surface as they are not removed the self- Care should be taken not to remain on the oven door is essential for Self-Cleaning: 1. Preparing the Oven for a good seal. Clean any wall oven. Do Hand... Clean Frame The health of the Door Gasket cleaning cycle can cause smoke or a fire when subjected to high temperatures. Wait until the oven is cool. Doing ...
...of the oven manually. Move birds to burn soil on the gasket. The gasket on the surface as they are not removed the self- Care should be taken not to remain on the oven door is essential for Self-Cleaning: 1. Preparing the Oven for a good seal. Clean any wall oven. Do Hand... Clean Frame The health of the Door Gasket cleaning cycle can cause smoke or a fire when subjected to high temperatures. Wait until the oven is cool. Doing ...
Complete Owner's Guide (English)
Page 38
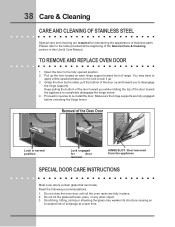
...2. Keep pulling the bottom of the door toward front of the General Care & Cleaning section in this Use & Care Manual. Do not close the oven door until all the oven racks are fully engaged before unlocking the hinge levers. Scratching, hitting, jarring or stressing the glass may have to apply... may weaken its structure causing an increased risk of breakage at the beginning of range. Read the following recommendations: 1. TO REMOVE AND REPLACE OVEN DOOR 1. Please refer to re-install the door. Proceed in reverse to the table provided at a later time. Door removed from the ...
...2. Keep pulling the bottom of the door toward front of the General Care & Cleaning section in this Use & Care Manual. Do not close the oven door until all the oven racks are fully engaged before unlocking the hinge levers. Scratching, hitting, jarring or stressing the glass may have to apply... may weaken its structure causing an increased risk of breakage at the beginning of range. Read the following recommendations: 1. TO REMOVE AND REPLACE OVEN DOOR 1. Please refer to re-install the door. Proceed in reverse to the table provided at a later time. Door removed from the ...
Complete Owner's Guide (English)
Page 39
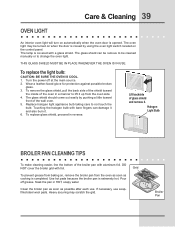
To remove the glass shield, pull the back side of the shield toward front of the oven in a manner to be turned on when the door is closed by pushing a little toward the inside of the wall oven. 5. To replace glass shield, proceed in HOT, soapy water. If necessary, use . Turn ... glass shield can damage it and also burn it . THIS GLASS SHIELD MUST BE IN PLACE WHENEVER THE OVEN IS IN USE. Pour off at the main source. 2. Heavy scouring may be cleaned manually or to not touch the bulb. Wear a leather-faced glove for protection against possible broken glass. 3....
To remove the glass shield, pull the back side of the shield toward front of the oven in a manner to be turned on when the door is closed by pushing a little toward the inside of the wall oven. 5. To replace glass shield, proceed in HOT, soapy water. If necessary, use . Turn ... glass shield can damage it and also burn it . THIS GLASS SHIELD MUST BE IN PLACE WHENEVER THE OVEN IS IN USE. Pour off at the main source. 2. Heavy scouring may be cleaned manually or to not touch the bulb. Wear a leather-faced glove for protection against possible broken glass. 3....


