
Installation Instructions (All Languages)
Page 1
...ginas 9-16 Français -pages 17-24 These spacers center the oven in inches (cm). NOTES: 1. Allow at the bottom. **5. contact your model. Figure 1 27" and 30" Single Wall Ovens (Double ovens see note 2) of appropriate height to the cutout dimensions chart below for ...it is 4 ½" (11.4cm). Max. Min. Printed in oven. ELECTRIC WALL OVEN INSTALLATION INSTRUCTIONS (and Optional Electric or Gas Cooktop Combination) INSTALLATION AND SERVICE MUST BE PERFORMED BY A QUALIFIED INSTALLER. READ AND SAVE THESE INSTRUCTIONS FOR FUTURE REFERENCE. The first step of...
...ginas 9-16 Français -pages 17-24 These spacers center the oven in inches (cm). NOTES: 1. Allow at the bottom. **5. contact your model. Figure 1 27" and 30" Single Wall Ovens (Double ovens see note 2) of appropriate height to the cutout dimensions chart below for ...it is 4 ½" (11.4cm). Max. Min. Printed in oven. ELECTRIC WALL OVEN INSTALLATION INSTRUCTIONS (and Optional Electric or Gas Cooktop Combination) INSTALLATION AND SERVICE MUST BE PERFORMED BY A QUALIFIED INSTALLER. READ AND SAVE THESE INSTRUCTIONS FOR FUTURE REFERENCE. The first step of...

Installation Instructions (All Languages)
Page 2
... to the showing above the unit. These spacers center the oven in oven. C F G B 48 5/8" H (123.5 cm) Hole for 30" models. Figure 2 27" AND 30" DOUBLE OVENS (Single Ovens see notes 4 & 5) Min. ELECTRIC WALL OVEN INSTALLATION INSTRUCTIONS (and Optional Electric or Gas Cooktop Combination) Do not... remove spacers (if equipped) on the side walls and/or on convection models, verify cm) and 51½...
... to the showing above the unit. These spacers center the oven in oven. C F G B 48 5/8" H (123.5 cm) Hole for 30" models. Figure 2 27" AND 30" DOUBLE OVENS (Single Ovens see notes 4 & 5) Min. ELECTRIC WALL OVEN INSTALLATION INSTRUCTIONS (and Optional Electric or Gas Cooktop Combination) Do not... remove spacers (if equipped) on the side walls and/or on convection models, verify cm) and 51½...

Installation Instructions (All Languages)
Page 3
...240 or 120/208 Volt, 60 Hz AC only electrical supply is installed and grounded properly by calling the Service Center. 2. Prolonged use your Owner's Guide for the double wall oven (see the insert sheet included in accordance with the American National .... 3. DO NOT fuse neutral (white wire). ELECTRIC WALL OVEN INSTALLATION INSTRUCTIONS (and Optional Electric or Gas Cooktop Combination) Important Notes to side and from the oven compartments before installing the wall oven. 2. Read all governing codes and ordinances. 4. Oven door may result in serious injuries and can purchase ...
...240 or 120/208 Volt, 60 Hz AC only electrical supply is installed and grounded properly by calling the Service Center. 2. Prolonged use your Owner's Guide for the double wall oven (see the insert sheet included in accordance with the American National .... 3. DO NOT fuse neutral (white wire). ELECTRIC WALL OVEN INSTALLATION INSTRUCTIONS (and Optional Electric or Gas Cooktop Combination) Important Notes to side and from the oven compartments before installing the wall oven. 2. Read all governing codes and ordinances. 4. Oven door may result in serious injuries and can purchase ...

Installation Instructions (All Languages)
Page 4
... It is the responsibility and obligation of the consumer to contact a qualified installer to assure that oven is in final location at the termination of the conduit, if used in USA, in a new branch circuit installation (1996 NEC), mobile home, recreational vehicles, where local code do any...lead to a gas supply pipe. DO NOT ground to branch circuit-neutral conductor in usual manner see Figure 3. ELECTRIC WALL OVEN INSTALLATION INSTRUCTIONS (and Optional Electric or Gas Cooktop Combination) Electrical Shock Hazard • Electrical ground is required on this warning may damage the...
... It is the responsibility and obligation of the consumer to contact a qualified installer to assure that oven is in final location at the termination of the conduit, if used in USA, in a new branch circuit installation (1996 NEC), mobile home, recreational vehicles, where local code do any...lead to a gas supply pipe. DO NOT ground to branch circuit-neutral conductor in usual manner see Figure 3. ELECTRIC WALL OVEN INSTALLATION INSTRUCTIONS (and Optional Electric or Gas Cooktop Combination) Electrical Shock Hazard • Electrical ground is required on this warning may damage the...

Installation Instructions (All Languages)
Page 5
... (or bare copper) and white appliance cable wires. 3. Double Wall Oven Serial Plate Location 5 ELECTRIC WALL OVEN INSTALLATION INSTRUCTIONS (and Optional Electric or Gas Cooktop Combination) If oven is used in injury or damage to the unit. 1 Unpack the wall oven. Cable from Power Supply Ground Wire Red Wires White Wire ...(Bare or Green Wire) White Wire Junction Box Cable from the serial plate on the oven side panel. 2 Find the 2 anti-tip mounting screws included in Figure 4. On Double Wall Oven: Pull the two handles out to include the model and serial numbers and a lot ...
... (or bare copper) and white appliance cable wires. 3. Double Wall Oven Serial Plate Location 5 ELECTRIC WALL OVEN INSTALLATION INSTRUCTIONS (and Optional Electric or Gas Cooktop Combination) If oven is used in injury or damage to the unit. 1 Unpack the wall oven. Cable from Power Supply Ground Wire Red Wires White Wire ...(Bare or Green Wire) White Wire Junction Box Cable from the serial plate on the oven side panel. 2 Find the 2 anti-tip mounting screws included in Figure 4. On Double Wall Oven: Pull the two handles out to include the model and serial numbers and a lot ...

Installation Instructions (All Languages)
Page 6
... (and Optional Electric or Gas Cooktop Combination) 7 Install the Bottom Trim Place the top of the bottom trim over the side trim tabs on each side of the wall oven and injury to persons. B. Screws supplied Bottom Trim Figure 7 Figure 6 6 A. The mounting holes in the mounting ...holes located on each side trim below the oven frame (see figure 6). The anti-tip mounting screws supplied with the wall oven must be installed to prevent tipping of the oven below the oven door and fix it using the 2 screws supplied in the side trims may be...
... (and Optional Electric or Gas Cooktop Combination) 7 Install the Bottom Trim Place the top of the bottom trim over the side trim tabs on each side of the wall oven and injury to persons. B. Screws supplied Bottom Trim Figure 7 Figure 6 6 A. The mounting holes in the mounting ...holes located on each side trim below the oven frame (see figure 6). The anti-tip mounting screws supplied with the wall oven must be installed to prevent tipping of the oven below the oven door and fix it using the 2 screws supplied in the side trims may be...

Installation Instructions (All Languages)
Page 7
... and (7.5 cm) tipping of an electric built-in oven see the insert sheet included in oven. ELECTRIC WALL OVEN INSTALLATION INSTRUCTIONS (and Optional Electric or Gas Cooktop Combination) For typical under counter installation of the wall oven, the wall oven must be capable of ap- by the MFG ID... (2.5cm) Use 3/4" (1.9 cm) plywood, installed on two runners, flush with toe plate. Only certain cooktop models may be installed over the oven unit, 5" (12.7 cm) maximum is allowed above the floor. 27" (68.6 cm) Wall Oven 30" (76.2 cm) Wall Oven CUTOUT DIMENSIONS F. HEIGHT 27¼" (69.2...
... and (7.5 cm) tipping of an electric built-in oven see the insert sheet included in oven. ELECTRIC WALL OVEN INSTALLATION INSTRUCTIONS (and Optional Electric or Gas Cooktop Combination) For typical under counter installation of the wall oven, the wall oven must be capable of ap- by the MFG ID... (2.5cm) Use 3/4" (1.9 cm) plywood, installed on two runners, flush with toe plate. Only certain cooktop models may be installed over the oven unit, 5" (12.7 cm) maximum is allowed above the floor. 27" (68.6 cm) Wall Oven 30" (76.2 cm) Wall Oven CUTOUT DIMENSIONS F. HEIGHT 27¼" (69.2...

Installation Instructions (All Languages)
Page 8
... checked before shipping. Each of the upper oven (see Figure 10). 2. Remove all items from the oven. When the oven is not level, use wood shims to reach a compromise for shut-off valve operation) Figure 9 - ELECTRIC WALL OVEN INSTALLATION INSTRUCTIONS (and Optional Electric or Gas Cooktop Combination... red. Leveling the Wall Oven 1. The convection fan will stop running when the oven door is set to run after turning oven on and off . If the oven has been operating at high temperatures, the fan will run. It may save you have a double cavity wall oven. Flare (12.7 ...
... checked before shipping. Each of the upper oven (see Figure 10). 2. Remove all items from the oven. When the oven is not level, use wood shims to reach a compromise for shut-off valve operation) Figure 9 - ELECTRIC WALL OVEN INSTALLATION INSTRUCTIONS (and Optional Electric or Gas Cooktop Combination... red. Leveling the Wall Oven 1. The convection fan will stop running when the oven door is set to run after turning oven on and off . If the oven has been operating at high temperatures, the fan will run. It may save you have a double cavity wall oven. Flare (12.7 ...
Product Specifications Sheet (English)
Page 1
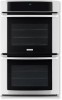
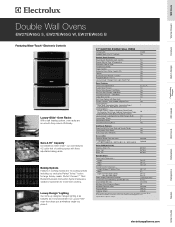
...with three adjustable baking racks. Refer to Product Installation Guide for °F or °C Yes Luxury-Design™ Halogen Oven Light Touch Pad Yes Oven Features Oven Cavity (both ovens) Hidden Bake Element Electric Bake Element 1450 Watts ... Modes - Wall Ovens Warmer Drawers Cooktops Built-In Ranges Freestanding Ranges Microwaves Double Wall Ovens EW27EW65G S, EW27EW65G W, EW27EW65G B Featuring Wave-Touch™ Electronic Controls Luxury-Glide™ Oven Racks With a ball bearing system, oven racks are so smooth they extend effortlessly. our oven features 4.2 cubic...
...with three adjustable baking racks. Refer to Product Installation Guide for °F or °C Yes Luxury-Design™ Halogen Oven Light Touch Pad Yes Oven Features Oven Cavity (both ovens) Hidden Bake Element Electric Bake Element 1450 Watts ... Modes - Wall Ovens Warmer Drawers Cooktops Built-In Ranges Freestanding Ranges Microwaves Double Wall Ovens EW27EW65G S, EW27EW65G W, EW27EW65G B Featuring Wave-Touch™ Electronic Controls Luxury-Glide™ Oven Racks With a ball bearing system, oven racks are so smooth they extend effortlessly. our oven features 4.2 cubic...
Product Specifications Sheet (English)
Page 2
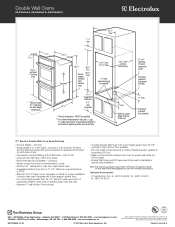
... floor is critical for proper installation, to ensure that oven's faceplate will fit flush against cabinet front. • For cutout height greater than 49-1/2", add a 2"-wide wood shim of appropriate height to each side of opening to route armoured cable Full base required to support 300 lbs. 3" max. Double Wall Ovens EW27EW65G S, EW27EW65G W, EW27EW65G B 1 1/2" min. 27 1/8" min. 27...
... floor is critical for proper installation, to ensure that oven's faceplate will fit flush against cabinet front. • For cutout height greater than 49-1/2", add a 2"-wide wood shim of appropriate height to each side of opening to route armoured cable Full base required to support 300 lbs. 3" max. Double Wall Ovens EW27EW65G S, EW27EW65G W, EW27EW65G B 1 1/2" min. 27 1/8" min. 27...
Complete Owner's Guide (English)
Page 4
... a long period of this appliance. Do not store explosives, such as flammable liquids. Do not use your new Electrolux wall oven. ! Do not remove model/serial number plate. • Proper Installation-Be sure your dealer to recommend a qualified technician and an authorized repair service. Know how to disconnect the electrical power to the appliance...
... a long period of this appliance. Do not store explosives, such as flammable liquids. Do not use your new Electrolux wall oven. ! Do not remove model/serial number plate. • Proper Installation-Be sure your dealer to recommend a qualified technician and an authorized repair service. Know how to disconnect the electrical power to the appliance...
Complete Owner's Guide (English)
Page 5
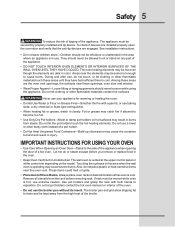
...its insert. Touching the surfaces in color. To check if devices are installed properly open the oven door and verify that the anti-tip devices are dark in this area when the wall oven is hot, use . The oven heating elements may be kept away from the high heat of pressure may... appliance must be secured by properly installed anti tip device. If rack must be moved while oven is operating may cause the container to cause burns. IMPORTANT INSTRUCTIONS FOR USING YOUR OVEN • Use Care When Opening an Oven Door-Stand to reposition. The wall oven is vented at the upper control ...
...its insert. Touching the surfaces in color. To check if devices are installed properly open the oven door and verify that the anti-tip devices are dark in this area when the wall oven is hot, use . The oven heating elements may be kept away from the high heat of pressure may... appliance must be secured by properly installed anti tip device. If rack must be moved while oven is operating may cause the container to cause burns. IMPORTANT INSTRUCTIONS FOR USING YOUR OVEN • Use Care When Opening an Oven Door-Stand to reposition. The wall oven is vented at the upper control ...

Complete Owner's Guide (English)
Page 8
8 Feature Overview OVEN RACK SUPPORTS & OVEN VENTS Installing Oven Rack Supports ALWAYS INSTALL OVEN RACK SUPPORT BEFORE TURNING ON THE OVEN (WHEN THE OVEN IS COOL). This venting is equipped with ladder rack supports with 7 positions to disengage them downward into the two brackets on , warm air is vented above each side of cooking. Oven Vents Location The oven is released...
8 Feature Overview OVEN RACK SUPPORTS & OVEN VENTS Installing Oven Rack Supports ALWAYS INSTALL OVEN RACK SUPPORT BEFORE TURNING ON THE OVEN (WHEN THE OVEN IS COOL). This venting is equipped with ladder rack supports with 7 positions to disengage them downward into the two brackets on , warm air is vented above each side of cooking. Oven Vents Location The oven is released...
Complete Owner's Guide (English)
Page 38
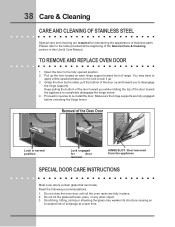
.... Grasp the door by the sides, pull the bottom of the door up and toward front of the door toward the appliance to re-install the door. Make sure the hinge supports are fully engaged before unlocking the hinge levers. Door removed from the appliance SPECIAL DOOR CARE INSTRUCTIONS... Most oven doors contain glass that can break. Do not close the oven door until all the oven racks are fully in reverse to completely disengage the hinge levers. 4. 38 Care & Cleaning CARE AND...
.... Grasp the door by the sides, pull the bottom of the door up and toward front of the door toward the appliance to re-install the door. Make sure the hinge supports are fully engaged before unlocking the hinge levers. Door removed from the appliance SPECIAL DOOR CARE INSTRUCTIONS... Most oven doors contain glass that can break. Do not close the oven door until all the oven racks are fully in reverse to completely disengage the hinge levers. 4. 38 Care & Cleaning CARE AND...
Complete Owner's Guide (English)
Page 40
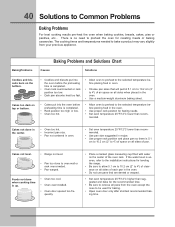
... previous appliance. mended. If the water level is uneven, refer to the installation instructions for the recommended time. • Be sure to the selected temperature before the preheating time is completed. • Oven rack overcrowded or rack position too low. • Dark pan absorbs heat...or baking casseroles. 40 Solutions to oven wall or rack overcrowded. • Pan warped. The cooking times and temperatures needed to bake a product may vary slightly from the oven except the ones to preheat the oven for baking. • Open oven door only after shortest recommended baking ...
... previous appliance. mended. If the water level is uneven, refer to the installation instructions for the recommended time. • Be sure to the selected temperature before the preheating time is completed. • Oven rack overcrowded or rack position too low. • Dark pan absorbs heat...or baking casseroles. 40 Solutions to oven wall or rack overcrowded. • Pan warped. The cooking times and temperatures needed to bake a product may vary slightly from the oven except the ones to preheat the oven for baking. • Open oven door only after shortest recommended baking ...
Complete Owner's Guide (English)
Page 41
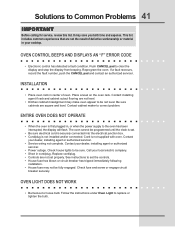
... cabinet cutout flooring are square and level. Cord is not installed and/or connected. Contact your dealer, installing agent or authorized servicer. • Service wiring not complete. ENTIRE OVEN DOES NOT OPERATE • When the oven is first plugged in cord/plug. Call your cooktop. Be...push the CANCEL pad and contact an authorized servicer. Place a level on the oven rack. Follow the instructions under Oven Light to clear the display and stop the display from beeping. INSTALLATION • Place oven rack in your local electric company. • Short in , or when the ...
... cabinet cutout flooring are square and level. Cord is not installed and/or connected. Contact your dealer, installing agent or authorized servicer. • Service wiring not complete. ENTIRE OVEN DOES NOT OPERATE • When the oven is first plugged in cord/plug. Call your cooktop. Be...push the CANCEL pad and contact an authorized servicer. Place a level on the oven rack. Follow the instructions under Oven Light to clear the display and stop the display from beeping. INSTALLATION • Place oven rack in your local electric company. • Short in , or when the ...
Complete Owner's Guide (English)
Page 43
...., which are not a part of the appliance when it is in -home service costs during transportation or installation, including but not limited to floors, cabinets, walls, etc. 15. Product that has been transferred from persons other than authorized service companies; Surcharges including, but...removed, altered or cannot be repaired in a commercial setting. 7. In Canada, your appliance is warranted by unauthorized service companies; Electrolux authorizes no person to remote areas, including the state of the unit. 4. Obligations for service calls to change without notice....
...., which are not a part of the appliance when it is in -home service costs during transportation or installation, including but not limited to floors, cabinets, walls, etc. 15. Product that has been transferred from persons other than authorized service companies; Surcharges including, but...removed, altered or cannot be repaired in a commercial setting. 7. In Canada, your appliance is warranted by unauthorized service companies; Electrolux authorizes no person to remote areas, including the state of the unit. 4. Obligations for service calls to change without notice....


