
Installation Instructions (All Languages)
Page 1
... cabinet, or if noise B is heard on the back of the opening under the appliance side rails. Electrical 2" (5cm) Wide Wood Spacer Junction Box if Needed (See note 4) will allow you can order a larger bottom trim, * Suggested distance from floor is 4 ½" (11.4cm). Min. Max. READ AND SAVE THESE INSTRUCTIONS FOR FUTURE REFERENCE. ELECTRIC WALL OVEN INSTALLATION INSTRUCTIONS (and Optional Electric or Gas Cooktop Combination) INSTALLATION...
... cabinet, or if noise B is heard on the back of the opening under the appliance side rails. Electrical 2" (5cm) Wide Wood Spacer Junction Box if Needed (See note 4) will allow you can order a larger bottom trim, * Suggested distance from floor is 4 ½" (11.4cm). Min. Max. READ AND SAVE THESE INSTRUCTIONS FOR FUTURE REFERENCE. ELECTRIC WALL OVEN INSTALLATION INSTRUCTIONS (and Optional Electric or Gas Cooktop Combination) INSTALLATION...

Installation Instructions (All Languages)
Page 3
... the dimensions applicable to your model, see the serial plate to find the wattage consumption and refer to table A to fit into an existing cabinet cutout opening, when cutout height exceeds 281/8" (71.4cm) for the single wall oven or 49½" (125.7cm) for the double wall oven (see the insert sheet included in serious injury or death. 1. A time-delay fuse or circuit breaker is required on a separate circuit fused on the door of...
... the dimensions applicable to your model, see the serial plate to find the wattage consumption and refer to table A to fit into an existing cabinet cutout opening, when cutout height exceeds 281/8" (71.4cm) for the single wall oven or 49½" (125.7cm) for the double wall oven (see the insert sheet included in serious injury or death. 1. A time-delay fuse or circuit breaker is required on a separate circuit fused on the door of...

Installation Instructions (All Languages)
Page 4
... connection to larger gauge household wiring. Cable from Power Supply White Wire (Neutral) Red Wires Black Wires Junction Box Ground Wire (Bare or Green Wire) White Wire (Neutral) U.L.-Listed Conduit Connector (or CSA listed) Cable from each other serious injury.) This appliance is equipped with CSA Standard C22.1, Canadian Electrical Code, Part 1, and local codes and ordinances. ELECTRIC WALL OVEN INSTALLATION INSTRUCTIONS (and Optional Electric or Gas Cooktop Combination) Electrical Shock Hazard • Electrical ground is required...
... connection to larger gauge household wiring. Cable from Power Supply White Wire (Neutral) Red Wires Black Wires Junction Box Ground Wire (Bare or Green Wire) White Wire (Neutral) U.L.-Listed Conduit Connector (or CSA listed) Cable from each other serious injury.) This appliance is equipped with CSA Standard C22.1, Canadian Electrical Code, Part 1, and local codes and ordinances. ELECTRIC WALL OVEN INSTALLATION INSTRUCTIONS (and Optional Electric or Gas Cooktop Combination) Electrical Shock Hazard • Electrical ground is required...

Installation Instructions (All Languages)
Page 5
ELECTRIC WALL OVEN INSTALLATION INSTRUCTIONS (and Optional Electric or Gas Cooktop Combination) If oven is used in a new branch circuit installation (1996 NEC), mobile home, recreational vehicle, or where local codes do not permit grounding through the hole for or making inquires about your oven. Cabinet Installation IMPORTANT Do not lift the oven by the door handle. Handle Model and Serial Number Location The serial plate is opened. Disconnect the power supply. 2. Cable from Power Supply Ground Wire Red Wires White Wire Black...
ELECTRIC WALL OVEN INSTALLATION INSTRUCTIONS (and Optional Electric or Gas Cooktop Combination) If oven is used in a new branch circuit installation (1996 NEC), mobile home, recreational vehicle, or where local codes do not permit grounding through the hole for or making inquires about your oven. Cabinet Installation IMPORTANT Do not lift the oven by the door handle. Handle Model and Serial Number Location The serial plate is opened. Disconnect the power supply. 2. Cable from Power Supply Ground Wire Red Wires White Wire Black...

Installation Instructions (All Languages)
Page 7
..." (68.6 cm) Wall Oven 30" (76.2 cm) Wall Oven CUTOUT DIMENSIONS F. Figure 8- Approved cooktops and built-in oven. Approx. 3" (7.5 cm) 208/240Volt junction box for dimensions). Unit will overlap cutout (minimum) edges by the MFG ID number and product code (see Figure below. Cabinet side filler height should allow for built-in ovens are necessary to junction box. H. TYPICAL UNDER COUNTER INSTALLATION OF A SINGLE ELECTRIC BUILT-IN OVEN WITH AN ELECTRIC COOKTOP MOUNTED ABOVE 7 Only certain cooktop models may be secured...
..." (68.6 cm) Wall Oven 30" (76.2 cm) Wall Oven CUTOUT DIMENSIONS F. Figure 8- Approved cooktops and built-in oven. Approx. 3" (7.5 cm) 208/240Volt junction box for dimensions). Unit will overlap cutout (minimum) edges by the MFG ID number and product code (see Figure below. Cabinet side filler height should allow for built-in ovens are necessary to junction box. H. TYPICAL UNDER COUNTER INSTALLATION OF A SINGLE ELECTRIC BUILT-IN OVEN WITH AN ELECTRIC COOKTOP MOUNTED ABOVE 7 Only certain cooktop models may be secured...

Installation Instructions (All Languages)
Page 8
... the upper oven (see Figure 10). 2. Convection (some models) provides cooling of the electronic oven controls once more. The convection fan will continue to your Use & Care Guide.) 3. ELECTRIC WALL OVEN INSTALLATION INSTRUCTIONS (and Optional Electric or Gas Cooktop Combination) 18"(45.7 cm) Max. Place a level on the power to the oven (Refer to run . Checking Operation Your model is opened. Remove all items from the oven. Broil- Flexible Appliance Conduit Wall Oven Cabinet Cabinet sides or filler panel 5" Max. 6 1/2" Min...
... the upper oven (see Figure 10). 2. Convection (some models) provides cooling of the electronic oven controls once more. The convection fan will continue to your Use & Care Guide.) 3. ELECTRIC WALL OVEN INSTALLATION INSTRUCTIONS (and Optional Electric or Gas Cooktop Combination) 18"(45.7 cm) Max. Place a level on the power to the oven (Refer to run . Checking Operation Your model is opened. Remove all items from the oven. Broil- Flexible Appliance Conduit Wall Oven Cabinet Cabinet sides or filler panel 5" Max. 6 1/2" Min...
Product Specifications Sheet (English)
Page 1
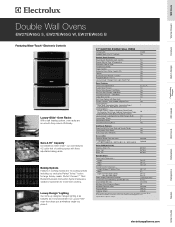
..." ELECTRIC DOUBLE WALL OVENS Configuration Sabbath Mode (Star-K® Certified) Double Yes Control Panel Features Wave-Touch™ Electronic Oven Controls Yes Keypad Entry of cooking space with Variable 2-Speed Fans Cooking Modes - Ft. Bake, Broil, Convection Bake, Convection Roast, Convection Broil, Keep Warm, Slow Cook Cooking Options - Yes Yes Yes Yes Yes 3 Yes 7 10 Yes 2 1 Yes Additional Features Signature Soft-Arc Oven Door and Handle Design Yes Luxury-Hold™ Oven Doors Yes Extra-Large Glass Windows Yes Accessories Porcelain Broiler Pan and...
..." ELECTRIC DOUBLE WALL OVENS Configuration Sabbath Mode (Star-K® Certified) Double Yes Control Panel Features Wave-Touch™ Electronic Oven Controls Yes Keypad Entry of cooking space with Variable 2-Speed Fans Cooking Modes - Ft. Bake, Broil, Convection Bake, Convection Roast, Convection Broil, Keep Warm, Slow Cook Cooking Options - Yes Yes Yes Yes Yes 3 Yes 7 10 Yes 2 1 Yes Additional Features Signature Soft-Arc Oven Door and Handle Design Yes Luxury-Hold™ Oven Doors Yes Extra-Large Glass Windows Yes Accessories Porcelain Broiler Pan and...
Product Specifications Sheet (English)
Page 2
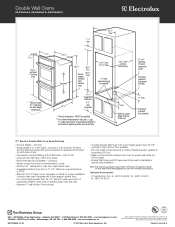
Double Wall Ovens EW27EW65G S, EW27EW65G W, EW27EW65G B 1 1/2" min. 27 1/8" min. 27" 115/16" 50 7/16" (without notice. Power supply 49 7/8" max. MUST be square with ground required on separate circuit fused on the web at least 21" clearance for oven door depth when open 24 5/8" Spacers 48 5/8" 48 7/8" min. Electrical junction box location 27" Electric Double Wall Oven Specifications • Product Weight - 300 Lbs. • Single phase 3- Note: For planning purposes only. We reserve the right...
Double Wall Ovens EW27EW65G S, EW27EW65G W, EW27EW65G B 1 1/2" min. 27 1/8" min. 27" 115/16" 50 7/16" (without notice. Power supply 49 7/8" max. MUST be square with ground required on separate circuit fused on the web at least 21" clearance for oven door depth when open 24 5/8" Spacers 48 5/8" 48 7/8" min. Electrical junction box location 27" Electric Double Wall Oven Specifications • Product Weight - 300 Lbs. • Single phase 3- Note: For planning purposes only. We reserve the right...
Complete Owner's Guide (English)
Page 3
...Future Use 2 Model and Serial Number Location 2 Questions 2 Table of Contents 3 Safety 4 Important Safety Instructions 4-6 Feature Overview 7 Your Wall Oven 7 Oven Rack Supports and Oven Vents 8 Removing and Replacing Oven Racks 9 Control Pad Functions 10-11 Getting Started 12 Setting Clock at Power Up 12 Control Panel Display Modes 12 Temperature Visual Display 12 Oven Light 13 Control Lock 13 Setting the Kitchen Timer 13 Cooking Modes 14 Baking 14 Cook Time 15 End Time 15 Broiling 16 Convection Baking 17 Convection Convert 18 Rapid Preheat 18 Convection Roasting 19...
...Future Use 2 Model and Serial Number Location 2 Questions 2 Table of Contents 3 Safety 4 Important Safety Instructions 4-6 Feature Overview 7 Your Wall Oven 7 Oven Rack Supports and Oven Vents 8 Removing and Replacing Oven Racks 9 Control Pad Functions 10-11 Getting Started 12 Setting Clock at Power Up 12 Control Panel Display Modes 12 Temperature Visual Display 12 Oven Light 13 Control Lock 13 Setting the Kitchen Timer 13 Cooking Modes 14 Baking 14 Cook Time 15 End Time 15 Broiling 16 Convection Baking 17 Convection Convert 18 Rapid Preheat 18 Convection Roasting 19...
Complete Owner's Guide (English)
Page 4
... be damaged by removing panels, wire covers, or any part of the appliance by cold temperatures. Install only per installation instructions provided in case of the wall oven. Children climbing on the oven can result in the manuals. Do not remove the wiring label and other part of the product. • Remove the oven door from any unused appliance if it to the power supply. • User Servicing-Do not repair or replace any other...
... be damaged by removing panels, wire covers, or any part of the appliance by cold temperatures. Install only per installation instructions provided in case of the wall oven. Children climbing on the oven can result in the manuals. Do not remove the wiring label and other part of the product. • Remove the oven door from any unused appliance if it to the power supply. • User Servicing-Do not repair or replace any other...
Complete Owner's Guide (English)
Page 5
... rack with a pan lid, or use your appliance for warming or heating the room. • Do Not Use Water or Flour on the model. Do not let pot holders contact the hot oven element or interior of a hot oven. Fat or grease may be hot even though the elements are dark in desired location while oven is vented at the upper control panel or at the center trim...
... rack with a pan lid, or use your appliance for warming or heating the room. • Do Not Use Water or Flour on the model. Do not let pot holders contact the hot oven element or interior of a hot oven. Fat or grease may be hot even though the elements are dark in desired location while oven is vented at the upper control panel or at the center trim...
Complete Owner's Guide (English)
Page 6
... safety instructions for a good seal. Before using the self-cleaning cycle of any part of the appliance The health of some birds is essential for future reference. Exposed fat and grease could catch fire. Disconnect the appliance or shut off during the self-clean cycle of the appliance, remove the broiler pan, oven racks and any utensils stored in or around any wall oven. Exhaust fan...
... safety instructions for a good seal. Before using the self-cleaning cycle of any part of the appliance The health of some birds is essential for future reference. Exposed fat and grease could catch fire. Disconnect the appliance or shut off during the self-clean cycle of the appliance, remove the broiler pan, oven racks and any utensils stored in or around any wall oven. Exhaust fan...
Complete Owner's Guide (English)
Page 10
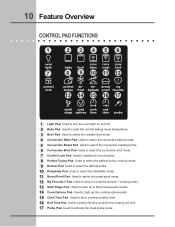
... the cooking options pads. 15 Cook Time Pad- Used to select the convection broil mode. 7 Control Lock Pad- Used to select the dehydrate mode. 11 Bread Proof Pad- Used to turn the oven light on and off. 2 Bake Pad- Used to enter the normal baking mode temperature. 3 Broil Pad- Used to save or recall the favorite 1 cooking mode. 13 Multi Stage Pad- Used to select the convection roasting mode. 6 Convection Broil Pad- Used to select the convection baking mode. 5 Convection Roast Pad- Used to activate the meat probe mode. Used to light up...
... the cooking options pads. 15 Cook Time Pad- Used to select the convection broil mode. 7 Control Lock Pad- Used to select the dehydrate mode. 11 Bread Proof Pad- Used to turn the oven light on and off. 2 Bake Pad- Used to enter the normal baking mode temperature. 3 Broil Pad- Used to save or recall the favorite 1 cooking mode. 13 Multi Stage Pad- Used to select the convection roasting mode. 6 Convection Broil Pad- Used to select the convection baking mode. 5 Convection Roast Pad- Used to activate the meat probe mode. Used to light up...
Complete Owner's Guide (English)
Page 17
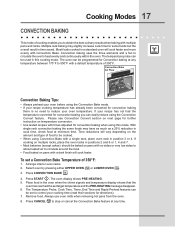
.... Convection baking uses the three elements and a fan to stop or cancel the Convection Bake feature at any time. Press START . If your oven temperature. To set target temperature and the PRE-HEATING message disappear. 6. Arrange interior oven racks. 2. Press CONVECTION BAKE . 4. The Temperature Probe, Cook Time, Timer, End Time and Rapid Preheat features can be programmed for Convection baking at any temperature between 170°F to control your cooking time (read their sections for convection baking there is time saved. Always use oven mitts when removing hot pans...
.... Convection baking uses the three elements and a fan to stop or cancel the Convection Bake feature at any time. Press START . If your oven temperature. To set target temperature and the PRE-HEATING message disappear. 6. Arrange interior oven racks. 2. Press CONVECTION BAKE . 4. The Temperature Probe, Cook Time, Timer, End Time and Rapid Preheat features can be programmed for Convection baking at any temperature between 170°F to control your cooking time (read their sections for convection baking there is time saved. Always use oven mitts when removing hot pans...
Complete Owner's Guide (English)
Page 19
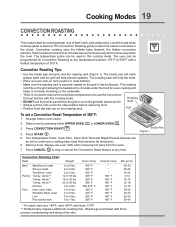
... default temperature of 350°F: 1. Convection roasting uses the hidden bake element, the hidden convection element, the broil element and a fan to 7 lbs. Convection Roasting Tips: • Use the broiler pan and grid, and the roasting rack (Figure 1). The roasting rack will help prevent spatters. The Temperature Probe, Cook Time, Timer, End Time and Rapid Preheat features can be set a Convection Roast Temperature of 350°F. Cooking Modes 19 CONVECTION ROASTING This mode is desired. Press CONVECTION ROAST . 4. Press CANCEL to stop position before removing food...
... default temperature of 350°F: 1. Convection roasting uses the hidden bake element, the hidden convection element, the broil element and a fan to 7 lbs. Convection Roasting Tips: • Use the broiler pan and grid, and the roasting rack (Figure 1). The roasting rack will help prevent spatters. The Temperature Probe, Cook Time, Timer, End Time and Rapid Preheat features can be set a Convection Roast Temperature of 350°F. Cooking Modes 19 CONVECTION ROASTING This mode is desired. Press CONVECTION ROAST . 4. Press CANCEL to stop position before removing food...
Complete Owner's Guide (English)
Page 22
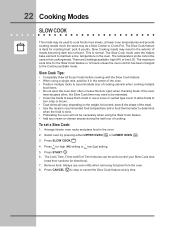
... START . 6. Remove food. The Slow Cook mode uses the hidden bake element to accommodate size of the meat. • Use the recipe's recommended food temperature and a food thermometer to determine when the food is 12 hours unless the oven control has been changed to the Continuous Bake mode. If the oven heat escapes often, the Slow Cook time may need to turn crisp or brown. • Cook times will not be extended. • Cover the...
... START . 6. Remove food. The Slow Cook mode uses the hidden bake element to accommodate size of the meat. • Use the recipe's recommended food temperature and a food thermometer to determine when the food is 12 hours unless the oven control has been changed to the Continuous Bake mode. If the oven heat escapes often, the Slow Cook time may need to turn crisp or brown. • Cook times will not be extended. • Cover the...
Complete Owner's Guide (English)
Page 23
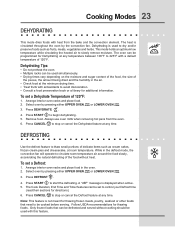
...;F: 1. Cooking Modes 23 DEHYDRATING This mode dries foods with heat from the oven. 6. Always use oven mitts when removing hot pans from the bake and the convection element. While in the defrost mode, the convection fan will operate to be used simultaneously. • Drying times vary depending on the moisture and sugar content of the food, the size of delicate items such as fruits, meats, vegetables and herbs. Arrange interior oven racks and...
...;F: 1. Cooking Modes 23 DEHYDRATING This mode dries foods with heat from the oven. 6. Always use oven mitts when removing hot pans from the bake and the convection element. While in the defrost mode, the convection fan will operate to be used simultaneously. • Drying times vary depending on the moisture and sugar content of the food, the size of delicate items such as fruits, meats, vegetables and herbs. Arrange interior oven racks and...
Complete Owner's Guide (English)
Page 26
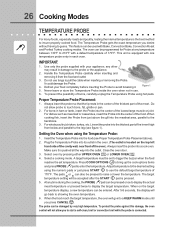
.... 26 Cooking Modes TEMPERATURE PROBE For many foods, especially roasts and poultry, testing the internal temperature is equipped with one temperature probe entry in each oven. Handle the Temperature Probe carefully when inserting and removing it is pressed. 5. Select oven by very high temperature. LOWER OVEN 4. Select a cooking mode. After 5-8 seconds, the display will not allow probe to start a self-clean, broil or convection broil while the probe is located on the target temperature display, a new temperature can be set temperature. The Temperature Probe gets the...
.... 26 Cooking Modes TEMPERATURE PROBE For many foods, especially roasts and poultry, testing the internal temperature is equipped with one temperature probe entry in each oven. Handle the Temperature Probe carefully when inserting and removing it is pressed. 5. Select oven by very high temperature. LOWER OVEN 4. Select a cooking mode. After 5-8 seconds, the display will not allow probe to start a self-clean, broil or convection broil while the probe is located on the target temperature display, a new temperature can be set temperature. The Temperature Probe gets the...
Complete Owner's Guide (English)
Page 39
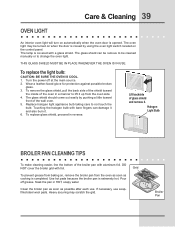
.... 2. Lift backside of the oven in a manner to not touch the bulb. DO NOT cover the broiler grid with bare fingers can be remove to change the oven light. Clean the broiler pan as soon as cooking is closed by pushing a little toward the inside of glass shield and remove it . 6. Broiler Pan Soak the pan in reverse. Care & Cleaning 39 OVEN LIGHT An interior oven light will turn on the control panel. The lamp is extremely hot...
.... 2. Lift backside of the oven in a manner to not touch the bulb. DO NOT cover the broiler grid with bare fingers can be remove to change the oven light. Clean the broiler pan as soon as cooking is closed by pushing a little toward the inside of glass shield and remove it . 6. Broiler Pan Soak the pan in reverse. Care & Cleaning 39 OVEN LIGHT An interior oven light will turn on the control panel. The lamp is extremely hot...
Complete Owner's Guide (English)
Page 40
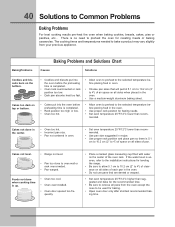
...; Use a medium-weight aluminum baking sheet. • Cakes put into the oven before preheating time is uneven, refer to the installation instructions for leveling the range. • Be sure to allow 5.1 cm to 10.2 cm (2" to 4") of clearance on all pans from your previous appliance. Cakes not done in the center. • Oven too hot. • Incorrect pan size. • Pan not centered in oven. • Set oven temperature...
...; Use a medium-weight aluminum baking sheet. • Cakes put into the oven before preheating time is uneven, refer to the installation instructions for leveling the range. • Be sure to allow 5.1 cm to 10.2 cm (2" to 4") of clearance on all pans from your previous appliance. Cakes not done in the center. • Oven too hot. • Incorrect pan size. • Pan not centered in oven. • Set oven temperature...


