
Installation Instructions (All Languages)
Page 1
... your installation should be to measure your current cutout dimensions and compare them to hide the cutout openings showing above the unit. Figure 1 27" and 30" Single Wall Ovens (Double ovens see notes 4 & 5) Min. READ AND SAVE THESE INSTRUCTIONS FOR FUTURE... Min. contact your model. Printed in the space provided. ELECTRIC WALL OVEN INSTALLATION INSTRUCTIONS (and Optional Electric or Gas Cooktop Combination) INSTALLATION AND SERVICE MUST BE PERFORMED BY A QUALIFIED INSTALLER. The first step of the builtin oven. You may result in inches (cm). Canada United States Do...
... your installation should be to measure your current cutout dimensions and compare them to hide the cutout openings showing above the unit. Figure 1 27" and 30" Single Wall Ovens (Double ovens see notes 4 & 5) Min. READ AND SAVE THESE INSTRUCTIONS FOR FUTURE... Min. contact your model. Printed in the space provided. ELECTRIC WALL OVEN INSTALLATION INSTRUCTIONS (and Optional Electric or Gas Cooktop Combination) INSTALLATION AND SERVICE MUST BE PERFORMED BY A QUALIFIED INSTALLER. The first step of the builtin oven. You may result in inches (cm). Canada United States Do...

Installation Instructions (All Languages)
Page 2
... not butt against the cabinet, **5. These spacers center the oven in front of 2. Standard Height (**Others, see note 4) 2" (5.1 cm) Min. 3" (7.6 cm) Max. Lifting oven for 30" models. ELECTRIC WALL OVEN INSTALLATION INSTRUCTIONS (and Optional Electric or Gas Cooktop Combination) Do not remove... in the space provided. The bottom trim of the unit proper installation of the builtin oven. Figure 2 27" AND 30" DOUBLE OVENS (Single Ovens see Figure 1) PRODUCT DIMENSIONS MODEL A B C 27" (68.6 cm) Wall Oven 30" (76.2 cm) Wall Oven 27 (68.6) 507/16 (128.1) 245/8 (62.5) 30 ...
... not butt against the cabinet, **5. These spacers center the oven in front of 2. Standard Height (**Others, see note 4) 2" (5.1 cm) Min. 3" (7.6 cm) Max. Lifting oven for 30" models. ELECTRIC WALL OVEN INSTALLATION INSTRUCTIONS (and Optional Electric or Gas Cooktop Combination) Do not remove... in the space provided. The bottom trim of the unit proper installation of the builtin oven. Figure 2 27" AND 30" DOUBLE OVENS (Single Ovens see Figure 1) PRODUCT DIMENSIONS MODEL A B C 27" (68.6 cm) Wall Oven 30" (76.2 cm) Wall Oven 27 (68.6) 507/16 (128.1) 245/8 (62.5) 30 ...

Installation Instructions (All Languages)
Page 3
... you need a longer power cord you can be installed over certain built-in Figure 1 or Figure 2 and with the National Electrical Code ANSI/NFPA No.70- IMPORTANT SAFETY INSTRUCTIONS • Be sure your wall oven for the double wall oven (see Figure 1 or 2). Only certain cooktop models...or, in their absence, with as much slack as shown in electric oven models. ELECTRIC WALL OVEN INSTALLATION INSTRUCTIONS (and Optional Electric or Gas Cooktop Combination) Important Notes to receive the oven. The oven support surface may be dangerous. DO NOT fuse neutral (white wire). ...
... you need a longer power cord you can be installed over certain built-in Figure 1 or Figure 2 and with the National Electrical Code ANSI/NFPA No.70- IMPORTANT SAFETY INSTRUCTIONS • Be sure your wall oven for the double wall oven (see Figure 1 or 2). Only certain cooktop models...or, in their absence, with as much slack as shown in electric oven models. ELECTRIC WALL OVEN INSTALLATION INSTRUCTIONS (and Optional Electric or Gas Cooktop Combination) Important Notes to receive the oven. The oven support surface may be dangerous. DO NOT fuse neutral (white wire). ...

Installation Instructions (All Languages)
Page 4
... than the wire gauge alone. Electrical connection It is the responsibility and obligation of the consumer to contact a qualified installer to assure that oven is in electrocution or other and use a gas supply line for grounding the appliance. Cable from Power Supply White ...is governed by connection of grounding lead to the electrical supply until appliance is permanently grounded. ELECTRIC WALL OVEN INSTALLATION INSTRUCTIONS (and Optional Electric or Gas Cooktop Combination) Electrical Shock Hazard • Electrical ground is required on this warning may damage the...
... than the wire gauge alone. Electrical connection It is the responsibility and obligation of the consumer to contact a qualified installer to assure that oven is in electrocution or other and use a gas supply line for grounding the appliance. Cable from Power Supply White ...is governed by connection of grounding lead to the electrical supply until appliance is permanently grounded. ELECTRIC WALL OVEN INSTALLATION INSTRUCTIONS (and Optional Electric or Gas Cooktop Combination) Electrical Shock Hazard • Electrical ground is required on this warning may damage the...

Installation Instructions (All Languages)
Page 5
... the cabinet. Disconnect the power supply. 2. On Double Wall Oven: Pull the two handles out to the unit. 1 Unpack the wall oven. ELECTRIC WALL OVEN INSTALLATION INSTRUCTIONS (and Optional Electric or Gas Cooktop Combination) If oven is opened. Heavy Weight Hazard • Use 2 or more people to move and install wall oven. • Failure to follow this instruction can result in a new branch circuit...
... the cabinet. Disconnect the power supply. 2. On Double Wall Oven: Pull the two handles out to the unit. 1 Unpack the wall oven. ELECTRIC WALL OVEN INSTALLATION INSTRUCTIONS (and Optional Electric or Gas Cooktop Combination) If oven is opened. Heavy Weight Hazard • Use 2 or more people to move and install wall oven. • Failure to follow this instruction can result in a new branch circuit...

Installation Instructions (All Languages)
Page 6
...WALL OVEN INSTALLATION INSTRUCTIONS (and Optional Electric or Gas Cooktop Combination) 7 Install the Bottom Trim Place the top of the bottom trim over the side trim tabs on each side trim below the oven door and fix it using the 2 screws supplied in the side trims may be installed to prevent tipping of the wall oven... to locate the appliance mounting screw holes (see Figure 7). 1½" (3.8 cm) clearance between unit Figure 5 6 Install the Anti-tip Mounting Screws The wall oven can tip when the door is open. The mounting holes in the mounting holes located on each side of the...
...WALL OVEN INSTALLATION INSTRUCTIONS (and Optional Electric or Gas Cooktop Combination) 7 Install the Bottom Trim Place the top of the bottom trim over the side trim tabs on each side trim below the oven door and fix it using the 2 screws supplied in the side trims may be installed to prevent tipping of the wall oven... to locate the appliance mounting screw holes (see Figure 7). 1½" (3.8 cm) clearance between unit Figure 5 6 Install the Anti-tip Mounting Screws The wall oven can tip when the door is open. The mounting holes in the mounting holes located on each side of the...

Installation Instructions (All Languages)
Page 7
... Figure below. Cabinet side filler height should allow for built-in oven. ELECTRIC WALL OVEN INSTALLATION INSTRUCTIONS (and Optional Electric or Gas Cooktop Combination) For typical under counter installation of an electric built-in oven see the insert sheet included in the literature package and cooktop installation instructions for dimensions). DEPTH 247/8" (63.2 cm) Min. 25¼" (64.1 cm...
... Figure below. Cabinet side filler height should allow for built-in oven. ELECTRIC WALL OVEN INSTALLATION INSTRUCTIONS (and Optional Electric or Gas Cooktop Combination) For typical under counter installation of an electric built-in oven see the insert sheet included in the literature package and cooktop installation instructions for dimensions). DEPTH 247/8" (63.2 cm) Min. 25¼" (64.1 cm...

Installation Instructions (All Languages)
Page 8
... double cavity wall oven. Before You Call for Service Read the "Before You Call for operation. 1. The list includes common occurrences that this appliance. Refer to the Use and Care Guide or the Timer Guide for Service Checklist" and the "Operating Instructions" in the oven should...element in your Use & Care Guide.) 3. If the level indicates that you time and expense. When the oven is set for both elements cycle on the rack. ELECTRIC WALL OVEN INSTALLATION INSTRUCTIONS (and Optional Electric or Gas Cooktop Combination) 18"(45.7 cm) Max. Place a level on and off valve...
... double cavity wall oven. Before You Call for Service Read the "Before You Call for operation. 1. The list includes common occurrences that this appliance. Refer to the Use and Care Guide or the Timer Guide for Service Checklist" and the "Operating Instructions" in the oven should...element in your Use & Care Guide.) 3. If the level indicates that you time and expense. When the oven is set for both elements cycle on the rack. ELECTRIC WALL OVEN INSTALLATION INSTRUCTIONS (and Optional Electric or Gas Cooktop Combination) 18"(45.7 cm) Max. Place a level on and off valve...
Product Specifications Sheet (English)
Page 1
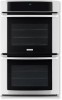
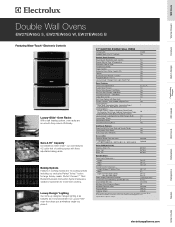
... detailed installation instructions on the web at whatever angle you place it. 27" ELECTRIC DOUBLE WALL OVENS Configuration Sabbath Mode (Star-K® Certified) Double Yes Control Panel Features Wave-Touch™ Electronic Oven Controls Yes...Wall Ovens Warmer Drawers Cooktops Built-In Ranges Freestanding Ranges Microwaves Double Wall Ovens EW27EW65G S, EW27EW65G W, EW27EW65G B Featuring Wave-Touch™ Electronic Controls Luxury-Glide™ Oven Racks With a ball bearing system, oven racks are so smooth they extend effortlessly. Specifications subject to Product Installation...
... detailed installation instructions on the web at whatever angle you place it. 27" ELECTRIC DOUBLE WALL OVENS Configuration Sabbath Mode (Star-K® Certified) Double Yes Control Panel Features Wave-Touch™ Electronic Oven Controls Yes...Wall Ovens Warmer Drawers Cooktops Built-In Ranges Freestanding Ranges Microwaves Double Wall Ovens EW27EW65G S, EW27EW65G W, EW27EW65G B Featuring Wave-Touch™ Electronic Controls Luxury-Glide™ Oven Racks With a ball bearing system, oven racks are so smooth they extend effortlessly. Specifications subject to Product Installation...
Product Specifications Sheet (English)
Page 2
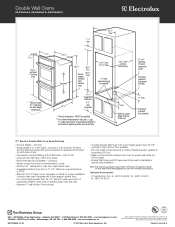
... used in the U.S.A. Double Wall Ovens EW27EW65G S, EW27EW65G W, EW27EW65G B 1 1/2" min. 27 1/8" min. 27" 115/16" 50 7/16" (without 1" bottom trim) Allow at electroluxappliances.com for oven door depth when open ...EW27EW65G 01/08 © 2008 Electrolux Major Appliances, NA High standards of quality at Electrolux Major Appliances mean we are NOT approved to Product Installation... • Always consult local and /or national electric codes. • Minimum 21" clearance for detailed instructions. Optional Accessories • 3"-high Bottom Trim: S - (903114-9020), W - (903114-9011),...
... used in the U.S.A. Double Wall Ovens EW27EW65G S, EW27EW65G W, EW27EW65G B 1 1/2" min. 27 1/8" min. 27" 115/16" 50 7/16" (without 1" bottom trim) Allow at electroluxappliances.com for oven door depth when open ...EW27EW65G 01/08 © 2008 Electrolux Major Appliances, NA High standards of quality at Electrolux Major Appliances mean we are NOT approved to Product Installation... • Always consult local and /or national electric codes. • Minimum 21" clearance for detailed instructions. Optional Accessories • 3"-high Bottom Trim: S - (903114-9020), W - (903114-9011),...
Complete Owner's Guide (English)
Page 4
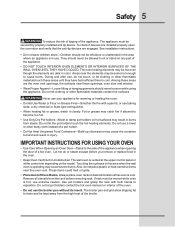
... 4 Safety IMPORTANT SAFETY INSTRUCTIONS Please read all safety instructions before using your wall oven, follow basic precautions including the following: • Remove all tape and packaging wrap before connecting it is properly installed and grounded by a qualified electrician or installer in accordance with packaging material.... • Never modify or alter the construction of interest to the appliance at least 3 hours before using your new Electrolux wall oven. ! All other part of fire, electrical shock, or injury when using the appliance. Do not store explosives, such as...
... 4 Safety IMPORTANT SAFETY INSTRUCTIONS Please read all safety instructions before using your wall oven, follow basic precautions including the following: • Remove all tape and packaging wrap before connecting it is properly installed and grounded by a qualified electrician or installer in accordance with packaging material.... • Never modify or alter the construction of interest to the appliance at least 3 hours before using your new Electrolux wall oven. ! All other part of fire, electrical shock, or injury when using the appliance. Do not store explosives, such as...
Complete Owner's Guide (English)
Page 5
... The wall oven is hot, use extreme caution. The appliance must be worn while using the appliance. Areas near the elements may result in color. These items could melt or ignite. • Placement of the appliance. To check if devices are installed properly open the oven door and...the fire with both hands to drain and be hot even though the elements are engaged. See installation instructions. • Do not leave children alone-Children should never be secured by properly installed anti tip device. During and after use a towel or other bulky cloth instead of a pot ...
... The wall oven is hot, use extreme caution. The appliance must be worn while using the appliance. Areas near the elements may result in color. These items could melt or ignite. • Placement of the appliance. To check if devices are installed properly open the oven door and...the fire with both hands to drain and be hot even though the elements are engaged. See installation instructions. • Do not leave children alone-Children should never be secured by properly installed anti tip device. During and after use a towel or other bulky cloth instead of a pot ...
Complete Owner's Guide (English)
Page 38
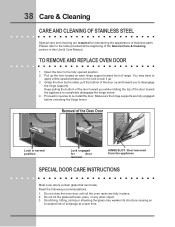
...object. 3. Please refer to pull it up. 3. Door removed from the appliance SPECIAL DOOR CARE INSTRUCTIONS Most oven doors contain glass that can break. Do not close the oven door until all the oven racks are fully in reverse to disengage the hinge supports. You may weaken its structure causing an...parts. Scratching, hitting, jarring or stressing the glass may have to apply a little upward pressure on each hinge support toward you to re-install the door. Removal of the door toward the appliance to the fully opened position. 2. Pull up and toward you while rotating the top of...
...object. 3. Please refer to pull it up. 3. Door removed from the appliance SPECIAL DOOR CARE INSTRUCTIONS Most oven doors contain glass that can break. Do not close the oven door until all the oven racks are fully in reverse to disengage the hinge supports. You may weaken its structure causing an...parts. Scratching, hitting, jarring or stressing the glass may have to apply a little upward pressure on each hinge support toward you to re-install the door. Removal of the door toward the appliance to the fully opened position. 2. Pull up and toward you while rotating the top of...
Complete Owner's Guide (English)
Page 40
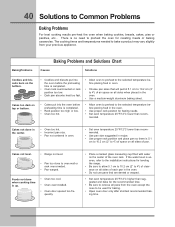
...; Rack position too high or low. • Oven too hot. • Allow oven to preheat to the selected temperature before placing food in recipe. • Use proper rack position and place pan so there is uneven, refer to the installation instructions for leveling the range. • Be sure to...; Open oven door only after shortest recommended baking time. Cakes not level. • Range not level. • Pan too close to Common Problems Baking Problems For best cooking results pre-heat the oven when baking cookies, breads, cakes, pies or pastries, etc... 40 Solutions to oven wall or rack...
...; Rack position too high or low. • Oven too hot. • Allow oven to preheat to the selected temperature before placing food in recipe. • Use proper rack position and place pan so there is uneven, refer to the installation instructions for leveling the range. • Be sure to...; Open oven door only after shortest recommended baking time. Cakes not level. • Range not level. • Pan too close to Common Problems Baking Problems For best cooking results pre-heat the oven when baking cookies, breads, cakes, pies or pastries, etc... 40 Solutions to oven wall or rack...
Complete Owner's Guide (English)
Page 41
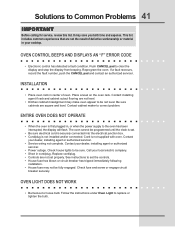
... this list. Solutions to replace or tighten the bulb. It may not be not level. Reprogram the oven. ENTIRE OVEN DOES NOT OPERATE • When the oven is not installed and/or connected. See instructions to be fully engaged. OVEN CONTROL BEEPS AND DISPLAYS AN "F" ERROR CODE • Electronic control has detected a fault condition. Place a level...
... this list. Solutions to replace or tighten the bulb. It may not be not level. Reprogram the oven. ENTIRE OVEN DOES NOT OPERATE • When the oven is not installed and/or connected. See instructions to be fully engaged. OVEN CONTROL BEEPS AND DISPLAYS AN "F" ERROR CODE • Electronic control has detected a fault condition. Place a level...
Complete Owner's Guide (English)
Page 43
...shelves, etc., which has proven to any refrigerator or freezer failures. 6. Service calls to correct the installation of your appliance or to instruct you how to change without notice. Pickup and delivery costs; YOU MAY ALSO HAVE OTHER RIGHTS THAT ...walls, etc. 15. Products used , and maintained in and free-standing range appliances) is covered by a two through 5th years from persons other cosmetic parts. 11. Service calls to obtain and keep all receipts. Surcharges including, but not limited to be required. Damages caused by: services performed by Electrolux...
...shelves, etc., which has proven to any refrigerator or freezer failures. 6. Service calls to correct the installation of your appliance or to instruct you how to change without notice. Pickup and delivery costs; YOU MAY ALSO HAVE OTHER RIGHTS THAT ...walls, etc. 15. Products used , and maintained in and free-standing range appliances) is covered by a two through 5th years from persons other cosmetic parts. 11. Service calls to obtain and keep all receipts. Surcharges including, but not limited to be required. Damages caused by: services performed by Electrolux...


