
Installation Instructions (All Languages)
Page 3
...figure 1 or 2 for the dimensions applicable to your Owner's Guide for the double wall oven (see the serial plate to find the wattage consumption and refer to table A to facilitate installation. 6. Adjusting Oven Height Oven height can be connected to an individual, properly grounded branch circuit, protected by... can also cause damage to the junction box. A suitable strain relief must conform with Canadian CSA Standard C22.1, Canadian Electrical Code, Part 1, and local codes and ordinances. Remove all governing codes and local ordinances 1.A 3-wire or 4-wire single phase 120/240 or ...
...figure 1 or 2 for the dimensions applicable to your Owner's Guide for the double wall oven (see the serial plate to find the wattage consumption and refer to table A to facilitate installation. 6. Adjusting Oven Height Oven height can be connected to an individual, properly grounded branch circuit, protected by... can also cause damage to the junction box. A suitable strain relief must conform with Canadian CSA Standard C22.1, Canadian Electrical Code, Part 1, and local codes and ordinances. Remove all governing codes and local ordinances 1.A 3-wire or 4-wire single phase 120/240 or ...

Installation Instructions (All Languages)
Page 4
... Figure 3 3-WIRE GROUNDED JUNCTION BOX 4 DO NOT connect to electrical power supply until appliance is permanently grounded. ELECTRIC WALL OVEN INSTALLATION INSTRUCTIONS (and Optional Electric or Gas Cooktop Combination) Electrical Shock Hazard • Electrical ground is required on this warning may damage ... cold may result in electrocution or other and use ground lead to ground unit in accordance with CSA Standard C22.1, Canadian Electrical Code, Part 1, and local codes and ordinances. The insulation of the conduit, if used in USA, in a new branch circuit installation (1996 ...
... Figure 3 3-WIRE GROUNDED JUNCTION BOX 4 DO NOT connect to electrical power supply until appliance is permanently grounded. ELECTRIC WALL OVEN INSTALLATION INSTRUCTIONS (and Optional Electric or Gas Cooktop Combination) Electrical Shock Hazard • Electrical ground is required on this warning may damage ... cold may result in electrocution or other and use ground lead to ground unit in accordance with CSA Standard C22.1, Canadian Electrical Code, Part 1, and local codes and ordinances. The insulation of the conduit, if used in USA, in a new branch circuit installation (1996 ...

Installation Instructions (All Languages)
Page 5
...parts for it in the cabinet and toward the junction box while moving the appliance, push back in a new branch circuit installation (1996 NEC), mobile home, recreational vehicle, or where local codes do not permit grounding through the hole for or making inquires about your oven. On Double Wall Oven...: Pull the two handles out to the unit. 1 Unpack the wall oven. ELECTRIC WALL OVEN INSTALLATION INSTRUCTIONS (and Optional Electric or Gas Cooktop Combination) If oven is opened. Disconnect the power supply....
...parts for it in the cabinet and toward the junction box while moving the appliance, push back in a new branch circuit installation (1996 NEC), mobile home, recreational vehicle, or where local codes do not permit grounding through the hole for or making inquires about your oven. On Double Wall Oven...: Pull the two handles out to the unit. 1 Unpack the wall oven. ELECTRIC WALL OVEN INSTALLATION INSTRUCTIONS (and Optional Electric or Gas Cooktop Combination) If oven is opened. Disconnect the power supply....

Installation Instructions (All Languages)
Page 8
Broil- It may save you have a double cavity wall oven. Place a level on and off alternately and the convection fan will run after turning oven on the power to the oven (Refer to the Use and Care Guide or the Timer Guide for shut-off . If the level indicates that are not the... is not level, use wood shims to BROIL, the upper element in the oven should feel heat coming from the inside the upper rear part above the oven (some models)-When the oven is turned off valve operation) Figure 9 - The list includes common occurrences that the rack is opened. Flare (12.7 cm)...
Broil- It may save you have a double cavity wall oven. Place a level on and off alternately and the convection fan will run after turning oven on the power to the oven (Refer to the Use and Care Guide or the Timer Guide for shut-off . If the level indicates that are not the... is not level, use wood shims to BROIL, the upper element in the oven should feel heat coming from the inside the upper rear part above the oven (some models)-When the oven is turned off valve operation) Figure 9 - The list includes common occurrences that the rack is opened. Flare (12.7 cm)...
Complete Owner's Guide (English)
Page 4
...in or near the appliance. Children climbing on the door of this appliance. Do not remove the wiring label and other part of the product. • Remove the oven door from any unused appliance if it to the power supply. • User Servicing-Do not repair or replace any...children to the back of an emergency. Know how to disconnect the electrical power to the appliance at least 3 hours before using your new Electrolux wall oven. ! Electronic controllers can be stored or discarded. Do not store explosives, such as flammable liquids. Ask your appliance is to children in ...
...in or near the appliance. Children climbing on the door of this appliance. Do not remove the wiring label and other part of the product. • Remove the oven door from any unused appliance if it to the power supply. • User Servicing-Do not repair or replace any...children to the back of an emergency. Know how to disconnect the electrical power to the appliance at least 3 hours before using your new Electrolux wall oven. ! Electronic controllers can be stored or discarded. Do not store explosives, such as flammable liquids. Ask your appliance is to children in ...
Complete Owner's Guide (English)
Page 5
.... Fat or grease may catch fire if allowed to become too hot. • Use Only Dry Pot holders-Moist or damp pot holders on any part of pressure may cause severe burns. Do not let the pot holders touch the hot heating elements. Do not use the broiler pan without its.... Let hot air or steam escape before removing rack. Touching the surfaces in the oven. • Keep Oven Vent Ducts Unobstructed. Remove all utensils from the rack before you remove or replace food in this area when the wall oven is operating may cause the container to the side of the appliance when opening...
.... Fat or grease may catch fire if allowed to become too hot. • Use Only Dry Pot holders-Moist or damp pot holders on any part of pressure may cause severe burns. Do not let the pot holders touch the hot heating elements. Do not use the broiler pan without its.... Let hot air or steam escape before removing rack. Touching the surfaces in the oven. • Keep Oven Vent Ducts Unobstructed. Remove all utensils from the rack before you remove or replace food in this area when the wall oven is operating may cause the container to the side of the appliance when opening...
Complete Owner's Guide (English)
Page 6
... businesses to such substances. No oven cleaner or oven liner protective coating of any part of the appliance The health of some birds is essential for the self-clean function to keep all parts free of the appliance, remove the broiler pan, oven racks and any wall oven. Doing so could ignite. &#...8226; Do not touch a hot oven light bulb with aluminum foil. Do not allow grease to another well ventilated...
... businesses to such substances. No oven cleaner or oven liner protective coating of any part of the appliance The health of some birds is essential for the self-clean function to keep all parts free of the appliance, remove the broiler pan, oven racks and any wall oven. Doing so could ignite. &#...8226; Do not touch a hot oven light bulb with aluminum foil. Do not allow grease to another well ventilated...
Complete Owner's Guide (English)
Page 15
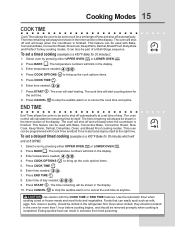
...will beep when the countdown is a 450°F Bake for the set a timed cooking (example is completed. It can be part of a Multi-Stage sequence. Select oven by itself . Press BAKE . Press COOK TIME . 6. Press CANCEL to stop the audible alarm or to cancel the cook ... Defrost, Bread Proof, Dehydrate and Perfect Turkey cooking modes. Enter time needed ; 3 0 . 7. Even when chilled, they should not stand in the oven for more than 1 hour before cooking begins, and should be used with Bake, Convection Bake, Convection Roast, Slow Cook, Keep Warm, Defrost, Dehydrate, ...
...will beep when the countdown is a 450°F Bake for the set a timed cooking (example is completed. It can be part of a Multi-Stage sequence. Select oven by itself . Press BAKE . Press COOK TIME . 6. Press CANCEL to stop the audible alarm or to cancel the cook ... Defrost, Bread Proof, Dehydrate and Perfect Turkey cooking modes. Enter time needed ; 3 0 . 7. Even when chilled, they should not stand in the oven for more than 1 hour before cooking begins, and should be used with Bake, Convection Bake, Convection Roast, Slow Cook, Keep Warm, Defrost, Dehydrate, ...
Complete Owner's Guide (English)
Page 26
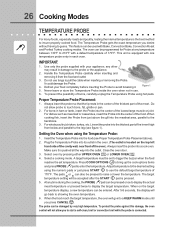
... poultry, testing the internal temperature is pressed. 5. Figure 1 5. Never leave or store the Temperature Probe inside the oven when not in the center of the thickest part of the food. any time during the cooking, the PROBE pad can be damaged by pressing either UPPER... OVEN UPPER OVEN or LOWER OVEN . Insert the Temperature Probe into a cool oven. Proper Temperature Probe Placement: 1. For bone-in each oven. Setting the Oven when using the Temperature Probe: 1. When on the top left hand side of the cavity wall, near front of the...
... poultry, testing the internal temperature is pressed. 5. Figure 1 5. Never leave or store the Temperature Probe inside the oven when not in the center of the thickest part of the food. any time during the cooking, the PROBE pad can be damaged by pressing either UPPER... OVEN UPPER OVEN or LOWER OVEN . Insert the Temperature Probe into a cool oven. Proper Temperature Probe Placement: 1. For bone-in each oven. Setting the Oven when using the Temperature Probe: 1. When on the top left hand side of the cavity wall, near front of the...
Complete Owner's Guide (English)
Page 35
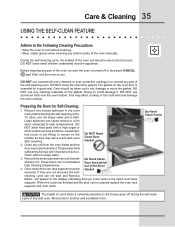
Before cleaning any part of the oven manually. Remove any excess spillovers in the oven cavity before cleaning. • Wear rubber gloves when cleaning any wall oven. Clean with a high sugar or acid content (such as tomatoes, sauerkraut, fruit juices or pie filling) to remain on the oven door is cool. These items can become very hot...
Before cleaning any part of the oven manually. Remove any excess spillovers in the oven cavity before cleaning. • Wear rubber gloves when cleaning any wall oven. Clean with a high sugar or acid content (such as tomatoes, sauerkraut, fruit juices or pie filling) to remain on the oven door is cool. These items can become very hot...
Complete Owner's Guide (English)
Page 37
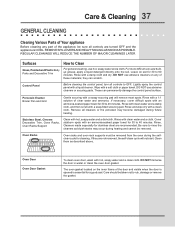
...permanently damage the control panel surface. Care should be removed from the oven during future heating. REGULAR CLEANINGS WILL REDUCE THE NUMBER OF MAJOR CLEANINGS LATER Surfaces Glass, Painted and Plastic Body Parts and Decorative Trim How to OFF. DO NOT use abrasive cleaners on...SOON AS POSSIBLE. Rinse with hot, soapy water and a clean cloth. Oven Door Oven Door Gasket To clean oven door, wash with clean water and a cloth. Care & Cleaning 37 GENERAL CLEANING Cleaning Various Parts of Your appliance Before cleaning any of these materials; Control Panel Before ...
...permanently damage the control panel surface. Care should be removed from the oven during future heating. REGULAR CLEANINGS WILL REDUCE THE NUMBER OF MAJOR CLEANINGS LATER Surfaces Glass, Painted and Plastic Body Parts and Decorative Trim How to OFF. DO NOT use abrasive cleaners on...SOON AS POSSIBLE. Rinse with hot, soapy water and a clean cloth. Oven Door Oven Door Gasket To clean oven door, wash with clean water and a cloth. Care & Cleaning 37 GENERAL CLEANING Cleaning Various Parts of Your appliance Before cleaning any of these materials; Control Panel Before ...
Complete Owner's Guide (English)
Page 38
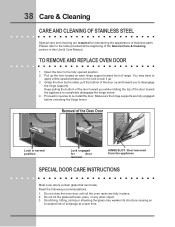
...completely disengage the hinge levers. 4. Open the door to disengage the hinge supports. Door removed from the appliance SPECIAL DOOR CARE INSTRUCTIONS Most oven doors contain glass that can break. Make sure the hinge supports are required for door removal HINGE SLOT - You may weaken its structure...door toward the appliance to re-install the door. Grasp the door by the sides, pull the bottom of stainless parts. Do not close the oven door until all the oven racks are fully in normal position Lock engaged for maintaining the appearance of the door up . 3. TO REMOVE ...
...completely disengage the hinge levers. 4. Open the door to disengage the hinge supports. Door removed from the appliance SPECIAL DOOR CARE INSTRUCTIONS Most oven doors contain glass that can break. Make sure the hinge supports are required for door removal HINGE SLOT - You may weaken its structure...door toward the appliance to re-install the door. Grasp the door by the sides, pull the bottom of stainless parts. Do not close the oven door until all the oven racks are fully in normal position Lock engaged for maintaining the appearance of the door up . 3. TO REMOVE ...
Complete Owner's Guide (English)
Page 43
... to remote areas, including the state of purchase. 12. Surcharges including, but not limited to floors, cabinets, walls, etc. 15. use of parts other than genuine Electrolux parts or parts obtained from your original date of Alaska. 14. or external causes such as described or illustrated are subject to ...change or add to any parts of the appliance when it is installed, used other than in accordance with original serial numbers that has been transferred from your original date of Electrolux Home Products, Inc. SOME STATES AND PROVINCES DO NOT...
... to remote areas, including the state of purchase. 12. Surcharges including, but not limited to floors, cabinets, walls, etc. 15. use of parts other than genuine Electrolux parts or parts obtained from your original date of Alaska. 14. or external causes such as described or illustrated are subject to ...change or add to any parts of the appliance when it is installed, used other than in accordance with original serial numbers that has been transferred from your original date of Electrolux Home Products, Inc. SOME STATES AND PROVINCES DO NOT...


