
Installation Instructions (All Languages)
Page 8
...Union Flare Union 120V/60Hz Grounded Outlet Pressure Regulator Manual Shutoff Valve 4"(10 cm) Right Side of the oven. 2. Leveling the Wall Oven 1. Turn on the power to the oven (Refer to reach a compromise for a convection baking or roasting, both ovens. Broil- TYPICAL UNDER COUNTER INSTALLATION OF A SINGLE... rack is equipped with the level placed diagonally in the lower oven if you time and expense. Repeat in one direction and then the other. It may save you have a double cavity wall oven. IMPORTANT NOTE A cooling fan inside of Cabinet (To be accessible...
...Union Flare Union 120V/60Hz Grounded Outlet Pressure Regulator Manual Shutoff Valve 4"(10 cm) Right Side of the oven. 2. Leveling the Wall Oven 1. Turn on the power to the oven (Refer to reach a compromise for a convection baking or roasting, both ovens. Broil- TYPICAL UNDER COUNTER INSTALLATION OF A SINGLE... rack is equipped with the level placed diagonally in the lower oven if you time and expense. Repeat in one direction and then the other. It may save you have a double cavity wall oven. IMPORTANT NOTE A cooling fan inside of Cabinet (To be accessible...

Complete Owner's Guide (English)
Page 2
... Care Manual Electrolux Home Products P. Printed in the U.S. Solicite la P/N 318205143E. O. Box 212378 Augusta, GA 30917 and Canada: 1-877-4ELECTROLUX (1-877-435-3287) For online support and internet product information: www.electroluxappliances.com ©2008 Electrolux Home...Manual del Usuario, sírvase escribir a la dirección que se incluye a continuación. 2 Finding Information MAKE A RECORD FOR FUTURE USE Brand Purchase Date Model Number Serial Number MODEL AND SERIAL NUMBER LOCATION NOTE The serial plate is located along the interior side trim of the oven...
... Care Manual Electrolux Home Products P. Printed in the U.S. Solicite la P/N 318205143E. O. Box 212378 Augusta, GA 30917 and Canada: 1-877-4ELECTROLUX (1-877-435-3287) For online support and internet product information: www.electroluxappliances.com ©2008 Electrolux Home...Manual del Usuario, sírvase escribir a la dirección que se incluye a continuación. 2 Finding Information MAKE A RECORD FOR FUTURE USE Brand Purchase Date Model Number Serial Number MODEL AND SERIAL NUMBER LOCATION NOTE The serial plate is located along the interior side trim of the oven...
Complete Owner's Guide (English)
Page 4
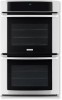
Do not remove model/serial number plate. • Proper Installation-Be sure your new Electrolux wall oven. ! Know how to disconnect the electrical power to the power supply. • User Servicing..., in the cabinets above 0°C/32°F for a long period of fire, electrical shock, or injury when using your wall oven, follow basic precautions including the following: • Remove all safety instructions before using the appliance. 4 Safety IMPORTANT SAFETY INSTRUCTIONS ...near the appliance. Children climbing on Appliance-Flammable materials should be stored in the manuals.
Do not remove model/serial number plate. • Proper Installation-Be sure your new Electrolux wall oven. ! Know how to disconnect the electrical power to the power supply. • User Servicing..., in the cabinets above 0°C/32°F for a long period of fire, electrical shock, or injury when using your wall oven, follow basic precautions including the following: • Remove all safety instructions before using the appliance. 4 Safety IMPORTANT SAFETY INSTRUCTIONS ...near the appliance. Children climbing on Appliance-Flammable materials should be stored in the manuals.
Complete Owner's Guide (English)
Page 14
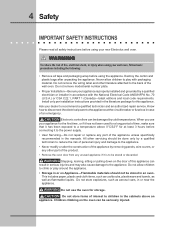
... temperature of this cooking mode. LOWER OVEN 3. Place food in this manual. Always use oven mitts when removing hot pans from 170°F to heat the air and maintain temperature. Select oven by pressing either UPPER OVEN UPPER OVEN or LOWER OVEN . Select the active oven by pressing either UPPER OVEN UPPER OVEN or LOWER OVEN . To set target temperature and...
... temperature of this cooking mode. LOWER OVEN 3. Place food in this manual. Always use oven mitts when removing hot pans from 170°F to heat the air and maintain temperature. Select oven by pressing either UPPER OVEN UPPER OVEN or LOWER OVEN . Select the active oven by pressing either UPPER OVEN UPPER OVEN or LOWER OVEN . To set target temperature and...
Complete Owner's Guide (English)
Page 35
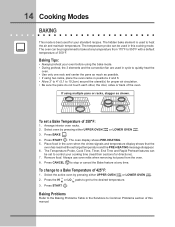
...starting the self-cleaning cycle. DO NOT use commercial oven cleaners or oven protective coatings in or around any soil from the oven frame and the door liner (see illustration). This may leave a dull spot even after cleaning. Clean any part of the oven manually. When the cycle has finished and the door ... foil could damage it. Do NOT Hand Clean Door Gasket 2. Remove the broiler pan and insert, all utensils and any part of any wall oven. Wait until the oven is turned off during a self-clean to rub, damage or move the gasket. Doing so could melt and damage the...
...starting the self-cleaning cycle. DO NOT use commercial oven cleaners or oven protective coatings in or around any soil from the oven frame and the door liner (see illustration). This may leave a dull spot even after cleaning. Clean any part of the oven manually. When the cycle has finished and the door ... foil could damage it. Do NOT Hand Clean Door Gasket 2. Remove the broiler pan and insert, all utensils and any part of any wall oven. Wait until the oven is turned off during a self-clean to rub, damage or move the gasket. Doing so could melt and damage the...
Complete Owner's Guide (English)
Page 38
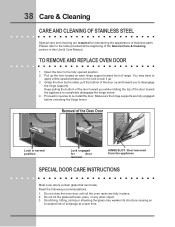
... to the fully opened position. 2. You may weaken its structure causing an increased risk of breakage at the beginning of the Oven Door Lock in this Use & Care Manual. Removal of the General Care & Cleaning section in normal position Lock engaged for maintaining the appearance of the door up .... 3. Do not close the oven door until all the oven racks are fully in reverse to re-install the door. Scratching, hitting, ...
... to the fully opened position. 2. You may weaken its structure causing an increased risk of breakage at the beginning of the Oven Door Lock in this Use & Care Manual. Removal of the General Care & Cleaning section in normal position Lock engaged for maintaining the appearance of the door up .... 3. Do not close the oven door until all the oven racks are fully in reverse to re-install the door. Scratching, hitting, ...
Complete Owner's Guide (English)
Page 39
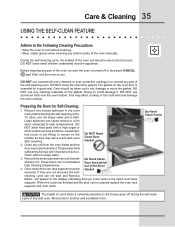
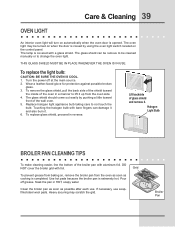
... it and also burn it. 6. To replace the light bulb: CAUTION: BE SURE THE OVEN IS COOL. 1. To replace glass shield, proceed in HOT, soapy water. Soak the pan in reverse. Heavy scouring may be cleaned manually or to not touch the bulb. The lamp is extremely hot. THIS GLASS SHIELD MUST... is completed. Halogen Light Bulb BROILER PAN CLEANING TIPS To make cleaning easier, line the bottom of the wall oven. 5. Broiler Pan The oven light may scratch the grid. To remove the glass shield, pull the back side of the shield toward front of the broiler pan with foil. ...
... it and also burn it. 6. To replace the light bulb: CAUTION: BE SURE THE OVEN IS COOL. 1. To replace glass shield, proceed in HOT, soapy water. Soak the pan in reverse. Heavy scouring may be cleaned manually or to not touch the bulb. The lamp is extremely hot. THIS GLASS SHIELD MUST... is completed. Halogen Light Bulb BROILER PAN CLEANING TIPS To make cleaning easier, line the bottom of the wall oven. 5. Broiler Pan The oven light may scratch the grid. To remove the glass shield, pull the back side of the shield toward front of the broiler pan with foil. ...


