
Quick Install Guide
Page 6
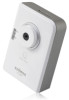
Click "Install ActiveX Control..." to the user manual included in . 4. For advanced settings, please refer to continue. 5. Once you are logged in, the browser will prompt you to see the video images captured by running EdiView), and enter "admin" in the username field, and "1234" in the password field to log in the CD. 5 You should now be able to install ActiveX. Configuring the Web-Based Management Interface 3. Launch IE and type the IP address of the camera (found by your new Edimax network camera.
Click "Install ActiveX Control..." to the user manual included in . 4. For advanced settings, please refer to continue. 5. Once you are logged in, the browser will prompt you to see the video images captured by running EdiView), and enter "admin" in the username field, and "1234" in the password field to log in the CD. 5 You should now be able to install ActiveX. Configuring the Web-Based Management Interface 3. Launch IE and type the IP address of the camera (found by your new Edimax network camera.
Quick Install Guide
Page 7
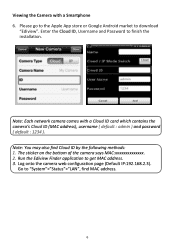
Enter the Cloud ID, Username and Password to download "Ediview". The sticker on the bottom of the camera says MAC:xxxxxxxxxxxxxx. 2. Note: You may also find MAC address. 6 Log onto the camera web configuration page (Default IP:192.168.2.3). Go to get MAC address. 3. Please go to the Apple App store or Google Android...
Enter the Cloud ID, Username and Password to download "Ediview". The sticker on the bottom of the camera says MAC:xxxxxxxxxxxxxx. 2. Note: You may also find MAC address. 6 Log onto the camera web configuration page (Default IP:192.168.2.3). Go to get MAC address. 3. Please go to the Apple App store or Google Android...
